人脸口罩检测(含运行代码+数据集)Pytorch+TensorRT+Xavier NX
人脸口罩检测(含运行代码+数据集)
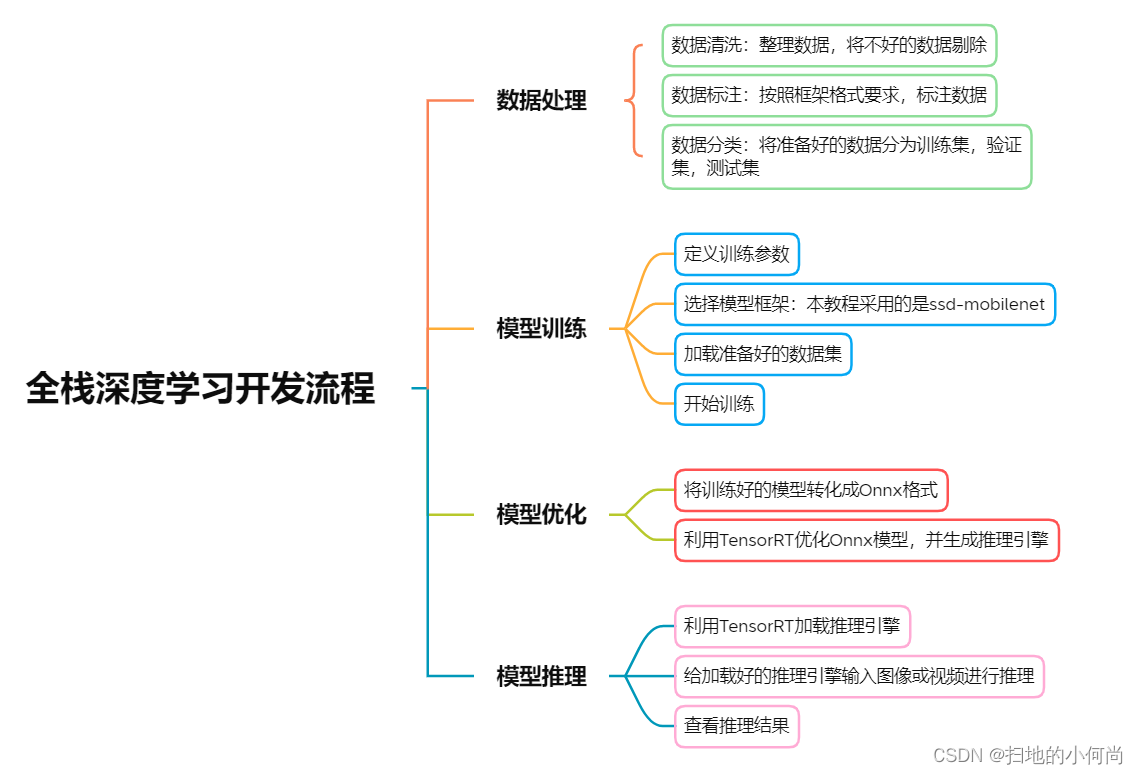
- 本教程目的为让开发者了解深度学习中的完整流程,这包括:
1.数据集导入及预处理流程
2.网络模型选择及参数设置流程
3.模型训练及导出流程
4.模型加载/优化并得出推断结果
项目源码以及数据集下载:
https://download.csdn.net/download/kunhe0512/85360655
-
本教程采用了以下主要的软硬件环境:
1.NVIDIA Xavier NX
2.Jetpack 4.6
3.TensorRT 8.0.1
4.Pytorch 1.10.0
5.Python 3.6.9
6.Opencv 4.1.1 -
实验内容:
- 本教程的实验内容是利用深度学习的方法,完成口罩检测的任务。
- 检测目标类别为:Background,face,mask,mask_weared_incorrect
- 在实验过程中,采用了OpenImages CVS格式的数据集和SSD-mobilenet的模型。
- 本实验利用Pytorch进行模型训练,将训练好的模型转化为ONNX格式,最后利用TensorRT进行推理
- 更多精彩内容,请扫描下方二维码来加入NVIDIA开发者计划

开始实验
1.导入需要的工具库
#1import osimport syssys.executableimport loggingimport argparseimport itertoolsimport torchfrom torch.utils.data import DataLoader, ConcatDatasetfrom torch.optim.lr_scheduler import CosineAnnealingLR, MultiStepLRfrom vision.utils.misc import str2bool, Timer, freeze_net_layers, store_labelsfrom vision.ssd.ssd import MatchPriorfrom vision.ssd.vgg_ssd import create_vgg_ssdfrom vision.ssd.mobilenetv1_ssd import create_mobilenetv1_ssdfrom vision.ssd.mobilenetv1_ssd_lite import create_mobilenetv1_ssd_litefrom vision.ssd.mobilenet_v2_ssd_lite import create_mobilenetv2_ssd_litefrom vision.ssd.squeezenet_ssd_lite import create_squeezenet_ssd_litefrom vision.datasets.voc_dataset import VOCDatasetfrom vision.datasets.open_images import OpenImagesDatasetfrom vision.nn.multibox_loss import MultiboxLossfrom vision.ssd.config import vgg_ssd_configfrom vision.ssd.config import mobilenetv1_ssd_configfrom vision.ssd.config import squeezenet_ssd_configfrom vision.ssd.data_preprocessing import TrainAugmentation, TestTransform2.使用GPU完成训练
#2DEVICE = torch.device("cuda:0")torch.backends.cudnn.benchmark = True3.设定训练方法
#3def train(loader, net, criterion, optimizer, device, debug_steps=100, epoch=-1): net.train(True) running_loss = 0.0 running_regression_loss = 0.0 running_classification_loss = 0.0 for i, data in enumerate(loader): images, boxes, labels = data images = images.to(device) boxes = boxes.to(device) labels = labels.to(device) optimizer.zero_grad() confidence, locations = net(images) regression_loss, classification_loss = criterion(confidence, locations, labels, boxes) # TODO CHANGE BOXES loss = regression_loss + classification_loss loss.backward() optimizer.step() running_loss += loss.item() running_regression_loss += regression_loss.item() running_classification_loss += classification_loss.item() if i and i % debug_steps == 0: avg_loss = running_loss / debug_steps avg_reg_loss = running_regression_loss / debug_steps avg_clf_loss = running_classification_loss / debug_steps print( f"Epoch: {epoch}, Step: {i}/{len(loader)}, " + f"Avg Loss: {avg_loss:.4f}, " + f"Avg Regression Loss {avg_reg_loss:.4f}, " + f"Avg Classification Loss: {avg_clf_loss:.4f}" ) running_loss = 0.0 running_regression_loss = 0.0 running_classification_loss = 0.04.设定测试方法
#4def test(loader, net, criterion, device): net.eval() running_loss = 0.0 running_regression_loss = 0.0 running_classification_loss = 0.0 num = 0 for _, data in enumerate(loader): images, boxes, labels = data images = images.to(device) boxes = boxes.to(device) labels = labels.to(device) num += 1 with torch.no_grad(): confidence, locations = net(images) regression_loss, classification_loss = criterion(confidence, locations, labels, boxes) loss = regression_loss + classification_loss running_loss += loss.item() running_regression_loss += regression_loss.item() running_classification_loss += classification_loss.item() return running_loss / num, running_regression_loss / num, running_classification_loss / num5.设定训练参数
#5net_name = "mb1-ssd"datasets = []datasets_path = ["data/mask"]model_dir = "models/mask/" voc_or_open_images = "open_images"batch_size = 4num_epochs = 6validation_epochs = 2num_workers = 2lr = 0.01base_net_lr = 0.001extra_layers_lr = 0.01momentum=0.9weight_decay=5e-46.加载数据集

#6timer = Timer()create_net = create_mobilenetv1_ssdconfig = mobilenetv1_ssd_config # create data transforms for train/test/valtrain_transform = TrainAugmentation(config.image_size, config.image_mean, config.image_std)target_transform = MatchPrior(config.priors, config.center_variance, config.size_variance, 0.5)test_transform = TestTransform(config.image_size, config.image_mean, config.image_std)# load datasets (could be multiple)print("Prepare training datasets.")for dataset_path in datasets_path: if voc_or_open_images == 'voc': dataset = VOCDataset(dataset_path, transform=train_transform,target_transform=target_transform) label_file = os.path.join(model_dir, "labels.txt") store_labels(label_file, dataset.class_names) num_classes = len(dataset.class_names) elif voc_or_open_images == 'open_images': dataset = OpenImagesDataset(dataset_path,transform=train_transform, target_transform=target_transform,dataset_type="train", balance_data=False) label_file = os.path.join(model_dir, "labels.txt") store_labels(label_file, dataset.class_names) print(dataset) num_classes = len(dataset.class_names) else: raise ValueError(f"Dataset type is not supported.") datasets.append(dataset)7.将加载好的数据集分割为训练集和验证集
#7# create training datasetprint(f"Stored labels into file {label_file}.")train_dataset = ConcatDataset(datasets)print("Train dataset size: {}".format(len(train_dataset)))train_loader = DataLoader(train_dataset, batch_size,num_workers=num_workers,shuffle=True) # create validation dataset print("Prepare Validation datasets.")if voc_or_open_images == "voc": val_dataset = VOCDataset(dataset_path, transform=test_transform,target_transform=target_transform, is_test=True)elif voc_or_open_images == 'open_images': val_dataset = OpenImagesDataset(dataset_path,transform=test_transform, target_transform=target_transform,dataset_type="test") print(val_dataset)print("Validation dataset size: {}".format(len(val_dataset)))val_loader = DataLoader(val_dataset, batch_size,num_workers = num_workers,shuffle=False)8.创建网络模型
#8# create the networkprint("Build network.")net = create_net(num_classes)min_loss = -10000.0last_epoch = -1params = [ {'params': net.base_net.parameters(), 'lr': base_net_lr}, {'params': itertools.chain( net.source_layer_add_ons.parameters(), net.extras.parameters() ), 'lr': extra_layers_lr}, {'params': itertools.chain( net.regression_headers.parameters(), net.classification_headers.parameters() )}]9.定义是否使用预训练模型或者
- 我们这里设计了三种模式:
1.重头开始训练,只需将你的模型路径赋值给base_net: base_net = “path/to/the/basic/model”
2.使用之前训练一半中间断开没训练完的模型继续训练,只需将模型路径赋值给resume:resume = “path/to/the/resume/model”
3.利用我们已经准好的预训练模型,只需将模型路径赋值给pretrained_ssd: pretrained_ssd = “path/to/the/pretrained_ssd/model” - 如果不太明白想选择什么模型,可以将resume,base_net和pretrained_ssd都赋值None,将会自动从头开始训练
#9# load a previous model checkpoint (if requested)timer.start("Load Model")resume=Nonebase_net = Nonepretrained_ssd = "models/face-mask-pretrain-model.pth"if resume: print(f"Resume from the model {resume}") net.load(resume)elif base_net: print(f"Init from base net {base_net}") net.init_from_base_net(base_net)elif pretrained_ssd: print(f"Init from pretrained ssd {pretrained_ssd}") net.init_from_pretrained_ssd(pretrained_ssd)print(f'Took {timer.end("Load Model"):.2f} seconds to load the model.')10.开始训练模型
#10# move the model to GPUnet.to(DEVICE)# define loss function and optimizercriterion = MultiboxLoss(config.priors, iou_threshold=0.5, neg_pos_ratio=3,center_variance=0.1, size_variance=0.2, device=DEVICE)optimizer = torch.optim.SGD(params, lr=lr, momentum=0.9, weight_decay=weight_decay)print(f"Learning rate: {lr}, Base net learning rate: {base_net_lr}, "+ f"Extra Layers learning rate: {extra_layers_lr}.")# set learning rate policyprint("Uses CosineAnnealingLR scheduler.")scheduler = CosineAnnealingLR(optimizer, 100, last_epoch=last_epoch)# train for the desired number of epochsprint(f"Start training from epoch {last_epoch + 1}.") for epoch in range(last_epoch + 1, num_epochs): scheduler.step() train(train_loader, net, criterion, optimizer,device=DEVICE, debug_steps=10, epoch=epoch) if epoch % validation_epochs == 0 or epoch == num_epochs - 1: val_loss, val_regression_loss, val_classification_loss = test(val_loader, net, criterion, DEVICE) print( f"Epoch: {epoch}, " + f"Validation Loss: {val_loss:.4f}, " + f"Validation Regression Loss {val_regression_loss:.4f}, " + f"Validation Classification Loss: {val_classification_loss:.4f}" ) model_path = os.path.join(model_dir, f"{net_name}-Epoch-{epoch}-Loss-{val_loss}.pth") net.save(model_path) print(f"Saved model {model_path}")print("Task done, exiting program.") 11.将训练好的模型转化成ONNX格式
#11!python3 onnx_export.py --model-dir=models/mask12.将转化好的ONNX格式利用TensorRT进行优化,生成TensorRT推理引擎
这里注意,需要安装Onnx2TensorRT
#12!onnx2trt models/mask/ssd-mobilenet.onnx -o models/TRT_ssd_mobilenet_v1_face2.bin13.加载引擎推理时所需要的工具库
#13import sysimport timeimport argparseimport cv2import pycuda.autoinit import numpy as npfrom utils.ssd_classes import get_cls_dictfrom utils.camera import add_camera_args, Camerafrom utils.display import open_window, set_display, show_fpsfrom utils.visualization import BBoxVisualizationimport ctypesimport tensorrt as trtimport pycuda.driver as cuda14.设计引擎输入输出的预处理方法和后处理方法
#14def do_nms(det, boxes, confs, clss): drop = False if len(boxes) 0.6 and not drop: if det[4] > confs[i]: boxes[i] = ((det[0],det[1],det[2],det[3])) confs[i] = det[4] clss[i] = det[5] drop = True if not drop: boxes.append((det[0],det[1],det[2],det[3])) confs.append(det[4]) clss.append(det[5]) return boxes, confs, clssdef _preprocess_trt(img, shape=(300, 300)): """Preprocess an image before TRT SSD inferencing.""" img = cv2.resize(img, shape) img = cv2.cvtColor(img, cv2.COLOR_BGR2RGB) img = img.transpose((2, 0, 1)).astype(np.float32) img *= (2.0/255.0) img -= 1.0 return imgdef _postprocess_trt(img, output, conf_th, output_layout): """Postprocess TRT SSD output.""" img_h, img_w, _ = img.shape boxes, confs, clss, results = [], [], [],[] #print(((len(output[1]))/4+1)) #print("len(outputs[0]): "+str(len(output[0]))+" len(outputs[1]): "+str(len(output[1]))) for n in range(0, int((len(output[1]))/4)): maxScore = -1000.0000 maxClass = 0 for m in range(0, 4): score = output[0][n*4+m] #print(score) if score < conf_th: continue if m maxScore): maxScore = score maxClass = m #if(maxClass < 0): # continue index = int(n) if maxScore < conf_th: continue #print(str(output[1][n*4+0])+" "+str(output[1][n*4+1])+" "+str(output[1][n*4+2])+" "+str(output[1][n*4+3])) x1 = int(output[1][n*4+0] * img_w) y1 = int(output[1][n*4+1] * img_h) x2 = int(output[1][n*4+2] * img_w) y2 = int(output[1][n*4+3] * img_h) det = [x1,y1,x2,y2,maxScore,maxClass,n] boxes, confs, clss = do_nms(det, boxes, confs, clss) return boxes, confs, clss15.定义SSD-mobilenet v1模型的推理引擎的加载
- 当我们已经优化好了引擎的时候,我们可以将优化好的引擎以文件的形式写到硬盘上,我们称之为序列化文件(serialized file)或PLAN文件
- 我们下次想直接使用优化好的引擎的时候,我们可以通过读取硬盘上的序列化文件,并利用 deserialize_cuda_engine() 方法进行反序列化,生成可执行的引擎
- 利用序列化文件生成可执行引擎可以为我们节省大量的时间
- 不同平台(软件或硬件平台)上生成的引擎的序列化文件不能直接通用,相同平台(软件且硬件平台)或同一台设备上生成的引擎序列化文件可以直接用
#15class TrtSSD(object): """TrtSSD class encapsulates things needed to run TRT SSD.""" #加载自定义组建,这里如果TensorRT版本小于7.0需要额外生成flattenconcat的自定义组件库 def _load_plugins(self): trt.init_libnvinfer_plugins(self.trt_logger, '') #加载通过Transfer Learning Toolkit生成的推理引擎 def _load_engine(self): TRTbin = 'models/TRT_%s.bin' % self.model with open(TRTbin, 'rb') as f, trt.Runtime(self.trt_logger) as runtime: return runtime.deserialize_cuda_engine(f.read()) #通过加载的引擎,生成可执行的上下文 def _create_context(self): for binding in self.engine: size = trt.volume(self.engine.get_binding_shape(binding)) * \ self.engine.max_batch_size ##注意:这里的host_mem需要时用pagelocked memory,以免内存被释放 host_mem = cuda.pagelocked_empty(size, np.float32) cuda_mem = cuda.mem_alloc(host_mem.nbytes) self.bindings.append(int(cuda_mem)) if self.engine.binding_is_input(binding): self.host_inputs.append(host_mem) self.cuda_inputs.append(cuda_mem) else: self.host_outputs.append(host_mem) self.cuda_outputs.append(cuda_mem) return self.engine.create_execution_context() #初始化引擎 def __init__(self, model, input_shape, output_layout=7): """Initialize TensorRT plugins, engine and conetxt.""" self.model = model self.input_shape = input_shape self.output_layout = output_layout self.trt_logger = trt.Logger(trt.Logger.INFO) self._load_plugins() self.engine = self._load_engine() self.host_inputs = [] self.cuda_inputs = [] self.host_outputs = [] self.cuda_outputs = [] self.bindings = [] self.stream = cuda.Stream() self.context = self._create_context() #释放引擎,释放GPU显存,释放CUDA流 def __del__(self): """Free CUDA memories.""" del self.stream del self.cuda_outputs del self.cuda_inputs #利用生成的可执行上下文执行推理 def detect(self, img, conf_th=0.3): """Detect objects in the input image.""" img_resized = _preprocess_trt(img, self.input_shape) np.copyto(self.host_inputs[0], img_resized.ravel()) #将处理好的图片从CPU内存中复制到GPU显存 cuda.memcpy_htod_async( self.cuda_inputs[0], self.host_inputs[0], self.stream) #开始执行推理任务 self.context.execute_async( batch_size=1, bindings=self.bindings, stream_handle=self.stream.handle) #将推理结果输出从GPU显存复制到CPU内存 cuda.memcpy_dtoh_async( self.host_outputs[1], self.cuda_outputs[1], self.stream) cuda.memcpy_dtoh_async( self.host_outputs[0], self.cuda_outputs[0], self.stream) self.stream.synchronize() output = self.host_outputs #print("len(outputs[0]): "+str(len(self.host_outputs[0]))+" len(outputs[1]): "+str(len(self.host_outputs[1]))) #for x in self.host_outputs[0]: # print(str(x),end=' ') #for x in self.host_outputs[1]: # print(str(x),end=' ') return _postprocess_trt(img, output, conf_th, self.output_layout)16.设置模型库
- 1.这里定义了多个模型库,我们选用的是人脸口罩检测,也就是最后一个ssd_mobilenet_v1_face2
- 2.这里还定义了我们模型的输入(300,300)
#16INPUT_HW = (300, 300)SUPPORTED_MODELS = [ 'ssd_mobilenet_v1_coco', 'ssd_mobilenet_v1_egohands', 'ssd_mobilenet_v2_coco', 'ssd_mobilenet_v2_egohands', 'ssd_mobilenet_v2_face', 'ssd_resnet18_5th', 'ssd_mobilenet_v1_face2', 'ssd_mobilenet_v1_fruit']17.开始定义方法来读取数据并将输出可视化的画到图像上
- detect_one()方法是检测单张图片,detect_video()方法是检测视频
- 注意:这里打印的fps值是包括将图像写到结果视频中的时间,如果取消将视频写到结果视频的功能,速度会有大幅度提升
#17-1def detect_video(video, trt_ssd, conf_th, vis,result_file_name): full_scrn = False fps = 0.0 tic = time.time() frame_width = int(video.get(cv2.CAP_PROP_FRAME_WIDTH)) frame_height = int(video.get(cv2.CAP_PROP_FRAME_HEIGHT)) fps = video.get(cv2.CAP_PROP_FPS) #print(str(frame_width)+str(frame_height)) ##定义输入编码 fourcc = cv2.VideoWriter_fourcc('M', 'P', '4', 'V') videoWriter = cv2.VideoWriter('result.AVI', fourcc, fps, (frame_width,frame_height)) ##开始循环检测,并将结果写到result.mp4中 while True: ret,img = video.read() if img is not None: boxes, confs, clss = trt_ssd.detect(img, conf_th) #print("boxes,confs,clss: "+ str(boxes)+" "+ str(confs)+" "+str(clss)) img = vis.draw_bboxes(img, boxes, confs, clss) videoWriter.write(img) toc = time.time() curr_fps = 1.0 / (toc - tic) fps = curr_fps if fps == 0.0 else (fps*0.95 + curr_fps*0.05) tic = toc print("\rfps: "+str(fps),end="") else: break#17-2def detect_one(img, trt_ssd, conf_th, vis): full_scrn = False tic = time.clock() ##开始检测,并将结果写到result.jpg中 boxes, confs, clss = trt_ssd.detect(img, conf_th) toc = time.clock() curr_fps = (toc - tic) #print("boxes: "+str(boxes)) #print("clss: "+str(clss)) #print("confs: "+str(confs)) img = vis.draw_bboxes(img, boxes, confs, clss) cv2.imwrite("result.jpg",img) print("time: "+str(curr_fps)+"(sec)")18.定义main()函数,检测单张图片**
- 您可以自行上传图像到当前文件夹,并将filename请改成您要测试的图片的名字
- face指的是没有戴口罩的人脸,face_mask指的是带了口罩的人脸,mask_weared_incorrect指的是带了口罩但是带的不规范的人脸
#18-1def main_one(): filename = "mask.jpg" result_file_name = str(filename) img = cv2.imread(filename) cls_dict = get_cls_dict("ssd_mobilenet_v1_face2".split('_')[-1]) model_name ="ssd_mobilenet_v1_face2" trt_ssd = TrtSSD(model_name, INPUT_HW) vis = BBoxVisualization(cls_dict) print("start detection!") detect_one(img, trt_ssd, conf_th=0.5, vis=vis) cv2.destroyAllWindows() print("finish!")#18-2from IPython.display import Imagemain_one()Image("result.jpg")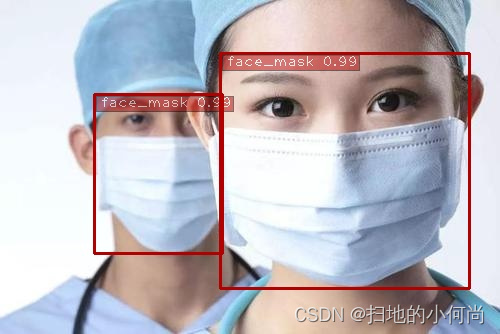
19.定义main()函数,检测视频
- 您可以自行上传视频到当前文件夹,并将filename请改成您要测试的视频的名字
- 检测视频部分由于要将检测的结果写到硬盘上,所以时间会加倍,如果要得到和单张检测相似的数据,可以将读写的语句注释掉
- face指的是没有戴口罩的人脸,face_mask指的是带了口罩的人脸,mask_weared_incorrect指的是带了口罩但是带的不规范的人脸)
#19-1def main_loop():filename = "face_mask_test_video.mp4" result_file_name = str(filename) video = cv2.VideoCapture(filename) cls_dict = get_cls_dict("ssd_mobilenet_v1_face2".split('_')[-1]) model_name ="ssd_mobilenet_v1_face2" trt_ssd = TrtSSD(model_name, INPUT_HW) vis = BBoxVisualization(cls_dict) print("start detection!") detect_video(video, trt_ssd, conf_th=0.8, vis=vis, result_file_name=result_file_name) video.release() cv2.destroyAllWindows() print("\nfinish!")#19-2main_loop()20.将生成的视频转码,以便能够在Jupyter Notebook中查看
- 这里采用的是利用GPU加速的转码技术,将输出的视频转换到MP4格式,比单纯使用CPU进行转码的速度有大幅度提升
#20!rm result-ffmpeg4.mp4!ffmpeg -i result.AVI -vcodec libx264 -f mp4 result-ffmpeg4.mp4 21.查看结果视频
#21from IPython.display import VideoVideo("result-ffmpeg4.mp4")