【HarmonyOS】【JAVA UI】自定义通知的实现
我们怎么实现自定义通知呢?今天写一个demo作为经验分享,我们从以下五个步骤进行描述
1. 绘画基本界面
2. 自定义通知的view界面
3. 代码层实现view的实现设置Text文字,设置Image图片
4. 运行效果
在开发中基本通知我们可以参考资料:
文档中心
第一步:绘画基本界面
1.1我们在布局绘画一个Text用于触发发布通知 xml代码如下
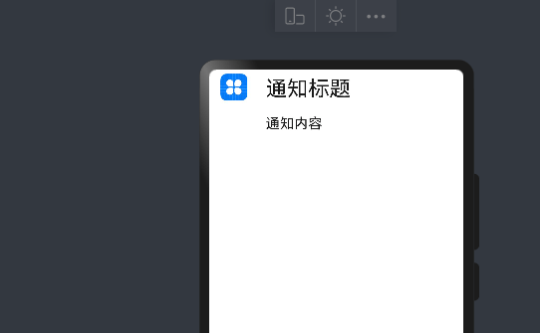
第二步:自定义通知的view界面
自定义通知布局,新建一个xml 布局名称notification_view.xml 需要设置remote为true
代码如下
效果如下
第三步 代码层实现view的实现设置Text文字,设置Image图片
3.1 使用ComponentProvider加载布局代码如下
ComponentProvider remoteView = new ComponentProvider(ResourceTable.Layout_notification_view, this);3.2设置文字
//todo 通知设置文字 remoteView.setTextColor(ResourceTable.Id_title, new Color(0xFFFF0000)); remoteView.setFloat(ResourceTable.Id_title, "setTextSize", 20); remoteView.setString(ResourceTable.Id_title, "setText", "这是通知标题");3.2使用setImageContent的api设置图片资源,
准备工作
1)在resources/base/media 文件存放一个图片为myicon.png图片,结构如下
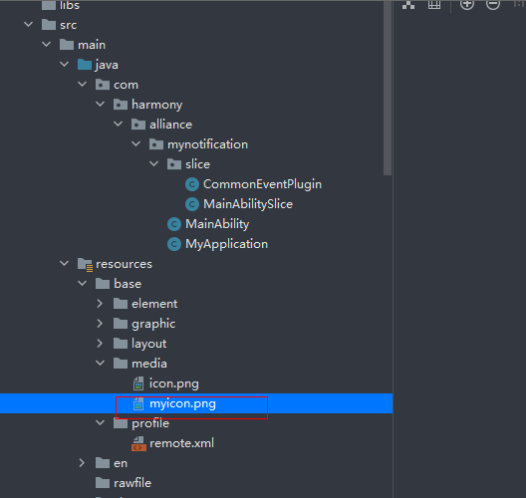
2)我们需要在resources/base/profile文件新建一个名为remote.xml文件,图片如下

3)romote.xml
$media:myicon4)Java代码设置图片
remoteView.setImageContent(ResourceTable.Id_myImage, ResourceTable.Media_myicon);5)通知代码实现
NotificationRequest.NotificationNormalContent content = new NotificationRequest.NotificationNormalContent(); NotificationRequest.NotificationContent notificationContent = new NotificationRequest.NotificationContent(content); NotificationRequest request = new NotificationRequest(this, 1); request.setContent(notificationContent).setCustomView(remoteView);6)全部代码如下
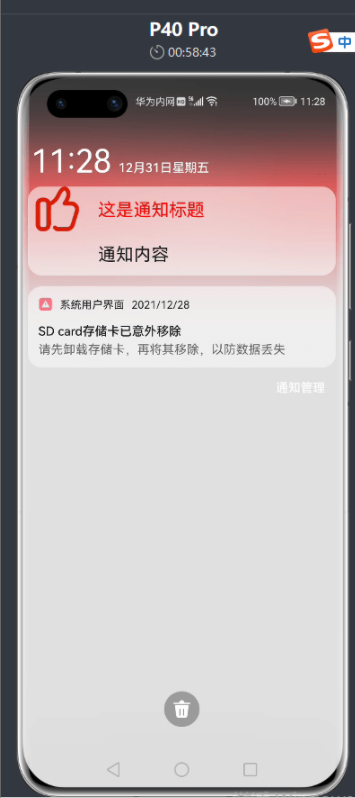
public class MainAbilitySlice extends AbilitySlice { private Text PushNotification; private String event = "com.utils.test"; static final HiLogLabel LABEL = new HiLogLabel(HiLog.LOG_APP, 0x00201, "######"); @Override public void onStart(Intent intent) { super.onStart(intent); super.setUIContent(ResourceTable.Layout_ability_main); PushNotification = findComponentById(ResourceTable.Id_PushNotification); ComponentProvider remoteView = new ComponentProvider(ResourceTable.Layout_notification_view, this); //todo 通知设置文字 remoteView.setTextColor(ResourceTable.Id_title, new Color(0xFFFF0000)); remoteView.setFloat(ResourceTable.Id_title, "setTextSize", 20); remoteView.setString(ResourceTable.Id_title, "setText", "这是通知标题"); //todo 通知设置图片 remoteView.setImageContent(ResourceTable.Id_myImage, ResourceTable.Media_myicon); NotificationRequest.NotificationNormalContent content = new NotificationRequest.NotificationNormalContent(); NotificationRequest.NotificationContent notificationContent = new NotificationRequest.NotificationContent(content); NotificationRequest request = new NotificationRequest(this, 1); request.setContent(notificationContent).setCustomView(remoteView); PushNotification.setClickedListener(new Component.ClickedListener() { @Override public void onClick(Component component) { try { NotificationHelper.publishNotification(request); } catch (ohos.rpc.RemoteException ex) { HiLog.error(LABEL, ex.getLocalizedMessage()); } } }); }}第四步:效果图如下
更多相关学习资料:
https://developer.huawei.com/consumer/cn/forum/topic/0201768617076660043?fid=0102683795438680754?ha_source=zzh