【HarmonyOS】【JAVA UI】鸿蒙怎么对图片编码为base64和base64解码为PixelMap,并显示在控件上
在HarmonyOS中对图片的解码和编码是常见的操作,在HarmonyOS怎么进行编码和解码呢?今天写一个demo进行实现该功能实现,我们从以下几个步骤进行讲解该功能
1. 准备环节
2. 图片编码为Base64字符串
3. Base64解码为PixelMap,并显示在Image控件上
第一步准备环节
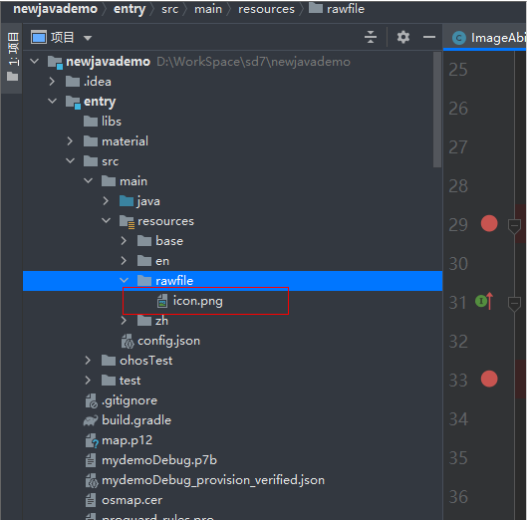
1.1 准备一张图片放在resources/rawfile文件夹下,图片如下
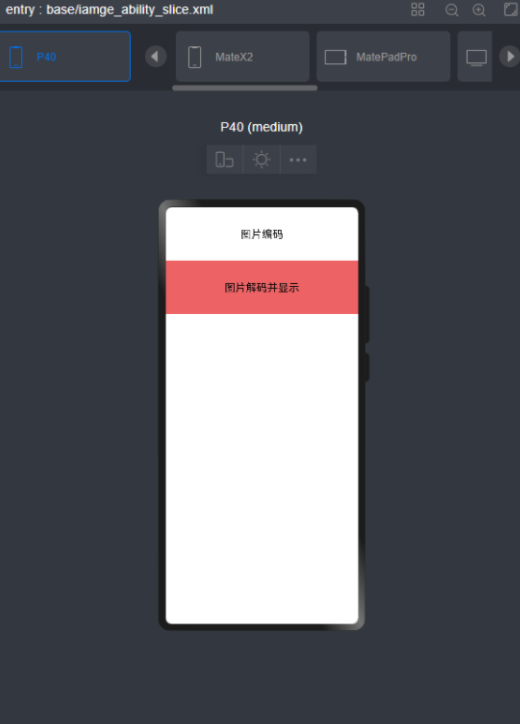
1.2 新建ImageAbilitySlice java类和xml布局, xml布局如下
XML效果图如下
第二步图片编码为Base64字符串
2.1这边我们参考资料是Base64的基本用法,来写一个工具类,代码如下
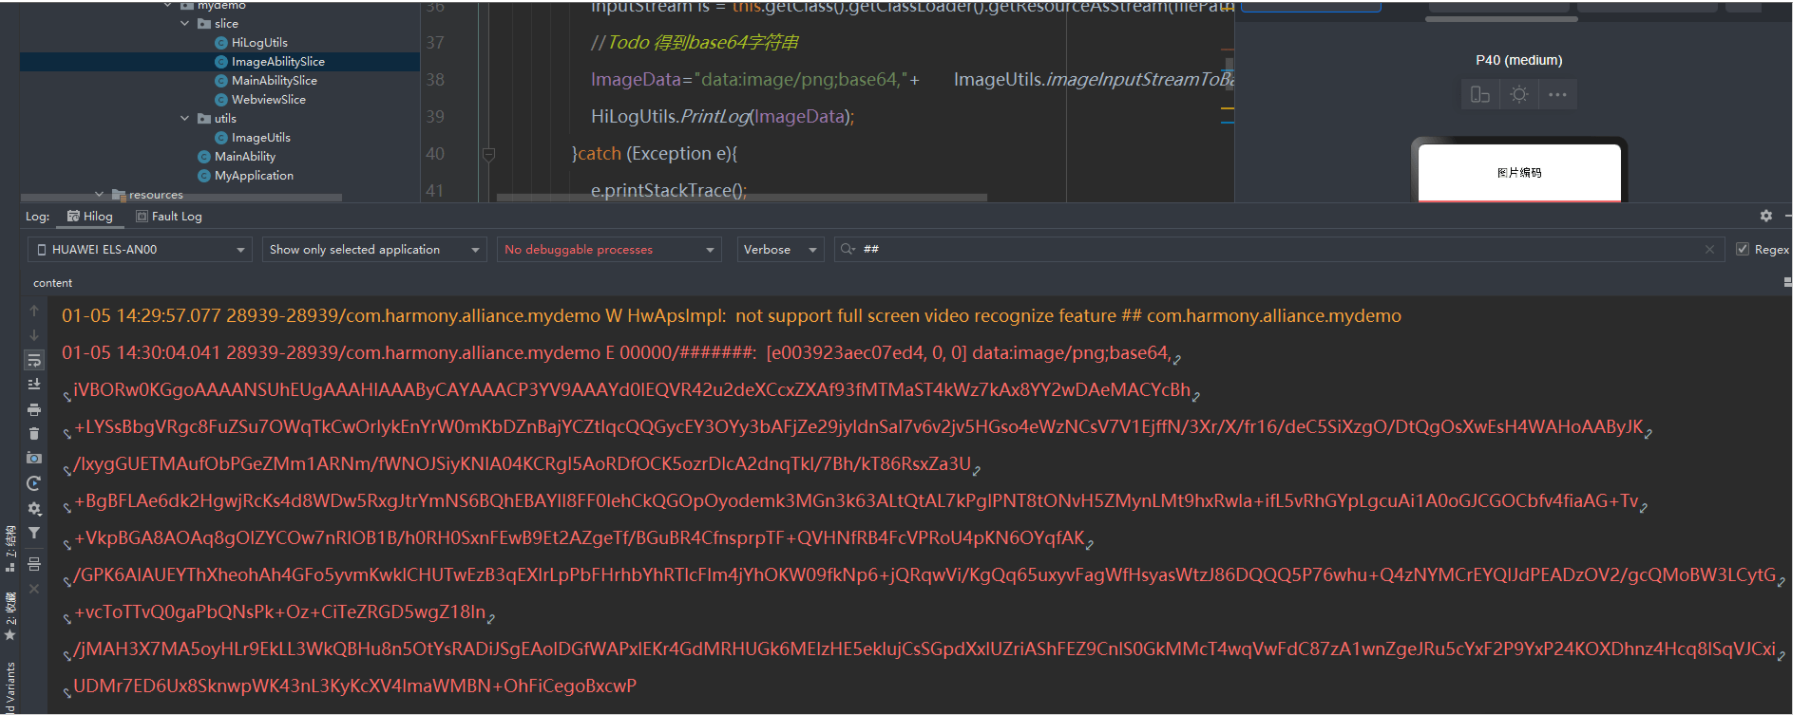
package com.harmony.alliance.mydemo.utils; import java.io.FileInputStream;import java.io.IOException;import java.io.InputStream;import java.util.Base64; public class ImageUtils { /** * 将图片转换成Base64编码的字符串 */ public static String imageToBase64(String path){ if(path==null||path.equals("")){ return null; } InputStream is = null; byte[] data = null; String result = null; try{ is = new FileInputStream(path); //创建一个字符流大小的数组。 data = new byte[is.available()]; //写入数组 is.read(data); //用默认的编码格式进行编码 result = Base64.getEncoder().encodeToString(data); }catch (Exception e){ e.printStackTrace(); }finally { if(null !=is){ try { is.close(); } catch (IOException e) { e.printStackTrace(); } } } return result; }/** * 将图片转换成Base64编码的字符串 */ public static String imageInputStreamToBase64( InputStream is){ if(is==null){ return null; } byte[] data = null; String result = null; try{ //创建一个字符流大小的数组。 data = new byte[is.available()]; //写入数组 is.read(data); //用默认的编码格式进行编码 result = Base64.getEncoder().encodeToString(data); }catch (Exception e){ e.printStackTrace(); }finally { if(null !=is){ try { is.close(); } catch (IOException e) { e.printStackTrace(); } } } return result; } }2.2实现图片编码的代码如下
textRead.setClickedListener(new Component.ClickedListener() { @Override public void onClick(Component component) { try { String filePath = String.format(Locale.ROOT, "assets/entry/resources/rawfile/%s", "icon.png"); InputStream is = this.getClass().getClassLoader().getResourceAsStream(filePath); //Todo 得到base64字符串 ImageData="data:image/png;base64,"+ImageUtils.imageInputStreamToBase64(is); HiLogUtils.PrintLog(ImageData); }catch (Exception e){ e.printStackTrace(); } } });效果图如下
第三步将Base64解码为mPixelMap并显示在Image控件上
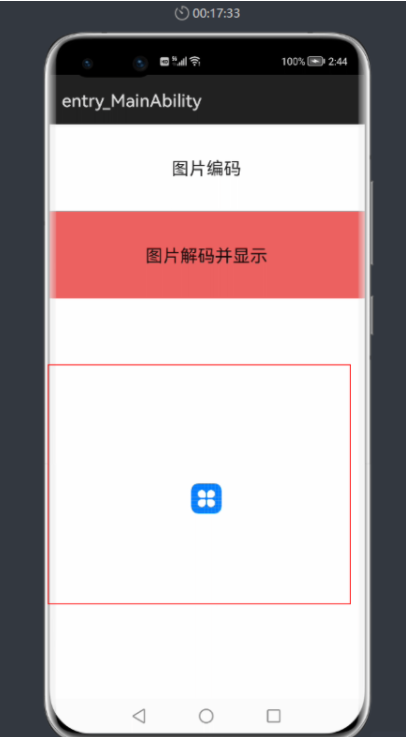
3.1我们这里使用如下Base64.getDecoder().decode和ImageSource、SourceOptions的相关技术,代码如下
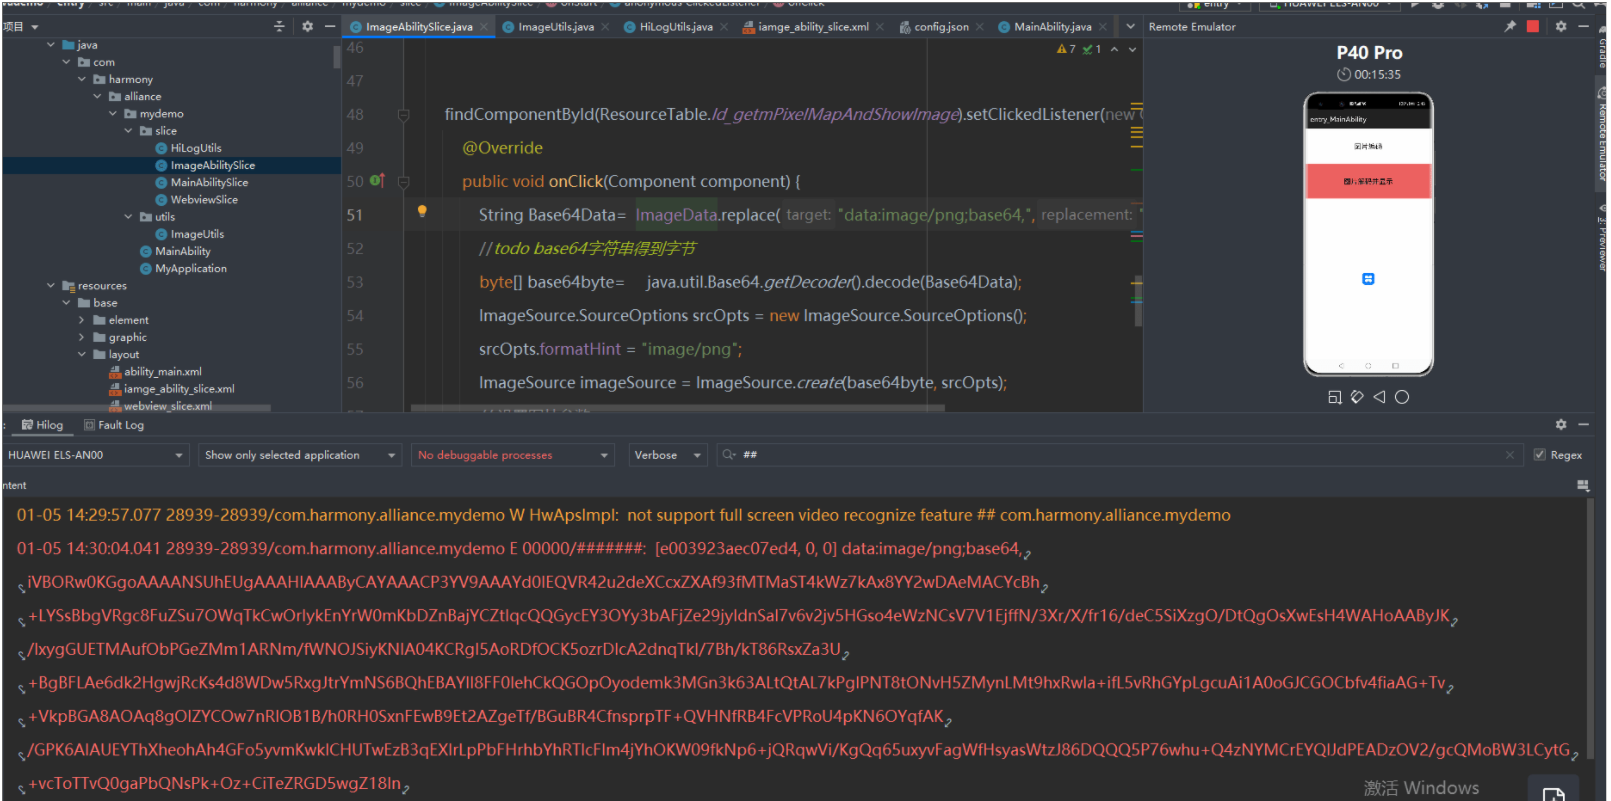
findComponentById(ResourceTable.Id_getmPixelMapAndShowImage).setClickedListener(new Component.ClickedListener() { @Override public void onClick(Component component) { String Base64Data= ImageData.replace("data:image/png;base64,",""); //todo base64字符串得到字节 byte[] base64byte= java.util.Base64.getDecoder().decode(Base64Data); ImageSource.SourceOptions srcOpts = new ImageSource.SourceOptions(); srcOpts.formatHint = "image/png"; ImageSource imageSource = ImageSource.create(base64byte, srcOpts); // 设置图片参数 ImageSource.DecodingOptions decodingOptions = new ImageSource.DecodingOptions(); PixelMap mPixelMap = imageSource.createPixelmap(decodingOptions); ShowImage.setPixelMap(mPixelMap); } });效果图如下
整体代码如下
package com.harmony.alliance.mydemo.slice; import com.harmony.alliance.mydemo.ResourceTable;import com.harmony.alliance.mydemo.utils.ImageUtils;import ohos.aafwk.ability.AbilitySlice;import ohos.aafwk.content.Intent;import ohos.agp.components.Component;import ohos.agp.components.Image;import ohos.agp.components.Text;import ohos.global.resource.RawFileEntry;import ohos.global.resource.Resource;import ohos.media.image.ImageSource;import ohos.media.image.PixelMap; import java.io.File;import java.io.FileOutputStream;import java.io.IOException;import java.io.InputStream;import java.util.Base64;import java.util.Locale; public class ImageAbilitySlice extends AbilitySlice { Image ShowImage; private String ImageData; @Override protected void onStart(Intent intent) { super.onStart(intent); setUIContent(ResourceTable.Layout_iamge_ability_slice); Text textRead= (Text) findComponentById(ResourceTable.Id_textRead); ShowImage= (Image) findComponentById(ResourceTable.Id_ShowImage); textRead.setClickedListener(new Component.ClickedListener() { @Override public void onClick(Component component) { try { String filePath = String.format(Locale.ROOT, "assets/entry/resources/rawfile/%s", "icon.png"); InputStream is = this.getClass().getClassLoader().getResourceAsStream(filePath); //Todo 得到base64字符串 ImageData="data:image/png;base64,"+ImageUtils.imageInputStreamToBase64(is); HiLogUtils.PrintLog(ImageData); }catch (Exception e){ e.printStackTrace(); } } }); findComponentById(ResourceTable.Id_getmPixelMapAndShowImage).setClickedListener(new Component.ClickedListener() { @Override public void onClick(Component component) { String Base64Data= ImageData.replace("data:image/png;base64,",""); //todo base64字符串得到字节 byte[] base64byte= java.util.Base64.getDecoder().decode(Base64Data); ImageSource.SourceOptions srcOpts = new ImageSource.SourceOptions(); srcOpts.formatHint = "image/png"; ImageSource imageSource = ImageSource.create(base64byte, srcOpts); // 设置图片参数 ImageSource.DecodingOptions decodingOptions = new ImageSource.DecodingOptions(); PixelMap mPixelMap = imageSource.createPixelmap(decodingOptions); ShowImage.setPixelMap(mPixelMap); } }); } }效果如下
更多相关学习资料:
https://developer.huawei.com/consumer/cn/forum/topic/0202768644032900242?fid=0102683795438680754?ha_source=zzh