关于 Kubernetes中Service的一些笔记
写在前面
- 学习
K8s,整理记忆 - 博文内容涉及:
K8s中通过Servie的实现的服务创建,服务发现,服务发布 - 以及
Load balancer负载,Ingress7层路由负载等的实际Demo
陈平安说,“我喜欢的姑娘,她已经是最好看了。可是比最好看更好看的她,是我在看她的时候、她假装不知道的时候,侧着脸,睫毛微颤的模样。” ——烽火戏诸侯《剑来》
Service
Service是Kubernetes的核心概念,可以为一组具有相同功能的容器应用提供一个统一的入口地址,并且通过多实例的方式将请求负载分发到后端的各个容器应用上。具体涉及service的负载均衡机制、如何访问Service、 Headless Service, DNS服务的机制和实践、Ingress 7层路由机制等。
我们这里以服务的
创建,发布,发现三个角度来学习,偏实战,关于Headless Service,DNS服务的机制和实践、Ingress 7层路由机制等一些原理理论会在之后的博文里分享
通过Service的定义, Kubernetes实现了一种分布式应用统一入口的定义和负载均衡机制。Service还可以进行其他类型的设置,例如设置多个端口号、直接设置为集群外部服务,或实现为Headless Service (无头服务)模式.
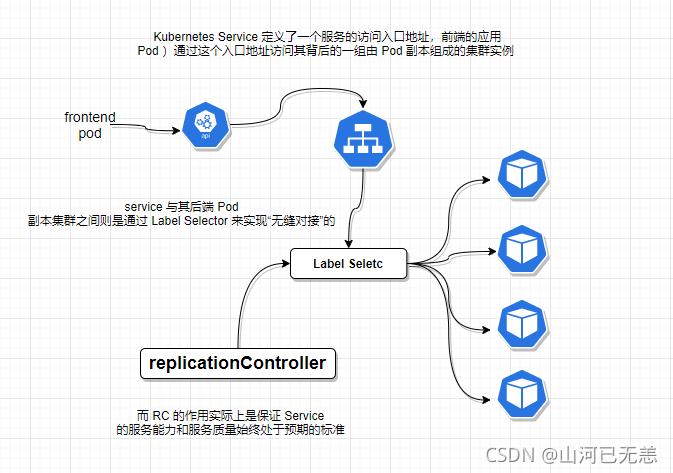
Kubernetes的Service定义了一个服务的访问入口地址,前端的应用(Pod)通过这个入口地址访问其背后的一组由Pod副本组成的集群实例, Service与其后端Pod副本集群之间则是通过Label Selector来实现“无缝对接”的。而RC或者deploy的作用实际上是保证Service的服务能力和服务质量始终处干预期的标准。
服务创建
为什么需要Service
学习环境准备,新建一个liruilong-svc-create命名空间
┌──[root@vms81.liruilongs.github.io]-[~/ansible]└─$d=k8s-svc-create┌──[root@vms81.liruilongs.github.io]-[~/ansible]└─$mkdir $d ;cd $d┌──[root@vms81.liruilongs.github.io]-[~/ansible/k8s-svc-create]└─$kubectl config set-context $(kubectl config current-context) --namespace=liruilong-svc-createContext "kubernetes-admin@kubernetes" modified.┌──[root@vms81.liruilongs.github.io]-[~/ansible/k8s-svc-create]└─$kubectl create ns liruilong-svc-createnamespace/liruilong-svc-create created┌──[root@vms81.liruilongs.github.io]-[~/ansible/k8s-svc-create]└─$kubectl get svcNo resources found in liruilong-svc-create namespace.┌──[root@vms81.liruilongs.github.io]-[~/ansible/k8s-svc-create]└─$使用pod资源创建服务
我们先来创建一个普通服务即不使用Service资源,只是通过pod创建
通过命令行的方式生成一个pod资源的yaml文件,然后我们修改一下
┌──[root@vms81.liruilongs.github.io]-[~/ansible/k8s-svc-create]└─$kubectl run pod-svc --image=nginx --image-pull-policy=IfNotPresent --dry-run=client -o yamlapiVersion: v1kind: Podmetadata: creationTimestamp: null labels: run: pod-svc name: pod-svcspec: containers: - image: nginx imagePullPolicy: IfNotPresent name: pod-svc resources: {} dnsPolicy: ClusterFirst restartPolicy: Alwaysstatus: {}这里我们修改下,使当前的pod可以对外提供能力,使用的方式,通过设置容器级别的hostPort,将容器应用的端口号映射到宿主机上
ports: - containerPort: 80 # 容器端口 hostPort: 800 # 提供能力的端口通过宿主机映射,当pod发生调度后,节点没法提供能力
通过设置Pod级别的hostNetwork=true,该Pod中所有容器的端口号都将被直接映射到物理机上。 在设置hostNetwork=true时需要注意,在容器的ports定义部分如果不指定hostPort,则默认hostPort等于containerPort,如果指定了hostPort,则hostPort必须等于containerPort的值:
spec nostNetwork: true containers: name: webapp image: tomcat imagePullPolicy: Never ports: - containerPort: 8080 通过下面的方式生成的pod可以通过800端口对外提供能力,这里的的IP为宿主机IP
┌──[root@vms81.liruilongs.github.io]-[~/ansible/k8s-svc-create]└─$cat pod-svc.yamlapiVersion: v1kind: Podmetadata: creationTimestamp: null labels: run: pod-svc name: pod-svcspec: containers: - image: nginx imagePullPolicy: IfNotPresent name: pod-svc ports: - containerPort: 80 hostPort: 800 resources: {} dnsPolicy: ClusterFirst restartPolicy: Alwaysstatus: {}┌──[root@vms81.liruilongs.github.io]-[~/ansible/k8s-svc-create]└─$这是一个单独的pod资源,生成的pod基于当前Node对外提供能力
┌──[root@vms81.liruilongs.github.io]-[~/ansible/k8s-svc-create]└─$kubectl apply -f pod-svc.yamlpod/pod-svc created┌──[root@vms81.liruilongs.github.io]-[~/ansible/k8s-svc-create]└─$kubectl get pods -owideNAME READY STATUS RESTARTS AGE IP NODE NOMINATED NODE READINESS GATESpod-svc 1/1 Running 0 3s 10.244.70.50 vms83.liruilongs.github.io <none> <none>对于pod-svc来讲,我们可以通过pod_ip+端口的方式访问,其实是类似于docker一样,把端口映射到宿主机的方式
然后我们以同样的方式生成几个新的pod,也是基于当前Node节点对外提供能力,这里我们只有两个节点,所以在生成第三个的时候,pod直接pending了,端口冲突,我们使用了宿主机映射的方式,所以每个node只能调度一个pop上去
┌──[root@vms81.liruilongs.github.io]-[~/ansible/k8s-svc-create]└─$sed 's/pod-svc/pod-svc-1/' pod-svc.yaml | kubectl apply -f -pod/pod-svc-1 created┌──[root@vms81.liruilongs.github.io]-[~/ansible/k8s-svc-create]└─$kubectl get pods -owideNAME READY STATUS RESTARTS AGE IP NODE NOMINATED NODE READINESS GATESpod-svc 1/1 Running 0 2m46s 10.244.70.50 vms83.liruilongs.github.io <none> <none>pod-svc-1 1/1 Running 0 13s 10.244.171.176 vms82.liruilongs.github.io <none> <none>┌──[root@vms81.liruilongs.github.io]-[~/ansible/k8s-svc-create]└─$sed 's/pod-svc/pod-svc-2/' pod-svc.yaml | kubectl apply -f -pod/pod-svc-2 created┌──[root@vms81.liruilongs.github.io]-[~/ansible/k8s-svc-create]└─$kubectl get pods -owideNAME READY STATUS RESTARTS AGE IP NODE NOMINATED NODE READINESS GATESpod-svc 1/1 Running 0 4m18s 10.244.70.50 vms83.liruilongs.github.io <none> <none>pod-svc-1 1/1 Running 0 105s 10.244.171.176 vms82.liruilongs.github.io <none> <none>pod-svc-2 0/1 Pending 0 2s <none> <none> <none> <none>┌──[root@vms81.liruilongs.github.io]-[~/ansible/k8s-svc-create]└─$这个时候,如果我们想多创建几个pod来提供能力,亦或者做负载。就要用到Service了
Service的创建
一般来说,对外提供服务的应用程序需要通过某种机制来实现,对于容器应用最简便的方式就是通过TCP/IP机制及监听IP和端口号来实现。即PodIP+容器端口的方式
直接通过Pod的IP地址和端口号可以访问到容器应用内的服务,但是Pod的IP地址是不可靠的,如果容器应用本身是分布式的部署方式,通过多个实例共同提供服务,就需要在这些实例的前端设置一个负载均衡器来实现请求的分发。
Kubernetes中的Service就是用于解决这些问题的核心组件。通过kubectl expose命令来创建Service
新创建的Service,系统为它分配了一个虚拟的IP地址(ClusterlP) , Service所需的端口号则从Pod中的containerPort复制而来:
下面我们就使用多个pod和deploy的方式为Service提供能力,创建Service
使用deployment创建SVC
创建一个有三个ng副本的deployment
┌──[root@vms81.liruilongs.github.io]-[~/ansible/k8s-svc-create]└─$kubectl create deployment web1 --image=nginx --replicas=3 --dry-run=client -o yamlapiVersion: apps/v1kind: Deploymentmetadata: creationTimestamp: null labels: app: web1 name: web1spec: replicas: 3 selector: matchLabels: app: web1 strategy: {} template: metadata: creationTimestamp: null labels: app: web1 spec: containers: - image: nginx name: nginx resources: {}status: {}┌──[root@vms81.liruilongs.github.io]-[~/ansible/k8s-svc-create]└─$kubectl create deployment web1 --image=nginx --replicas=3 --dry-run=client -o yaml > web1.yaml┌──[root@vms81.liruilongs.github.io]-[~/ansible/k8s-svc-create]└─$kubectl get pods -o wideNo resources found in liruilong-svc-create namespace.┌──[root@vms81.liruilongs.github.io]-[~/ansible/k8s-svc-create]└─$kubectl apply -f web1.yamldeployment.apps/web1 created┌──[root@vms81.liruilongs.github.io]-[~/ansible/k8s-svc-create]└─$kubectl get pods -o wideNAME READY STATUSRESTARTS AGE IPNODE NOMINATED NODE READINESS GATESweb1-6fbb48567f-2zfkm 0/1 ContainerCreating 0 2s <none> vms83.liruilongs.github.io <none> <none>web1-6fbb48567f-krj4j 0/1 ContainerCreating 0 2s <none> vms83.liruilongs.github.io <none> <none>web1-6fbb48567f-mzvtk 0/1 ContainerCreating 0 2s <none> vms82.liruilongs.github.io <none> <none>┌──[root@vms81.liruilongs.github.io]-[~/ansible/k8s-svc-create]└─$通过deploy: web1 为服务能力提供者,创建一个Servie服务
除了使用kubectl expose命令创建Service,我们也可以通过配置文件定义Service,再通过kubectl create命令进行创建
Service定义中的关键字段是ports和selector 。ports定义部分指定了Service所需的虚拟端口号为8081,如果与Pod容器端口号8080不一样,所以需要再通过targetPort来指定后端Pod的端口号。selector定义部分设置的是后端Pod所拥有的label:
┌──[root@vms81.liruilongs.github.io]-[~/ansible/k8s-svc-create]└─$kubectl expose --name=svc1 deployment web1 --port=80service/svc1 exposed┌──[root@vms81.liruilongs.github.io]-[~/ansible/k8s-svc-create]└─$kubectl get svc -o wideNAME TYPE CLUSTER-IP EXTERNAL-IP PORT(S) AGE SELECTORsvc1 ClusterIP 10.110.53.142 <none> 80/TCP 23s app=web1┌──[root@vms81.liruilongs.github.io]-[~/ansible/k8s-svc-create]└─$kubectl get podsNAME READY STATUS RESTARTS AGEweb1-6fbb48567f-2zfkm 1/1 Running 0 14mweb1-6fbb48567f-krj4j 1/1 Running 0 14mweb1-6fbb48567f-mzvtk 1/1 Running 0 14m┌──[root@vms81.liruilongs.github.io]-[~/ansible/k8s-svc-create]└─$kubectl get ep -owideNAME ENDPOINTS AGEsvc1 10.244.171.177:80,10.244.70.60:80,10.244.70.61:80 13m┌──[root@vms81.liruilongs.github.io]-[~/ansible/k8s-svc-create]└─$kubectl get pods --show-labelsNAME READY STATUS RESTARTS AGE LABELSweb1-6fbb48567f-2zfkm 1/1 Running 0 18m app=web1,pod-template-hash=6fbb48567fweb1-6fbb48567f-krj4j 1/1 Running 0 18m app=web1,pod-template-hash=6fbb48567fweb1-6fbb48567f-mzvtk 1/1 Running 0 18m app=web1,pod-template-hash=6fbb48567f┌──[root@vms81.liruilongs.github.io]-[~/ansible/k8s-svc-create]└─$使用pod创建Service
每个Pod都会被分配一个单独的IP地址,而且每个Pod都提供了一个独立的Endpoint(Pod IP+ContainerPort)以被客户端访问,现在多个Pod副本组成了一个集群来提供服务.客户端如何来访问它们呢?一般的做法是部署一个负载均衡器(软件或硬件),
Kubernetes中运行在每个Node上的kube-proxy进程其实就是一个智能的软件负载均衡器,它负责把对Service的请求转发到后端的某个Pod实例上,并在内部实现服务的负载均衡与会话保持机制。
资源文件定义
┌──[root@vms81.liruilongs.github.io]-[~/ansible/liveness-probe]└─$cat readiness-probe.yamlapiVersion: v1kind: Podmetadata: creationTimestamp: null labels: run: pod-liveness name: pod-livenessspec: containers: image: nginx imagePullPolicy: IfNotPresent name: pod-liveness resources: {} dnsPolicy: ClusterFirst restartPolicy: Alwaysstatus: {}创建3个有Ngixn的pod,通过POD创建一个SVC做测试用
┌──[root@vms81.liruilongs.github.io]-[~/ansible/liveness-probe]└─$sed 's/pod-liveness/pod-liveness-1/' readiness-probe.yaml | kubectl apply -f -pod/pod-liveness-1 created┌──[root@vms81.liruilongs.github.io]-[~/ansible/liveness-probe]└─$sed 's/pod-liveness/pod-liveness-2/' readiness-probe.yaml | kubectl apply -f -pod/pod-liveness-2 created┌──[root@vms81.liruilongs.github.io]-[~/ansible/liveness-probe]└─$kubectl get pods -o wideNAME READY STATUS RESTARTS AGE IP NODE NOMINATED NODE READINESS GATESpod-liveness 1/1 Running 0 3m1s 10.244.70.50 vms83.liruilongs.github.io <none> <none>pod-liveness-1 1/1 Running 0 2m 10.244.70.51 vms83.liruilongs.github.io <none> <none>pod-liveness-2 1/1 Running 0 111s 10.244.70.52 vms83.liruilongs.github.io <none> <none>修改主页文字
┌──[root@vms81.liruilongs.github.io]-[~/ansible/liveness-probe]└─$serve=pod-liveness┌──[root@vms81.liruilongs.github.io]-[~/ansible/liveness-probe]└─$kubectl exec -it $serve -- sh -c "echo $serve > /usr/share/nginx/html/index.html"┌──[root@vms81.liruilongs.github.io]-[~/ansible/liveness-probe]└─$kubectl exec -it $serve -- sh -c "cat /usr/share/nginx/html/index.html"pod-liveness┌──[root@vms81.liruilongs.github.io]-[~/ansible/liveness-probe]└─$serve=pod-liveness-1┌──[root@vms81.liruilongs.github.io]-[~/ansible/liveness-probe]└─$kubectl exec -it $serve -- sh -c "echo $serve > /usr/share/nginx/html/index.html"┌──[root@vms81.liruilongs.github.io]-[~/ansible/liveness-probe]└─$serve=pod-liveness-2┌──[root@vms81.liruilongs.github.io]-[~/ansible/liveness-probe]└─$kubectl exec -it $serve -- sh -c "echo $serve > /usr/share/nginx/html/index.html"┌──[root@vms81.liruilongs.github.io]-[~/ansible/liveness-probe]└─$修改标签
┌──[root@vms81.liruilongs.github.io]-[~/ansible/liveness-probe]└─$kubectl get pods --show-labelsNAME READY STATUS RESTARTS AGE LABELSpod-liveness 1/1 Running 0 15m run=pod-livenesspod-liveness-1 1/1 Running 0 14m run=pod-liveness-1pod-liveness-2 1/1 Running 0 14m run=pod-liveness-2┌──[root@vms81.liruilongs.github.io]-[~/ansible/liveness-probe]└─$kubectl edit pods pod-liveness-1pod/pod-liveness-1 edited┌──[root@vms81.liruilongs.github.io]-[~/ansible/liveness-probe]└─$kubectl edit pods pod-liveness-2pod/pod-liveness-2 edited┌──[root@vms81.liruilongs.github.io]-[~/ansible/liveness-probe]└─$kubectl get pods --show-labelsNAME READY STATUS RESTARTS AGE LABELSpod-liveness 1/1 Running 0 17m run=pod-livenesspod-liveness-1 1/1 Running 0 16m run=pod-livenesspod-liveness-2 1/1 Running 0 16m run=pod-liveness┌──[root@vms81.liruilongs.github.io]-[~/ansible/liveness-probe]└─$使用POD创建SVC
┌──[root@vms81.liruilongs.github.io]-[~/ansible/liveness-probe]└─$kubectl expose --name=svc pod pod-liveness --port=80service/svc exposed┌──[root@vms81.liruilongs.github.io]-[~/ansible/liveness-probe]└─$kubectl get epNAME ENDPOINTS AGEsvc 10.244.70.50:80,10.244.70.51:80,10.244.70.52:80 16s┌──[root@vms81.liruilongs.github.io]-[~/ansible/liveness-probe]└─$kubectl get svcNAME TYPE CLUSTER-IPEXTERNAL-IP PORT(S) AGEsvc ClusterIP 10.104.246.121 <none> 80/TCP 36s┌──[root@vms81.liruilongs.github.io]-[~/ansible/liveness-probe]└─$kubectl get pods -o wideNAME READY STATUS RESTARTS AGE IP NODE NOMINATED NODE READINESS GATESpod-liveness 1/1 Running 0 24m 10.244.70.50 vms83.liruilongs.github.io <none> <none>pod-liveness-1 1/1 Running 0 23m 10.244.70.51 vms83.liruilongs.github.io <none> <none>pod-liveness-2 1/1 Running 0 23m 10.244.70.52 vms83.liruilongs.github.io <none> <none>测试SVC正常,三个POD会正常 负载
┌──[root@vms81.liruilongs.github.io]-[~/ansible]└─$while true; do curl 10.104.246.121 ; sleep 1> donepod-livenesspod-liveness-2pod-livenesspod-liveness-1pod-liveness-2^C基于 ClusterlP 提供的两种负载分发策略
目前 Kubernetes 提供了两种负载分发策略:RoundRobin和SessionAffinity
| 负载分发策略 | 描述 |
|---|---|
| RoundRobin | 轮询模式,即轮询将请求转发到后端的各个Pod上。 |
| SessionAffinity | 基于客户端IP地址进行会话保持的模式, |
在默认情况下, Kubernetes采用RoundRobin模式对客户端请求进行,负载分发,但我们也可以通过设置service.spec.sessionAffinity=ClientIP来启用SessionAffinity策略。
查看svc包含的Pod
┌──[root@vms81.liruilongs.github.io]-[~/ansible/k8s-svc-create]└─$kubectl get svc -owide | grep -v NAME | awk '{print $NF}' | xargs kubectl get pods -lNAME READY STATUS RESTARTS AGEpod-svc 1/1 Running 0 18mpod-svc-1 1/1 Running 0 17mpod-svc-2 1/1 Running 0 16m┌──[root@vms81.liruilongs.github.io]-[~/ansible/k8s-svc-create]└─$端口的请求转发及多端口设置
一个容器应用也可能提供多个端口的服务,那么在Service的定义中也可以相应地设置为将多个端口转发到多个应用服务。
Kubernetes Service支持多个Endpoint(端口),在存在多个Endpoint的情况下,要求每个Endpoint定义一个名字来区分。下面是Tomcat多端口的Service定义样例:
- port: 8080 targetPort: 80 name: web1- port: 8008 targetPort: 90 name: web2多端口为什么需要给每个端口命名呢?这就涉及Kubernetes的服务发现机制了(通过DNS是方式实现的服务发布)
命令行的方式
┌──[root@vms81.liruilongs.github.io]-[~/ansible/k8s-svc-create]└─$kubectl expose --name=svc pod pod-svc --port=808 --target-port=80 --selector=run=pod-svcservice/svc exposed┌──[root@vms81.liruilongs.github.io]-[~/ansible/k8s-svc-create]└─$kubectl get svc -owideNAME TYPE CLUSTER-IPEXTERNAL-IP PORT(S) AGE SELECTORsvc ClusterIP 10.102.223.233 <none> 808/TCP 4s run=pod-svc┌──[root@vms81.liruilongs.github.io]-[~/ansible/k8s-svc-create]└─$kube-proxy的路由规则不同,ServiceIP的访问也不同
- iptable: Service(CLUSTER-IP )地址 ping 不通
- ipvs: Service(CLUSTER-IP )地址可以ping通
服务的发现
所谓服务发现,就是我们在pod内部,或者说容器内部,怎么获取到要访问的服务的IP和端口。类似于微服务中的注册中心概念
| Kubernetes 的服务发现机制 | 区别 |
|---|---|
最早时Kubernetes采用了Linux环境变量的方式解决这个问题,即每个Service生成一些对应的Linux环境变量(ENV),并在每个Pod的容器在启动时,自动注入这些环境变量 |
命名空间隔离 |
后来Kubernetes通过Add-On增值包的方式引入了DNS系统,把服务名作为DNS域名,这样一来,程序就可以直接使用服务名来建立通信连接了。目前Kubernetes上的大部分应用都已经采用了DNS这些新兴的服务发现机制 |
命名空间可见 |
环境准备,我们还是用之前的那个pod做的服务来处理
┌──[root@vms81.liruilongs.github.io]-[~]└─$kubectl get pods -owideNAME READY STATUS RESTARTS AGE IP NODE NOMINATED NODE READINESS GATESpod-svc 1/1 Running 0 69m 10.244.70.35 vms83.liruilongs.github.io <none> <none>pod-svc-1 1/1 Running 0 68m 10.244.70.39 vms83.liruilongs.github.io <none> <none>pod-svc-2 1/1 Running 0 68m 10.244.171.153 vms82.liruilongs.github.io <none> <none>┌──[root@vms81.liruilongs.github.io]-[~]└─$s=pod-svc┌──[root@vms81.liruilongs.github.io]-[~]└─$kubectl exec -it $s -- sh -c "echo $s > /usr/share/nginx/html/index.html"┌──[root@vms81.liruilongs.github.io]-[~]└─$s=pod-svc-1┌──[root@vms81.liruilongs.github.io]-[~]└─$kubectl exec -it $s -- sh -c "echo $s > /usr/share/nginx/html/index.html"┌──[root@vms81.liruilongs.github.io]-[~]└─$s=pod-svc-2┌──[root@vms81.liruilongs.github.io]-[~]└─$kubectl exec -it $s -- sh -c "echo $s > /usr/share/nginx/html/index.html"┌──[root@vms81.liruilongs.github.io]-[~]└─$kubectl get svc -owideNAME TYPE CLUSTER-IPEXTERNAL-IP PORT(S) AGE SELECTORsvc ClusterIP 10.102.223.233 <none> 808/TCP 46m run=pod-svc┌──[root@vms81.liruilongs.github.io]-[~]└─$while true ;do curl 10.102.223.233:808;sleep 2 ; donepod-svc-2pod-svc-1pod-svcpod-svcpod-svcpod-svc-2^C┌──[root@vms81.liruilongs.github.io]-[~]└─$测试镜像准备
┌──[root@vms81.liruilongs.github.io]-[~/ansible]└─$ansible node -m shell -a "docker pull yauritux/busybox-curl"通过Linux环境变量方式发现:命名空间隔离
在每个创建的pod里会存在已经存在的SVC的变量信息,这些变量信息基于命名空间隔离,
其他命名空间没有
┌──[root@vms81.liruilongs.github.io]-[~/ansible/k8s-svc-create]└─$kubectl run testpod -it --rm --image=yauritux/busybox-curl --image-pull-policy=IfNotPresent -n defaultIf you don't see a command prompt, try pressing enter./home # env | grep ^SVC/home # 只存在当前命名空间,只能获取相同namespace里的变量
换句话的意思,在相同的命名空间里,我们可以在容器里通过变量的方式获取已经存在的Service来提供能力
┌──[root@vms81.liruilongs.github.io]-[~]└─$kubectl run testpod -it --rm --image=yauritux/busybox-curl --image-pull-policy=IfNotPresentIf you don't see a command prompt, try pressing enter./home # env | grep ^SVCSVC_PORT_808_TCP_ADDR=10.102.223.233SVC_PORT_808_TCP_PORT=808SVC_PORT_808_TCP_PROTO=tcpSVC_SERVICE_HOST=10.102.223.233SVC_PORT_808_TCP=tcp://10.102.223.233:808SVC_SERVICE_PORT=808SVC_PORT=tcp://10.102.223.233:808/home #/home # while true ;do curl $SVC_SERVICE_HOST:$SVC_PORT_808_TCP_PORT ;sleep 2 ; donepod-svc-2pod-svc-2pod-svcpod-svc^C/home #通过DNS的方式发现:命名空间可见
Kubernetes发明了一种很巧妙又影响深远的设计:
Service不是共用一个负载均衡器的IP地址,而是每个Service分配了一个全局唯一的虚拟IP地址,这个虚拟IP被称为Cluster IP,这样一来,每个服务就变成了具备唯一IP地址的“通信节点”,服务调用就变成了最基础的TCP网络通信问题。
Service一旦被创建, Kubernetes就会自动为它分配一个可用的Cluster IP,而且在Service的整个生命周期内,它的Cluster IP不会发生改变。于是,服务发现这个棘手的问题在Kubernetes的架构里也得以轻松解决:只要用Service的Name与Service的Cluster IP地址做一个DNS域名映射即可完美解决问题。
┌──[root@vms81.liruilongs.github.io]-[~/ansible]└─$kubectl get svc -n kube-system -owideNAME TYPE CLUSTER-IPEXTERNAL-IP PORT(S) AGE SELECTORkube-dns ClusterIP 10.96.0.10<none> 53/UDP,53/TCP,9153/TCP 6d20h k8s-app=kube-dnsmetrics-server ClusterIP 10.111.104.173 <none> 443/TCP 6d18h k8s-app=metrics-server┌──[root@vms81.liruilongs.github.io]-[~/ansible]└─$kubectl get pods -n kube-system -l k8s-app=kube-dnsNAME READY STATUS RESTARTS AGEcoredns-7f6cbbb7b8-ncd2s 1/1 Running 2 (23h ago) 3d22hcoredns-7f6cbbb7b8-pjnct 1/1 Running 2 (23h ago) 3d22h有个这个DNS服务之后,创建的每个SVC就会自动的注册一个DNS
┌──[root@vms81.liruilongs.github.io]-[~]└─$kubectl run testpod -it --rm --image=yauritux/busybox-curl --image-pull-policy=IfNotPresentIf you don't see a command prompt, try pressing enter./home # cat /etc/resolv.confnameserver 10.96.0.10search liruilong-svc-create.svc.cluster.local svc.cluster.local cluster.local localdomain 168.26.131options ndots:5/home #在kube-system里有dns,可以自动发现所有命名空间里的服务的clusterIP,所以,在同一个命名空间里,一个服务访问另外一个服务的时候,可以直接通过服务名来访问,只要创建了一个服务(不管在哪个ns里创建的),都会自动向kube-system里的DNS注册如果是不同的命名空间,可以通过服务名.命名空间名 来访问`服务名.命名空间
┌──[root@vms81.liruilongs.github.io]-[~/ansible]└─$kubectl config view | grep namesp namespace: liruilong-svc-create┌──[root@vms81.liruilongs.github.io]-[~/ansible]└─$我们这其他的命名空间里创建的一pod来访问当前空间的提供的服务能力
┌──[root@vms81.liruilongs.github.io]-[~/ansible/k8s-svc-create]└─$kubectl run testpod -it --rm --image=yauritux/busybox-curl --image-pull-policy=IfNotPresent -n defaultIf you don't see a command prompt, try pressing enter.'/home # curl svc.liruilong-svc-create:808pod-svc-2/home #通过ClusterIP 实现
这是一种相对来说,简单的方法,即直接通过 ClusterIP 来访问服务能力,同时支持跨命名空间
不同命名空间的测试pod
┌──[root@vms81.liruilongs.github.io]-[~/ansible/k8s-svc-create]└─$kubectl run testpod -it --rm --image=yauritux/busybox-curl --image-pull-policy=IfNotPresent -n defaultIf you don't see a command prompt, try pressing enter./home # while true ;do curl 10.102.223.233:808;sleep 2 ; donepod-svcpod-svc-1pod-svcpod-svc-2pod-svc^C/home #实战WordPress博客搭建
| WordPress博客搭建 |
|---|
 |
环境准备,没有的需要安装
┌──[root@vms81.liruilongs.github.io]-[~/ansible]└─$ansible node -m shell -a "docker images | grep mysql"192.168.26.82 | CHANGED | rc=0 >>mysql latest ecac195d15af 2 months ago 516MBmysql <none> 9da615fced53 2 months ago 514MBhub.c.163.com/library/mysql latest 9e64176cd8a2 4 years ago 407MB192.168.26.83 | CHANGED | rc=0 >>mysql latest ecac195d15af 2 months ago 516MBmysql <none> 9da615fced53 2 months ago 514MBhub.c.163.com/library/mysql latest 9e64176cd8a2 4 years ago 407MB┌──[root@vms81.liruilongs.github.io]-[~/ansible]└─$ansible node -m shell -a "docker images | grep wordpress"192.168.26.82 | CHANGED | rc=0 >>hub.c.163.com/library/wordpress latest dccaeccfba36 4 years ago 406MB192.168.26.83 | CHANGED | rc=0 >>hub.c.163.com/library/wordpress latest dccaeccfba36 4 years ago 406MB┌──[root@vms81.liruilongs.github.io]-[~/ansible]└─$创建一个mysql数据库pod
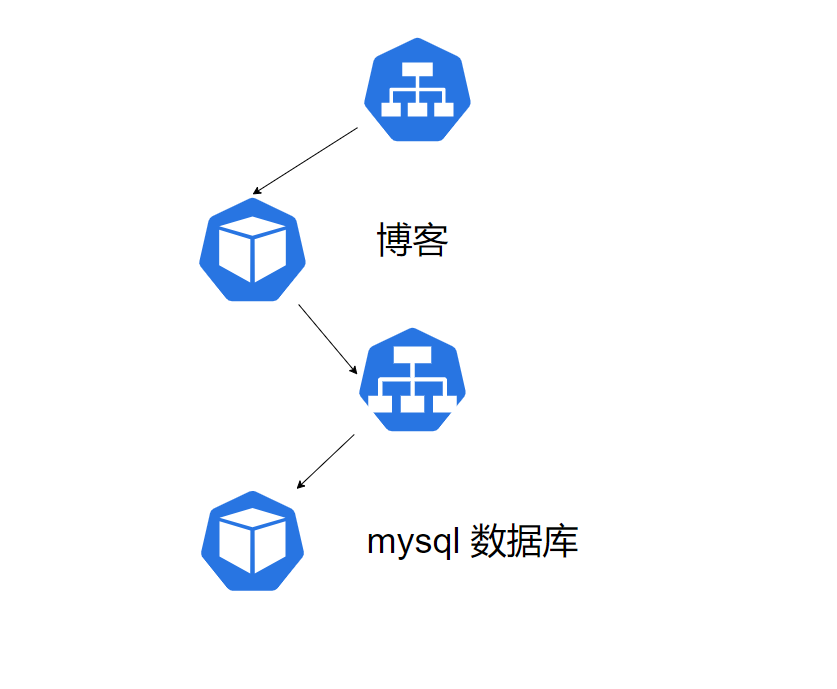
┌──[root@vms81.liruilongs.github.io]-[~/ansible/k8s-svc-create]└─$cat db-pod-mysql.yamlapiVersion: v1kind: Podmetadata: creationTimestamp: null labels: run: dbpod name: dbpodspec: containers: - image: hub.c.163.com/library/mysql imagePullPolicy: IfNotPresent name: dbpod resources: {} env: - name: MYSQL_ROOT_PASSWORD value: liruilong - name: MYSQL_USER value: root - name: MYSQL_DATABASE value: blog dnsPolicy: ClusterFirst restartPolicy: Alwaysstatus: {}┌──[root@vms81.liruilongs.github.io]-[~/ansible/k8s-svc-create]└─$kubectl apply -f db-pod-mysql.yamlpod/dbpod created┌──[root@vms81.liruilongs.github.io]-[~/ansible/k8s-svc-create]└─$kubectl get podsNAME READY STATUS RESTARTS AGEdbpod 1/1 Running 0 5s创建一个连接mysql-pod的Service,也可以理解为发布mysql服务,默认使用ClusterIP的方式
┌──[root@vms81.liruilongs.github.io]-[~/ansible/k8s-svc-create]└─$kubectl get pods --show-labelsNAME READY STATUS RESTARTS AGE LABELSdbpod 1/1 Running 0 80s run=dbpod┌──[root@vms81.liruilongs.github.io]-[~/ansible/k8s-svc-create]└─$kubectl expose --name=dbsvc pod dbpod --port=3306service/dbsvc exposed┌──[root@vms81.liruilongs.github.io]-[~/ansible/k8s-svc-create]└─$kubectl get svc dbsvc -o yamlapiVersion: v1kind: Servicemetadata: creationTimestamp: "2021-12-21T15:31:19Z" labels: run: dbpod name: dbsvc namespace: liruilong-svc-create resourceVersion: "310763" uid: 05ccb22d-19c4-443a-ba86-f17d63159144spec: clusterIP: 10.102.137.59 clusterIPs: - 10.102.137.59 internalTrafficPolicy: Cluster ipFamilies: - IPv4 ipFamilyPolicy: SingleStack ports: - port: 3306 protocol: TCP targetPort: 3306 selector: run: dbpod sessionAffinity: None type: ClusterIPstatus: loadBalancer: {}创建一个WordPress博客的pod
┌──[root@vms81.liruilongs.github.io]-[~/ansible/k8s-svc-create]└─$kubectl get svcNAME TYPE CLUSTER-IP EXTERNAL-IP PORT(S) AGEdbsvc ClusterIP 10.102.137.59 <none> 3306/TCP3m12s┌──[root@vms81.liruilongs.github.io]-[~/ansible/k8s-svc-create]└─$cat blog-pod.yamlapiVersion: v1kind: Podmetadata: creationTimestamp: null labels: run: blog name: blogspec: containers: - image: hub.c.163.com/library/wordpress imagePullPolicy: IfNotPresent name: blog resources: {} env: - name: WORDPRESS_DB_USER value: root - name: WORDPRESS_DB_PASSWORD value: liruilong - name: WORDPRESS_DB_NAME value: blog - name: WORDPRESS_DB_HOST #value: $(MYSQL_SERVICE_HOST) value: 10.102.137.59 dnsPolicy: ClusterFirst restartPolicy: Alwaysstatus: {}创建一个发布博客服务的SVC
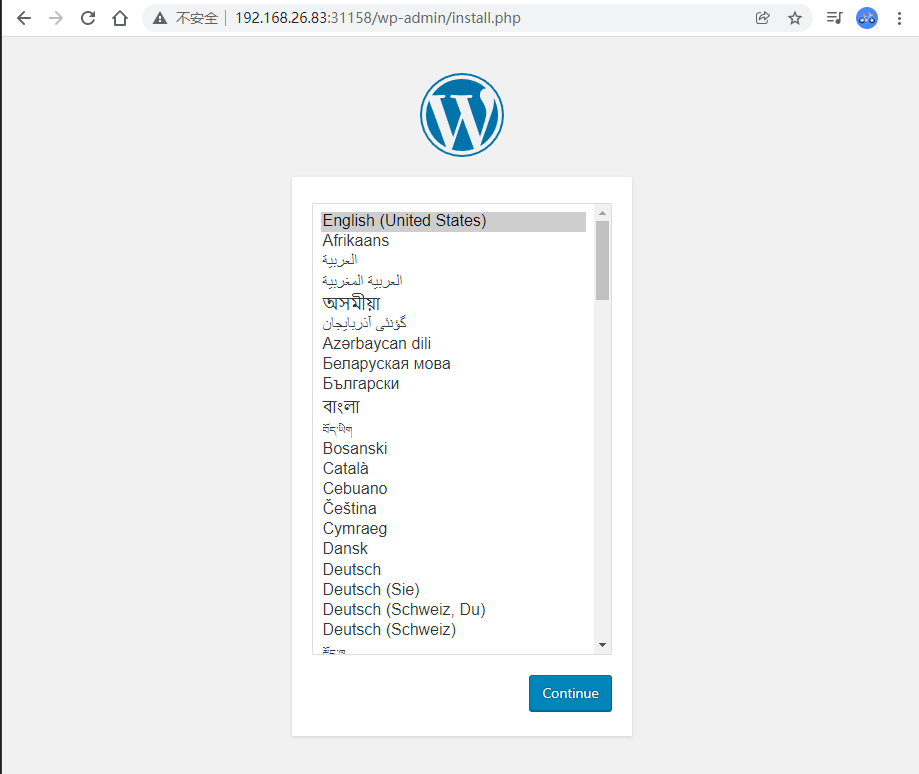
┌──[root@vms81.liruilongs.github.io]-[~/ansible/k8s-svc-create]└─$kubectl expose --name=blogsvc pod blog --port=80 --type=NodePort┌──[root@vms81.liruilongs.github.io]-[~/ansible/k8s-svc-create]└─$kubectl get svc blogsvc -o yamlapiVersion: v1kind: Servicemetadata: creationTimestamp: "2021-12-20T17:11:03Z" labels: run: blog name: blogsvc namespace: liruilong-svc-create resourceVersion: "294057" uid: 4d350715-0210-441d-9c55-af0f31b7a090spec: clusterIP: 10.110.28.191 clusterIPs: - 10.110.28.191 externalTrafficPolicy: Cluster internalTrafficPolicy: Cluster ipFamilies: - IPv4 ipFamilyPolicy: SingleStack ports: - nodePort: 31158 port: 80 protocol: TCP targetPort: 80 selector: run: blog sessionAffinity: None type: NodePortstatus: loadBalancer: {}查看服务状态测试
┌──[root@vms81.liruilongs.github.io]-[~/ansible/k8s-svc-create]└─$kubectl get svc -o wideNAME TYPE CLUSTER-IP EXTERNAL-IP PORT(S) AGE SELECTORblogsvc NodePort 10.110.28.191 <none> 80:31158/TCP 22h run=blogdbsvc ClusterIP 10.102.137.59 <none> 3306/TCP15m run=dbpod┌──[root@vms81.liruilongs.github.io]-[~/ansible/k8s-svc-create]└─$kubectl get pods -o wideNAME READY STATUS RESTARTS AGE IP NODE NOMINATED NODE READINESS GATESblog 1/1 Running 0 14m 10.244.171.159 vms82.liruilongs.github.io <none> <none>dbpod 1/1 Running 0 21m 10.244.171.163 vms82.liruilongs.github.io <none> <none>┌──[root@vms81.liruilongs.github.io]-[~/ansible/k8s-svc-create]└─$| 访问 |
|---|
 |
这里的话,在同一个命名空间里。所以可以使用变量来读取数据库所发布服务的ServiceIP
┌──[root@vms81.liruilongs.github.io]-[~/ansible/k8s-svc-create]└─$kubectl exec -it blog -- bashroot@blog:/var/www/html# env | grep DBSVCDBSVC_PORT_3306_TCP_ADDR=10.102.137.59DBSVC_SERVICE_PORT=3306DBSVC_PORT_3306_TCP_PORT=3306DBSVC_PORT_3306_TCP=tcp://10.102.137.59:3306DBSVC_SERVICE_HOST=10.102.137.59DBSVC_PORT=tcp://10.102.137.59:3306DBSVC_PORT_3306_TCP_PROTO=tcproot@blog:/var/www/html#即博客的pod中也可以这样配置
env: - name: WORDPRESS_DB_USER value: root - name: WORDPRESS_DB_PASSWORD value: liruilong - name: WORDPRESS_DB_NAME value: blog - name: WORDPRESS_DB_HOST value: $(DBSVC_SERVICE_HOST) #value: 10.102.137.59或者这样
env: - name: WORDPRESS_DB_USER value: root - name: WORDPRESS_DB_PASSWORD value: liruilong - name: WORDPRESS_DB_NAME value: blog - name: WORDPRESS_DB_HOST value: dbsvc.liruilong-svc-create ##value: 10.102.137.59服务的发布
所谓发布指的是,如何让集群之外的主机能访问服务
| Kubernetes里的“三种IP" | 描述 |
|---|---|
| Node IP | Node 节点的IP地址,Node IP是Kubernetes集群中每个节点的物理网卡的IP地址,这是一个真实存在的物理网络,所有属于这个网络的服务器之间都能通过这个网络直接通信,不管它们中是否有部分节点不属于这个Kubernetes集群。这也表明了Kubernetes集群之外的节点访问Kubernetes集群之内的某个节点或者TCP/IP服务时,必须要通过Node IP进行通信。 |
| Pod IP | Pod 的 IP 地址:Pod IP是每个Pod的IP地址,它是Docker Engine根据dockero网桥的IP地址段进行分配的,通常是一个虚拟的二层网络,前面我们说过, Kubernetes要求位于不同Node上的Pod能够彼此直接通信,所以Kubernetes里一个Pod里的容器访问另外一个Pod里的容器,就是通过Pod IP所在的虚拟二层网络进行通信的,而真实的TCP/IP流量则是通过Node IP所在的物理网卡流出的。 |
| Cluster IP | Service 的IP地址,Cluster IP仅仅作用于Kubernetes Service这个对象,并由Kubernetes管理和分配IP地址(来源于Cluster IP地址池)。Cluster IP无法被Ping,因为没有一个“实体网络对象”来响应。Cluster IP只能结合Service Port组成一个具体的通信端口,单独的Cluster IP不具备TCP/IP通信的基础,并且它们属于Kubernetes集群这样一个封闭的空间,集群之外的节点如果要访问这个通信端口,则需要做一些额外的工作。在Kubernetes集群之内, Node IP网、Pod IP网与Cluster IP网之间的通信,采用的是Kubermetes自己设计的一种编程方式的特殊的路由规则,与我们所熟知的IP路由有很大的不同。 |
外部系统访问 Service,采用
NodePort是解决上述问题的最直接、最有效、最常用的做法。具体做法在Service的定义里做如下扩展即可:
...spec: type: NodePort posts: - port: 8080 nodePort: 31002 selector: tier: frontend ...即这里我们可以通过nodePort:31002 来访问Service,NodePort的实现方式是在Kubernetes集群里的每个Node上为需要外部访问的Service开启个对应的TCP监听端口,外部系统只要用任意一个Node的IP地址+具体的NodePort端口即可访问此服务,在任意Node上运行netstat命令,我们就可以看到有NodePort端口被监听:
下面我们具体看下实际案例
NodePort方式
┌──[root@vms81.liruilongs.github.io]-[~/ansible/k8s-svc-create]└─$kubectl expose --name=blogsvc pod blog --port=80 --type=NodePortapiVersion: v1kind: Servicemetadata: creationTimestamp: "2021-12-20T17:11:03Z" labels: run: blog name: blogsvc namespace: liruilong-svc-create resourceVersion: "294057" uid: 4d350715-0210-441d-9c55-af0f31b7a090spec: clusterIP: 10.110.28.191 clusterIPs: - 10.110.28.191 externalTrafficPolicy: Cluster internalTrafficPolicy: Cluster ipFamilies: - IPv4 ipFamilyPolicy: SingleStack ports: - nodePort: 31158 port: 80 protocol: TCP targetPort: 80 selector: run: blog sessionAffinity: None type: NodePortstatus: loadBalancer: {}即我们前面的几个都是通过NodePort来服务映射,对所以工作节点映射,所以节点都可以访问,即外部通过节点IP+31158的形式访问,确定当服务太多时,端口不好维护
┌──[root@vms81.liruilongs.github.io]-[~/ansible/k8s-svc-create]└─$kubectl get svcNAME TYPE CLUSTER-IP EXTERNAL-IP PORT(S) AGEblogsvc NodePort 10.110.28.191 <none> 80:31158/TCP 23hdbsvc ClusterIP 10.102.137.59 <none> 3306/TCP49m┌──[root@vms81.liruilongs.github.io]-[~/ansible/k8s-svc-create]└─$hostPort方式
hostPort 容器映射,只能在pod所在节点映射到宿主机,这种一般不建议使用,当然静态节点觉得可以
┌──[root@vms81.liruilongs.github.io]-[~/ansible/k8s-svc-create]└─$cat pod-svc.yamlapiVersion: v1kind: Podmetadata: creationTimestamp: null labels: run: pod-svc name: pod-svcspec: containers: - image: nginx imagePullPolicy: IfNotPresent name: pod-svc ports: - containerPort: 80 hostPort: 800 resources: {} dnsPolicy: ClusterFirst restartPolicy: Alwaysstatus: {}┌──[root@vms81.liruilongs.github.io]-[~/ansible/k8s-svc-create]└─$kubectl get pods -o wideNAME READY STATUS RESTARTS AGE IP NODE NOMINATED NODE READINESS GATESpod-svc 1/1 Running 0 69s 10.244.171.172 vms82.liruilongs.github.io <none> <none>修改Service类型为ClusterIP ,从1.20开始可以直接修改,之前的版本需要删除nodepost
LoadBalancer方式
Service 负载均衡问题
NodePort还没有完全解决外部访问Service的所有问题,比如负载均衡问题,假如我们的集群中有10个Node,则此时最好有一个负载均衡器,外部的请求只需访问此负载均衡器的IP地址,由负载均衡器负责转发流量到后面某个Node的NodePort上。如图
| NodePort的负载均衡 |
|---|
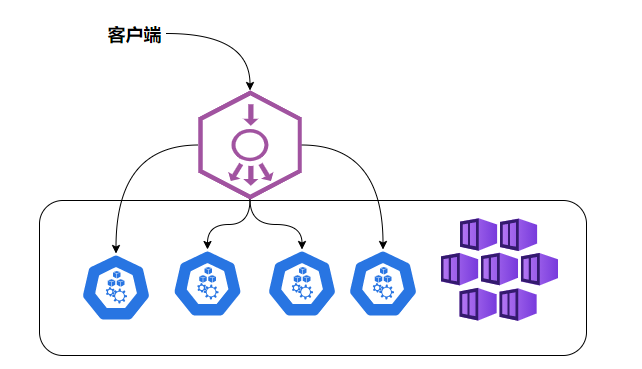 |
Load balancer组件独立于Kubernetes集群之外,通常是一个硬件的负载均衡器,或者是以软件方式实现的,例如HAProxy或者Nginx。对于每个Service,我们通常需要配置一个对应的Load balancer实例来转发流量到后端的Node上 |
Kubernetes提供了自动化的解决方案,如果我们的集群运行在谷歌的GCE公有云上,那么只要我们把Service的type-NodePort改为type-LoadBalancer,此时Kubernetes会自动创建一个对应的Load balancer实例并返回它的IP地址供外部客户端使用。当让我们也可以用一些插件来实现,如metallb等 |
LoadBalancer 需要建立服务之外的负载池。然后给Service分配一个IP。
我们直接创建一个LoadBalancer的Service的时候,会一直处于pending状态,是因为我们没有对应的云负载均衡器
┌──[root@vms81.liruilongs.github.io]-[~/ansible/k8s-svc-create]└─$kubectl expose --name=blogsvc pod blog --port=80 --type=LoadBalancerservice/blogsvc exposed┌──[root@vms81.liruilongs.github.io]-[~/ansible/k8s-svc-create]└─$kubectl get svc -o wide | grep blogsvcblogsvc LoadBalancer 10.106.28.175 <pending> 80:32745/TCP 26s run=blog┌──[root@vms81.liruilongs.github.io]-[~/ansible/k8s-svc-create]└─$Metallb可以通过k8s原生的方式提供LB类型的Service支持
| 使用: metallb https://metallb.universe.tf/ |
|---|
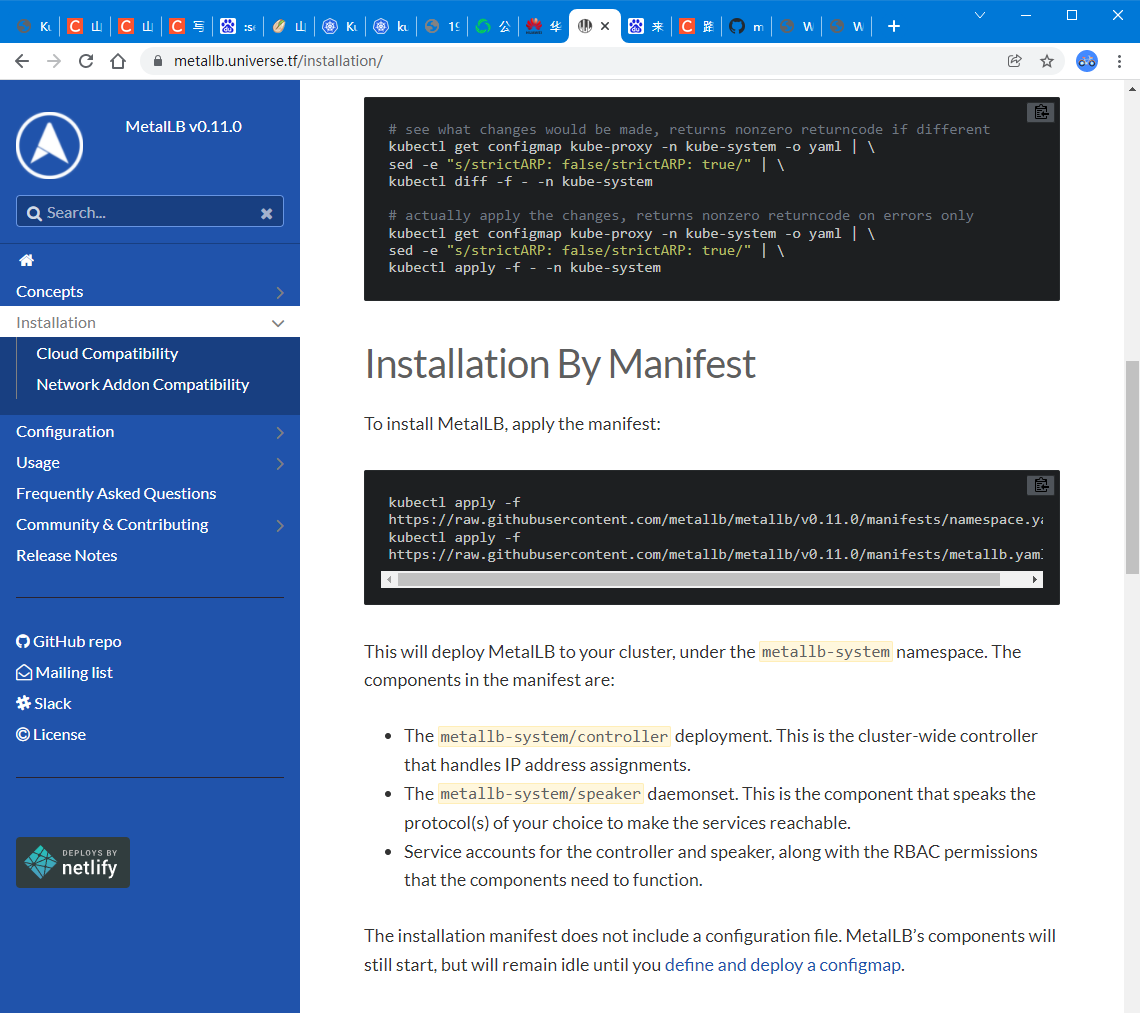 |
| 资源文件https://github.com/metallb/metallb/blob/main/manifests/metallb.yaml |
创建命名空间
┌──[root@vms81.liruilongs.github.io]-[~/ansible/k8s-svc-create]└─$kubectl create ns metallb-systemnamespace/metallb-system created┌──[root@vms81.liruilongs.github.io]-[~/ansible/k8s-svc-create]└─$kubectl config set-context $(kubectl config current-context) --namespace=metallb-systemContext "kubernetes-admin@kubernetes" modified.┌──[root@vms81.liruilongs.github.io]-[~/ansible/k8s-svc-create]└─$:set paste 解决粘贴混乱的问题
创建metallb
┌──[root@vms81.liruilongs.github.io]-[~/ansible/k8s-svc-create/metalld]└─$kubectl apply -f metallb.yaml┌──[root@vms81.liruilongs.github.io]-[~/ansible/k8s-svc-create/metalld]└─$kubectl get pods -o wideNAME READY STATUS RESTARTS AGE IP NODE NOMINATED NODE READINESS GATEScontroller-66d9554cc-8rxq8 1/1 Running 0 3m36s 10.244.171.170 vms82.liruilongs.github.io <none> <none>speaker-bbl94 1/1 Running 0 3m36s 192.168.26.83 vms83.liruilongs.github.io <none> <none>speaker-ckbzj 1/1 Running 0 3m36s 192.168.26.81 vms81.liruilongs.github.io <none> <none>speaker-djmpr 1/1 Running 0 3m36s 192.168.26.82 vms82.liruilongs.github.io <none> <none>┌──[root@vms81.liruilongs.github.io]-[~/ansible/k8s-svc-create/metalld]└─$创建地址池
┌──[root@vms81.liruilongs.github.io]-[~/ansible/k8s-svc-create/metalld]└─$vim pool.yaml┌──[root@vms81.liruilongs.github.io]-[~/ansible/k8s-svc-create/metalld]└─$kubectl apply -f pool.yamlconfigmap/config created┌──[root@vms81.liruilongs.github.io]-[~/ansible/k8s-svc-create/metalld]└─$cat pool.yamlapiVersion: v1kind: ConfigMapmetadata: namespace: metallb-system name: configdata: config: | address-pools: - name: default protocol: layer2 addresses: - 192.168.26.240-192.168.26.250┌──[root@vms81.liruilongs.github.io]-[~/ansible/k8s-svc-create/metalld]└─$使用type=LoadBalancer的配置通过metallb分配192.168.26.240这个地址给blogsvc
┌──[root@vms81.liruilongs.github.io]-[~/ansible/k8s-svc-create/metalld]└─$kubectl get svcNo resources found in metallb-system namespace.┌──[root@vms81.liruilongs.github.io]-[~/ansible/k8s-svc-create/metalld]└─$kubectl config set-context $(kubectl config current-context) --namespace=liruilong-svc-createContext "kubernetes-admin@kubernetes" modified.┌──[root@vms81.liruilongs.github.io]-[~/ansible/k8s-svc-create/metalld]└─$kubectl get svcNAME TYPE CLUSTER-IP EXTERNAL-IP PORT(S) AGEdbsvc ClusterIP 10.102.137.59 <none> 3306/TCP 101m┌──[root@vms81.liruilongs.github.io]-[~/ansible/k8s-svc-create/metalld]└─$kubectl expose --name=blogsvc pod blog --port=80 --type=LoadBalancerservice/blogsvc exposed┌──[root@vms81.liruilongs.github.io]-[~/ansible/k8s-svc-create/metalld]└─$kubectl get svc -o wideNAME TYPE CLUSTER-IPEXTERNAL-IP PORT(S) AGE SELECTORblogsvc LoadBalancer 10.108.117.197 192.168.26.240 80:30230/TCP 9s run=blogdbsvc ClusterIP 10.102.137.59 <none> 3306/TCP101m run=dbpod直接访问192.168.26.240就可以了 |
|---|
 |
在创建一个也可以访问
┌──[root@vms81.liruilongs.github.io]-[~/ansible/k8s-svc-create/metalld]└─$kubectl expose --name=blogsvc-1 pod blog --port=80 --type=LoadBalancerservice/blogsvc-1 exposed┌──[root@vms81.liruilongs.github.io]-[~/ansible/k8s-svc-create/metalld]└─$kubectl get svc -o wideNAME TYPE CLUSTER-IPEXTERNAL-IP PORT(S) AGE SELECTORblogsvc LoadBalancer 10.108.117.197 192.168.26.240 80:30230/TCP 11m run=blogblogsvc-1 LoadBalancer 10.110.58.143 192.168.26.241 80:31827/TCP 3s run=blogdbsvcClusterIP 10.102.137.59 <none> 3306/TCP113m run=dbpod┌──[root@vms81.liruilongs.github.io]-[~/ansible/k8s-svc-create/metalld]└─$| 也可以访问 |
|---|
 |
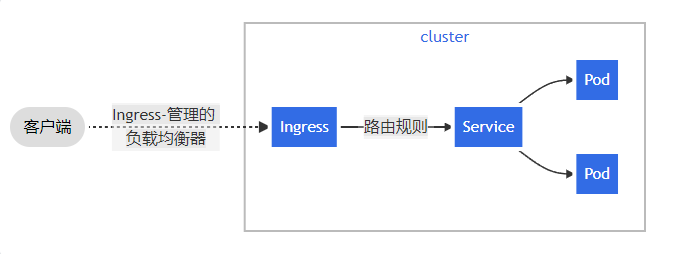
ingress方式(推荐)
| Ingress |
|---|
| Ingress 是对集群中服务的外部访问进行管理的 API 对象,典型的访问方式是 HTTP。 |
| Ingress 可以提供负载均衡、SSL 终结和基于名称的虚拟托管。 |
| Ingress 公开了从集群外部到集群内服务的 HTTP 和 HTTPS 路由。 流量路由由 Ingress 资源上定义的规则控制。 |
| 个人理解,就是实现了一个Ngixn功能,可以更具路由规则分配流量等 |
 |
| 命名空间里配置ingress规则,嵌入到控制器nginx-反向代理的方式(ingress-nginx-controller) |
可以将 Ingress 配置为服务提供外部可访问的 URL、负载均衡流量、终止 SSL/TLS,以及提供基于名称的虚拟主机等能力。 Ingress 控制器 通常负责通过负载均衡器来实现 Ingress,尽管它也可以配置边缘路由器或其他前端来帮助处理流量。 |
Ingress 不会公开任意端口或协议。 将 HTTP 和 HTTPS 以外的服务公开到 Internet 时,通常使用 Service.Type=NodePort 或 Service.Type=LoadBalancer 类型的服务 |
ingress-nginx-controller 部署
需要的镜像
┌──[root@vms81.liruilongs.github.io]-[~/ansible/k8s-svc-create]└─$grep image nginx-controller.yaml image: docker.io/liangjw/ingress-nginx-controller:v1.0.1 imagePullPolicy: IfNotPresent image: docker.io/liangjw/kube-webhook-certgen:v1.1.1 imagePullPolicy: IfNotPresent image: docker.io/liangjw/kube-webhook-certgen:v1.1.1 imagePullPolicy: IfNotPresent┌──[root@vms81.liruilongs.github.io]-[~/ansible/k8s-svc-create]└─$准备工作,镜像上传,导入
┌──[root@vms81.liruilongs.github.io]-[~/ansible]└─$ansible node -m copy -a "dest=/root/ src=./../ingress-nginx-controller-img.tar"192.168.26.82 | CHANGED => { "ansible_facts": { "discovered_interpreter_python": "/usr/bin/python" }, "changed": true, "checksum": "a3c2f87fd640c0bfecebeab24369c7ca8d6f0fa0", "dest": "/root/ingress-nginx-controller-img.tar", "gid": 0, "group": "root", "md5sum": "d5bf7924cb3c61104f7a07189a2e6ebd", "mode": "0644", "owner": "root", "size": 334879744, "src": "/root/.ansible/tmp/ansible-tmp-1640207772.53-9140-99388332454846/source", "state": "file", "uid": 0}192.168.26.83 | CHANGED => { "ansible_facts": { "discovered_interpreter_python": "/usr/bin/python" }, "changed": true, "checksum": "a3c2f87fd640c0bfecebeab24369c7ca8d6f0fa0", "dest": "/root/ingress-nginx-controller-img.tar", "gid": 0, "group": "root", "md5sum": "d5bf7924cb3c61104f7a07189a2e6ebd", "mode": "0644", "owner": "root", "size": 334879744, "src": "/root/.ansible/tmp/ansible-tmp-1640207772.55-9142-78097462005167/source", "state": "file", "uid": 0}┌──[root@vms81.liruilongs.github.io]-[~/ansible]└─$ansible node -m shell -a "docker load -i /root/ingress-nginx-controller-img.tar"创建ingress控制器ingress-nginx-controller
┌──[root@vms81.liruilongs.github.io]-[~/ansible/k8s-svc-create]└─$kubectl apply -f nginx-controller.yaml┌──[root@vms81.liruilongs.github.io]-[~/ansible/k8s-svc-create]└─$kubectl get pods -n ingress-nginx -o wideNAME READY STATUS RESTARTS AGE IP NODE NOMINATED NODE READINESS GATESingress-nginx-admission-create--1-hvvxd 0/1 Completed 0 89s 10.244.171.171 vms82.liruilongs.github.io <none> <none>ingress-nginx-admission-patch--1-g4ffs 0/1 Completed 0 89s 10.244.70.7 vms83.liruilongs.github.io <none> <none>ingress-nginx-controller-744d4fc6b7-7fcfj 1/1 Running 0 90s 192.168.26.83 vms83.liruilongs.github.io <none> <none>┌──[root@vms81.liruilongs.github.io]-[~/ansible/k8s-svc-create]└─$配置DNS 创建域名到服务的映射
┌──[root@vms81.liruilongs.github.io]-[~/ansible]└─$ansible 192.168.26.83 -m shell -a "echo -e '192.168.26.83 liruilongs.nginx1\n192.168.26.83 liruilongs.nginx2\n192.168.26.83 liruilongs.nginx3' >> /etc/hosts"192.168.26.83 | CHANGED | rc=0 >>┌──[root@vms81.liruilongs.github.io]-[~/ansible]└─$ansible 192.168.26.83 -m shell -a "cat /etc/hosts"192.168.26.83 | CHANGED | rc=0 >>127.0.0.1 localhost localhost.localdomain localhost4 localhost4.localdomain4::1 localhost localhost.localdomain localhost6 localhost6.localdomain6192.168.26.81 vms81.liruilongs.github.io vms81192.168.26.82 vms82.liruilongs.github.io vms82192.168.26.83 vms83.liruilongs.github.io vms83192.168.26.83 liruilongs.nginx1192.168.26.83 liruilongs.nginx2192.168.26.83 liruilongs.nginx3┌──[root@vms81.liruilongs.github.io]-[~/ansible]└─$服务模拟,创建三个pod做服务
┌──[root@vms81.liruilongs.github.io]-[~/ansible/k8s-svc-create]└─$cat pod.yamlapiVersion: v1kind: Podmetadata: creationTimestamp: null labels: run: pod-svc name: pod-svcspec: containers: - image: nginx imagePullPolicy: IfNotPresent name: pod-svc resources: {} dnsPolicy: ClusterFirst restartPolicy: Alwaysstatus: {}┌──[root@vms81.liruilongs.github.io]-[~/ansible/k8s-svc-create]└─$kubectl apply -f pod.yamlpod/pod-svc created┌──[root@vms81.liruilongs.github.io]-[~/ansible/k8s-svc-create]└─$sed 's/pod-svc/pod-svc-1/' pod.yaml > pod-1.yaml┌──[root@vms81.liruilongs.github.io]-[~/ansible/k8s-svc-create]└─$sed 's/pod-svc/pod-svc-2/' pod.yaml > pod-2.yaml┌──[root@vms81.liruilongs.github.io]-[~/ansible/k8s-svc-create]└─$kubectl apply -f pod-1.yamlpod/pod-svc-1 created┌──[root@vms81.liruilongs.github.io]-[~/ansible/k8s-svc-create]└─$kubectl apply -f pod-2.yamlpod/pod-svc-2 created┌──[root@vms81.liruilongs.github.io]-[~/ansible/k8s-svc-create]└─$kubectl get pods -o wideNAME READY STATUS RESTARTS AGE IP NODE NOMINATED NODE READINESS GATESpod-svc 1/1 Running 0 2m42s 10.244.171.174 vms82.liruilongs.github.io <none> <none>pod-svc-1 1/1 Running 0 80s 10.244.171.175 vms82.liruilongs.github.io <none> <none>pod-svc-2 1/1 Running 0 70s 10.244.171.176 vms82.liruilongs.github.io <none> <none>┌──[root@vms81.liruilongs.github.io]-[~/ansible/k8s-svc-create]└─$修改Nginx的主页,根据pod创建三个服务SVC
┌──[root@vms81.liruilongs.github.io]-[~/ansible/k8s-svc-create]└─$kubectl get pods --show-labelsNAME READY STATUS RESTARTS AGE LABELSpod-svc 1/1 Running 0 3m7s run=pod-svcpod-svc-1 1/1 Running 0 105s run=pod-svc-1pod-svc-2 1/1 Running 0 95s run=pod-svc-2┌──[root@vms81.liruilongs.github.io]-[~/ansible/k8s-svc-create]└─$serve=pod-svc┌──[root@vms81.liruilongs.github.io]-[~/ansible/k8s-svc-create]└─$kubectl exec -it $serve -- sh -c "echo $serve > /usr/share/nginx/html/index.html"┌──[root@vms81.liruilongs.github.io]-[~/ansible/k8s-svc-create]└─$kubectl expose --name=$serve-svc pod $serve --port=80service/pod-svc-svc exposed┌──[root@vms81.liruilongs.github.io]-[~/ansible/k8s-svc-create]└─$serve=pod-svc-1┌──[root@vms81.liruilongs.github.io]-[~/ansible/k8s-svc-create]└─$kubectl exec -it $serve -- sh -c "echo $serve > /usr/share/nginx/html/index.html"┌──[root@vms81.liruilongs.github.io]-[~/ansible/k8s-svc-create]└─$kubectl expose --name=$serve-svc pod $serve --port=80service/pod-svc-1-svc exposed┌──[root@vms81.liruilongs.github.io]-[~/ansible/k8s-svc-create]└─$serve=pod-svc-2┌──[root@vms81.liruilongs.github.io]-[~/ansible/k8s-svc-create]└─$kubectl exec -it $serve -- sh -c "echo $serve > /usr/share/nginx/html/index.html"┌──[root@vms81.liruilongs.github.io]-[~/ansible/k8s-svc-create]└─$kubectl expose --name=$serve-svc pod $serve --port=80service/pod-svc-2-svc exposed创建了三个SVC做负载模拟
┌──[root@vms81.liruilongs.github.io]-[~/ansible/k8s-svc-create]└─$kubectl get svc -o wideNAME TYPE CLUSTER-IP EXTERNAL-IP PORT(S) AGE SELECTORpod-svc-1-svc ClusterIP 10.99.80.121 <none> 80/TCP 94s run=pod-svc-1pod-svc-2-svc ClusterIP 10.110.40.30 <none> 80/TCP 107s run=pod-svc-2pod-svc-svc ClusterIP 10.96.152.5 <none> 80/TCP 85s run=pod-svc┌──[root@vms81.liruilongs.github.io]-[~/ansible/k8s-svc-create]└─$┌──[root@vms81.liruilongs.github.io]-[~/ansible/k8s-svc-create]└─$kubectl get ingNo resources found in liruilong-svc-create namespace.┌──[root@vms81.liruilongs.github.io]-[~/ansible/k8s-svc-create]└─$vim ingress.yaml创建 Ingress,当然这里只是简单测试,可以更具具体业务情况配置复杂的路由策略
ingress.yaml
apiVersion: networking.k8s.io/v1kind: Ingressmetadata: name: my-ingress annotations: kubernetes.io/ingress.class: "nginx" #必须要加spec: rules: - host: liruilongs.nginx1 http: paths: - path: / pathType: Prefix backend: service: name: pod-svc-svc port:number: 80 - host: liruilongs.nginx2 http: paths: - path: / pathType: Prefix backend: service: name: pod-svc-1-svc port:number: 80 - host: liruilongs.nginx3 http: paths: - path: / pathType: Prefix backend: service: name: pod-svc-2-svc port:number: 80┌──[root@vms81.liruilongs.github.io]-[~/ansible/k8s-svc-create]└─$kubectl apply -f ingress.yamlingress.networking.k8s.io/my-ingress created┌──[root@vms81.liruilongs.github.io]-[~/ansible/k8s-svc-create]└─$kubectl get ingNAME CLASS HOSTS ADDRESS PORTS AGEmy-ingress <none> liruilongs.nginx1,liruilongs.nginx2,liruilongs.nginx3 80 17s负载测试
┌──[root@vms81.liruilongs.github.io]-[~/ansible]└─$ansible 192.168.26.83 -m shell -a "curl liruilongs.nginx1"192.168.26.83 | CHANGED | rc=0 >>pod-svc ┌──[root@vms81.liruilongs.github.io]-[~/ansible]└─$ansible 192.168.26.83 -m shell -a "curl liruilongs.nginx2"192.168.26.83 | CHANGED | rc=0 >>pod-svc-1 DNS解析的地址为控制器的地址,这里控制器使用的是docker内部网络的方式,即直接把端口映射宿主机了
┌──[root@vms81.liruilongs.github.io]-[~/ansible/k8s-svc-create]└─$grep -i hostN nginx-controller.yaml hostNetwork: true
