(原+整理+分享)【Java】系列-[8]SpringBoot定时任务
本文是好久之前参考网上大佬教程,边学习边参考边做笔记,整理的内容,分享下大家学习~
如果这位大佬看见,请评论留下您的名字和联系方式,我这里修改为【转载】

目录
引言
1、pom包配置
2、启动类启用定时
3、创建定时任务实现类
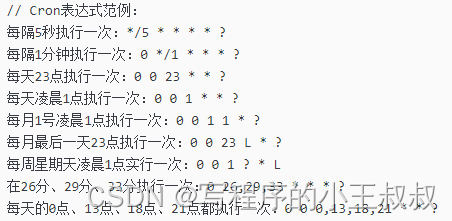
参数说明
引言
在我们的项目开发过程中,经常需要定时任务来帮助我们来做一些内容,springboot默认已经帮我们实行了,只需要添加相应的注解就可以实现
1、pom包配置
pom包里面只需要引入springboot starter包即可.
org.springframework.boot spring-boot-starter org.springframework.boot spring-boot-starter-test test org.springframework.boot spring-boot-devtools true 2、启动类启用定时
在启动类上面加上@EnableScheduling即可开启定时
@SpringBootApplication@EnableSchedulingpublic class Application { public static void main(String[] args) { SpringApplication.run(Application.class, args); }}3、创建定时任务实现类
定时任务1:@Componentpublic class SchedulerTask { private int count=0; @Scheduled(cron="*/6 * * * * ?") private void process(){ System.out.println("this is scheduler task runing "+(count++)); }}定时任务2:@Componentpublic class Scheduler2Task { private static final SimpleDateFormat dateFormat = new SimpleDateFormat("HH:mm:ss"); @Scheduled(fixedRate = 6000) public void reportCurrentTime() { System.out.println("现在时间:" + dateFormat.format(new Date())); }}结果如下:this is scheduler task runing 0现在时间:09:44:17this is scheduler task runing 1现在时间:09:44:23this is scheduler task runing 2现在时间:09:44:29this is scheduler task runing 3现在时间:09:44:35参数说明
@Scheduled 参数可以接受两种定时的设置,
一种是我们常用的cron="*/6 * * * * ?",
一种是 fixedRate = 6000,两种都表示每隔六秒打印一下内容。
fixedRate 说明@Scheduled(fixedRate = 6000) :上一次开始执行时间点之后6秒再执行@Scheduled(fixedDelay = 6000) :上一次执行完毕时间点之后6秒再执行@Scheduled(initialDelay=1000, fixedRate=6000) :第一次延迟1秒后执行,之后按fixedRate的规则每6秒执行一次文章中,有问题,可以在评论区评论
转载声明:本文为博主原创文章,未经博主允许不得转载
如果我的文章有帮助到您,欢迎打赏一下鼓励博主