如何在云服务器使用docker快速部署jupyter web服务器(Nginx+docker+jupyter+tensorflow)
如何在云服务器部署jupyter web服务器
| jack lee 邮箱:291148484@163.com 如有错误可以法邮件给我纠正,希望本文对你有所帮助。 |
导读:如果你用过百度人工只能的在线提交代码项目,是不是觉得AI Stdio很酷。或者阿里云天池,这些在线编程与NoteBook项目,它们往往后台集成了jupyter lab/notebook与相关的其它库,再进行自己的云技术相关配置。再这篇文章中,我将带你们在网络服务器上搭建一个基于
tensorflow镜像的jupyter环境。阅读完本文后,你将掌握该类环境搭建的最基础的步骤。对于有兴趣者,你也可以尝试再搭建完成后对jupyter的web UI进行修改,建立一个自己风格的AI STDIO网络开发环境。
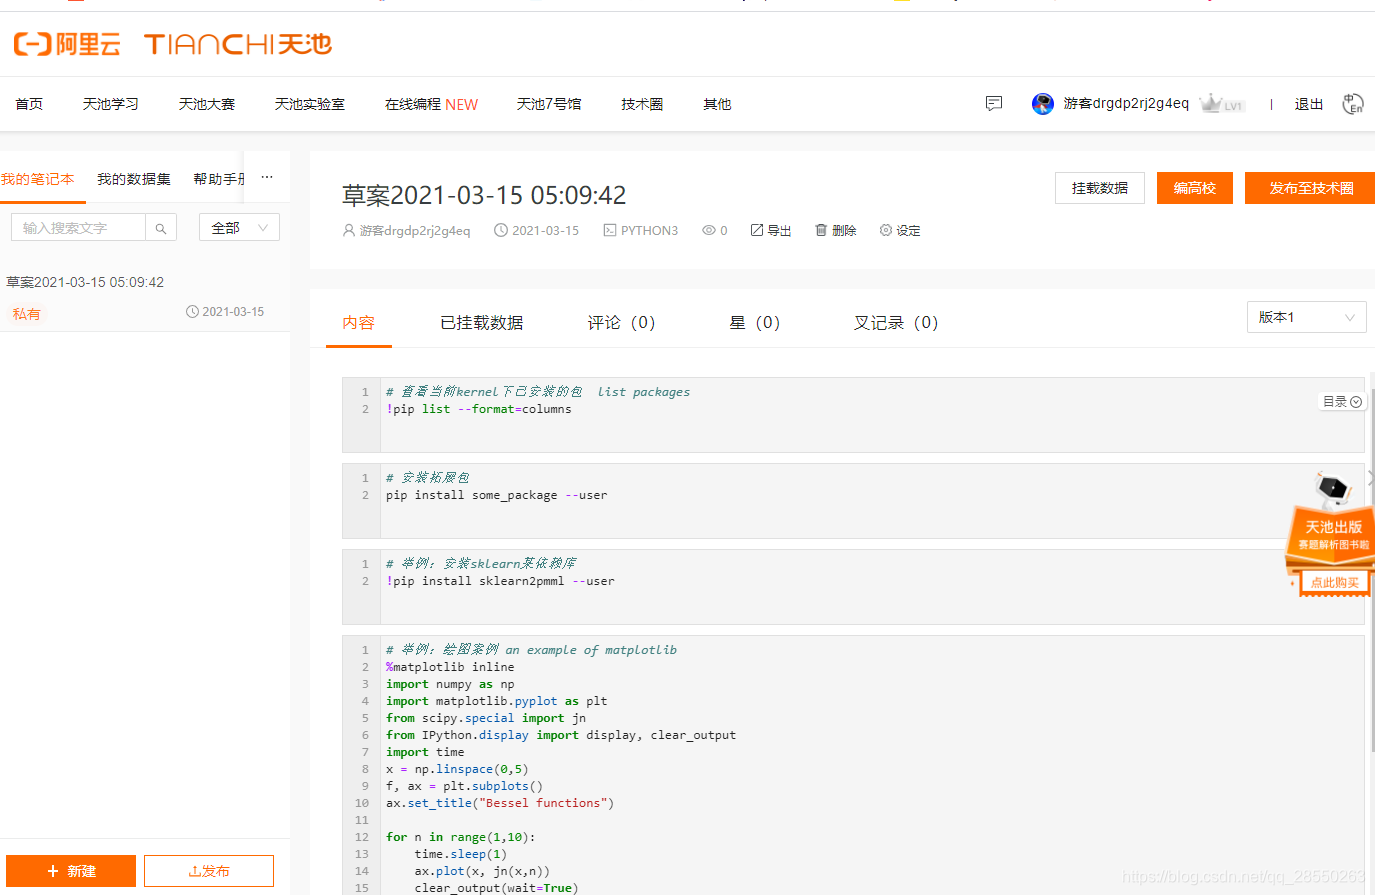
图:阿里天池 Notebook
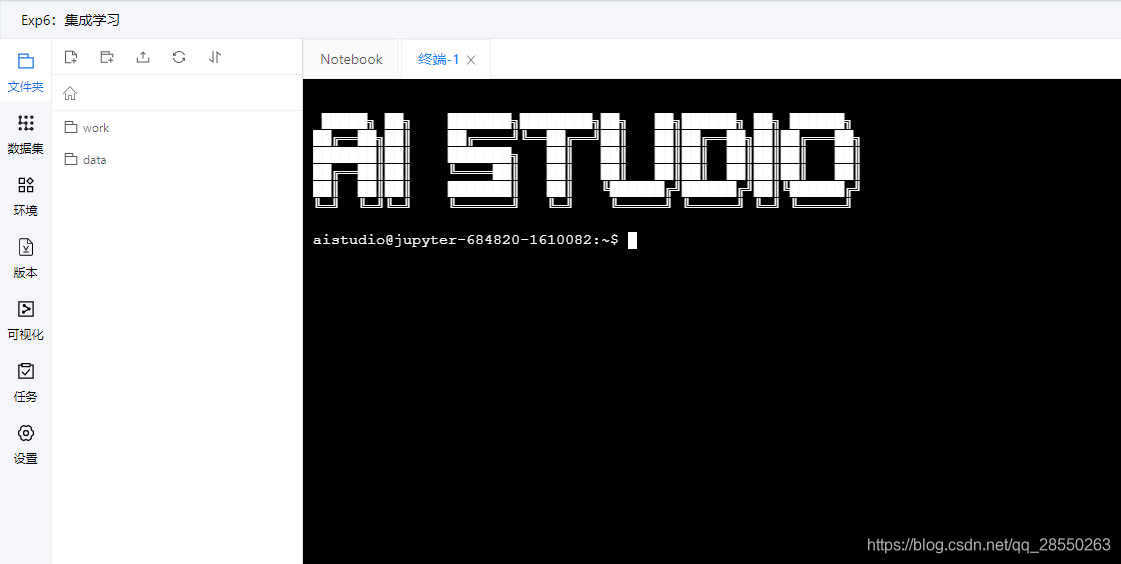
图:百度 AI STDIO 。可以进入Notebook也可以进入终端,还有很多其它功能。
好的,现在我们自己试试开始吧!
如果你不能长期使用XShell,那么推荐使用一款免费好用的SSH工具链接你的Linux服务器:PuTTY
该工具安装简单、使用方便。可以自己在网上取查找相关教程,这里不做介绍了。 -
- 注:文本内容以下以ubuntu系统为例,如果使用centos等其它Linux系统,再以下内容中基本就是包管理工具名不一样,替换即可
先要部署docker:
如果你的Linux服务器没有配置国内源的话,可能接下来的下载速度会很慢,建议配置一个国内源。这里以阿里云为例。
配置前,需要安装vim工具:
如有必要,也先更新apt源:
apt updateapt upgrade -y安装vim:
apt - get install vim然后使用vim编辑apt的源配置文件:
vim /etc/apt/sources.list先使用"#"号注释掉或者删掉原先的地址,而后添加以下内容(阿里云镜像):
deb http://mirrors.aliyun.com/ubuntu/ bionic main restricted universe multiversedeb http://mirrors.aliyun.com/ubuntu/ bionic-security main restricted universe multiversedeb http://mirrors.aliyun.com/ubuntu/ bionic-updates main restricted universe multiversedeb http://mirrors.aliyun.com/ubuntu/ bionic-proposed main restricted universe multiversedeb http://mirrors.aliyun.com/ubuntu/ bionic-backports main restricted universe multiversedeb-src http://mirrors.aliyun.com/ubuntu/ bionic main restricted universe multiversedeb-src http://mirrors.aliyun.com/ubuntu/ bionic-security main restricted universe multiversedeb-src http://mirrors.aliyun.com/ubuntu/ bionic-updates main restricted universe multiversedeb-src http://mirrors.aliyun.com/ubuntu/ bionic-proposed main restricted universe multiversedeb-src http://mirrors.aliyun.com/ubuntu/ bionic-backports main restricted universe multiverse保存,退出。
再次更新和升级:
apt-get updateapt-get install upgrade安装docker
apt-get install docker既然向快速部署,我连jupyter都懒得自己安装。直接拉一个部署了jupyter的docker镜像:
docker pull tensorflow/tensorflow:latest这个镜像的下载过程需要一点时间。
然后将镜像运行为docker容器,同时映射端口一步到位:
docker run -it -p 80:8000 tensorflow/tensorflow:latest-jupyter我的思路是用Nginx做反向代理,进一步隐藏真实端口,这样更加安全。所以先映射到8000端口,而不是直接使用jupyter使用的8888(当然jupyter默认使用的端口也可以修改,这里不做介绍)。
第一次进入时,会直接在外部看到jupyter输出的信息并且已经启动了jupyter,直接Ctrl-C几次退出jupyter就好了,这不是我们需要的方式。
现在查看刚刚我们所有的docker容器:
docker ps -a可以看到打印出了当前创建的docker容器
CONTAINER ID IMAGE COMMAND CREATED STATUS PORTSNAMESc229f9b659fb tensorflow/tensorflow:latest-jupyter "bash -c 'source /et…" 2 minutes ago Up 1 minutes 8888/tcp, 0.0.0.0:80->8000/tcp fervent_mclean启动它(需要根据你自己创建的容器的ID):
docker start c229f9b659fb进入容器
docker exec -it c229f9b659fb /bin/bash进入容器后相当于进入了一个新的系统,对宿主机系统而言,容器里面相当于与外隔绝的虚拟隔离环境。只不过这个容器是直接拉了一个由tensorflow配好一些东西了,其它的也就相当于一个新的系统。并且在容器内,你直接拥有root权限,所有命令不需要sudo。进入之后,你也可以为容器内的系统配置为国内源。
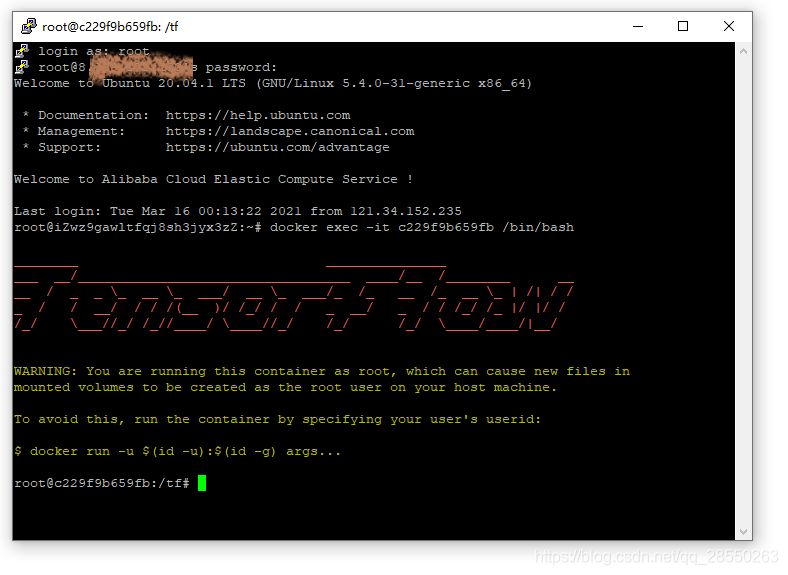
图:由宿主机进入tensorflow官方docker run的系统容器后画面
这里,你能就按到tensorflow的LOGO。因为它们配置这个容器的时候顺便就配了一下商标。当然自己配置也不难,你完全可以自己尝试配置一个镜像然后添加自己的头像上床到docker hub供大家pull哈。
以下为进入后在docker容器内的操作。为了之后可以编辑配置文件,我们在容器内也是需要安装vim工具的,同样的方法:
apt updateapt install vim安装lsof工具,因为之后我们需要查看网络端口情况:
apt install lsof安装Nginx部署Web服务器,之后以其作为反向代理:
apt install nginx接下来,通过vim工具打开nginx配置文件:
vim /etc/nginx/nginx.conf将该文件编辑为以下内容:
user www-data;worker_processes auto;pid /run/nginx.pid;include /etc/nginx/modules-enabled/*.conf;events { worker_connections 768; # multi_accept on;}http { ## # Basic Settings ## sendfile on; tcp_nopush on; tcp_nodelay on; keepalive_timeout 65; types_hash_max_size 2048; # server_tokens off; # server_names_hash_bucket_size 64; # server_name_in_redirect off; include /etc/nginx/mime.types; default_type application/octet-stream; ## # SSL Settings ## ssl_protocols TLSv1 TLSv1.1 TLSv1.2; # Dropping SSLv3, ref: POODLE ssl_prefer_server_ciphers on; ## # Logging Settings ## access_log /var/log/nginx/access.log; error_log /var/log/nginx/error.log; ## # Gzip Settings ## gzip on; # gzip_vary on; # gzip_proxied any; # gzip_comp_level 6; # gzip_buffers 16 8k; # gzip_http_version 1.1; # gzip_types text/plain text/css application/json application/javascript text/xml application/xml application/xml+rss text/javascript; ## # Virtual Host Configs ## include /etc/nginx/conf.d/*.conf; include /etc/nginx/sites-enabled/*; server { listen 8000; server_name 这里替换为你的域名或者服务器的IP地址; location / { proxy_set_header Host $host:$server_port; proxy_set_header X-Real-IP $remote_addr; proxy_set_header X-Forwarded-For $proxy_add_x_forwarded_for; proxy_pass http://127.0.0.1:8888; } }}编辑完成后保存,退出vim。
配置完成之后,还有一个Nginxm默认配置需要稍做修改:
cd /etc/nginxls可以看到由以下文件和文件夹:
conf.d koi-win nginx.confsites-enabledfastcgi.conf mime.types proxy_params snippetsfastcgi_params modules-available scgi_params uwsgi_paramskoi-utf modules-enabled sites-available win-utf有个sites-available文件夹,可以用tab补齐的方法快熟输入:
cd sites-available/里面只有一个`default文件:
lsdefault使用vim打开它:
vim default你看到的大概是这样的:
### You should look at the following URL's in order to grasp a solid understanding# of Nginx configuration files in order to fully unleash the power of Nginx.# https://www.nginx.com/resources/wiki/start/# https://www.nginx.com/resources/wiki/start/topics/tutorials/config_pitfalls/# https://wiki.debian.org/Nginx/DirectoryStructure## In most cases, administrators will remove this file from sites-enabled/ and# leave it as reference inside of sites-available where it will continue to be# updated by the nginx packaging team.## This file will automatically load configuration files provided by other# applications, such as Drupal or WordPress. These applications will be made# available underneath a path with that package name, such as /drupal8.## Please see /usr/share/doc/nginx-doc/examples/ for more detailed examples.### Default server configuration#server { listen 80 default_server; listen [::]:80 default_server; # SSL configuration # # listen 443 ssl default_server; # listen [::]:443 ssl default_server; # # Note: You should disable gzip for SSL traffic. # See: https://bugs.debian.org/773332 # # Read up on ssl_ciphers to ensure a secure configuration. # See: https://bugs.debian.org/765782 # # Self signed certs generated by the ssl-cert package # Don't use them in a production server! # # include snippets/snakeoil.conf; root /var/www/html; # Add index.php to the list if you are using PHP index index.html index.htm index.nginx-debian.html; server_name _; location / { # First attempt to serve request as file, then # as directory, then fall back to displaying a 404. try_files $uri $uri/ = 404; }...(文件后面已省略)
将server下的第二行,即
listen [::]:80 default_server;添加"#"符以注释掉:
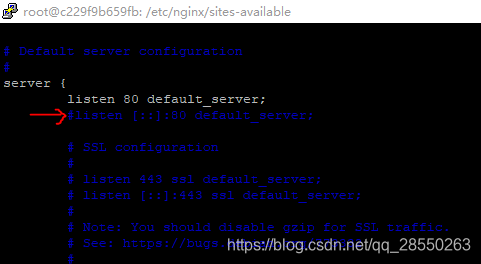
保存,再退出。这样Nginx的配置就完成了。
为了作为服务器部署使用,jupyter是一定要配置密码的。接下来,我们先在docker容器中进入python编程环境。这个python就是部署jupyter的python,我们可以在里面计算哈希密码值:
python进入之后在交互式环境中输入以下两行python代码:
>>>from notebook.auth import passwd>>>passwd()这时系统将提示你输入密码,需要输入两次(第二次是密码的确认):
Enter password: ········Verify password: ········输入完成后,你将获取一个如下格式的字符串,这个就是加密后的密码(以我获取的为例):
'sha1:c018cb5b13a0:7b945869a95654d657655c9bb909d7a90112e843'复制或者记录这个字符串,接下来我们需要用这个字符串来配置jupyter。
这里,先在交互式编程环境中使用python退出函数退回该环境:
exit()现在我们回到了docker容器级"系统"下,先使用如下指令生成一个jupyter配置文件:
jupyter notebook --generate-config可以见到返回一行文字,它包含了生成的配置文件绝对路径:
Writing default config to: /root/.jupyter/jupyter_notebook_config.py我们现在使用vim打开它:
vim /root/.jupyter/jupyter_notebook_config.py以下是打开的配置文件,为了方便大家了解和学习jupyter配置,这里我们展示了整个配置文件的内容:
# Configuration file for jupyter-notebook.#------------------------------------------------------------------------------# Application(SingletonConfigurable) configuration#------------------------------------------------------------------------------## This is an application.## The date format used by logging formatters for %(asctime)s#c.Application.log_datefmt = '%Y-%m-%d %H:%M:%S'## The Logging format template#c.Application.log_format = '[%(name)s]%(highlevel)s %(message)s'## Set the log level by value or name.#c.Application.log_level = 30#------------------------------------------------------------------------------# JupyterApp(Application) configuration#------------------------------------------------------------------------------## Base class for Jupyter applications## Answer yes to any prompts.#c.JupyterApp.answer_yes = False## Full path of a config file.#c.JupyterApp.config_file = ''## Specify a config file to load.#c.JupyterApp.config_file_name = ''## Generate default config file.#c.JupyterApp.generate_config = False#------------------------------------------------------------------------------# NotebookApp(JupyterApp) configuration#------------------------------------------------------------------------------## Set the Access-Control-Allow-Credentials: true header#c.NotebookApp.allow_credentials = False## Set the Access-Control-Allow-Origin header## Use '*' to allow any origin to access your server.## Takes precedence over allow_origin_pat.#c.NotebookApp.allow_origin = ''## Use a regular expression for the Access-Control-Allow-Origin header## Requests from an origin matching the expression will get replies with:## Access-Control-Allow-Origin: origin## where `origin` is the origin of the request.## Ignored if allow_origin is set.#c.NotebookApp.allow_origin_pat = ''## Allow password to be changed at login for the notebook server.## While loggin in with a token, the notebook server UI will give the opportunity# to the user to enter a new password at the same time that will replace the# token login mechanism.## This can be set to false to prevent changing password from the UI/API.#c.NotebookApp.allow_password_change = True## Allow requests where the Host header doesn't point to a local server## By default, requests get a 403 forbidden response if the 'Host' header shows# that the browser thinks it's on a non-local domain. Setting this option to# True disables this check.## This protects against 'DNS rebinding' attacks, where a remote web server# serves you a page and then changes its DNS to send later requests to a local# IP, bypassing same-origin checks.## Local IP addresses (such as 127.0.0.1 and ::1) are allowed as local, along# with hostnames configured in local_hostnames.#c.NotebookApp.allow_remote_access = False## Whether to allow the user to run the notebook as root.#c.NotebookApp.allow_root = False## Reload the webapp when changes are made to any Python src files.#c.NotebookApp.autoreload = False## DEPRECATED use base_url#c.NotebookApp.base_project_url = '/'## The base URL for the notebook server.## Leading and trailing slashes can be omitted, and will automatically be added.#c.NotebookApp.base_url = '/'## Specify what command to use to invoke a web browser when opening the notebook.# If not specified, the default browser will be determined by the `webbrowser`# standard library module, which allows setting of the BROWSER environment# variable to override it.#c.NotebookApp.browser = ''## The full path to an SSL/TLS certificate file.#c.NotebookApp.certfile = ''## The full path to a certificate authority certificate for SSL/TLS client# authentication.#c.NotebookApp.client_ca = ''## The config manager class to use#c.NotebookApp.config_manager_class = 'notebook.services.config.manager.ConfigManager'## The notebook manager class to use.#c.NotebookApp.contents_manager_class = 'notebook.services.contents.largefilemanager.LargeFileManager'## Extra keyword arguments to pass to `set_secure_cookie`. See tornado's# set_secure_cookie docs for details.#c.NotebookApp.cookie_options = {}## The random bytes used to secure cookies. By default this is a new random# number every time you start the Notebook. Set it to a value in a config file# to enable logins to persist across server sessions.## Note: Cookie secrets should be kept private, do not share config files with# cookie_secret stored in plaintext (you can read the value from a file).#c.NotebookApp.cookie_secret = b''## The file where the cookie secret is stored.#c.NotebookApp.cookie_secret_file = ''## Override URL shown to users.## Replace actual URL, including protocol, address, port and base URL, with the# given value when displaying URL to the users. Do not change the actual# connection URL. If authentication token is enabled, the token is added to the# custom URL automatically.## This option is intended to be used when the URL to display to the user cannot# be determined reliably by the Jupyter notebook server (proxified or# containerized setups for example).#c.NotebookApp.custom_display_url = ''## The default URL to redirect to from `/`#c.NotebookApp.default_url = '/tree'## Disable cross-site-request-forgery protection## Jupyter notebook 4.3.1 introduces protection from cross-site request# forgeries, requiring API requests to either:## - originate from pages served by this server (validated with XSRF cookie and# token), or - authenticate with a token## Some anonymous compute resources still desire the ability to run code,# completely without authentication. These services can disable all# authentication and security checks, with the full knowledge of what that# implies.#c.NotebookApp.disable_check_xsrf = False## Whether to enable MathJax for typesetting math/TeX## MathJax is the javascript library Jupyter uses to render math/LaTeX. It is# very large, so you may want to disable it if you have a slow internet# connection, or for offline use of the notebook.## When disabled, equations etc. will appear as their untransformed TeX source.#c.NotebookApp.enable_mathjax = True## extra paths to look for Javascript notebook extensions#c.NotebookApp.extra_nbextensions_path = []## handlers that should be loaded at higher priority than the default services#c.NotebookApp.extra_services = []## Extra paths to search for serving static files.## This allows adding javascript/css to be available from the notebook server# machine, or overriding individual files in the IPython#c.NotebookApp.extra_static_paths = []## Extra paths to search for serving jinja templates.## Can be used to override templates from notebook.templates.#c.NotebookApp.extra_template_paths = []###c.NotebookApp.file_to_run = ''## Extra keyword arguments to pass to `get_secure_cookie`. See tornado's# get_secure_cookie docs for details.#c.NotebookApp.get_secure_cookie_kwargs = {}## Deprecated: Use minified JS file or not, mainly use during dev to avoid JS# recompilation#c.NotebookApp.ignore_minified_js = False## (bytes/sec) Maximum rate at which stream output can be sent on iopub before# they are limited.#c.NotebookApp.iopub_data_rate_limit = 1000000## (msgs/sec) Maximum rate at which messages can be sent on iopub before they are# limited.#c.NotebookApp.iopub_msg_rate_limit = 1000## The IP address the notebook server will listen on.#c.NotebookApp.ip = 'localhost'## Supply extra arguments that will be passed to Jinja environment.#c.NotebookApp.jinja_environment_options = {}## Extra variables to supply to jinja templates when rendering.#c.NotebookApp.jinja_template_vars = {}## The kernel manager class to use.#c.NotebookApp.kernel_manager_class = 'notebook.services.kernels.kernelmanager.MappingKernelManager'## The kernel spec manager class to use. Should be a subclass of# `jupyter_client.kernelspec.KernelSpecManager`.## The Api of KernelSpecManager is provisional and might change without warning# between this version of Jupyter and the next stable one.#c.NotebookApp.kernel_spec_manager_class = 'jupyter_client.kernelspec.KernelSpecManager'## The full path to a private key file for usage with SSL/TLS.#c.NotebookApp.keyfile = ''## Hostnames to allow as local when allow_remote_access is False.## Local IP addresses (such as 127.0.0.1 and ::1) are automatically accepted as# local as well.#c.NotebookApp.local_hostnames = ['localhost']## The login handler class to use.#c.NotebookApp.login_handler_class = 'notebook.auth.login.LoginHandler'## The logout handler class to use.#c.NotebookApp.logout_handler_class = 'notebook.auth.logout.LogoutHandler'## The MathJax.js configuration file that is to be used.#c.NotebookApp.mathjax_config = 'TeX-AMS-MML_HTMLorMML-full,Safe'## A custom url for MathJax.js. Should be in the form of a case-sensitive url to# MathJax, for example: /static/components/MathJax/MathJax.js#c.NotebookApp.mathjax_url = ''## Sets the maximum allowed size of the client request body, specified in the# Content-Length request header field. If the size in a request exceeds the# configured value, a malformed HTTP message is returned to the client.## Note: max_body_size is applied even in streaming mode.#c.NotebookApp.max_body_size = 536870912## Gets or sets the maximum amount of memory, in bytes, that is allocated for use# by the buffer manager.#c.NotebookApp.max_buffer_size = 536870912## Gets or sets a lower bound on the open file handles process resource limit.# This may need to be increased if you run into an OSError: [Errno 24] Too many# open files. This is not applicable when running on Windows.#c.NotebookApp.min_open_files_limit = 0## Dict of Python modules to load as notebook server extensions.Entry values can# be used to enable and disable the loading ofthe extensions. The extensions# will be loaded in alphabetical order.#c.NotebookApp.nbserver_extensions = {}## The directory to use for notebooks and kernels.#c.NotebookApp.notebook_dir = ''## Whether to open in a browser after starting. The specific browser used is# platform dependent and determined by the python standard library `webbrowser`# module, unless it is overridden using the --browser (NotebookApp.browser)# configuration option.#c.NotebookApp.open_browser = True## Hashed password to use for web authentication.## To generate, type in a python/IPython shell:## from notebook.auth import passwd; passwd()## The string should be of the form type:salt:hashed-password.#c.NotebookApp.password = ''## Forces users to use a password for the Notebook server. This is useful in a# multi user environment, for instance when everybody in the LAN can access each# other's machine through ssh.## In such a case, serving the notebook server on localhost is not secure since# any user can connect to the notebook server via ssh.#c.NotebookApp.password_required = False## The port the notebook server will listen on (env: JUPYTER_PORT).#c.NotebookApp.port = 8888## The number of additional ports to try if the specified port is not available# (env: JUPYTER_PORT_RETRIES).#c.NotebookApp.port_retries = 50## DISABLED: use %pylab or %matplotlib in the notebook to enable matplotlib.#c.NotebookApp.pylab = 'disabled'## If True, display a button in the dashboard to quit (shutdown the notebook# server).#c.NotebookApp.quit_button = True## (sec) Time window used to check the message and data rate limits.#c.NotebookApp.rate_limit_window = 3## Reraise exceptions encountered loading server extensions?#c.NotebookApp.reraise_server_extension_failures = False## DEPRECATED use the nbserver_extensions dict instead#c.NotebookApp.server_extensions = []## The session manager class to use.#c.NotebookApp.session_manager_class = 'notebook.services.sessions.sessionmanager.SessionManager'## Shut down the server after N seconds with no kernels or terminals running and# no activity. This can be used together with culling idle kernels# (MappingKernelManager.cull_idle_timeout) to shutdown the notebook server when# it's not in use. This is not precisely timed: it may shut down up to a minute# later. 0 (the default) disables this automatic shutdown.#c.NotebookApp.shutdown_no_activity_timeout = 0## The UNIX socket the notebook server will listen on.#c.NotebookApp.sock = ''## The permissions mode for UNIX socket creation (default: 0600).#c.NotebookApp.sock_mode = '0600'## Supply SSL options for the tornado HTTPServer. See the tornado docs for# details.#c.NotebookApp.ssl_options = {}## Supply overrides for terminado. Currently only supports "shell_command". On# Unix, if "shell_command" is not provided, a non-login shell is launched by# default when the notebook server is connected to a terminal, a login shell# otherwise.#c.NotebookApp.terminado_settings = {}## Set to False to disable terminals.## This does *not* make the notebook server more secure by itself. Anything the# user can in a terminal, they can also do in a notebook.## Terminals may also be automatically disabled if the terminado package is not# available.#c.NotebookApp.terminals_enabled = True## Token used for authenticating first-time connections to the server.## The token can be read from the file referenced by JUPYTER_TOKEN_FILE or set# directly with the JUPYTER_TOKEN environment variable.## When no password is enabled, the default is to generate a new, random token.## Setting to an empty string disables authentication altogether, which is NOT# RECOMMENDED.#c.NotebookApp.token = ''## Supply overrides for the tornado.web.Application that the Jupyter notebook# uses.#c.NotebookApp.tornado_settings = {}## Whether to trust or not X-Scheme/X-Forwarded-Proto and X-Real-Ip/X-Forwarded-# For headerssent by the upstream reverse proxy. Necessary if the proxy handles# SSL#c.NotebookApp.trust_xheaders = False## Disable launching browser by redirect file## For versions of notebook > 5.7.2, a security feature measure was added that# prevented the authentication token used to launch the browser from being# visible. This feature makes it difficult for other users on a multi-user# system from running code in your Jupyter session as you.## However, some environments (like Windows Subsystem for Linux (WSL) and# Chromebooks), launching a browser using a redirect file can lead the browser# failing to load. This is because of the difference in file structures/paths# between the runtime and the browser.## Disabling this setting to False will disable this behavior, allowing the# browser to launch by using a URL and visible token (as before).#c.NotebookApp.use_redirect_file = True## DEPRECATED, use tornado_settings#c.NotebookApp.webapp_settings = {}## Specify Where to open the notebook on startup. This is the `new` argument# passed to the standard library method `webbrowser.open`. The behaviour is not# guaranteed, but depends on browser support. Valid values are:## - 2 opens a new tab,# - 1 opens a new window,# - 0 opens in an existing window.## See the `webbrowser.open` documentation for details.#c.NotebookApp.webbrowser_open_new = 2## Set the tornado compression options for websocket connections.## This value will be returned from# :meth:`WebSocketHandler.get_compression_options`. None (default) will disable# compression. A dict (even an empty one) will enable compression.## See the tornado docs for WebSocketHandler.get_compression_options for details.#c.NotebookApp.websocket_compression_options = None## The base URL for websockets, if it differs from the HTTP server (hint: it# almost certainly doesn't).## Should be in the form of an HTTP origin: ws[s]://hostname[:port]#c.NotebookApp.websocket_url = ''#------------------------------------------------------------------------------# ConnectionFileMixin(LoggingConfigurable) configuration#------------------------------------------------------------------------------## Mixin for configurable classes that work with connection files## JSON file in which to store connection info [default: kernel-.json]## This file will contain the IP, ports, and authentication key needed to connect# clients to this kernel. By default, this file will be created in the security# dir of the current profile, but can be specified by absolute path.#c.ConnectionFileMixin.connection_file = ''## set the control (ROUTER) port [default: random]#c.ConnectionFileMixin.control_port = 0## set the heartbeat port [default: random]#c.ConnectionFileMixin.hb_port = 0## set the iopub (PUB) port [default: random]#c.ConnectionFileMixin.iopub_port = 0## Set the kernel's IP address [default localhost]. If the IP address is# something other than localhost, then Consoles on other machines will be able# to connect to the Kernel, so be careful!#c.ConnectionFileMixin.ip = ''## set the shell (ROUTER) port [default: random]#c.ConnectionFileMixin.shell_port = 0## set the stdin (ROUTER) port [default: random]#c.ConnectionFileMixin.stdin_port = 0###c.ConnectionFileMixin.transport = 'tcp'#------------------------------------------------------------------------------# KernelManager(ConnectionFileMixin) configuration#------------------------------------------------------------------------------## Manages a single kernel in a subprocess on this host.## This version starts kernels with Popen.## Should we autorestart the kernel if it dies.#c.KernelManager.autorestart = True## DEPRECATED: Use kernel_name instead.## The Popen Command to launch the kernel. Override this if you have a custom# kernel. If kernel_cmd is specified in a configuration file, Jupyter does not# pass any arguments to the kernel, because it cannot make any assumptions about# the arguments that the kernel understands. In particular, this means that the# kernel does not receive the option --debug if it given on the Jupyter command# line.#c.KernelManager.kernel_cmd = []## Time to wait for a kernel to terminate before killing it, in seconds.#c.KernelManager.shutdown_wait_time = 5.0#------------------------------------------------------------------------------# Session(Configurable) configuration#------------------------------------------------------------------------------## Object for handling serialization and sending of messages.## The Session object handles building messages and sending them with ZMQ sockets# or ZMQStream objects. Objects can communicate with each other over the# network via Session objects, and only need to work with the dict-based IPython# message spec. The Session will handle serialization/deserialization, security,# and metadata.## Sessions support configurable serialization via packer/unpacker traits, and# signing with HMAC digests via the key/keyfile traits.## Parameters ----------## debug : bool# whether to trigger extra debugging statements# packer/unpacker : str : 'json', 'pickle' or import_string# importstrings for methods to serialize message parts. If just# 'json' or 'pickle', predefined JSON and pickle packers will be used.# Otherwise, the entire importstring must be used.## The functions must accept at least valid JSON input, and output *bytes*.## For example, to use msgpack:# packer = 'msgpack.packb', unpacker='msgpack.unpackb'# pack/unpack : callables# You can also set the pack/unpack callables for serialization directly.# session : bytes# the ID of this Session object. The default is to generate a new UUID.# username : unicode# username added to message headers. The default is to ask the OS.# key : bytes# The key used to initialize an HMAC signature. If unset, messages# will not be signed or checked.# keyfile : filepath# The file containing a key. If this is set, `key` will be initialized# to the contents of the file.## Threshold (in bytes) beyond which an object's buffer should be extracted to# avoid pickling.#c.Session.buffer_threshold = 1024## Whether to check PID to protect against calls after fork.## This check can be disabled if fork-safety is handled elsewhere.#c.Session.check_pid = True## Threshold (in bytes) beyond which a buffer should be sent without copying.#c.Session.copy_threshold = 65536## Debug output in the Session#c.Session.debug = False## The maximum number of digests to remember.## The digest history will be culled when it exceeds this value.#c.Session.digest_history_size = 65536## The maximum number of items for a container to be introspected for custom# serialization. Containers larger than this are pickled outright.#c.Session.item_threshold = 64## execution key, for signing messages.#c.Session.key = b''## path to file containing execution key.#c.Session.keyfile = ''## Metadata dictionary, which serves as the default top-level metadata dict for# each message.#c.Session.metadata = {}## The name of the packer for serializing messages. Should be one of 'json',# 'pickle', or an import name for a custom callable serializer.#c.Session.packer = 'json'## The UUID identifying this session.#c.Session.session = ''## The digest scheme used to construct the message signatures. Must have the form# 'hmac-HASH'.#c.Session.signature_scheme = 'hmac-sha256'## The name of the unpacker for unserializing messages. Only used with custom# functions for `packer`.#c.Session.unpacker = 'json'## Username for the Session. Default is your system username.#c.Session.username = 'username'#------------------------------------------------------------------------------# MultiKernelManager(LoggingConfigurable) configuration#------------------------------------------------------------------------------## A class for managing multiple kernels.## The name of the default kernel to start#c.MultiKernelManager.default_kernel_name = 'python3'## The kernel manager class. This is configurable to allow subclassing of the# KernelManager for customized behavior.#c.MultiKernelManager.kernel_manager_class = 'jupyter_client.ioloop.IOLoopKernelManager'## Share a single zmq.Context to talk to all my kernels#c.MultiKernelManager.shared_context = True#------------------------------------------------------------------------------# MappingKernelManager(MultiKernelManager) configuration#------------------------------------------------------------------------------## A KernelManager that handles notebook mapping and HTTP error handling## White list of allowed kernel message types. When the list is empty, all# message types are allowed.#c.MappingKernelManager.allowed_message_types = []## Whether messages from kernels whose frontends have disconnected should be# buffered in-memory. When True (default), messages are buffered and replayed on# reconnect, avoiding lost messages due to interrupted connectivity. Disable if# long-running kernels will produce too much output while no frontends are# connected.#c.MappingKernelManager.buffer_offline_messages = True## Whether to consider culling kernels which are busy. Only effective if# cull_idle_timeout > 0.#c.MappingKernelManager.cull_busy = False## Whether to consider culling kernels which have one or more connections. Only# effective if cull_idle_timeout > 0.#c.MappingKernelManager.cull_connected = False## Timeout (in seconds) after which a kernel is considered idle and ready to be# culled. Values of 0 or lower disable culling. Very short timeouts may result# in kernels being culled for users with poor network connections.#c.MappingKernelManager.cull_idle_timeout = 0## The interval (in seconds) on which to check for idle kernels exceeding the# cull timeout value.#c.MappingKernelManager.cull_interval = 300## Timeout for giving up on a kernel (in seconds). On starting and restarting# kernels, we check whether the kernel is running and responsive by sending# kernel_info_requests. This sets the timeout in seconds for how long the kernel# can take before being presumed dead. This affects the MappingKernelManager# (which handles kernel restarts) and the ZMQChannelsHandler (which handles the# startup).#c.MappingKernelManager.kernel_info_timeout = 60###c.MappingKernelManager.root_dir = ''#------------------------------------------------------------------------------# KernelSpecManager(LoggingConfigurable) configuration#------------------------------------------------------------------------------## If there is no Python kernelspec registered and the IPython kernel is# available, ensure it is added to the spec list.#c.KernelSpecManager.ensure_native_kernel = True## The kernel spec class. This is configurable to allow subclassing of the# KernelSpecManager for customized behavior.#c.KernelSpecManager.kernel_spec_class = 'jupyter_client.kernelspec.KernelSpec'## Whitelist of allowed kernel names.## By default, all installed kernels are allowed.#c.KernelSpecManager.whitelist = set()#------------------------------------------------------------------------------# ContentsManager(LoggingConfigurable) configuration#------------------------------------------------------------------------------## Base class for serving files and directories.## This serves any text or binary file, as well as directories, with special# handling for JSON notebook documents.## Most APIs take a path argument, which is always an API-style unicode path, and# always refers to a directory.## - unicode, not url-escaped# - '/'-separated# - leading and trailing '/' will be stripped# - if unspecified, path defaults to '',# indicating the root path.## Allow access to hidden files#c.ContentsManager.allow_hidden = False###c.ContentsManager.checkpoints = None###c.ContentsManager.checkpoints_class = 'notebook.services.contents.checkpoints.Checkpoints'###c.ContentsManager.checkpoints_kwargs = {}## handler class to use when serving raw file requests.## Default is a fallback that talks to the ContentsManager API, which may be# inefficient, especially for large files.## Local files-based ContentsManagers can use a StaticFileHandler subclass, which# will be much more efficient.## Access to these files should be Authenticated.#c.ContentsManager.files_handler_class = 'notebook.files.handlers.FilesHandler'## Extra parameters to pass to files_handler_class.## For example, StaticFileHandlers generally expect a `path` argument specifying# the root directory from which to serve files.#c.ContentsManager.files_handler_params = {}## Glob patterns to hide in file and directory listings.#c.ContentsManager.hide_globs = ['__pycache__', '*.pyc', '*.pyo', '.DS_Store', '*.so', '*.dylib', '*~']## Python callable or importstring thereof## To be called on a contents model prior to save.## This can be used to process the structure, such as removing notebook outputs# or other side effects that should not be saved.## It will be called as (all arguments passed by keyword)::## hook(path=path, model=model, contents_manager=self)## - model: the model to be saved. Includes file contents.# Modifying this dict will affect the file that is stored.# - path: the API path of the save destination# - contents_manager: this ContentsManager instance#c.ContentsManager.pre_save_hook = None###c.ContentsManager.root_dir = '/'## The base name used when creating untitled directories.#c.ContentsManager.untitled_directory = 'Untitled Folder'## The base name used when creating untitled files.#c.ContentsManager.untitled_file = 'untitled'## The base name used when creating untitled notebooks.#c.ContentsManager.untitled_notebook = 'Untitled'#------------------------------------------------------------------------------# FileManagerMixin(Configurable) configuration#------------------------------------------------------------------------------## Mixin for ContentsAPI classes that interact with the filesystem.## Provides facilities for reading, writing, and copying both notebooks and# generic files.## Shared by FileContentsManager and FileCheckpoints.## Note ---- Classes using this mixin must provide the following attributes:## root_dir : unicode# A directory against against which API-style paths are to be resolved.## log : logging.Logger## By default notebooks are saved on disk on a temporary file and then if# successfully written, it replaces the old ones. This procedure, namely# 'atomic_writing', causes some bugs on file system without operation order# enforcement (like some networked fs). If set to False, the new notebook is# written directly on the old one which could fail (eg: full filesystem or quota# )#c.FileManagerMixin.use_atomic_writing = True#------------------------------------------------------------------------------# FileContentsManager(FileManagerMixin,ContentsManager) configuration#------------------------------------------------------------------------------## If True (default), deleting files will send them to the platform's# trash/recycle bin, where they can be recovered. If False, deleting files# really deletes them.#c.FileContentsManager.delete_to_trash = True## Python callable or importstring thereof## to be called on the path of a file just saved.## This can be used to process the file on disk, such as converting the notebook# to a script or HTML via nbconvert.## It will be called as (all arguments passed by keyword)::## hook(os_path=os_path, model=model, contents_manager=instance)## - path: the filesystem path to the file just written - model: the model# representing the file - contents_manager: this ContentsManager instance#c.FileContentsManager.post_save_hook = None###c.FileContentsManager.root_dir = ''## DEPRECATED, use post_save_hook. Will be removed in Notebook 5.0#c.FileContentsManager.save_script = False#------------------------------------------------------------------------------# NotebookNotary(LoggingConfigurable) configuration#------------------------------------------------------------------------------## A class for computing and verifying notebook signatures.## The hashing algorithm used to sign notebooks.#c.NotebookNotary.algorithm = 'sha256'## The sqlite file in which to store notebook signatures. By default, this will# be in your Jupyter data directory. You can set it to ':memory:' to disable# sqlite writing to the filesystem.#c.NotebookNotary.db_file = ''## The secret key with which notebooks are signed.#c.NotebookNotary.secret = b''## The file where the secret key is stored.#c.NotebookNotary.secret_file = ''## A callable returning the storage backend for notebook signatures. The default# uses an SQLite database.#c.NotebookNotary.store_factory = traitlets.Undefined#------------------------------------------------------------------------------# GatewayKernelManager(MappingKernelManager) configuration#------------------------------------------------------------------------------## Kernel manager that supports remote kernels hosted by Jupyter Kernel or# Enterprise Gateway.#------------------------------------------------------------------------------# GatewayKernelSpecManager(KernelSpecManager) configuration#------------------------------------------------------------------------------#------------------------------------------------------------------------------# GatewayClient(SingletonConfigurable) configuration#------------------------------------------------------------------------------## This class manages the configuration. It's its own singleton class so that we# can share these values across all objects. It also contains some helper methods# to build request arguments out of the various config options.## The authorization token used in the HTTP headers. (JUPYTER_GATEWAY_AUTH_TOKEN# env var)#c.GatewayClient.auth_token = None## The filename of CA certificates or None to use defaults.# (JUPYTER_GATEWAY_CA_CERTS env var)#c.GatewayClient.ca_certs = None## The filename for client SSL certificate, if any. (JUPYTER_GATEWAY_CLIENT_CERT# env var)#c.GatewayClient.client_cert = None## The filename for client SSL key, if any. (JUPYTER_GATEWAY_CLIENT_KEY env var)#c.GatewayClient.client_key = None## The time allowed for HTTP connection establishment with the Gateway server.# (JUPYTER_GATEWAY_CONNECT_TIMEOUT env var)#c.GatewayClient.connect_timeout = 40.0## A comma-separated list of environment variable names that will be included,# along with their values, in the kernel startup request. The corresponding# `env_whitelist` configuration value must also be set on the Gateway server -# since that configuration value indicates which environmental values to make# available to the kernel. (JUPYTER_GATEWAY_ENV_WHITELIST env var)#c.GatewayClient.env_whitelist = ''## Additional HTTP headers to pass on the request. This value will be converted# to a dict. (JUPYTER_GATEWAY_HEADERS env var)#c.GatewayClient.headers = '{}'## The password for HTTP authentication. (JUPYTER_GATEWAY_HTTP_PWD env var)#c.GatewayClient.http_pwd = None## The username for HTTP authentication. (JUPYTER_GATEWAY_HTTP_USER env var)#c.GatewayClient.http_user = None## The gateway API endpoint for accessing kernel resources# (JUPYTER_GATEWAY_KERNELS_ENDPOINT env var)#c.GatewayClient.kernels_endpoint = '/api/kernels'## The gateway API endpoint for accessing kernelspecs# (JUPYTER_GATEWAY_KERNELSPECS_ENDPOINT env var)#c.GatewayClient.kernelspecs_endpoint = '/api/kernelspecs'## The gateway endpoint for accessing kernelspecs resources# (JUPYTER_GATEWAY_KERNELSPECS_RESOURCE_ENDPOINT env var)#c.GatewayClient.kernelspecs_resource_endpoint = '/kernelspecs'## The time allowed for HTTP request completion. (JUPYTER_GATEWAY_REQUEST_TIMEOUT# env var)#c.GatewayClient.request_timeout = 40.0## The url of the Kernel or Enterprise Gateway server where kernel specifications# are defined and kernel management takes place. If defined, this Notebook# server acts as a proxy for all kernel management and kernel specification# retrieval. (JUPYTER_GATEWAY_URL env var)#c.GatewayClient.url = None## For HTTPS requests, determines if server's certificate should be validated or# not. (JUPYTER_GATEWAY_VALIDATE_CERT env var)#c.GatewayClient.validate_cert = True## The websocket url of the Kernel or Enterprise Gateway server. If not# provided, this value will correspond to the value of the Gateway url with 'ws'# in place of 'http'. (JUPYTER_GATEWAY_WS_URL env var)#c.GatewayClient.ws_url = None#------------------------------------------------------------------------------# TerminalManager(LoggingConfigurable,NamedTermManager) configuration#------------------------------------------------------------------------------#### Timeout (in seconds) in which a terminal has been inactive and ready to be# culled. Values of 0 or lower disable culling.#c.TerminalManager.cull_inactive_timeout = 0## The interval (in seconds) on which to check for terminals exceeding the# inactive timeout value.#c.TerminalManager.cull_interval = 300其中第284行为:
#c.NotebookApp.password = ''将之前生成好的加密密码复制过来,即改成如下形式
c.NotebookApp.password = 'sha1:c018cb5b13a0:7b945869a95654d657655c9bb909d7a90112e843'保存该配置文件并退出到docker容器中。这里需要指出,由于jupyter版本的不一致等因素,你的配置文件不一定和我的一样在284行,但是你应该找到的是#c.NotebookApp.password = ''这一段,将这个模板前的注释符取消既可以了。
然后,继续更改以下配置:
允许所有域名:
c.NotebookApp.allow_origin='*'允许远程:
c.NotebookApp.allow_remote_access = True指定默认启动目录(根据你的需求填写目录):
c.NotebookApp.notebook_dir = '/home/jupyterstart'启动后不打开浏览器
c.NotebookApp.open_browser = False接下来,就到了启动Nginx的时候了:
输入exeit命令退出容器(系统),即:
exit好了,现在你要做的就是重新启动这个docker容器(注意替换成你自己系统上刚刚做的容器ID号):
docker stopc229f9b659fbdocker start c229f9b659fb再次进入该容器
docker exec -it c229f9b659fb /bin/bash在这个容器中,由于tensorflow官方已经帮我们配置过,jupyter服务将自动启动。因此紧接着,我们只需要启动作为反向代理的Nginxf服务器:
nginx -c /etc/nginx/nginx.conf 退出容器:
exit这样,在云服务器中就假设好了一台juyter服务器,现在我们变可以打开浏览器,输入我们的域名地址或者服务器的ip地址,如我的域名(域名需要购买并在注册局等级注册,同时在域名供应商设置解析到自己服务器的ip地址才可以使用。域名只是相当于ip地址的助记符,没有的话直接在浏览器输入公网服务器ip也是一样的):
jcstdio.cn第一次打开后的页面,由于没有登录过,浏览器cookie也不会由历史的密码信息,肯定是需要输入密码的。你看到的juputer登陆页面大概是这个样子的:
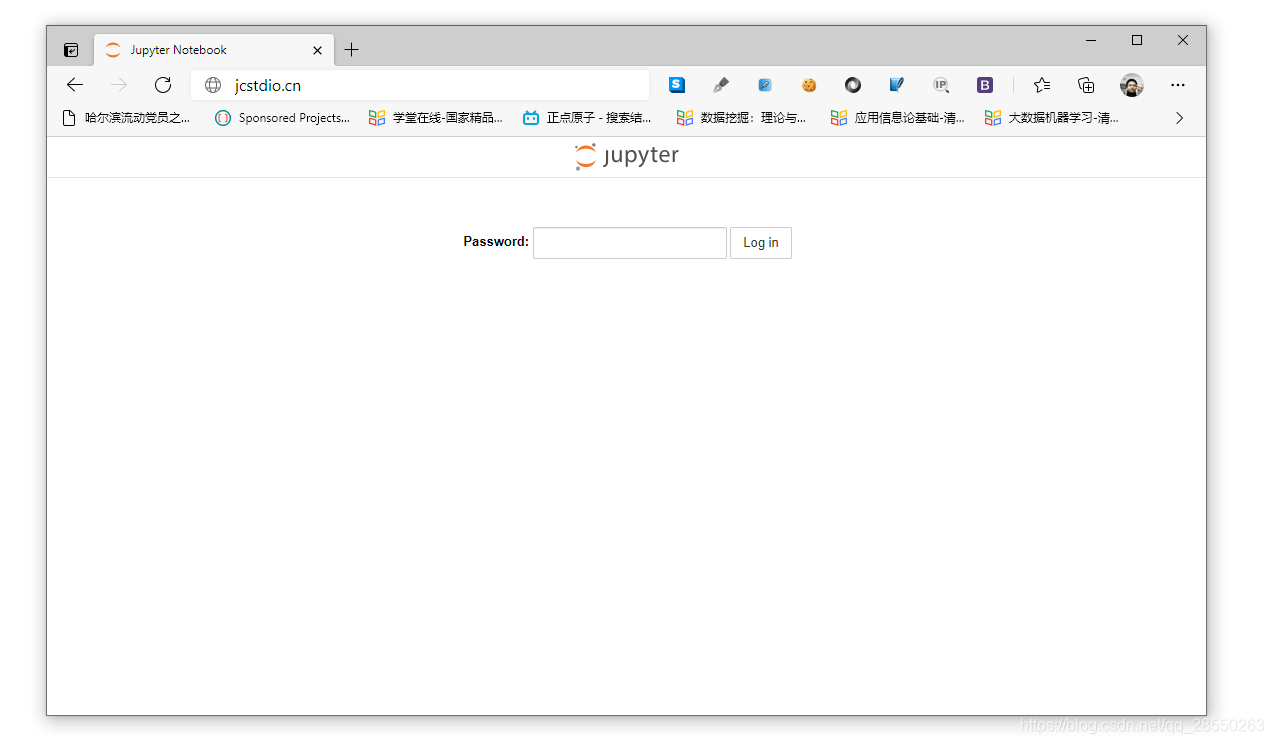
输入你设置的密码。注意不是经过编码加密后的密码,而是之前你设置时输入了两次才确认的原始密码。输入完成后将进入到jupyetr web的主页:
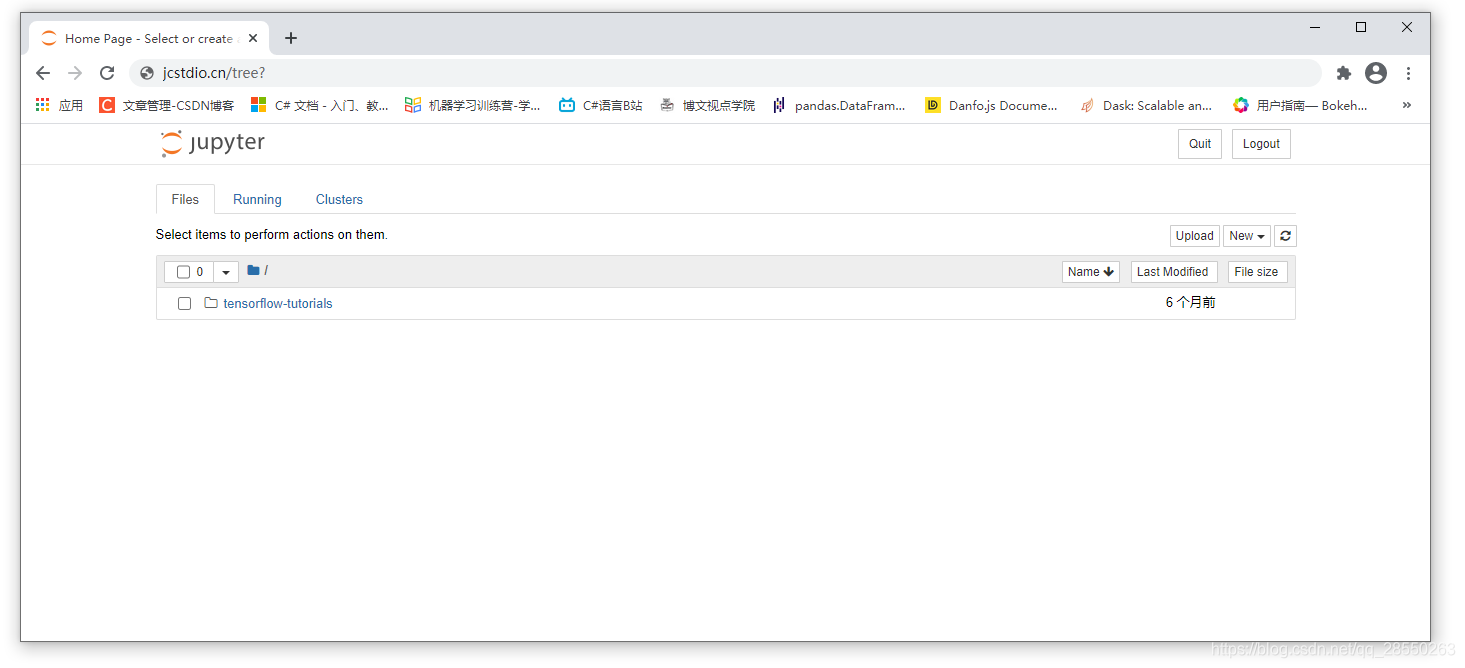
与你自己取安装jupyetr不同,这里已经配置好了tensorflow开发所需要的所有依赖包以及tensorflow本身。同时你可以注意到,这里有一个tensorflow-tutorials文件夹。打开它:
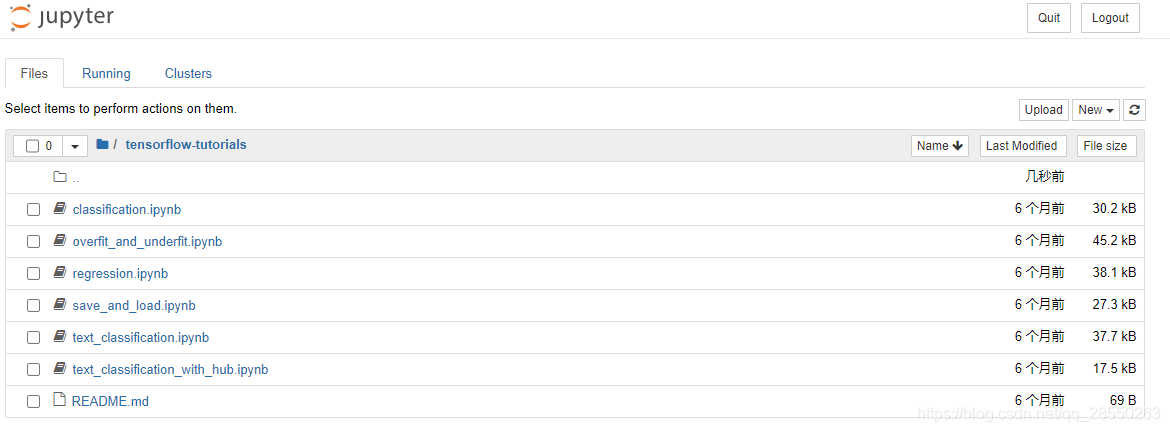
如你所见,里面的是tensorflow官方入门的经典案例。
另外,在python界混的人早早晚晚需要自己去添加一些库,每次远程登录Linux宿主机再进入docker的容器中的Linux系统以使用命令进行包管理难免不方便。这里也给大家介绍两种我常用的方法。
-
方法一:需要时,直接在代码中安装。
比如假装我想安装一个sklearn。先打开一个jupyter notebook,输入以下代码即可:import osos.sys("pip3 install sklearn") -
方法二:在jupyter中打开终端。
这个看起来很向开头的 BAIDU AISTDIO。步骤如下:
(1)打开终端:
(2)在这里,你可以直接对docker中的系统运行bash命令。比如使用pip工具进行安装。
还是以安装sklearn为例:
输入pip3 install sklearn:
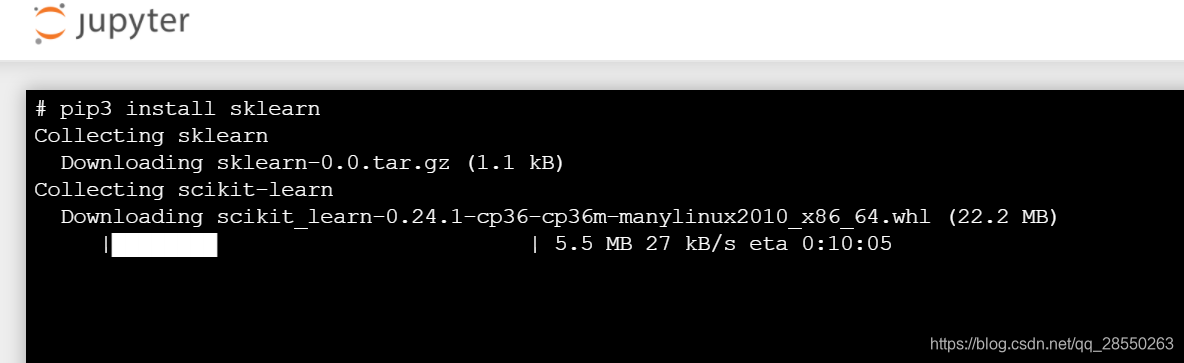
可以看到,由于没有给docker里ubuntu系统的python配置国内源,下载速度还是有点慢的。
最后作为补充,再教大家如何在Linux系统中将python源设置为国内源吧,这次我们以豆瓣源为例:
依次执行以下命令:
mkdir ~/.pipcd ~/.pipvim pip.conf编辑pip.conf文件内容如下:
★豆瓣源(推荐):
[global]timeout = 6000index-url = http://pypi.douban.com/simpletrusted-host = pypi.douban.com保存并退出,你将拥有更快的速度。
另外,还有一些比较常用的源。如:
★阿里源(推荐):
[global] timeout = 6000index-url = http://mirrors.aliyun.com/pypi/simple/ trusted-host=mirrors.aliyun.com 国内源首选阿里源或者豆瓣源。虽然有些高校也架设了服务器同步了Pypi镜像,但作为开发者一般不推荐使用高校源。不过以下也为想试试同学精选列了一些。
中科大源(不推荐)
[global]timeout = 6000index-url = http://pypi.mirrors.ustc.edu.cn/simple/trusted-host = https://pypi.tuna.tsinghua.edu.cn清华源(不推荐):
[global]timeout = 6000index-url = https://pypi.tuna.tsinghua.edu.cn/simpletrusted-host = https://pypi.tuna.tsinghua.edu.cn还有其它的国内源,只要按照上面的格式将统一资源定位符(url)进行相应的修改即可。
搜狐源
http://mirrors.sohu.com/Python/V2EX
pypi.v2ex.com/simple北京外果语大学源
http://pypi.mirrors.ustc.edu.cn/华中理工大学
http://pypi.hustunique.com/山东理工大学
http://pypi.sdutlinux.org/
