鸿蒙OpenHarmony hi3516开发板,标准系统按钮开关灯
背景
从HarmonyOS应用开发玩到OpenHarmony应用开发,前前后后也有大半年了,北向HelloWorld的应用从JAVA写到了JS,又写到了eTS。北向应用的开发不说是精通,至少也早已是个半吊子,查查文档和参考下开发样例,还是能慢慢的写出个应用。然而,南向设备的开发,却一直拖着不知道如何上手。于是,最近终于狠下决心了: 从设备开发的HelloWorld---点灯开始,先在OpenHarmony标准设备上,使用linux自带的GPIO点个灯,走出第一步,后续再使用HDF,NAPI等能力,持续探索南向设备开发。
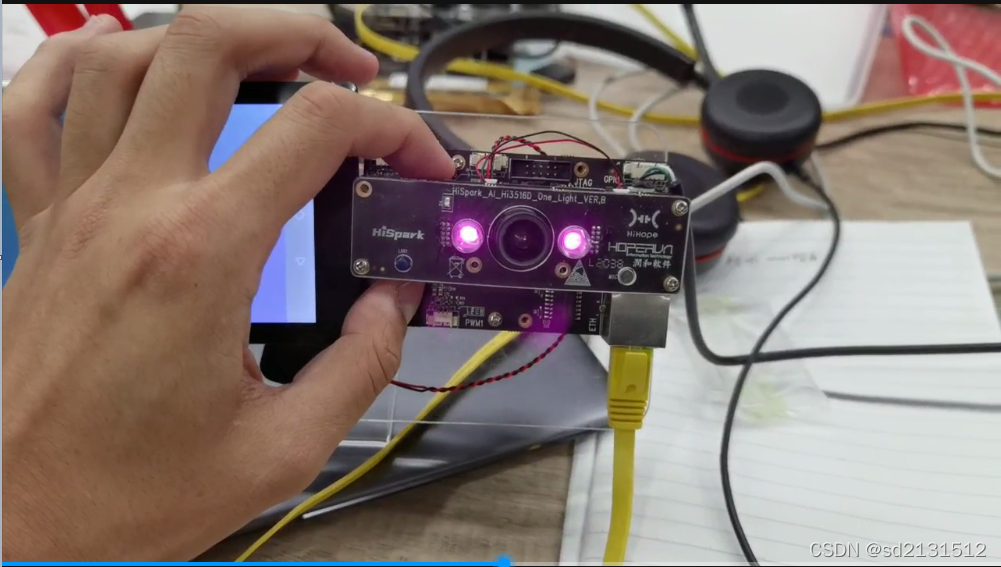
那么,这次我想做的是使用OpenHarmony3.0 LTS版本的标准系统上,开发一个应用程序,通过调用linux自带通用GPIO驱动,实现点击按钮实现点灯和关灯。这次我使用的开发板是润和hi3516 dv300。最终效果如下:
什么是GPIO?
这个问题,对于搞单片机,嵌入式的同学来说,估计第一天就会了。而对于我们搞软件的同学来说,却很少听过,其实我之前就没听说过。。。
GPIO,英文全称为General-Purpose IO ports,也就是 通用IO口。嵌入式系统中常常有数量众多,但是结构却比较简单的外部设备/电路,对这些设备/电路有的需要CPU为之提供控制手段,有的则需要被CPU用作输入信号。而且,许多这样的设备/电路只要求一位,即只要有开/关两种状态就够了,比如灯亮与灭。对这些设备/电路的控制,使用传统的串行口或并行口都不合适。所以在微控制器芯片上一般都会提供一个“通用可编程IO接口”,即GPIO。
我个人的理解是单片机这类设备,是可以通过直接操作寄存器,或者是厂商提供的函数控制GPIO,而linux嵌入式设备,则可以使用linux自带通用GPIO驱动来控制GPIO,或者是自写驱动。而OpenHarmony在此之上,又封装了一层HDF,通过HDF这层封装,可以适配不同操作系统控制GPIO.
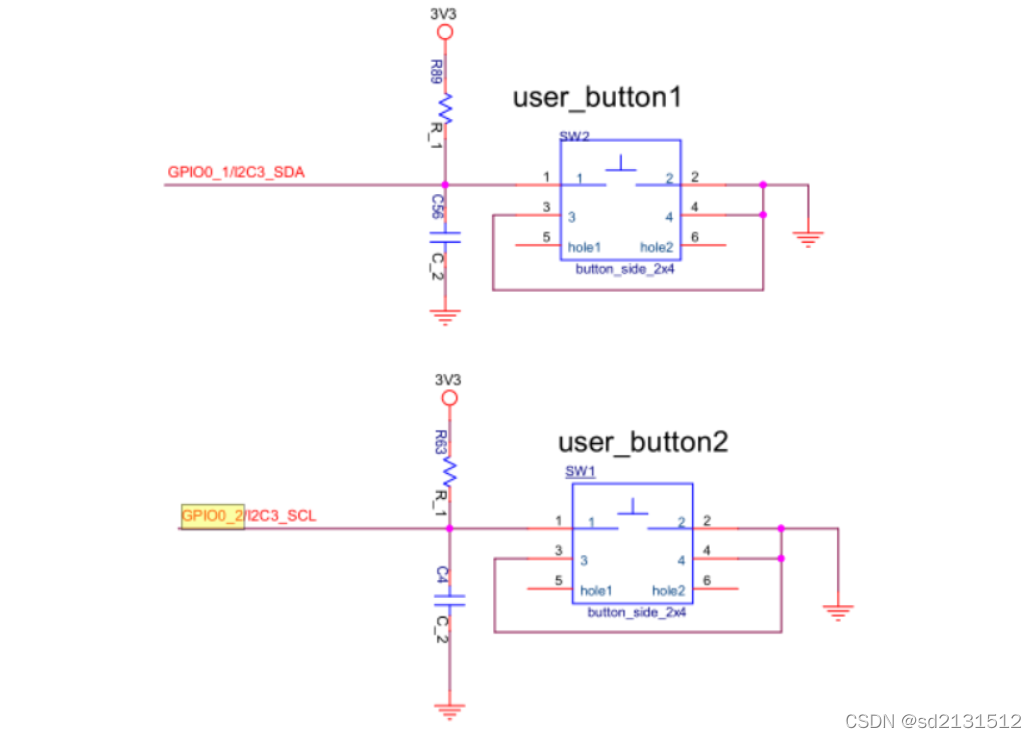
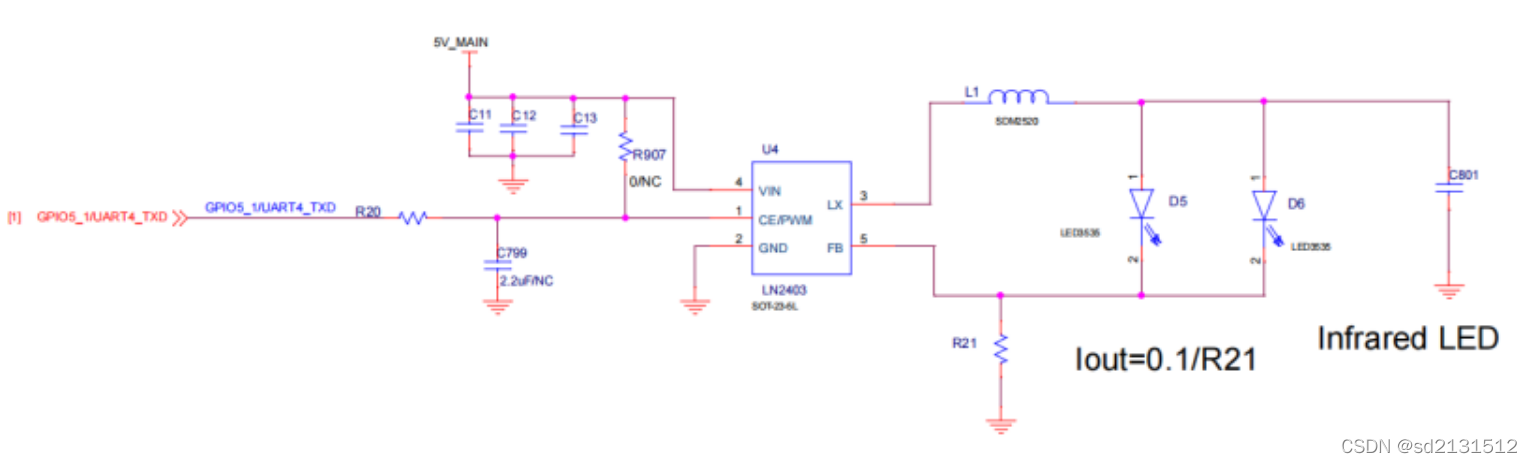
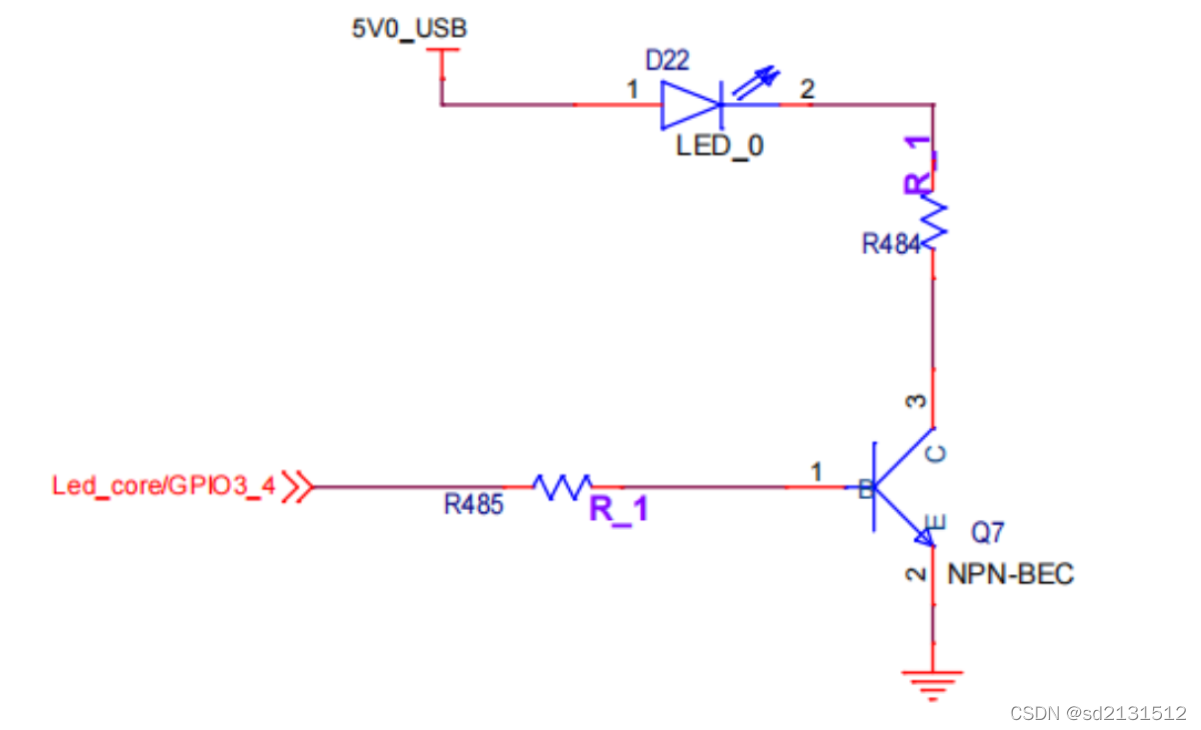
润和hi3516dv300 按钮和灯的GPIO口
这些信息可以从原理图中获取:
-
可以看到两个自定义按钮的GPIO口分别是:GPIO0_1,GPIO0_2
-
-
三个LED的GPIO口分别是:核心板的红色LED在GPIO3_4,绿色LED指示灯在GPIO2_3,最上层板的红灯接在GPIO5_1
-

-
使用linux自带通用GPIO驱动开灯关灯
从文档,了解到Hi3516DV300有控制器管理12组GPIO管脚,每组8个。
GPIO号 = GPIO组索引 (0~11) * 每组GPIO管脚数(8) + 组内偏移
举例:GPIO10_3的GPIO号 = 10 * 8 + 3 = 83
所以,按钮
GPIO0_1 = 0 * 8 + 1 = 1
GPIO0_2 = 0 * 8 + 2 = 2
三个灯
GPIO5_1 = 5 * 8 + 1;
GPIO2_3 = 2 * 8 + 3;
GPIO3_4 = 3 * 8 + 4;
所以通过学习Linux操作GPIO,了解到可以使用echo的形式,通过linux自带通用GPIO驱动来控制GPIO。于是乎,我们可以直接通过hiTools的串口连接到开发板上,使用如下命令实现点亮红灯:
/sys/class/gpio# echo 41 > export # 设置红灯GPIO口为导出/sys/class/gpio/gpio41# echo out > direction # 设置红灯GPIO口为输出/sys/class/gpio/gpio41# echo 1 > value # 设置红灯GPIO口为1通过代码来实现
通过代码来实现,是通过文件的形式来调用linux自带通用GPIO驱动。
此外,针对按钮,需要使用poll的方式监控文件变化,响应GPIO中断
#include#include#include#include#include#include#define MSG(args...) printf(args) //函数声明static int gpio_export(int pin);static int gpio_unexport(int pin);static int gpio_direction(int pin, int dir);static int gpio_write(int pin, int value);static int gpio_read(int pin);static int gpio_edge(int pin, int edge);static int gpio_export(int pin) { char buffer[64]; int len; int fd; fd = open("/sys/class/gpio/export", O_WRONLY); if (fd < 0) { MSG("Failed to open export for writing!\n"); return(-1); } len = snprintf(buffer, sizeof(buffer), "%d", pin); printf("%s,%d,%d\n",buffer,sizeof(buffer),len); if (write(fd, buffer, len) < 0) { MSG("Failed to export gpio!"); return -1; } close(fd); return 0; } static int gpio_unexport(int pin) { char buffer[64]; int len; int fd; fd = open("/sys/class/gpio/unexport", O_WRONLY); if (fd < 0) { MSG("Failed to open unexport for writing!\n"); return -1; } len = snprintf(buffer, sizeof(buffer), "%d", pin); if (write(fd, buffer, len) IN, 1-->OUTstatic int gpio_direction(int pin, int dir) { static const char dir_str[] = "in\0out"; char path[64]; int fd; snprintf(path, sizeof(path), "/sys/class/gpio/gpio%d/direction", pin); fd = open(path, O_WRONLY); if (fd < 0) { MSG("Failed to open gpio direction for writing!\n"); return -1; } if (write(fd, &dir_str[dir == 0 ? 0 : 3], dir == 0 ? 2 : 3) LOW, 1-->HIGHstatic int gpio_write(int pin, int value) { static const char values_str[] = "01"; char path[64]; int fd; snprintf(path, sizeof(path), "/sys/class/gpio/gpio%d/value", pin); fd = open(path, O_WRONLY); if (fd < 0) { MSG("Failed to open gpio value for writing!\n"); return -1; } if (write(fd, &values_str[value == 0 ? 0 : 1], 1) < 0) { MSG("Failed to write value!\n"); return -1; } close(fd); return 0; }static int gpio_read(int pin) { char path[64]; char value_str[3]; int fd; snprintf(path, sizeof(path), "/sys/class/gpio/gpio%d/value", pin); fd = open(path, O_RDONLY); if (fd < 0) { MSG("Failed to open gpio value for reading!\n"); return -1; } if (read(fd, value_str, 3) none, 1-->rising, 2-->falling, 3-->bothstatic int gpio_edge(int pin, int edge){const char dir_str[] = "none\0rising\0falling\0both"; int ptr;char path[64]; int fd; switch(edge){ case 0: ptr = 0; break; case 1: ptr = 5; break; case 2: ptr = 12; break; case 3: ptr = 20; break; default: ptr = 0;} snprintf(path, sizeof(path), "/sys/class/gpio/gpio%d/edge", pin); fd = open(path, O_WRONLY); if (fd < 0) { MSG("Failed to open gpio edge for writing!\n"); return -1; } if (write(fd, &dir_str[ptr], strlen(&dir_str[ptr])) < 0) { MSG("Failed to set edge!\n"); return -1; } close(fd); return 0; }int main() { int gpio_fd, ret; struct pollfd fds[1]; char buff[10]; //41为红灯, 1为1号按键 gpio_unexport(41); gpio_unexport(1); //41红灯亮起 gpio_export(41); gpio_direction(41, 1);//output out gpio_write(41, 1); //1按钮初始化 gpio_export(1); gpio_direction(1, 0);//input in gpio_edge(1,2); gpio_fd = open("/sys/class/gpio/gpio1/value",O_RDONLY); if(gpio_fd < 0) { MSG("Failed to open value!\n"); return -1; } fds[0].fd = gpio_fd; fds[0].events = POLLPRI; while(1) { ret = poll(fds,1,5000); if( ret == -1 ) MSG("poll\n"); if( fds[0].revents & POLLPRI) { ret = lseek(gpio_fd,0,SEEK_SET); if( ret == -1 ) MSG("lseek\n"); ret = read(gpio_fd,buff,10);//读取按钮值,但这里没使用 if( ret == -1 ) MSG("read\n"); //切换红灯 int status = gpio_read(41); printf("41 = %d\n",status); gpio_write(41, 1 - status); //gpio_write(44, cnt++%2); printf("\n"); } printf("one loop\n"); //usleep(5); } return 0;}将上述程序烧录标准系统镜像
步骤1: 下载OpenHarmony 3.0LTS版本,编译和烧录标准镜像
可参考我之前的文章
步骤2: 编写上述程序
新建并保存在applications/standard/app/hello.c
步骤3: hello.c同级目录下创建BUILD.gn
import("//build/ohos.gni")import("//drivers/adapter/uhdf2/uhdf.gni")ohos_executable("hello") { sources = [ "hello.c" ] subsystem_name = "applications" part_name = "prebuilt_hap"}步骤4: 修改applications\standard\hap\ohos.build
module_list里增加 "//applications/standard/app:hello"
步骤5:重新编译和烧录,可参考步骤1
./build.sh --product-name Hi3516DV300 --ccache步骤6:使用串口连接,执行bin目录下的hello
cd bin./hello则可以点击按钮1,来点亮和熄灭led红灯
快速调试方法
编写和修改hello.c时,每次不想重新烧录镜像,目前只找到如下方法快速编译和烧录
步骤1:增加--ccache参数增量编译(倒也没必要单独也makefile了)
./build.sh --product-name Hi3516DV300 --ccache步骤2:在out目录中,通过find找到hello文件,并拷贝到本地(windows)
步骤3:使用hdc_std单独更新hello程序
hdc_std file send 本地路径\hello /data/注意:默认只有data目录下才能上传文件,如果需要放到类似bin等其他目录,则可以使用
hdc_std smode # 授予后台服务进程root权限或者
mount -oremount,rw / # 更改文件系统的读写权限近期还有很多事待验证,一步一个脚印吧
-
尝试小型系统控制GPIO
-
尝试使用HDF控制GPIO
-
尝试扩展NAPI,从应用端控制GPIO
源代码
https://gitee.com/42690727/my-open-harmony-sample/tree/master/%E6%A0%87%E5%87%86%E8%AE%BE%E5%A4%87/3.1%20Beta/gpio%E7%82%B9%E7%81%AF

