MyBatis框架
文章目录
-
- 一、MyBatis 简介
-
- 1.1 MyBatis 概述
- 1.2 MyBatis 特性
- 1.3 MyBatis 下载
- 1.4 和其它持久化层技术对比
- 二、搭建MyBatis
-
- 2.1 开发环境
- 2.2 创建Maven项目
- 2.3 创建MyBatis的核心配置文件
- 2.4 创建mapper接口
- 2.5 创建MyBatis的映射文件
- 2.6 Junit测试
- 2.7 优化功能
- 2.8 加入log4j2日志功能
- 三、MyBatis操作数据库
-
- 3.1 修改数据
- 3.2 删除数据
- 3.3 查询数据
- 四、核心配置文件
- 五、MyBatis获取参数值的两种方式(重点)
-
- 5.1 单个字面量类型的参数
- 5.2 多个字面量类型的参数
- 5.3 map集合类型的参数
- 5.4 实体类类型的参数
- 5.5 使用@Param注解命名参数
- 5.7 获取参数小结
- 六、MyBatis的各种查询功能
-
- 6.1 查询一个实体类对象
- 6.2 查询一个List集合
- 6.3 查询单个数据
- 6.4 查询一条Map集合类型数据
- 6.5 查询多条Map集合类型数据
- 七、特殊SQL的执行
-
- 7.1 模糊查询
- 7.2 批量删除
- 7.3 动态设置表名
- 八、自定义映射resultMap
-
- 8.1 resultMap处理字段和属性的映射关系
- 8.2 多对一映射处理
- 8.3 一对多映射处理
- 九、动态SQL
-
- 9.1 if
- 9.2 where
- 9.3 trim
- 9.4 choose、when、otherwise
- 9.5 foreach
- 十、MyBatis的缓存
-
- 10.1 MyBatis的一级缓存
- 10.2 MyBatis的二级缓存
- 十一、MyBatis的逆向工程
-
- 11.1 pom.xml
- 11.2 创建逆向工程的配置文件
- 11.3 实体类、Mapper接口、映射文件的生成
- 十二、MyBatis的分页插件
笔记中的代码:https://download.csdn.net/download/qq_43669047/85338456
PDF版笔记:https://download.csdn.net/download/qq_43669047/85338910
一、MyBatis 简介
1.1 MyBatis 概述
- MyBatis 是支持普通 SQL查询,存储过程和高级映射的优秀持久层框架。MyBatis 消除了几乎所有的JDBC代码和参数的手工设置以及结果集的检索。MyBatis 使用简单的 XML或注解用于配置和原始映射,将接口和 Java 的POJOs(Plain Ordinary Java Objects,普通的 Java对象)映射成数据库中的记录。
- MyBatis官方中文文档地址:https://mybatis.net.cn/
1.2 MyBatis 特性
- MyBatis 支持定制化SQL、存储过程以及高级映射
- MyBatis 避免了几乎所有的JDBC代码和手动设置参数以及获取结果集
- 可以使用简单的xml或者注解用于配置和原始映射,将接口和java的POJO(plain Old java objects,普通的java对象)映射成数据库中的记录。
- 是一个半自动的ORM(Obeject Relation Mapping)框架
1.3 MyBatis 下载
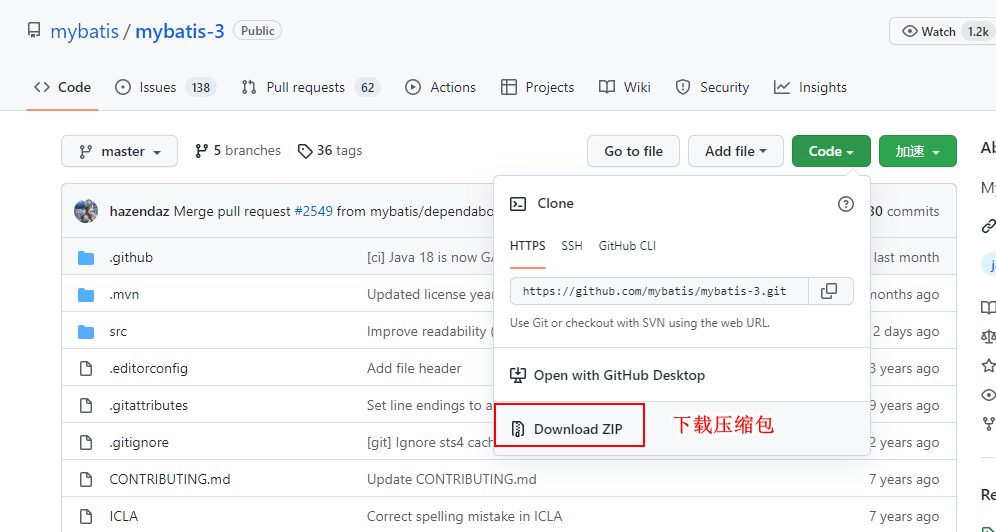
MyBatis 下载地址:https://github.com/mybatis/mybatis-3


1.4 和其它持久化层技术对比
JDBC
SQL夹杂在java代码中,耦合度高;
维护时需要频繁修改;
代码冗长,开发效率低。
Hibernate和JPA
- 操作简单,效率高;
- 程序中的长难SQL需要绕过框架;
- 基于全映射的全自动框架,大量字段的POJO进行部分映射较困难;
- 反射操作过多,导致数据库性能下降。
MyBatis
- 轻量级,性能好;
- SQL和Java编码分开,功能边界清晰。Java代码专注于业务逻辑、SQL专注于数据操作。
二、搭建MyBatis
2.1 开发环境
IDE:IDEA 2019.3.3
构建工具:maven 3.6.3
MySQL版本:8.0.24
MyBatis版本:MyBatis 3.5.9
注:不一定非要一致,遇到问题可以自己尝试百度解决。
遇到的坑:开始使用Maven3.8.5构建项目,出现
unable import to Maven Project。通过查找得知,IDEA 2019.3.3最高支持maven3.6.3版本,如果构建项目中出现问题,考虑是否是版本不兼容。
2.2 创建Maven项目
-
创建项目:参考https://blog.csdn.net/qq_43669047/article/details/124646201?spm=1001.2014.3001.5501
-
设置打包方式:jar
<packaging>jar</packaging> -
引入依赖
可以在Maven仓库中查看相关依赖的版本,并添加依赖到pom.xml文件
<dependencies> <dependency> <groupId>org.mybatis</groupId> <artifactId>mybatis</artifactId> <version>3.5.9</version> </dependency><dependency><groupId>junit</groupId><artifactId>junit</artifactId><version>4.13.1</version><scope>test</scope></dependency><dependency><groupId>mysql</groupId><artifactId>mysql-connector-java</artifactId><version>8.0.27</version></dependency>
2.3 创建MyBatis的核心配置文件
习惯上命名为
mybatis-config.xml,但并不是强制要求。如果整合Spring,这个配置文件可以省略。该配置文件存放位置为:src/main/resources目录下。
<!DOCTYPE configuration PUBLIC "-//mybatis.org//DTD Config 3.0//EN" "http://mybatis.org/dtd/mybatis-3-config.dtd"><configuration> <environments default="development"> <environment id="development"> <transactionManager type="JDBC"/> <dataSource type="POOLED"> <property name="driver" value="com.mysql.cj.jdbc.Driver"/> <property name="url" value="jdbc:mysql://127.0.0.1:3306/mybatis"/> <property name="username" value="root"/> <property name="password" value="root"/> </dataSource> </environment> </environments> <mappers> <mapper resource="mappers/UserMapper.xml"/> </mappers></configuration>2.4 创建mapper接口
MyBatis中的mapper接口相当于以前的dao。但区别在于,mapper仅仅是接口,我们不需要提供实现类。
MyBatis中有面向接口编程的功能,每当我们调用接口中的方法,会自动匹配一个SQL语句并执行。
public interface UserMapper { / * 添加用户信息 */ int insertUser();}2.5 创建MyBatis的映射文件
ORM(Object Relationship Mapping):对象关系映射
对象:Java中的实体类
关系:关系型数据库
映射:二者之间的关系
Java概念 数据库概念 类 表 属性 字段/列 对象 记录/行 注意:1、映射文件命名规则:实体类的类名+Mapper.xml,例如:UserMapper.xml
2、MyBatis中可以面向接口操作数据,但前提示要保持两个一致:(1)映射文件的
namespace要和mapper接口全类名一致;(2)映射文件中SQL语句的id要与mapper接口中的方法名一致。
<!DOCTYPE mapper PUBLIC "-//mybatis.org//DTD Mapper 3.0//EN" "http://mybatis.org/dtd/mybatis-3-mapper.dtd"><mapper namespace="com.atguigu.mybatis.mapper.UserMapper"> <insert id="insertUser"> insert into t_user values(null,'admin','123456','23','男','12345@qq.com'); </insert></mapper>但是,还没有完…还需要在mybatis-config.xml文件中引入该映射文件
<mappers><mapper resource="mappers/UserMapper.xml"/></mappers>2.6 Junit测试
public class MyBatisTest { @Test public void testMyBatis() throws IOException { //加载核心配置文件 InputStream is = Resources.getResourceAsStream("mybatis-config.xml"); //获取sqlSessionFactoryBuilder SqlSessionFactoryBuilder sqlSessionFactoryBuilder = new SqlSessionFactoryBuilder(); //获取sqlSessionFactory SqlSessionFactory sqlSessionFactory = sqlSessionFactoryBuilder.build(is); //获取sqlSession SqlSession sqlSession = sqlSessionFactory.openSession(); //获取Mapper接口对象 / * UserMapper是一个接口,那怎么得到一个实例对象呢? * getMapper(T Class aclss)的底层采用了代理模式,可以帮助我们得到一个接口的实现类对象。 */ UserMapper userMapper = sqlSession.getMapper(UserMapper.class); //测试 int result = userMapper.insertUser(); //提交事务 sqlSession.commit(); System.out.println("result:" + result); }}测试中遇到的问题:
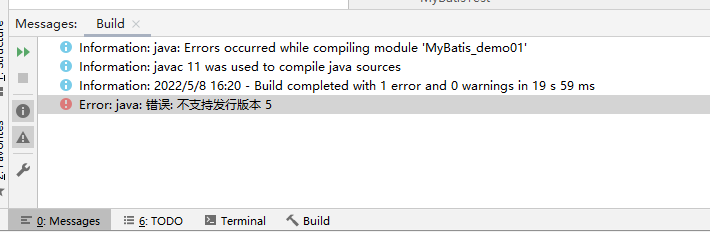
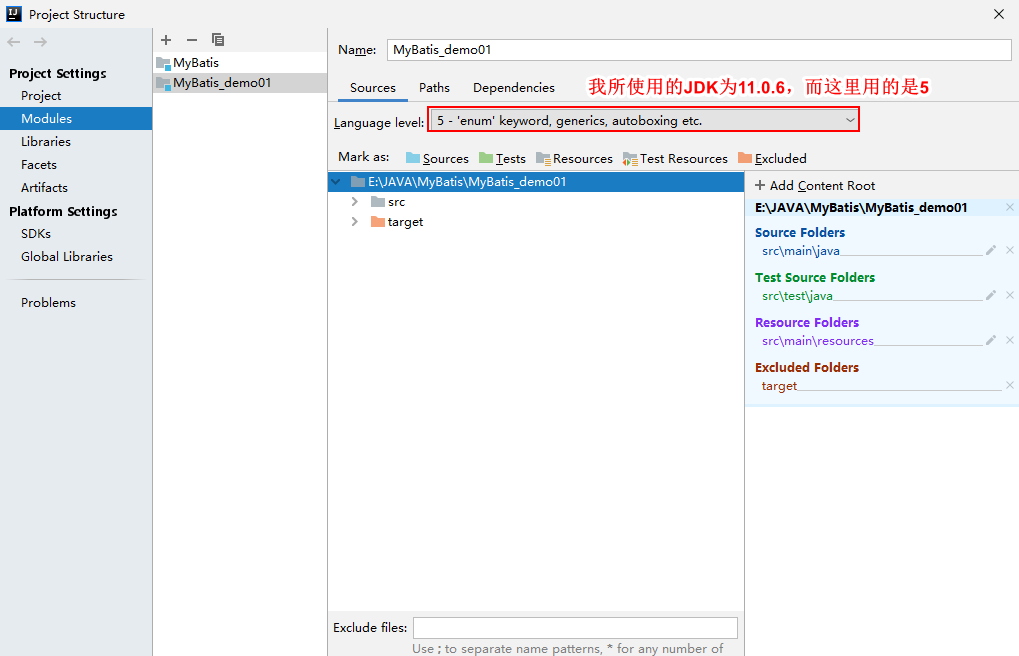
产生该问题的原因:
-
JDK版本与项目版本不一致导致。
解决办法:
方法一:参考博客:https://blog.csdn.net/weixin_51735258/article/details/123381889
方法二:在pom.xml文件中配置编译版本
<properties> <maven.compiler.source>11</maven.compiler.source> <maven.compiler.target>11</maven.compiler.target></properties>测试结果:
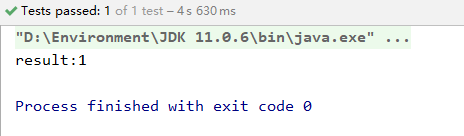
测试结果显示已经执行成功,但是在数据库中并没有看到有数据插入,这是为什么?
原因:配置文件中事务管理方式为
JDBC方式,需要手动提交或回滚。提交事务之后,id为什么不是1开始?
原因:未提交的事务也会占用id,因此不是从1开始。
2.7 优化功能
- 每次都需要手动提交,很麻烦。
//将openSession()方法中的参数设置为true,意为autoCommit(自动提交)SqlSession sqlSession = sqlSessionFactory.openSession(true);
- 无法查看SQL语句的执行过程。
解决:使用日志,加入log4日志功能,具体参考下文。
2.8 加入log4j2日志功能
-
加入依赖
<dependency> <groupId>org.apache.logging.log4j</groupId> <artifactId>log4j-core</artifactId> <version>2.17.1</version></dependency> -
加入log4j的配置文件
log4j的配置文件名为log4j.xml,存放位置为 src/main/resources 目录下
<Configuration> <Appenders> <Console name="Console" target="SYSTEM_OUT"> <PatternLayout pattern="%d{HH:mm:ss.SSS} [%t] %-5level %logger{36} - %msg%n"/> </Console> </Appenders> <Loggers> <Logger name="java.sql" level="debug"/> <Logger name="org.apache.ibatis" level="info"/> <Root level="DEBUG"> <appender-ref ref="Console"/> </Root> </Loggers></Configuration>关于log4j2相关内容:https://blog.csdn.net/bugzeroman/article/details/102803860
-
log4j2的日志级别
在log4j2中, 共有8个级别,按照从低到高为:ALL < TRACE < DEBUG < INFO < WARN < ERROR < FATAL < OFF。
All:最低等级的,用于打开所有日志记录.
Trace:是追踪,就是程序推进一下.
Debug:指出细粒度信息事件对调试应用程序是非常有帮助的.
Info:消息在粗粒度级别上突出强调应用程序的运行过程.
Warn:输出警告及warn以下级别的日志.
Error:输出错误信息日志.
Fatal:输出每个严重的错误事件将会导致应用程序的退出的日志.
OFF:最高等级的,用于关闭所有日志记录.
程序会打印高于或等于所设置级别的日志,设置的日志等级越高,打印出来的日志就越少。

三、MyBatis操作数据库
3.1 修改数据
<update id="updateUser">update t_user set username = 'zhangsun' where id = '3';</update>//单元测试public void testUpdate() throws IOException { //加载配置文件 InputStream is = Resources.getResourceAsStream("mybatis-config.xml"); //创建sqlSessionFactoryBuilder SqlSessionFactoryBuilder sqlSessionFactoryBuilder = new SqlSessionFactoryBuilder(); //获取SqlSessionFactory SqlSessionFactory sqlSessionFactory = sqlSessionFactoryBuilder.build(is); //获取sqlSession SqlSession sqlSession = sqlSessionFactory.openSession(true); //获取Mapper对象 UserMapper userMapper = sqlSession.getMapper(UserMapper.class); //执行sql userMapper.updateUser();}3.2 删除数据
与添加、删除数据类似。
3.3 查询数据
查询操作与之前的增、删、改有所不同,查询需要返回结果集。在MyBatis中必须配置
resultType或者resultMap,其中resultType用来设置默认的映射关系,resultMap用来设置自定义的映射关系。
- 查询结果是单条数据
<select id="selectById" resultType="com.atguigu.mybatis.pojo.User">select * from t_user where id = 2;</select>public void testSelectById() throws IOException { //加载配置文件 InputStream is = Resources.getResourceAsStream("mybatis-config.xml"); //创建sqlSessionFactoryBuilder SqlSessionFactoryBuilder sqlSessionFactoryBuilder = new SqlSessionFactoryBuilder(); //获取SqlSessionFactory SqlSessionFactory sqlSessionFactory = sqlSessionFactoryBuilder.build(is); //获取sqlSession SqlSession sqlSession = sqlSessionFactory.openSession(true); //获取Mapper对象 UserMapper userMapper = sqlSession.getMapper(UserMapper.class); //执行sql //出错,It's likely that neither a Result Type nor a Result Map was specified. //没有在配置文件中添加结果集类型 //User user = userMapper.selectById(); User user = userMapper.selectById(); System.out.println(user);}- 查询结果是一个集合
<!--List getAllUser()--><select id="getAllUser" resultType="com.atguigu.mybatis.pojo.User">select * from t_user;</select>public void testSelectAllUser() throws IOException { //加载配置文件 InputStream is = Resources.getResourceAsStream("mybatis-config.xml"); //创建sqlSessionFactoryBuilder SqlSessionFactoryBuilder sqlSessionFactoryBuilder = new SqlSessionFactoryBuilder(); //获取SqlSessionFactory SqlSessionFactory sqlSessionFactory = sqlSessionFactoryBuilder.build(is); //获取sqlSession SqlSession sqlSession = sqlSessionFactory.openSession(true); //获取Mapper对象 UserMapper userMapper = sqlSession.getMapper(UserMapper.class); //执行 List<User> userList = userMapper.getAllUser(); userList.forEach(user -> System.out.println(user));}测试结果:
User{id=2, username='admin', password='123456', age=23, sex='男', email='12345@qq.com'}User{id=4, username='admin', password='123456', age=23, sex='男', email='12345@qq.com'}User{id=5, username='admin', password='123456', age=23, sex='男', email='12345@qq.com'}四、核心配置文件
使用properties配置文件保存数据库连接的参数
#jdbc.properties配置文件#为了防止项目中出现同名的driver、url导致错误,尽可能在前面加上文件名jdbc.driver=com.mysql.cj.jdbc.Driverjdbc.url=jdbc:mysql://127.0.0.1:3306/mybatis?characterEncoding=utf8jdbc.username=rootjdbc.password=root<properties resource="jdbc.properties"/><dataSource type="POOLED"> <property name="driver" value="${jdbc.driver}"/> <property name="url" value="${jdbc.url}"/> <property name="username" value="${jdbc.username}"/> <property name="password" value="${jdbc.password}"/></dataSource>当映射文件中的包名过长的时候,很不方便,可以使用
typeAliases标签来设置别名
<typeAliases> <typeAlias type="com.atguigu.mybatis.pojo.User" alias="User"/></typeAliases>比
typeAliases更常用的是package,以包为单位,将包下所有的类型全部设置为默认的别名注意:
package需要写在typeAliases标签内部,不然会报错
<typeAliases> <typeAlias type="com.atguigu.mybatis.pojo.User" alias="User"/> <package name="com.atguigu.mybatis.pojo"/></typeAliases>mybatis-config.xml中还有一个重要的标签,那就是
mappers,可以在内部使用mapper标签来引入一个映射文件,但是如果一个包中有很多类的话,使用package标签引入整个包的映射文件就更为方便。如果使用
package引入映射文件,必须要满足以下条件:
- mapper接口所在的包要和映射文件所在的包一致
- mapper接口要和映射文件的名字一致
<mappers> <mapper resource="mappers/UserMapper.xml"/> <package name="com.atguigu.mybatis.mapper"/></mappers>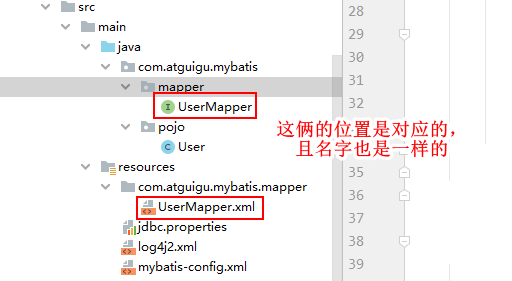
另外,如果出现Invalid bound statement (not found)问题可以尝试删除掉项目下的target目录,因为之前生成的文件可能影响了编译。
综合以上,mybatis-config.xml核心配置文件内容如下:
<!DOCTYPE configuration PUBLIC "-//mybatis.org//DTD Config 3.0//EN" "http://mybatis.org/dtd/mybatis-3-config.dtd"><configuration> <properties resource="jdbc.properties"/> <typeAliases> <typeAlias type="com.atguigu.mybatis.pojo.User" alias="User"/> <package name="com.atguigu.mybatis.pojo"/> </typeAliases> <environments default="development"> <environment id="development"> <transactionManager type="JDBC"/> <dataSource type="POOLED"> <property name="driver" value="${jdbc.driver}"/> <property name="url" value="${jdbc.url}"/> <property name="username" value="${jdbc.username}"/> <property name="password" value="${jdbc.password}"/> </dataSource> </environment> </environments> <mappers><!-- --> <package name="com.atguigu.mybatis.mapper"/> </mappers></configuration>五、MyBatis获取参数值的两种方式(重点)
MyBatis获取参数值的两种方式:
${}和#{}
${}的本质是字符串拼接,#{}的本质是占位符赋值
${}使用字符串拼接的方式拼接sql,若为字符串或者日期的字段进行赋值时,需要手动加单引号;
#{}使用占位符赋值的方式拼接sql,此时字符串或者日期字段进行赋值时,可以自动添加单引号。字符串拼接不仅书写繁琐,还会造成sql注入问题。
5.1 单个字面量类型的参数
若mapper接口中的方法参数为单个的字面量类型,此时可以使用
${}和#{}以任意名称获取参数的值,注意${}需要手动添加单引号。
<select id="selectUserByName" resultType="User">select * from t_user where username = #{username} and id = 2;</select><select id="selectUserByName" resultType="User">select * from t_user where username = '${username}' and id = 2;</select>5.2 多个字面量类型的参数
若mapper接口中的方法参数为单个的字面量类型,MyBatis多个参数可接受的类型为
[arg1, arg0... param1, param2...],具体什么意思呢?意思就是以
arg1,arg0...为键,以传入的参数为值,形成键值对或者以param1,param2...为键,以参数为值。并且arg和param在同一个map集合,可以交叉使用,但是不推荐。
<select id="checkLogin" resultType="User"> select * from t_user where username = #{arg0} and password = #{arg1};</select><select id="checkLogin" resultType="User"> select * from t_user where username = '${arg0}' and password = '${arg1}';</select>5.3 map集合类型的参数
若mapper接口方法参数有多个时,可以手动将这些参数放到一个Map集合中,这样就不会使用MyBatis默认的Map集合,而是使用我们自己定义的。
<!--User checkLoginByMap(Map map);--><select id="checkLoginByMap" resultType="User"> select * from t_user where username = #{username} and password = #{password};</select>//测试//参数为Map集合类型@Testpublic void testCheckLoginByMap(){ SqlSession sqlSession = SqlSessionUtils.getSqlSession(); ParameterMapper mapper = sqlSession.getMapper(ParameterMapper.class); Map<String, Object> map = new HashMap<String, Object>(); map.put("username","admin"); map.put("password","123456"); User user = mapper.checkLoginByMap(map); System.out.println(user);}5.4 实体类类型的参数
如果mapper接口方法中的参数是一个实体类类型的参数,只需要通过
#{}和${}以属性的方式访问属性值即可,注意单引号问题。
<insert id="insertUser"> insert into t_user values (null,#{username},#{password},#{age},#{sex},#{email});</insert>//以实体类作为参数@Testpublic void testInsertUser(){ SqlSession sqlSession = SqlSessionUtils.getSqlSession(); ParameterMapper mapper = sqlSession.getMapper(ParameterMapper.class); int result = mapper.insertUser(new User(null, "王五", "123456", 12, "男", "wangwu@qq.com")); System.out.println(result);}5.5 使用@Param注解命名参数
<select id="checkLoginByAnnotation" resultType="User">select * from t_user where username = #{username} and password = #{password};</select>//使用注解@Testpublic void testCheckLoginByAnnotation(){ SqlSession sqlSession = SqlSessionUtils.getSqlSession(); ParameterMapper mapper = sqlSession.getMapper(ParameterMapper.class); User user = mapper.checkLoginByAnnotation("admin","123456"); System.out.println(user);}5.7 获取参数小结
以上总共有5种获取参数的方法,但是可以将这5种总结为两种,就是
实体类类型作为参数和使用@Param注解。
- 单个字面量参数、多个字面量参数、map集合类型参数都可以使用@Param注解实现。
- 实体类类型参数作为另一种情况。
六、MyBatis的各种查询功能
6.1 查询一个实体类对象
/ * 查询用户,返回实体类对象 */User getUserById(@Param("id") int id);<select id="getUserById" resultType="User">select * from t_user where id = #{id};</select>6.2 查询一个List集合
/* 查询一组用户,返回list集合*/List<User> getAllUsers();<!--List getAllUsers();--><select id="getAllUsers" resultType="User">select * from t_user;</select>6.3 查询单个数据
/ * 查询用户数量,返回单个值 */int getUserCount();<select id="getUserCount" resultType="Integer">select count(*) from t_user;</select>6.4 查询一条Map集合类型数据
/ * 根据id查询用户信息为一个map集合 */Map<String, Object> getUserByIdToMap(@Param("id") Integer id);<!--Map getUserByIdToMap(@Param("id") Integer id);--><select id="getUserByIdToMap" resultType="map">select * from t_user where id = #{id};</select>查询结果:
{password=123456, sex=男, id=3, age=22, email=1564@163.com, username=zhangsan}6.5 查询多条Map集合类型数据
/ * 查询所有用户信息为map集合 */List<Map<String, Object>> getAllUsersToMap();<!--Map getAllUsersToMap();--><select id="getAllUsersToMap" resultType="map">select * from t_user;</select>查询结果:
[{password=123456, sex=男, id=2, age=23, email=12345@qq.com, username=admin}, {password=123456, sex=男, id=3, age=22, email=1564@163.com, username=zhangsan}, {password=root, sex=女, id=4, age=19, email=78923@123.com, username=lisi}, {password=123456, sex=男, id=6, age=12, email=wangwu@qq.com, username=王五}]可以在mapper接口的方法上添加@MapKey注解,此时就可以将每条数据转换的map集合作为值,以某个字段的值作为键,放在一个Map集合中。
/ * 查询所有用户信息为map集合 */ @MapKey("id") Map<String, Object> getAllUsersToMap();<!--Map getAllUsersToMap();--><select id="getAllUsersToMap" resultType="map">select * from t_user;</select>查询结果:
{2={password=123456, sex=男, id=2, age=23, email=12345@qq.com, username=admin}, 3={password=123456, sex=男, id=3, age=22, email=1564@163.com, username=zhangsan}, 4={password=root, sex=女, id=4, age=19, email=78923@123.com, username=lisi}, 6={password=123456, sex=男, id=6, age=12, email=wangwu@qq.com, username=王五}}七、特殊SQL的执行
7.1 模糊查询
-
使用
${}拼接<select id="getUserByLike" resultType="User">select * from t_user where username like '%${username}%';</select> -
使用MySQL内置字符串拼接函数
<select id="getUserByLike" resultType="User">select * from t_user where username like concat('%',#{username},'%');</select> -
用
"%"#{字符串}"%"直接拼接<select id="getUserByLike" resultType="User"> select * from t_user where username like "%"#{username}"%";</select>
7.2 批量删除
/ * 批量删除 */int deleteMore(@Param("ids") String ids);<delete id="deleteMore">delete from t_user where id in (${ids});</delete>7.3 动态设置表名
/ * 查询指定表中的数据 */List<Object> getUserByTableName(@Param("tableName")String tableName); <!--List getUserByTableName(@Param("tableName")String tableName);--> <select id="getUserByTableName" resultType="User"> select * from ${tableName}; </select>八、自定义映射resultMap
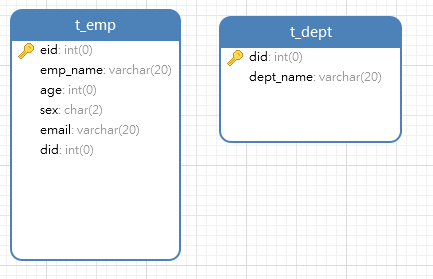
使用到的数据表结构如下:
8.1 resultMap处理字段和属性的映射关系
<resultMap id="empResultMap" type="emp"> <id property="eid" column="eid"></id> <result property="empName" column="emp_name"></result> <result property="age" column="age"></result> <result property="sex" column="sex"></result> <result property="email" column="email"></result></resultMap><!--List getAllEmp();--><select id="getAllEmp" resultMap="empResultMap"> select * from t_emp;</select>测试:
public void testgetAllEmp(){ SqlSession sqlSession = SqlSessionUtils.getSqlSession(); EmpMapper mapper = sqlSession.getMapper(EmpMapper.class); List<Emp> allEmp = mapper.getAllEmp(); allEmp.forEach(emp -> System.out.println(emp));}结果:
Emp{eid=1, empName='张三', age=12, sex='男', email='135@123.com'}Emp{eid=2, empName='李四', age=23, sex='女', email='lisi@qq.com'}Emp{eid=3, empName='王五', age=56, sex='男', email='wangwu@163.com'}Emp{eid=4, empName='赵六', age=45, sex='男', email='zhaoliu@gmail.com'}Emp{eid=5, empName='张飞', age=34, sex='男', email='zhaoliu@gmail.com'}Emp{eid=6, empName='李逵', age=23, sex='男', email='135@123.com'}8.2 多对一映射处理
/ * 查询某一员工信息及所属部门 */Emp getEmpAndDept(@Param("eid")Integer eid);
- 方式一:使用
ResultMap
<resultMap id="empAndDeptResultMapOne" type="emp"> <id property="eid" column="eid"></id> <result property="empName" column="emp_name"></result> <result property="age" column="age"></result> <result property="sex" column="sex"></result> <result property="email" column="email"></result> <result property="dept.did" column="did"></result> <result property="dept.deptName" column="dept_name"></result></resultMap><select id="getEmpAndDept" resultMap="empAndDeptResultMapOne"> select * from t_emp left join t_dept on t_emp.did = t_dept.did where eid = #{eid};</select>
- 方式二:通过
association解决
<resultMap id="empAndDeptResultMapTwo" type="emp"> <id property="eid" column="eid"></id> <result property="empName" column="emp_name"></result> <result property="age" column="age"></result> <result property="sex" column="sex"></result> <result property="email" column="email"></result> <association property="dept" javaType="Dept"> <id property="did" column="did"></id> <result property="deptName" column="dept_name"></result> </association></resultMap><select id="getEmpAndDept" resultMap="empAndDeptResultMapTwo">select * from t_emp left join t_dept on t_emp.did = t_dept.did where eid = #{eid};</select>方式三:通过
分步查询处理多对一
//EmpMapper接口 / * 查询某一员工信息及所属部门 * 分步查询第一步:查询员工信息 */Emp getEmpAndDeptByStepOne(@Param("eid")Integer eid);<resultMap id="empAndDeptByStepResultMap" type="Emp"> <id property="eid" column="eid"></id> <result property="empName" column="emp_name"></result> <result property="age" column="age"></result> <result property="sex" column="sex"></result> <result property="email" column="email"></result> <association property="dept" select="com.atguigu.mybatis.mapper.DeptMapper.getEmpAndDeptByStepTwo" column="did"> </association></resultMap><select id="getEmpAndDeptByStepOne" resultMap="empAndDeptByStepResultMap">select * from t_emp where eid = #{eid};</select>//DeptMapper接口/ * 查询某一员工信息及所属部门 * 分步查询第二步:查询部分信息 */Dept getEmpAndDeptByStepTwo(@Param("did")Integer did);<resultMap id="deptResultMap" type="Dept"> <id property="did" column="did"></id> <result property="deptName" column="dept_name"></result></resultMap><select id="getEmpAndDeptByStepTwo" resultMap="deptResultMap">select * from t_dept where did = #{did};</select>
第三种方式相比前两种要复杂一些,第一步先根据
eid查找出用户信息,用户信息中会有一个字段did,然后将该字段作为第二步查询的条件,查询did等于刚才查找出的用户的did对应的部门信息。分步查询的好处就是:
延迟加载,但是必须在配置文件中设置全局配置信息;lazyLoadingEnabled:延迟加载的全局开关。当开启时,所有关联对象都会延迟加载
aggressiveLazyLoading:当开启时,任何方法的调用都会加载该对象的所有属性。否则,每个属性按需加载
可以通过association和collection中的fetchType属性设置当前的分步查询是否使用延迟加载,fetchType=“lazy(延迟加载)|eager(立即加载)”。
延迟加载:如果开启,可以理解为将原来的分步查询操作变成两个独立的查询,可以独立执行,执行第一步并不会将第二步一起执行。如果关闭,那么两步操作都会执行。
8.3 一对多映射处理
方式一:使用
collection处理
/* 获取部门以及部门中所有的员工信息*/Dept getDeptAndEmp(@Param("did")Integer did);<resultMap id="deptAndEmpResultMap" type="Dept"> <id property="did" column="did"></id> <result property="deptName" column="dept_name"></result> <collection property="emps" ofType="Emp"> <id property="eid" column="eid"></id> <result property="empName" column="emp_name"></result> <result property="age" column="age"></result> <result property="sex" column="sex"></result> <result property="email" column="email"></result></collection></resultMap><select id="getDeptAndEmp" resultMap="deptAndEmpResultMap">select * from t_dept left join t_emp on t_dept.did = t_emp.did where t_dept.did = #{did};</select>方式二:分步查询
/* 分步查询获取部门以及部门中所有的员工信息* 第一步:获取部门did*/Dept getDeptAndEmpByStep(@Param("did")Integer did);<resultMap id="deptAndEmpByStepResultMap" type="Dept"> <id property="did" column="did"></id> <result property="deptName" column="dept_name"></result> <collection property="emps" select="com.atguigu.mybatis.mapper.EmpMapper.getDeptAndEmpByStepTwo" column="did"> </collection></resultMap><select id="getDeptAndEmpByStepOne" resultMap="deptAndEmpByStepResultMap">select * from t_dept where did = #{did};</select>/* 分步查询获取部门以及部门中所有的员工信息* 第二步:通过did获取员工集合*/List<Emp> getDeptAndEmpByStepTwo(@Param("did")Integer did);<!--List getDeptAndEmpByStepTwo(@Param("did")Integer did);--><select id="getDeptAndEmpByStepTwo" resultType="Emp">select * from t_emp where did = #{did};</select>九、动态SQL
MyBatis框架的动态SQL技术是一种根据特定条件动态拼接SQL语句的功能,它存在的意义是为了解决拼接SQL语句字符串时的痛点问题。
9.1 if
<!--List getEmpByCondition(Emp emp);--><select id="getEmpByCondition" resultType="Emp"> select * from t_emp where 1 = 1 <if test="empName != null and empName != '' "> and emp_name = #{empName} </if> <if test="sex != null and sex != '' "> and sex = #{sex} </if> <if test="age != null and age != '' "> and age = #{age} </if> <if test="email != null and email != '' "> and email = #{email} </if></select>9.2 where
当where标签中有内容时,会自动生成where关键字,并且将内容前多余的and或or去掉。
当where标签中没有内容时,此时where标签没有任何效果。
注意:where标签不能将其中内容后面的and或or去掉。
<!--List getEmpByCondition(Emp emp);--><select id="getEmpByCondition" resultType="Emp">select * from t_emp<where><if test="empName != null and empName != '' ">emp_name = #{empName}</if><if test="sex != null and sex != '' ">and sex = #{sex}</if><if test="age != null and age != '' ">and age = #{age}</if><if test="email != null and email != '' ">and email = #{email}</if></where></select>9.3 trim
若标签中有内容时,
prefix|suffix:将
trim标签中内容前面或后面添加指定内容 prefixOverrides | suffixOverrides:将
trim标签中内容前面或后面去掉指定内容如果没有内容时,不起作用。
<!--List getEmpByCondition(Emp emp);--><select id="getEmpByCondition" resultMap="empResultMap">select * from t_emp<trim prefix="where" suffixOverrides="and|or"><if test="empName != null and empName != '' ">emp_name = #{empName} and</if><if test="sex != null and sex != '' ">sex = #{sex} and</if><if test="age != null and age != '' ">age = #{age} and</if><if test="email != null and email != '' ">email = #{email}</if></trim></select>9.4 choose、when、otherwise
相当于java中的
if...else if...else,when至少要有一个,otherwise最多只能有一个。
<!--List getEmpByChoose(Emp emp);--><select id="getEmpByChoose" resultMap="empResultMap">select * from t_emp<where><choose><when test="empName != '' and empName != null">emp_name = #{empName};</when><when test="age != '' and age != null">age = #{age};</when> <when test="sex != '' and sex != null"> sex = #{sex}; </when> <when test="email != '' and email != null"> email = #{email}; </when><otherwise>did = 1;</otherwise></choose></where></select>9.5 foreach
/* 通过数组实现批量删除*/int deleteMoreByArray(@Param("eids") Integer[] eids);<delete id="deleteMoreByArray">delete from t_emp where eid in<foreach collection="eids" item="eid" separator="," open="(" close=")">#{eid}</foreach></delete>十、MyBatis的缓存
10.1 MyBatis的一级缓存
一级缓存是SqlSession级别的,通过同一个SqlSession查询的数据会被缓存,下次查询相同的数据,就会从缓存中获取,不会从数据库重新访问。一级缓存默认开启。
使一级缓存失效的情况:
- 不同的SqlSession对应不同的一级缓存
- 同一个SqlSession但是查询条件不同
- 同一个SqlSession两次查询期间执行了任何一次增删改操作
- 同一个SqlSession两次查询期间手动清空了缓存
10.2 MyBatis的二级缓存
二级缓存是SqlSessionFactory级别,通过同一个SqlSessionFactory创建的SqlSession查询的结果会被缓存;此后若再次执行相同的查询语句,结果就会从缓存中获取。
二级缓存开启的条件:
- 在核心配置文件中,设置全局配置属性cacheEnabled=“true”,默认为true,不需要设置
- 在映射文件中设置标签
- 二级缓存必须在SqlSession关闭或提交之后有效
- 查询的数据所转换的实体类类型必须实现序列化接口
使二级缓存失效的情况:
- 两次查询期间执行了任意的增删改,会使一级和二级缓存同时失效
十一、MyBatis的逆向工程
正向工程:先创建Java实体类,由框架负责根据实体类生成数据库表。Hibernate支持正向工程。
逆向工程:先创建数据库表,由框架负责根据数据库表,反向生成Java实体类,Mapper接口、Mapper映射文件
11.1 pom.xml
<project xmlns="http://maven.apache.org/POM/4.0.0" xmlns:xsi="http://www.w3.org/2001/XMLSchema-instance" xsi:schemaLocation="http://maven.apache.org/POM/4.0.0 http://maven.apache.org/xsd/maven-4.0.0.xsd"> <modelVersion>4.0.0</modelVersion> <groupId>com.atguigu.mybatis</groupId> <artifactId>MyBatis_MBG</artifactId> <version>1.0-SNAPSHOT</version> <packaging>jar</packaging> <dependencies> <dependency> <groupId>org.mybatis</groupId> <artifactId>mybatis</artifactId> <version>3.5.9</version> </dependency> <dependency> <groupId>junit</groupId> <artifactId>junit</artifactId> <version>4.13.1</version> <scope>test</scope> </dependency> <dependency> <groupId>org.mybatis.generator</groupId> <artifactId>mybatis-generator-core</artifactId> <version>1.4.0</version> </dependency> <dependency> <groupId>com.alibaba</groupId> <artifactId>druid</artifactId> <version>1.2.8</version> </dependency> <dependency> <groupId>mysql</groupId> <artifactId>mysql-connector-java</artifactId> <version>8.0.27</version> </dependency> </dependencies> <build> <plugins> <plugin> <groupId>org.mybatis.generator</groupId> <artifactId>mybatis-generator-maven-plugin</artifactId> <version>1.4.0</version> </plugin> </plugins> </build></project>11.2 创建逆向工程的配置文件
文件名必须为generatorConfig,通常放在src/main/resources目录下,也会默认在该目录下寻找
<!DOCTYPE generatorConfiguration PUBLIC "-//mybatis.org//DTD MyBatis Generator Configuration 1.0//EN" "http://mybatis.org/dtd/mybatis-generator-config_1_0.dtd"><generatorConfiguration><!-- --> <properties resource="jdbc.properties"></properties> <context id="DB2Tables" targetRuntime="MyBatis3"> <jdbcConnection driverClass="${jdbc.driver}" connectionURL="${jdbc.url}" userId="${jdbc.username}" password="${jdbc.password}"> </jdbcConnection> <javaModelGenerator targetPackage="com.atguigu.mybatis.pojo" targetProject=".\src\main\java"> <property name="enableSubPackages" value="true"/> <property name="trimString" value="true"/> </javaModelGenerator> <sqlMapGenerator targetPackage="com.atguigu.mybatis.mapper" targetProject=".\src\main\resources"> <property name="enableSubPackages" value="true"/> </sqlMapGenerator> <javaClientGenerator type="XMLMAPPER" targetPackage="com.atguigu.mybatis.mapper" targetProject=".\src\main\java"> <property name="enableSubPackages" value="true"/> </javaClientGenerator> <table tableName="t_emp" domainObjectName="Emp"></table> <table tableName="t_dept" domainObjectName="Dept"></table> </context></generatorConfiguration>11.3 实体类、Mapper接口、映射文件的生成
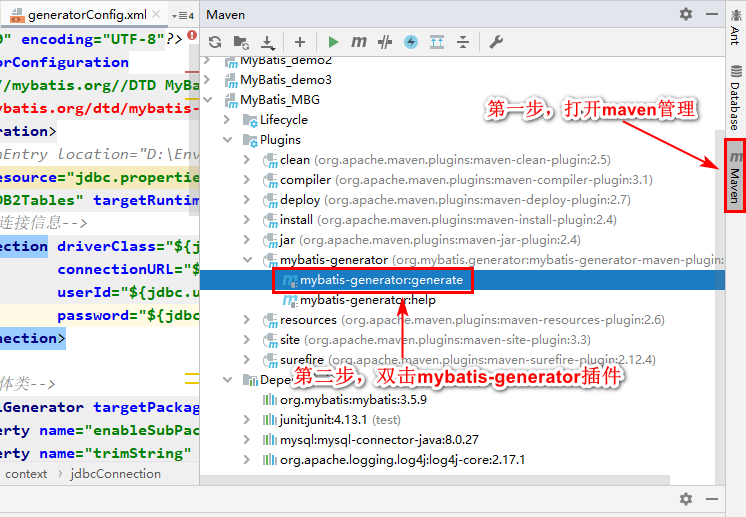
等待执行完毕即可,随后就会看到根据配置文件生成的实体类、Mapper接口以及映射文件。
十二、MyBatis的分页插件
PageHelper的使用可以查看官方文档:https://pagehelper.github.io/docs/howtouse/
- 添加依赖
<dependency> <groupId>com.github.pagehelper</groupId> <artifactId>pagehelper</artifactId> <version>5.2.1</version></dependency>
- 配置分页插件
<plugins> <plugin interceptor="com.github.pagehelper.PageInterceptor"></plugin></plugins>
- 分页插件的使用
//一个简单的测试@Testpublic void testPageHelp(){InputStream is = null;try {is = Resources.getResourceAsStream("mybatis-config.xml");SqlSessionFactory sqlSessionFactory = new SqlSessionFactoryBuilder().build(is);SqlSession sqlSession = sqlSessionFactory.openSession(true);EmpMapper mapper = sqlSession.getMapper(EmpMapper.class);PageHelper.startPage(2,4);List<Emp> emps = mapper.selectByExample(null);emps.forEach(emp -> System.out.println(emp));} catch (IOException e) {e.printStackTrace();}}
