SpringBoot的两种缓存技术使用教程(Spring Cache、Alibaba JetCache 框架)
相信有许多小伙伴在开发当中,多多少少都遇到过稍大数据量的处理,可能会因为一些业务需要,导致该业务的响应速度达不到开发的标准,会对其进行优化处理;如果单单依赖于数据库去获取数据,已经是远远不够的了,此时就需要引入缓存技术。
常用的缓存而言,本地缓存和Redis缓存,简单的介绍一番:
本地缓存:存储于内存当中,速度快,缺点就是无法持久化,项目关闭数据就会丢失,不适用于分布式项目当中,会造成数据不一致的情况。
Redis缓存:访问的速度快,相比于本地缓存有所拓展,可以设置过期时间,刷新缓存等,在使用当中也可能会因为网络波动回有所影响。
本文主要介绍Spring Cache、Alibaba JetCache 框架,接下来我们介绍介绍这两种缓存技术。
一:Spring Cache
SpringCache是SpringBoot自带的一种缓存技术,使用方法较为简单;在这里介绍Redis缓存的使用,首先是引入springboot的web包和redis的包;
org.springframework.boot spring-boot-starter-web org.springframework.boot spring-boot-starter-data-redis导包后,我们需要在启动类上打上@EnableCaching 注解启动缓存功能。
@EnableCaching// 开启缓存public class Application { public static void main(String[] args) { SpringApplication.run(Application.class, args); } }在yml中做一些简单的配置:
spring: cache: type: redis redis: host: 127.0.0.1 port: 6379 password: database: 5接下来我们做一个模拟演示,针对于Student去模拟一下简单的业务操作,主要是介绍缓存的运用,这里直接看service层(不做DAO层与数据库之间的交互):
@Servicepublic class StudentServiceImpl extends ServiceImpl implements StudentService{ @Autowired private StudentMapper studentMapper; @Override @Cacheable(value = "student", key = "#id")// 在这里直接启用缓存,key是作为Redis缓存的key public Student getStudentById(Long id) { Student student = studentMapper.getStudentById(id); return student; } @Override @CachePut(value = "student", key = "#student.id", condition = "#student.id != null")// 在这里更新缓存,key是作为Redis缓存的key,condition做条件判断 public Student updateStudent(Student student) { studentMapper.updateStudent(student); return studentMapper.getStudentById(student.getId()); } @Override @CacheEvict(value = "student", key = "#id")// 在这里删除缓存,key是作为Redis缓存的key public Boolean deleteStudentById(Long id) { return studentMapper.deleteStudentById(id); }}如上代码所示我们使用到了@Cacheable(启用缓存)、@CachePut(更新缓存)、@CacheEvict(删除缓存) 三个注解;
@Cacheable(启用缓存):从缓存中查找数据,若没找到就执行方法从数据库查找该数据,,并将数据添加到缓存当中
@CachePut(更新缓存):根据key找到该缓存,condition为true时执行方法将缓存进行一波更新
CacheEvict(删除缓存):直接根据key将缓存删除
在SpringCache当中,实现的功能相对来是时比较单一的,并没有二级缓存一说,也没有缓存刷新一说,相比较于jetcache就显得比较鸡肋,jetcache的优势显而易见。
对了,在这里说一句,如果对象存储到redis后发现类型不是我们理想的,我们可以通过修改 RedisCacheConfiguration 中的序列化规则:
@Configurationpublic class RedisConfig extends CachingConfigurerSupport { @Bean public RedisCacheConfiguration redisCacheConfiguration(){ Jackson2JsonRedisSerializer jackson2JsonRedisSerializer = new Jackson2JsonRedisSerializer(Object.class); RedisCacheConfiguration configuration = RedisCacheConfiguration.defaultCacheConfig(); configuration = configuration.serializeValuesWith(RedisSerializationContext.SerializationPair.fromSerializer(jackson2JsonRedisSerializer)).entryTtl(Duration.ofDays(30)); return configuration; }}二:Alibaba JetCache 框架
阿里的这个缓存框架相比于Spring的自带缓存来说是更加方便,功能更加的完善,提供两级缓存和异步cacheAPI操作,以及其他的TTL等。使用起来可以说是让开发者如鱼得水,接下来简单地说一说它的使用及可能出现的问题;
首先还是需要引进jetcache的包,必不可少的流程走一走;
com.alicp.jetcache jetcache-starter-redis 2.5.11当然,还是需要在启动类上做一做手脚;我们在启动类上去开启缓存
// 开启在方法上使用缓存注解@EnableMethodCache(basePackages = "com.daily.applet")// 开启使用注解方式创建cache@EnableCreateCacheAnnotationpublic class Application { public static void main(String[] args) { SpringApplication.run(Application.class, args); }}jetcache-jedis使用 在配置文件application.yml中的配置:
jetcache: statIntervalMinutes: 15 areaInCacheName: false local: default: type: linkedhashmap keyConvertor: fastjson limit: 100 remote: default: type: redis keyConvertor: fastjson valueEncoder: java valueDecoder: java poolConfig: minIdle: 5 maxIdle: 20 maxTotal: 50 host: 127.0.0.1 port: 6379 password: 接下来说一说它的具体使用,从两个方面入手,缓存实例和注解实现缓存方法:
2.1使用@CreateCache创建缓存实例
@Servicepublic class StudentServiceImpl extends ServiceImpl implements StudentService{ // 创建缓存实例 @CreateCache(name = "student_cache", expire = 3600,timeUnit = TimeUnit.SECONDS,cacheType = CacheType.BOTH, localLimit = 50) private Cache studentCache; @Autowired private StudentMapper studentMapper; @Override public Student getStudentById(Long id) { Student student= studentCache.get(id); if (Objects.nonNull(student)) { return student; } student= studentMapper.getStudentById(id); studentCache.put(id, student); return student; }}如上代码所示,创建缓存实例去实现数据缓存,做了一个简单的示例,通过缓存实例去查找和添加缓存;实现比较简单,易上手。
2.2注解方式实现方法缓存
直接上图说明:
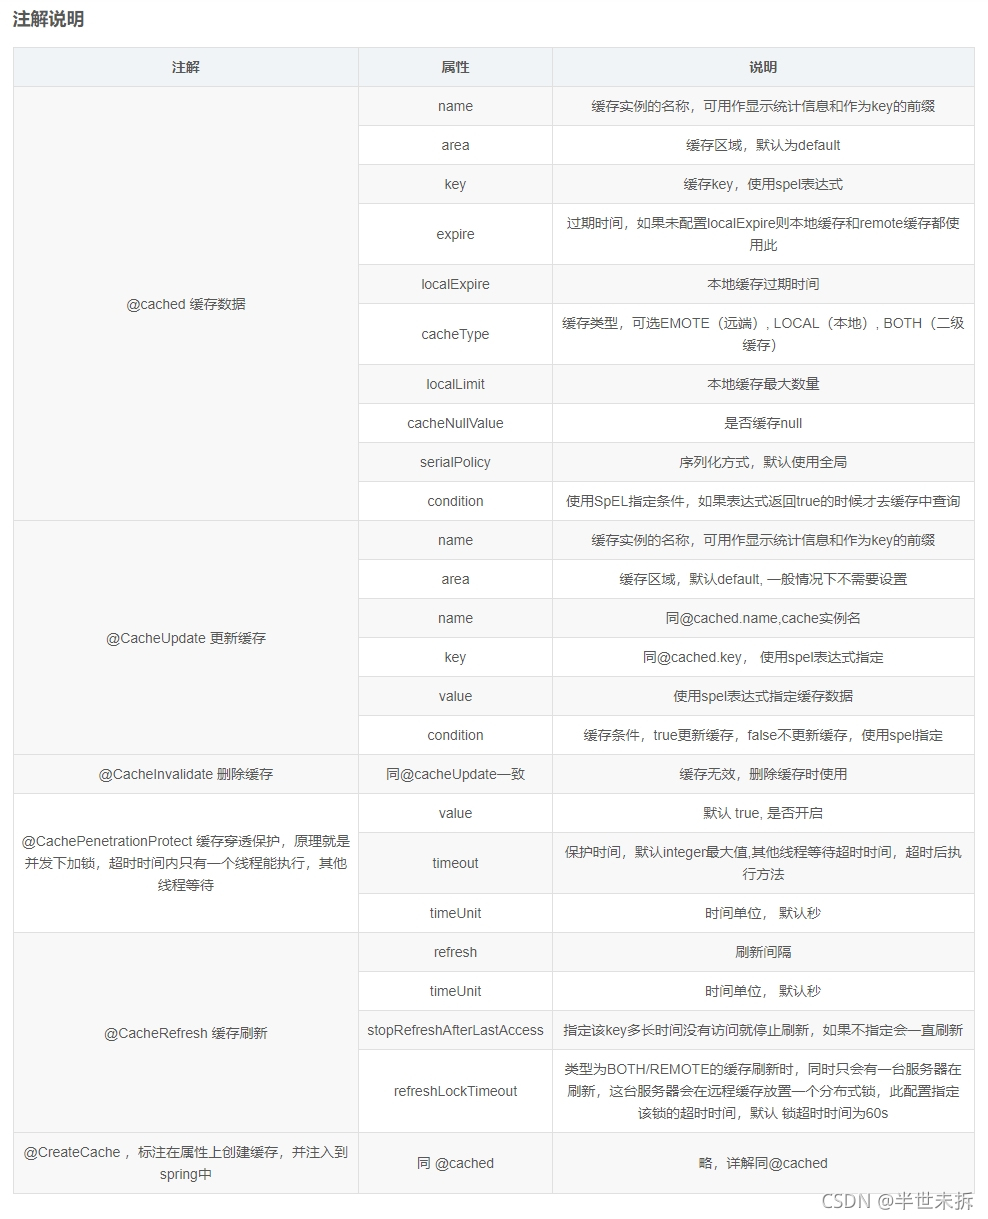
图中所展示的是注解中的属性解说,这方面是很重要的;多说一句,在这里的key作为缓存的key,有些朋友使用spel表达式指定之后,可能达不到自己想要的效果,特别是将参数作为key,而参数又是一个对象时,可能会出现错误,这个时候可以不用去指定key,会默认将参数作为key去进行缓存。简单的说一说它的几个注解的用法及意义:
2.2.1@Cached
@Servicepublic class GoodsServiceImpl extends ServiceImpl implements GoodsService { @Autowired private GoodsMappergoodsMapper; @Override @Cached(area = "default", name = "goods.", expire = 30, localExpire = 30, cacheType = CacheType.REMOTE, timeUnit = TimeUnit.MINUTES) public PageInfo getGoodsList(GoodsQueryDTO dto) { PageInfo pageInfo = new PageInfo(dto.getPageCurr(), dto.getPageSize()); List goodsVOS = goodsMapper.getGoodsList(dto, pageInfo); pageInfo.setRecords(goodsVOS); return pageInfo; }}这里的是我实战中的部分代码,偷个懒直接粘贴了(表示在代码段里面手撕代码很痛苦),直接加在方法上面,使用简单方便;
2.2.2@CacheUpdate
更新缓存
@Servicepublic class GoodsServiceImpl extends ServiceImpl implements GoodsService { @Override @CacheUpdate(name = "goods_cache",key="'goods'" ,value = "#object") public Object updateObject(...) { // 业务处理 return object; }}2.2.3@CacheRefresh
刷新缓存
@Servicepublic class GoodsServiceImpl extends ServiceImpl implements GoodsService { @Autowired private GoodsMappergoodsMapper; @Override @Cached(area = "default", name = "goods.", expire = 30, localExpire = 30, cacheType = CacheType.REMOTE, timeUnit = TimeUnit.MINUTES) @CacheRefresh(refresh = 3,timeUnit = TimeUnit.MINUTES) public PageInfo getGoodsList(GoodsQueryDTO dto) { PageInfo pageInfo = new PageInfo(dto.getPageCurr(), dto.getPageSize()); List goodsVOS = goodsMapper.getGoodsList(dto, pageInfo); pageInfo.setRecords(goodsVOS); return pageInfo; }}2.2.4@CacheInvalidate
缓存删除
@Servicepublic class GoodsServiceImpl extends ServiceImpl implements GoodsService { @Override @CacheInvalidate(name = "goods_cache", key = "'goods'") public void deleteObject(...) { // 业务处理 System.out.println("删除缓存:zxy"); }}2.2.5@CachePenetrationProtect
添加缓存穿透保护,是jvm级别进程级别的,不是分布式的;只保护本服务并发只有一个获取锁执行,其他的等待
@Servicepublic class GoodsServiceImpl extends ServiceImpl implements GoodsService { @Autowired private GoodsMappergoodsMapper; @Override @Cached(area = "default", name = "goods.", expire = 30, localExpire = 30, cacheType = CacheType.REMOTE, timeUnit = TimeUnit.MINUTES) @CacheRefresh(refresh = 3,timeUnit = TimeUnit.MINUTES) @CachePenetrationProtect public PageInfo getGoodsList(GoodsQueryDTO dto) { PageInfo pageInfo = new PageInfo(dto.getPageCurr(), dto.getPageSize()); List goodsVOS = goodsMapper.getGoodsList(dto, pageInfo); pageInfo.setRecords(goodsVOS); return pageInfo; }}上述就是Spring Cache、Alibaba JetCache 框架的比较和使用教程,最后,如果在使用当中出现了如下报错:Caused by: java.lang.NoClassDefFoundError: redis/clients/util/Pool
可能就是因为jedis的版本问题;需要引入新版本的jedis;引入该包可解决:
redis.clients jedis 2.9.1该文章就到这里结束啦!!!欢迎大佬多多指点

