DAYU200 | 分布式遥控器
1.概述
目前家庭电视机主要通过其自带的遥控器进行操控,实现的功能较为单一。例如,当我们要在TV端搜索节目时,电视机在遥控器的操控下往往只能完成一些字母或数字的输入,而无法输入其他复杂的内容。分布式遥控器将手机的输入能力和电视遥控器的遥控能力结合为一体,从而快速便捷操控电视。
分布式遥控器的实现基于OpenHarmony的分布式能力和RPC通信能力,UI使用eTS进行开发。如下图所示,分别用两块开发板模拟TV端和手机端。
分布式组网后可以通过TV端界面的Controller按钮手动拉起手机端的遥控界面,在手机端输入时会将输入的内容同步显示在TV端搜索框,点击搜索按钮会根据输入的内容搜索相关节目。
还可以通过点击方向键(上下左右)将焦点移动到我们想要的节目上,再点击播放按钮进行播放,按返回按钮返回TV端主界面。
同时还可以通过手机遥控端关机按钮同时关闭TV端和手机端界面。
UI效果图如下:
图1 TV端主页默认页面
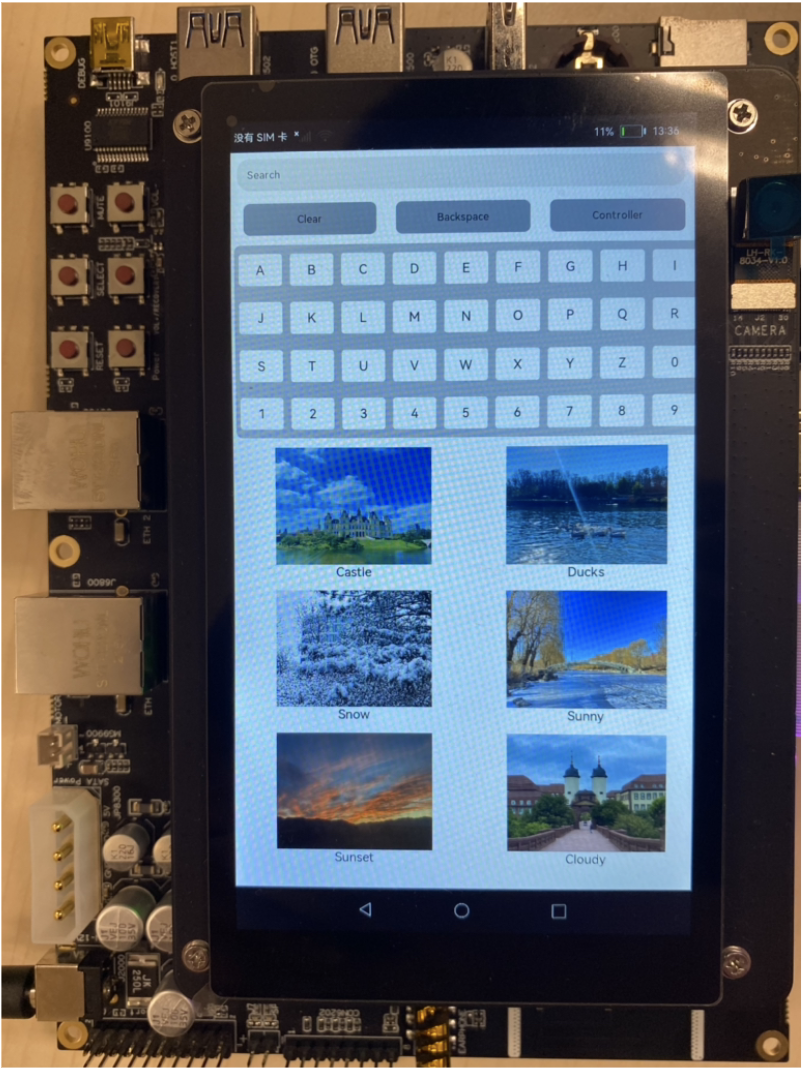
图2 手机端遥控页面
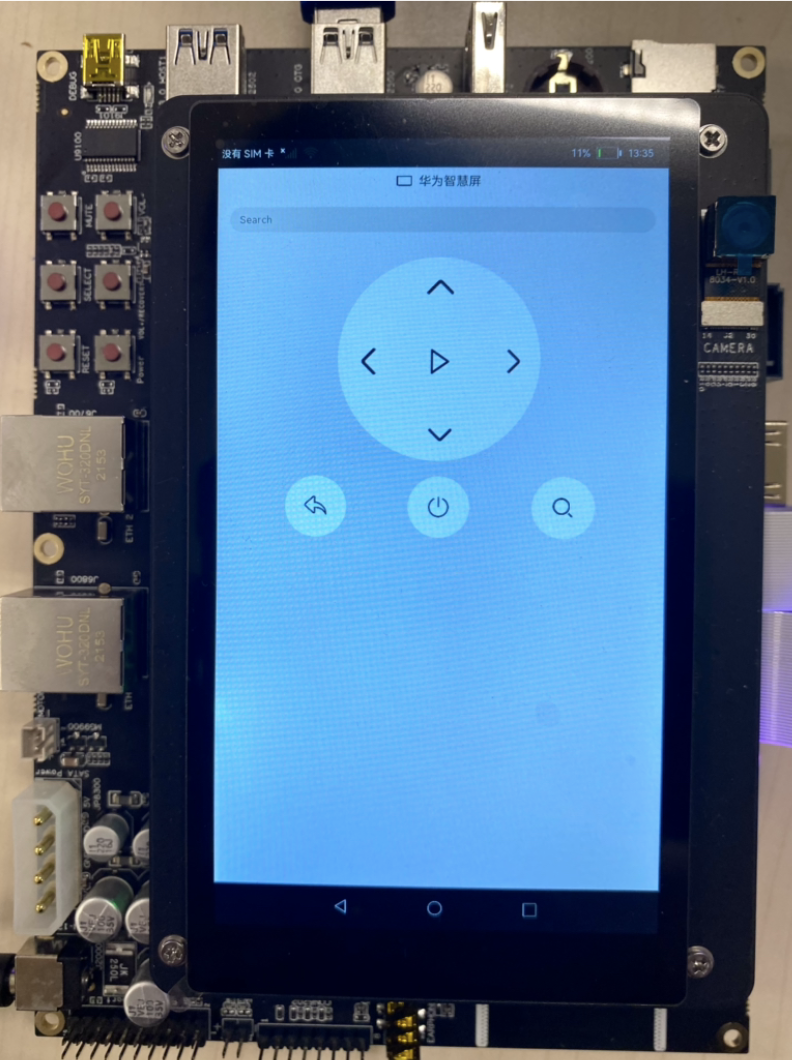
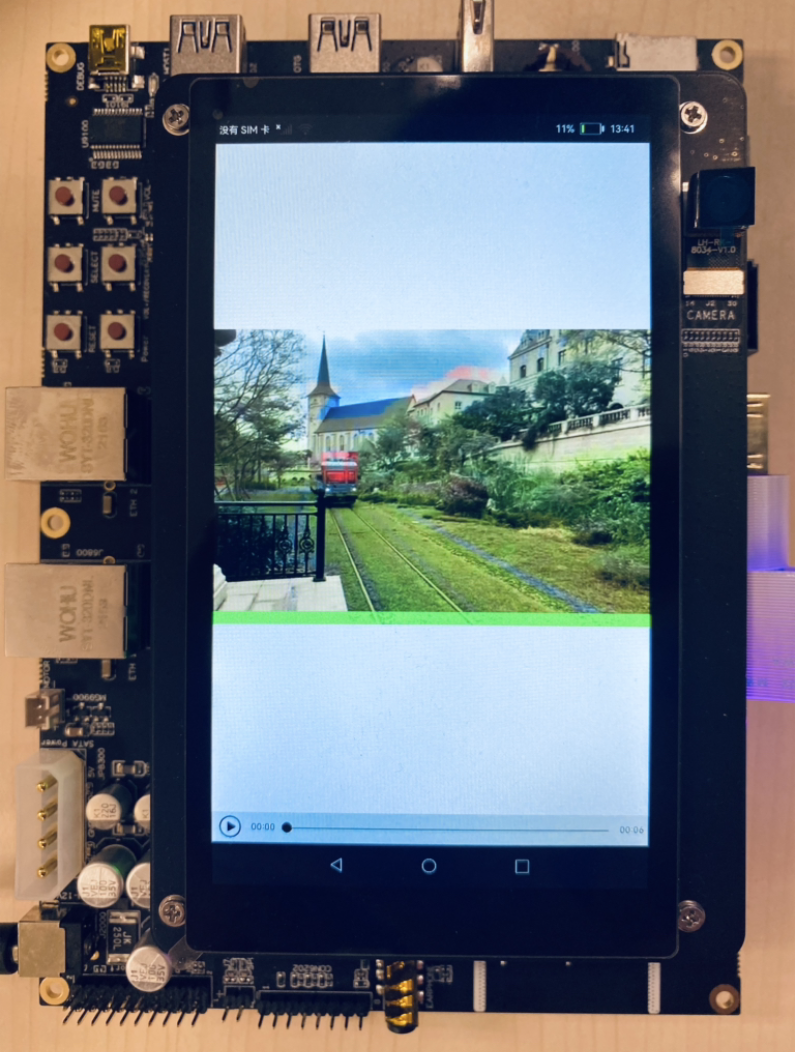
图3 TV端视频播放页面
2.实现TV端界面
在本章节中,您将学会开发TV端默认界面和TV端视频播放界面,示意图参考第一章图1和图3所示。
建立数据模型,将图片ID、图片源、图片名称和视频源绑定成一个数据模型。详情代码可以查看MainAbility/model/PicData.ets和MainAbility/model/PicDataModel.ets两个文件。
实现TV端默认页面布局和样式。
在MainAbility/pages/TVIndex.ets 主界面文件中添加入口组件。页面布局代码如下:
// 入口组件@Entry@Componentstruct Index { private letters: string[] = ['A', 'B', 'C', 'D', 'E', 'F', 'G', 'H', 'I', 'J', 'K', 'L', 'M', 'N', 'O', 'P', 'Q', 'R', 'S', 'T', 'U', 'V', 'W', 'X', 'Y', 'Z', '0', '1', '2', '3', '4', '5', '6', '7', '8', '9'] private source: string @State text: string = '' @State choose: number = -1 build() { Flex({ direction: FlexDirection.Column }) { TextInput({text: this.text, placeholder: 'Search' }) .onChange((value: string) => { this.text = value }) Row({space: 30}) { Text('Clear') .fontSize(16) .backgroundColor('#ABB0BA') .textAlign(TextAlign.Center) .onClick(() => { this.text = '' }) .clip(true) .borderRadius(10) Text('Backspace') .fontSize(16) .backgroundColor('#ABB0BA') .textAlign(TextAlign.Center) .onClick(() => { this.text = this.text.substring(0, this.text.length - 1) }) .clip(true) .borderRadius(10) Text('Controller') .fontSize(16) .backgroundColor('#ABB0BA') .textAlign(TextAlign.Center) .onClick(() => { ...... }) .clip(true) .borderRadius(10) } Grid() { ForEach(this.letters, (item) => { GridItem() { Text(item).fontSize(20).backgroundColor('#FFFFFF').textAlign(TextAlign.Center).onClick(() => { this.text += item }).clip(true).borderRadius(5) } }, item => item) } .rowsTemplate('1fr 1fr 1fr 1fr') .columnsTemplate('1fr 1fr 1fr 1fr 1fr 1fr 1fr 1fr 1fr') .columnsGap(8) .rowsGap(8) .width('75%') .height('25%') .margin(5) .backgroundColor('#D2D3D8') .clip(true) .borderRadius(10) Grid() { ForEach(this.picItems, (item: PicData) => { GridItem() { PicGridItem({ picItem: item }) } }, (item: PicData) => item.id.toString()) } .rowsTemplate('1fr 1fr 1fr') .columnsTemplate('1fr 1fr') .columnsGap(5) .rowsGap(8) .width('90%') .height('58%') .backgroundColor('#FFFFFF') .margin(5) } .width('98%') .backgroundColor('#FFFFFF') }}其中PicGridItem将PicItem的图片源和图片名称绑定,实现代码如下:
// 九宮格拼图组件@Componentstruct PicGridItem { private picItem: PicData build() { Column() { Image(this.picItem.image) .objectFit(ImageFit.Contain) .height('85%') .width('100%') .onClick(() => { ...... }) }) Text(this.picItem.name) .fontSize(20) .fontColor('#000000') } .height('100%') .width('90%') }}实现TV端视频播放界面。
在MainAbility/pages/VideoPlay.ets 文件中添加组件。页面布局代码如下:
import router from '@system.router'@Entry@Componentstruct Play {// 取到Index页面跳转来时携带的source对应的数据。 private source: string = router.getParams().source build() { Column() { Video({ src: this.source, }) .width('100%') .height('100%') .autoPlay(true) .controls(true) } }}在MainAbility/pages/TVIndex.ets中,给PicGridItem的图片添加点击事件,点击图片即可播放PicItem的视频源。实现代码如下:
Image(this.picItem.image) ...... .onClick(() => { router.push({ uri: 'pages/VideoPlay', params: { source: this.picItem.video } }) })3、实现手机遥控端界面
在本章节中,您将学会开发手机遥控端默认界面,示意图参考第一章图2所示。
PhoneAbility/pages/PhoneIndex.ets 主界面文件中添加入口组件。页面布局代码如下:
@Entry@Componentstruct Index { build() { Flex({ direction: FlexDirection.Column, alignItems: ItemAlign.Center }) { Row() { Image($rawfile('TV.png')) .width(25) .height(25) Text('华为智慧屏').fontSize(20).margin(10) } // 文字搜索框 TextInput({ placeholder: 'Search' }) .margin(20) .onChange((value: string) => { if (connectModel.mRemote){ ...... } }) Grid() { GridItem() { // 向上箭头 Button({ type: ButtonType.Circle, stateEffect: true }) { Image($rawfile('up.png')).width(80).height(80) } .onClick(() => { ...... }) .width(80) .height(80) .backgroundColor('#FFFFFF') } .columnStart(1) .columnEnd(5) GridItem() { // 向左箭头 Button({ type: ButtonType.Circle, stateEffect: true }) { Image($rawfile('left.png')).width(80).height(80) } .onClick(() => { ...... }) .width(80) .height(80) .backgroundColor('#FFFFFF') } GridItem() { // 播放键 Button({ type: ButtonType.Circle, stateEffect: true }) { Image($rawfile('play.png')).width(60).height(60) } .onClick(() => { ...... }) .width(80) .height(80) .backgroundColor('#FFFFFF') } GridItem() { // 向右箭头 Button({ type: ButtonType.Circle, stateEffect: true }) { Image($rawfile('right.png')).width(70).height(70) } .onClick(() => { ...... }) .width(80) .height(80) .backgroundColor('#FFFFFF') } GridItem() { // 向下箭头 Button({ type: ButtonType.Circle, stateEffect: true }) { Image($rawfile('down.png')).width(70).height(70) } .onClick(() => { ...... }) .width(80) .height(80) .backgroundColor('#FFFFFF') } .columnStart(1) .columnEnd(5) } .rowsTemplate('1fr 1fr 1fr') .columnsTemplate('1fr 1fr 1fr') .backgroundColor('#FFFFFF') .margin(10) .clip(new Circle({ width: 325, height: 325 })) .width(350) .height(350) Row({ space:100 }) { // 返回键 Button({ type: ButtonType.Circle, stateEffect: true }) { Image($rawfile('return.png')).width(40).height(40) } .onClick(() => { ...... }) .width(100) .height(100) .backgroundColor('#FFFFFF') // 关机键 Button({ type: ButtonType.Circle, stateEffect: true }) { Image($rawfile('off.png')).width(40).height(40) } .onClick(() => { ...... }) .width(100) .height(100) .backgroundColor('#FFFFFF') // 搜索键 Button({ type: ButtonType.Circle, stateEffect: true }) { Image($rawfile('search.png')).width(40).height(40) } .onClick(() => { ...... }) .width(100) .height(100) .backgroundColor('#FFFFFF') } .padding({ left:100 }) } .backgroundColor('#E3E3E3') }}