自定义CollapsingToolbaLayout完成可收缩的带头像的Toolbar
前言
CollapsingToolbarLayout是谷歌官方提供的Material的组件之一,实现了可折叠的Toolbar,效果还不错,具体怎么使用已经有了很多不错的文章,请善用搜索功能,这里就不在赘述了。而我们今天要实现的是往ToolBar`中添加一个头像,
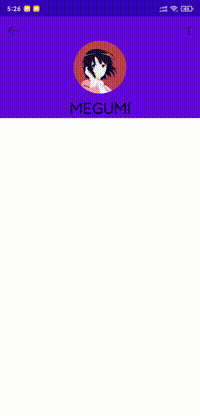
完成的效果如下图
文章会比较长,感兴趣的可以前往项目地址
一、CollapsingToolbarLayout分析
正所谓前人栽树,后人乘凉。要想少走点弯路,多copy看看别人的代码不妨是个好方法。谷歌的CollapsingToolbaLayout写得相当的优雅,主要代码不过几百行。先从构造方法入手:
1. 构造方法
public CollapsingToolbarLayout(@NonNull Context context, @Nullable AttributeSet attrs, int defStyleAttr) { super(wrap(context, attrs, defStyleAttr, DEF_STYLE_RES), attrs, defStyleAttr); // Ensure we are using the correctly themed context rather than the context that was passed in. context = getContext(); collapsingTextHelper = new CollapsingTextHelper(this); collapsingTextHelper.setTextSizeInterpolator(AnimationUtils.DECELERATE_INTERPOLATOR); collapsingTextHelper.setRtlTextDirectionHeuristicsEnabled(false); elevationOverlayProvider = new ElevationOverlayProvider(context);...// 告诉ViewGroup不要跳过draw方法的调用 setWillNotDraw(false); ViewCompat.setOnApplyWindowInsetsListener( this, new androidx.core.view.OnApplyWindowInsetsListener() { @Override public WindowInsetsCompat onApplyWindowInsets(View v, @NonNull WindowInsetsCompat insets) { return onWindowInsetChanged(insets); } }); }这里我做了简化处理,挑了主要部分,简化的部分主要完成从xml获取一些资源,比如Toolbar的标题折叠时的字体大小颜色那些。CollapsingTextHelper是谷歌写的一个工具类,用于辅助计算Toolbar的标题,折叠标题主要是它完成的。
2. 如何与AppBarLayout联动
我们知道CollapsingToolbarLayout需要放在AppBarLayout中才能有效果,否则只是一个普通的FrameLayout。看接下来的代码:
@Override protected void onAttachedToWindow() { super.onAttachedToWindow();// 如果是AppBarLayout的直接子View,那么给AppBarLayout添加一个OnOffsetChangedListener // Add an OnOffsetChangedListener if possible final ViewParent parent = getParent(); if (parent instanceof AppBarLayout) { AppBarLayout appBarLayout = (AppBarLayout) parent; if (onOffsetChangedListener == null) { onOffsetChangedListener = new OffsetUpdateListener(); } appBarLayout.addOnOffsetChangedListener(onOffsetChangedListener); ... } } @Override protected void onDetachedFromWindow() { // 移除监听器 // Remove our OnOffsetChangedListener if possible and it exists final ViewParent parent = getParent(); if (onOffsetChangedListener != null && parent instanceof AppBarLayout) { ((AppBarLayout) parent).removeOnOffsetChangedListener(onOffsetChangedListener); } super.onDetachedFromWindow(); }可以看到,在Attached的时候添加了一个OnOffsetChangedListener,这就是联动的关键,我们看它做了什么
private class OffsetUpdateListener implements AppBarLayout.OnOffsetChangedListener { OffsetUpdateListener() {} @Override public void onOffsetChanged(AppBarLayout layout, int verticalOffset) { currentOffset = verticalOffset; final int insetTop = lastInsets != null ? lastInsets.getSystemWindowInsetTop() : 0; for (int i = 0, z = getChildCount(); i < z; i++) { final View child = getChildAt(i); final LayoutParams lp = (LayoutParams) child.getLayoutParams(); final ViewOffsetHelper offsetHelper = getViewOffsetHelper(child); switch (lp.collapseMode) { case LayoutParams.COLLAPSE_MODE_PIN: // 需要固定的View固定 offsetHelper.setTopAndBottomOffset( MathUtils.clamp(-verticalOffset, 0, getMaxOffsetForPinChild(child))); break; case LayoutParams.COLLAPSE_MODE_PARALLAX: // 需要差速滑动的View设置差速值 offsetHelper.setTopAndBottomOffset(Math.round(-verticalOffset * lp.parallaxMult)); break; default: break; } } // Show or hide the scrims if needed updateScrimVisibility(); if (statusBarScrim != null && insetTop > 0) { ViewCompat.postInvalidateOnAnimation(CollapsingToolbarLayout.this); } // Update the collapsing text's fraction int height = getHeight(); final int expandRange = height - ViewCompat.getMinimumHeight(CollapsingToolbarLayout.this) - insetTop; final int scrimRange = height - getScrimVisibleHeightTrigger(); collapsingTextHelper.setFadeModeStartFraction( Math.min(1, (float) scrimRange / (float) expandRange)); collapsingTextHelper.setCurrentOffsetY(currentOffset + expandRange); collapsingTextHelper.setExpansionFraction(Math.abs(verticalOffset) / (float) expandRange); } }先说一下onOffsetChanged(AppBarLayout layout, int verticalOffset)的两个参数
| 参数 | 含义 |
|---|---|
| layout | 那肯定是AppBarLayout |
| verticalOffset | 垂直的滑动偏移,值处于0-AppBarLayout.height ,总是<=0 |
上面的代码总共就完成了两件事,根据layoutParam移动子View和重绘标题,记住,是重绘标题。因为标题是使用canvas画的,而不是移动某个TextView。ViewOffsetHelper同样是一个工具类,用于辅助计算移动偏移量的,内部调用了ViewCompat.offsetTopAndBottom、ViewCompat.offsetLeftAndRight等
3. 折叠标题的实现
上面说到标题是使用Canvas画的,具体看下面代码
@Override public void draw(@NonNull Canvas canvas) { super.draw(canvas); // If we don't have a toolbar, the scrim will be not be drawn in drawChild() below. // Instead, we draw it here, before our collapsing text. ensureToolbar(); // 此处省略contentScrim的绘制 ... // 绘制标题 collapsingTextHelper.draw(canvas); // 此处省略statusBarScrim的绘制... }可以说很清楚了,先确定是否有ToolBar,然后绘制标题,绘制的具体实现就不展开了,大致就是计算出标题的位置,然后使用StaticLayout画的
ensureToolbar()也是想当关键的一步:
private void ensureToolbar() { if (!refreshToolbar) { return; } // First clear out the current Toolbar this.toolbar = null; toolbarDirectChild = null; if (toolbarId != -1) { // 如果是通过Id指定的Toolbar,那么获取Toolbar的直接父布局 // If we have an ID set, try and find it and it's direct parent to us this.toolbar = findViewById(toolbarId); if (this.toolbar != null) { toolbarDirectChild = findDirectChild(this.toolbar); } } if (this.toolbar == null) { // 如果是没有ID,那么从直接子View中获取ToolBar // If we don't have an ID, or couldn't find a Toolbar with the correct ID, try and find // one from our direct children ViewGroup toolbar = null; for (int i = 0, count = getChildCount(); i < count; i++) { final View child = getChildAt(i); if (isToolbar(child)) { toolbar = (ViewGroup) child; break; } } this.toolbar = toolbar; }// 更新虚拟View updateDummyView(); refreshToolbar = false; }上面又调用了一个关键方法updateDummyView()DummyView,顾名思义,虚拟视图,这个View不会进行显示
private void updateDummyView() { if (!collapsingTitleEnabled && dummyView != null) { // If we have a dummy view and we have our title disabled, remove it from its parent final ViewParent parent = dummyView.getParent(); if (parent instanceof ViewGroup) { ((ViewGroup) parent).removeView(dummyView); } } if (collapsingTitleEnabled && toolbar != null) { if (dummyView == null) { dummyView = new View(getContext()); } if (dummyView.getParent() == null) { toolbar.addView(dummyView, LayoutParams.MATCH_PARENT, LayoutParams.MATCH_PARENT); } } }可以看到,dummyView被添加成了Toolbar的直接子View,并且占据了整个Toolbar空间,这就意味着Toolbar的所有部件都将被隐藏,除了导航按钮图标和菜单栏。而dummyView同时被拿做标题绘制的参考View,因为dummyView始终在Toolbar内部,它的左侧紧贴导航图标的右边,右侧紧贴菜单栏的左边,只需要拿到它的位置,很容易就计算出标题的相对位置。
小结
CollapsingToolbarLayout完成折叠标题等功能主要是通过监听AppBarLayout的垂直滑动量来计算子View的位置,然后进行子View的偏移和标题的重绘
二、实现
通过上面的分析,我们基本知道大致的流程怎么样了:获取想要操控的子View=>监听AppBarLayout=>在滑动回调时更新子View的形状、大小、位置等信息。
再看看效果图
1. 缩放比例的计算
上图可以看出,ToolBar分为两个状态,展开与折叠,标题和头像随着滑动距离的增加和减少进行相应的放大与缩小,而这个缩放比例怎么计算呢?
上面分析了,onOffsetChanged(AppBarLayout layout, int verticalOffset)回调中的第二个参数与AppBarLayout的高度有关,总是小于0,因此我们可以通过滑动偏移量和高度做运算即可获得当前滑动的比例:
/ * 获取当前的缩放比例 */ private fun getOffsetRatio(): Float { if (minimumHeight == height || -mAppBarLayoutOffset < top) return 0F return (mAppBarLayoutOffset + top) * -1.00F / (height - minimumHeight) }minimumHeight为折叠时的高度,在onMeasure() 中计算的,等于Toolbar的高度。top呢是getTop()的kotlin语法糖,自定义View的就应该很清楚,这个值是到父布局顶部的相对距离。
这个方法拿到了当前的滑动比例,通过这个值我们可以计算View各种参数的缩放比例:
拿标题的文字大小举例:
我们假设文字展开后的大小为X,收缩后的大小为Y,比例为m。因为默认状态是展开,所以,缩放后的大小为X-(X-Y)*m,变化一下就是(1-m)*X+mY,因此我们只需要知道文字的开始和结束大小,就可以计算出缩放后的大小。
2. 标题的处理
从效果图可以看出,ToolBar展开时标题横向居中,字体放大,ToolBar收缩时标题与头像齐平,字体与ToolBar默认标题一样大。因此我们可以定义如下几个参数:
/ * 当前字体大小 */ private var mCurrentTextSize = 15F / * 展开时字体的放大倍数 */ private var mExpandedRatio: Float = TEXT_EXPANDED_RATIO / * 字体折叠时的大小,默认与ToolBar默认标题一样大 */ private var mCollapsingSize = 15F / * 头像折叠时的大小,默认40dp */ private val mAvatarCollapsedSize: Float3. 头像位置的处理
展开时头像默认居中,那么头像左侧为(width - mImageView.width) / 2,收缩时头像处于原Toolbar标题时的位置,那肯定会想到dummyView,那我直接获取它的left不就好了吗?
通过事时证明,这是完全错误的。具体原因我暂时没分析出来,因为给布局添加左右padding后dummyView的left的值跟没有padding时是一样的。
然而我们能想到的谷歌肯定能想到,谷歌在CollapsingToolbarLayout使用了一个叫DescendantOffsetUtils工具来计算布局的实时显示位置(相对于父布局),这个工具那是相当的厉害了,无论是调用scale,tanslation等不会改变View布局参数的方法都可以用这个来计算显示的位置,最常见的就是调用scale后获取View的显示大小。然而这个工具并没有公开,被注解了只能同库使用,好在这个就是单独的工具,没有其它依赖,那只能使用CV大法了。
/ * 谷歌写的获取view在parent中的偏移Rect,但是被注解了只能同库使用,所以复制到这来 */object DescendantOffsetUtils { private val matrix = ThreadLocal<Matrix>() private val rectF = ThreadLocal<RectF>() / * This is a port of the common [ViewGroup.offsetDescendantRectToMyCoords] from * the framework, but adapted to take transformations into account. The result will be the * bounding rect of the real transformed rect. * * @param descendant view defining the original coordinate system of rect * @param rect (in/out) the rect to offset from descendant to this view's coordinate system */ private fun offsetDescendantRect( parent: ViewGroup, descendant: View, rect: Rect ) { var m = matrix.get() if (m == null) { m = Matrix() matrix.set(m) } else { m.reset() } offsetDescendantMatrix(parent, descendant, m) var rectF = rectF.get() if (rectF == null) { rectF = RectF() rectF.set(rectF) } rectF.set(rect) m.mapRect(rectF) rect[(rectF.left + 0.5f).toInt(), (rectF.top + 0.5f).toInt(), (rectF.right + 0.5f).toInt()] = (rectF.bottom + 0.5f).toInt() } / * Retrieve the transformed bounding rect of an arbitrary descendant view. This does not need to * be a direct child. * * @param descendant descendant view to reference * @param out rect to set to the bounds of the descendant view */ fun getDescendantRect( parent: ViewGroup, descendant: View, out: Rect ) { out[0, 0, descendant.width] = descendant.height offsetDescendantRect(parent, descendant, out) } private fun offsetDescendantMatrix( target: ViewParent, view: View, m: Matrix ) { val parent = view.parent if (parent is View && parent !== target) { val vp = parent as View offsetDescendantMatrix(target, vp, m) m.preTranslate(-vp.scrollX.toFloat(), -vp.scrollY.toFloat()) } m.preTranslate(view.left.toFloat(), view.top.toFloat()) if (!view.matrix.isIdentity) { m.preConcat(view.matrix) } }}有了实时位置,起始位置和结束为,剩下的就是套公式,那么头像处理方法如下:
private fun offsetAvatar() { if (mImageView != null) { val offsetRatio = getOffsetRatio() val scale = 1 - offsetRatio + offsetRatio * mAvatarCollapsedSize / mImageView!!.measuredWidth mImageView!!.scaleX = scale mImageView!!.scaleY = scale DescendantOffsetUtils.getDescendantRect(this, mImageView!!, mImageViewBounds) DescendantOffsetUtils.getDescendantRect(this, mDummyView!!, mDummyViewBounds) val left = (1 - offsetRatio) * ((width - mImageView!!.width) / 2) + offsetRatio * mDummyViewBounds.left val top = (1 - offsetRatio) * (height - mDummyViewBounds.bottom) / 2 + offsetRatio * mDummyViewBounds.top + (mDummyViewBounds.height() - mImageViewBounds.height()) / 2 ViewCompat.offsetLeftAndRight(mImageView!!, (left - mImageViewBounds.left).toInt()) ViewCompat.offsetTopAndBottom(mImageView!!, (top - mImageViewBounds.top).toInt()) } }最后
这里是源码,欢迎提issue,有什么好看的效果也可以多交流交流。

