健身也内卷?这届网友用 Python 掌握了做标准俯卧撑的秘诀
编者按:自己在家锻炼时,我们很难知道自己的动作是否标准。本文作者用Python写了一个可以检测俯卧撑动作是否标准的程序,一起来看看他是怎么做的。
原文链接:https://aryanvij02.medium.com/push-ups-with-python-mediapipe-open-a544bd9b4351
GitHub 地址:https://github.com/aryanvij02/PushUpCounter
译者 | 章雨铭 责编 | 屠敏
在新加坡军队中,有一种测试叫做IPPT(个人身体素质测试)。这个测试的困难不在于它对体力的要求有多高,而在于用来计算做俯卧撑和仰卧起坐次数的电子机器。
和大多数人一样,我的俯卧撑动作总是不达标(根据机器的意见)。此外,由于缺乏参照机器标准的练习,许多NSMen(已经完成两年强制性服役的人)在IPPT测试中都难以取得好成绩。
因此,我决定使用mediapipe和OpenCV创建一个程序,跟踪我们的俯卧撑动作,确保我们每一个俯卧撑动作都达标。
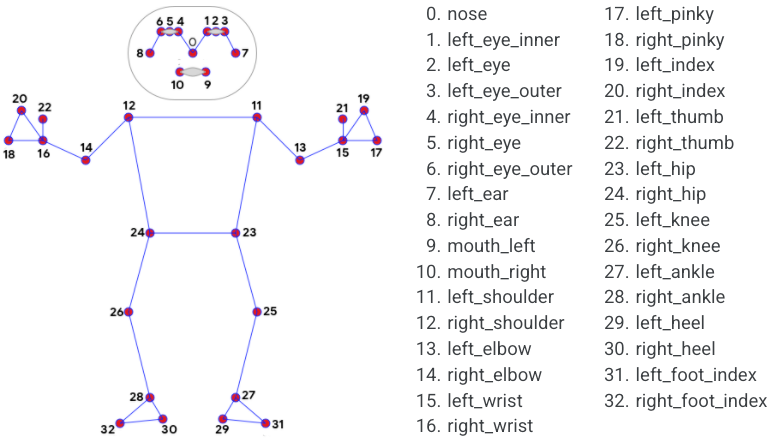
由mediapipe姿势模块检测到的肢体关节
import cv2import mediapipe as mpimport mathclass poseDetector() :def __init__(self, mode=False, complexity=1, smooth_landmarks=True,enable_segmentation=False, smooth_segmentation=True,detectionCon=0.5, trackCon=0.5):self.mode = modeself.complexity = complexityself.smooth_landmarks = smooth_landmarksself.enable_segmentation = enable_segmentationself.smooth_segmentation = smooth_segmentationself.detectionCon = detectionConself.trackCon = trackConself.mpDraw = mp.solutions.drawing_utilsself.mpPose = mp.solutions.poseself.pose = self.mpPose.Pose(self.mode, self.complexity, self.smooth_landmarks,self.enable_segmentation, self.smooth_segmentation,self.detectionCon, self.trackCon)def findPose (self, img, draw=True):imgRGB = cv2.cvtColor(img, cv2.COLOR_BGR2RGB)self.results = self.pose.process(imgRGB)if self.results.pose_landmarks:if draw:self.mpDraw.draw_landmarks(img,self.results.pose_landmarks,self.mpPose.POSE_CONNECTIONS)return imgdef findPosition(self, img, draw=True):self.lmList = []if self.results.pose_landmarks:for id, lm in enumerate(self.results.pose_landmarks.landmark):#finding height, width of the image printedh, w, c = img.shape#Determining the pixels of the landmarkscx, cy = int(lm.x * w), int(lm.y * h)self.lmList.append([id, cx, cy])if draw:cv2.circle(img, (cx, cy), 5, (255,0,0), cv2.FILLED)return self.lmListdef findAngle(self, img, p1, p2, p3, draw=True):#Get the landmarksx1, y1 = self.lmList[p1][1:]x2, y2 = self.lmList[p2][1:]x3, y3 = self.lmList[p3][1:]#Calculate Angleangle = math.degrees(math.atan2(y3-y2, x3-x2) -math.atan2(y1-y2, x1-x2))if angle < 0:angle += 360if angle > 180:angle = 360 - angleelif angle > 180:angle = 360 - angle# print(angle)#Drawif draw:cv2.line(img, (x1, y1), (x2, y2), (255,255,255), 3)cv2.line(img, (x3, y3), (x2, y2), (255,255,255), 3)cv2.circle(img, (x1, y1), 5, (0,0,255), cv2.FILLED)cv2.circle(img, (x1, y1), 15, (0,0,255), 2)cv2.circle(img, (x2, y2), 5, (0,0,255), cv2.FILLED)cv2.circle(img, (x2, y2), 15, (0,0,255), 2)cv2.circle(img, (x3, y3), 5, (0,0,255), cv2.FILLED)cv2.circle(img, (x3, y3), 15, (0,0,255), 2)cv2.putText(img, str(int(angle)), (x2-50, y2+50),cv2.FONT_HERSHEY_PLAIN, 2, (0,0,255), 2)return angledef main():detector = poseDetector()cap = cv2.VideoCapture(0)while cap.isOpened():ret, img = cap.read() #ret is just the return variable, not much in there that we will use.if ret:img = detector.findPose(img)cv2.imshow('Pose Detection', img)if cv2.waitKey(10) & 0xFF == ord('q'):breakcap.release()cv2.destroyAllWindows()if __name__ == "__main__":main()
以上是这个程序的代码。
上面的代码来源于PoseModule.py,有以下几个功能:
-
激活mediapipe的姿势检测模块。
-
检测人体。
-
根据模型找到人体上不同肢体关节的位置。(肢体显示在上面的图片中)。
-
查找关节之间的角度(取决于你选择的关节)。对于我的俯卧撑程序,我选择找到肘部、肩部和臀部的角度,因为这些对俯卧撑动作的标准至关重要。
接下来是实际的俯卧撑计数的代码。我们使用PoseModule并确定一个俯卧撑合格与否的标准。
import cv2import mediapipe as mpimport numpy as npimport PoseModule as pmcap = cv2.VideoCapture(0)detector = pm.poseDetector()count = 0direction = 0form = 0feedback = "Fix Form"while cap.isOpened():ret, img = cap.read() #640 x 480#Determine dimensions of video - Help with creation of box in Line 43width = cap.get(3) # float `width`height = cap.get(4) # float `height`# print(width, height)img = detector.findPose(img, False)lmList = detector.findPosition(img, False)# print(lmList)if len(lmList) != 0:elbow = detector.findAngle(img, 11, 13, 15)shoulder = detector.findAngle(img, 13, 11, 23)hip = detector.findAngle(img, 11, 23,25)#Percentage of success of pushupper = np.interp(elbow, (90, 160), (0, 100))#Bar to show Pushup progressbar = np.interp(elbow, (90, 160), (380, 50))#Check to ensure right form before starting the programif elbow > 160 and shoulder > 40 and hip > 160:form = 1#Check for full range of motion for the pushupif form == 1:if per == 0:if elbow 160:feedback = "Up"if direction == 0:count += 0.5direction = 1else:feedback = "Fix Form"if per == 100:if elbow > 160 and shoulder > 40 and hip > 160:feedback = "Down"if direction == 1:count += 0.5direction = 0else:feedback = "Fix Form"# form = 0print(count)#Draw Barif form == 1:cv2.rectangle(img, (580, 50), (600, 380), (0, 255, 0), 3)cv2.rectangle(img, (580, int(bar)), (600, 380), (0, 255, 0), cv2.FILLED)cv2.putText(img, f'{int(per)}%', (565, 430), cv2.FONT_HERSHEY_PLAIN, 2,(255, 0, 0), 2)#Pushup countercv2.rectangle(img, (0, 380), (100, 480), (0, 255, 0), cv2.FILLED)cv2.putText(img, str(int(count)), (25, 455), cv2.FONT_HERSHEY_PLAIN, 5,(255, 0, 0), 5)#Feedbackcv2.rectangle(img, (500, 0), (640, 40), (255, 255, 255), cv2.FILLED)cv2.putText(img, feedback, (500, 40 ), cv2.FONT_HERSHEY_PLAIN, 2,(0, 255, 0), 2)cv2.imshow('Pushup counter', img)if cv2.waitKey(10) & 0xFF == ord('q'):breakcap.release()cv2.destroyAllWindows()
有个需要注意的地方在第17-21行。确定从相机捕捉到的图像的分辨率,并在绘制俯卧撑计数的矩形时调整像素值,等等。(第68-82行)。
我们完成了!一个能确保动作标准的俯卧撑计数软件。没有完全俯下?不算数! 膝盖放在了地上?不算数!
快乐的做俯卧撑吧!

