Java多线程教程(作者原创)
个人简介
作者是一个来自河源的大三在校生,以下笔记都是作者自学之路的一些浅薄经验,如有错误请指正,将来会不断的完善笔记,帮助更多的Java爱好者入门。
文章目录
-
- 个人简介
- Java并发编程(多线程高并发)
-
- 创建线程的三种方式
-
- 继承于Thread类
- 实现Runnable接口(推荐)
- 实现Callable接口
- Thread常用方法
-
- join方法
- 计数器
- 模拟并发(多线程)抢票=>超卖问题
-
- 单线程抢票,没有安全问题
- 多线程抢票出现安全问题
- 解决多线程抢票线程不安全问题
- 多线程的原子性、可见性、有序性
-
- 原子性
- 可见性(演示不出来)
- 有序性
- 多线程锁问题
-
- 多线程出现异常自动释放锁
- 死锁(重要)
- 原子类AtomicXXX
-
- 原子类(AtomicInteger/AtomicLong)
- 多线程操作数组线程不安全
-
- 解决方案(加锁和原子数组)
- 线程通信
-
- wait()/notify()机制实现线程通信
- 生产者消费者模式
-
- 一个生产者和一个消费者操作值
- 多个生产者和多个消费者操作值
- 一个生产者和一个消费者操作栈(用List集合去模拟)
- 多个生产者和多个消费者操作栈(用List集合去模拟)
- 利用管道流通信
- Condition通信(用到了显式锁)
- ThreadLocal
- Lock显式锁
-
- ReentrantLock的使用
- 可重入锁特性
- tryLock方法(解决死锁)
- 读写锁(ReadWriteLock)
-
- 读读共享
- 写写互斥
- 读写互斥
- 线程池ThreadPool
-
- 线程池的简单使用
Java并发编程(多线程高并发)
创建线程的三种方式
继承于Thread类
public class createThreadTest1 { public static void main(String[] args) { thread01 thread01 = new thread01(); thread01.start(); //调用start方法开启线程 }}class thread01 extends Thread{ @Override public void run() { System.out.println(Thread.currentThread().getName()+"===>正在运行"); try { Thread.sleep(500); } catch (InterruptedException e) { e.printStackTrace(); } }}实现Runnable接口(推荐)
因为Java不支持多继承,所以用实现接口的方法可扩展性会更高,让唯一的继承留个更加有用的类
public class createThreadTest1 { public static void main(String[] args) { Thread thread02 = new Thread(new thread02()); thread02.start(); }}class thread02 implements Runnable{ @Override public void run() { System.out.println(Thread.currentThread().getName()+"===>正在运行"); try { Thread.sleep(500); } catch (InterruptedException e) { e.printStackTrace(); } }}也可以这样:
//方法3:匿名开启线程 new Thread(new Runnable() { @Override public void run() { System.out.println("匿名开启线程");} }).start();可以用lambda表达式
new Thread(() ->{ System.out.println("666"); }).start();实现Callable接口
callable实现比较复杂
public class createThreadTest1 { public static void main(String[] args) throws ExecutionException, InterruptedException { thread03 thread03 = new thread03(); FutureTask<String> futureTask=new FutureTask<>(thread03); new Thread(futureTask).start(); String getMsg = futureTask.get(); //这段代码必须在开启线程之后写 System.out.println(getMsg); }class thread03 implements Callable<String>{ @Override public String call() throws Exception { return "callable"; }}Thread常用方法
public class threadMethod { public static void main(String[] args) { thread01 thread01=new thread01(); Thread thread = new Thread(thread01); thread.setName("t1");//1.设置线程名字 thread.setPriority(5);//2.设置线程优先级(一般不建议设置),优先级高不一定先执行。。。。 System.out.println("thread.getState()==>"+thread.getState());//3.获取当前线程状态 boolean alive1 = thread.isAlive();//4.查看当前线程是否活着 System.out.println("alive==>"+alive1); thread.start(); //开启线程 try { Thread.sleep(500);//5.线程休眠500ms boolean alive = thread.isAlive();//查看当前线程是否活着 System.out.println("alive==>"+alive); } catch (InterruptedException e) { e.printStackTrace(); } }}class thread01 implements Runnable{ @Override public void run() { System.out.println("id==>"+Thread.currentThread().getId()); //获取当前线程id System.out.println("name==>"+Thread.currentThread().getName());//获取当前线程名 System.out.println("Priority===>"+Thread.currentThread().getPriority());//获取线程优先级 System.out.println("state==>"+Thread.currentThread().getState());//获取当前线程状态 System.out.println("alive==>"+Thread.currentThread().isAlive()); }}join方法
注意:join方法只能在开启线程之后在使用,不然就会无效,也就是先start()再join()
join方法的用处,可以让子线程去处理或者计算一些值,计算完之后main线程可以使用计算完的值
public class threadJoinTest { private static int count=0; public static void main(String[] args) { System.out.println("main========="); Thread t1 = new Thread(new Runnable() { @Override public void run() { System.out.println("进入run方法"); for (int i = 0; i < 5; i++) {count++; System.out.println("子线程==="+count); } } }); t1.start(); try { //注意:join方法必须要在start方法后面,不然不生效,因为调用了start方法才会创建线程。然后再线程插队 t1.join(); //线程插队。也就是只有t1线程执行完,join方法后面的代码才能执行 } catch (InterruptedException e) { e.printStackTrace(); } System.out.println("main线程==="+count); }}计数器
public class threadTimer { public static void main(String[] args) { timer timer = new timer(); timer.setNum(10); new Thread(timer).start(); }}class timer implements Runnable{ private int num; private boolean isRun=true; public void setNum(int num) { this.num = num; } @Override public void run() { while (isRun){ if(num<=0){ isRun=false; System.out.println("程序结束!"); return; } System.out.println("倒计时,还剩"+num+"秒"); try { Thread.sleep(1000); num--; } catch (InterruptedException e) { e.printStackTrace(); } } }}模拟并发(多线程)抢票=>超卖问题
单线程抢票,没有安全问题
public class threadTicket { / * 模拟高并发抢票线程不安全问题 */ public static void main(String[] args) { ticket ticket = new ticket(); new Thread(ticket).start(); }}class ticket implements Runnable{ private int ticket=100; //抢100张票 @Override public void run() { while (true){ if(ticket<=0){ System.out.println("票被抢完了"); return; } ticket--; System.out.println(Thread.currentThread().getName()+"==>抢到票了,还剩"+ticket+"张票"); try { Thread.sleep(200); } catch (InterruptedException e) { e.printStackTrace(); } } }}多线程抢票出现安全问题
public class threadTicket { / * 模拟高并发抢票线程不安全问题 */ public static void main(String[] args) { ticket ticket = new ticket(); for (int i = 0; i < 10; i++) { //开启10个线程抢票 new Thread(ticket).start(); } }}class ticket implements Runnable{ private int ticket=100; //抢100张票 @Override public void run() { while (true){ if(ticket<=0){ System.out.println("票被抢完了"); return; } ticket--; System.out.println(Thread.currentThread().getName()+"==>抢到票了,还剩"+ticket+"张票"); try { Thread.sleep(200); } catch (InterruptedException e) { e.printStackTrace(); } } }}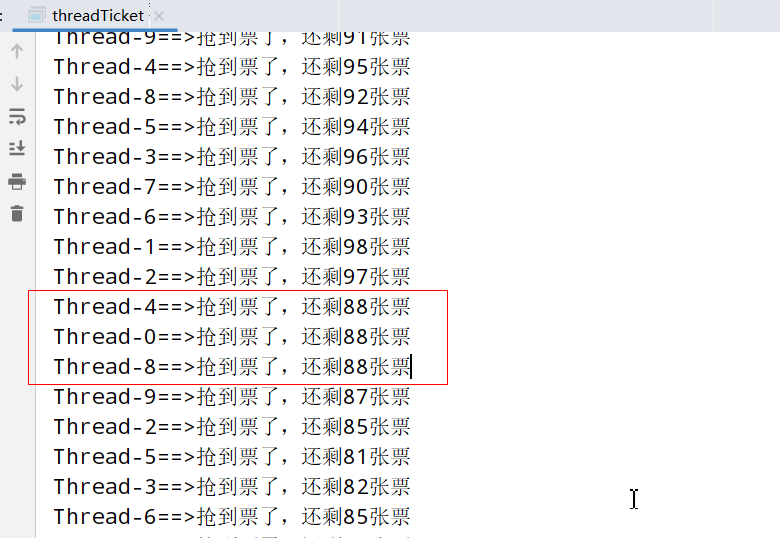
出现很多人抢到同一张票,出现了线程不安全问题
解决多线程抢票线程不安全问题
其实多线程抢票为啥会出现线程不安全问题,原因就是’ i-- ’ 语句。i–不是原子操作,肯定会出线程安全问题
i-- ,其实有几个过程 == 1.先读取i的值 2.让i-1 3.赋值给i 4.保存到主内存
方法一:加锁,使用synchronized关键字
缺点:synchronized关键字和Lock显式锁是JVM级别的,对于同一个JVM进程中有效,但是对于分布式环境的多进程是无效的,因为分布式环境是多进程的,也就是不属于同一个JVM进程,这时候只能采用分布式锁了,比如Redis分布式锁
同步语句块。
public class threadTicket { / * 模拟高并发抢票线程不安全问题 */ public static void main(String[] args) { ticket ticket = new ticket(); for (int i = 0; i < 15; i++) { new Thread(ticket).start(); } }}class ticket implements Runnable{ private int ticket=10; //抢10张票 @Override public void run() { synchronized (this){ if(ticket<=0){ System.out.println("票被抢完了"); return; } ticket--; System.out.println(Thread.currentThread().getName()+"==>抢到票了,还剩"+ticket+"张票"); try { Thread.sleep(200); } catch (InterruptedException e) { e.printStackTrace(); } } }}和上面一样
public class threadTicket { / * 模拟高并发抢票线程不安全问题 */ public static void main(String[] args) { ticket ticket = new ticket(); for (int i = 0; i < 15; i++) { new Thread(ticket).start(); } }}class ticket implements Runnable { private int ticket = 30; //抢10张票 private static final Object obj = new Object(); //加上static,不管是什么对象,只要是这个类的,就只有一个obj @Override public void run() { while (true) { synchronized (obj) { if (ticket <= 0) { System.out.println("票被抢完了"); return; } ticket--; System.out.println(Thread.currentThread().getName() + "==>抢到票了,还剩" + ticket + "张票"); try { Thread.sleep(200); } catch (InterruptedException e) { e.printStackTrace(); } } } }}方式二:使用并发包下的原子类Atomicxxxx
Atomic原子类,保证了线程中变量的原子性,又因为源码里面有volatile关键字,使得这个value对于线程是可见的,保证了变量的可见性。
public class threadTicket { / * 模拟高并发抢票线程不安全问题 */ public static void main(String[] args) { ticket ticket = new ticket(); for (int i = 0; i < 10; i++) { //开启10个线程抢票 new Thread(ticket).start(); } }}class ticket implements Runnable{// private int ticket=100; //抢100张票 private AtomicInteger atomicInteger=new AtomicInteger(5); @Override public void run() { while (true){ if(atomicInteger.get()<=0){ System.out.println("票被抢完了"); return; }// ticket--; int andDecrement = atomicInteger.getAndDecrement(); System.out.println(Thread.currentThread().getName()+"==>抢到票了,还剩"+andDecrement+"张票"); try { Thread.sleep(200); } catch (InterruptedException e) { e.printStackTrace(); } } }多线程的原子性、可见性、有序性
原子性
保证原子性有两个方法:1.使用锁 2.CAS指令
众所周知,i++ i-- 不是原子操作,那么也就不具有原子性,在多线程环境下,面对多个线程并发访问是线程不安全的,容易出问题的
方法一:synchronized关键字或者lock显式锁
public class threadTicket { / * 模拟高并发抢票线程不安全问题 */ public static void main(String[] args) { ticket ticket = new ticket(); for (int i = 0; i < 15; i++) { new Thread(ticket).start(); } }}class ticket implements Runnable { private int ticket = 30; //抢10张票 private static final Object obj = new Object(); //加上static,不管是什么对象,只要是这个类的,就只有一个obj @Override public void run() { while (true) { synchronized (obj) { if (ticket <= 0) { System.out.println("票被抢完了"); return; } ticket--; System.out.println(Thread.currentThread().getName() + "==>抢到票了,还剩" + ticket + "张票"); try { Thread.sleep(200); } catch (InterruptedException e) { e.printStackTrace(); } } } }}方法二:用CAS指令,不过java并发包提供了实现CAS指令的工具,也就是AtomicXXX,底层使用了volatile,保证了变量对于线程的可见性
public class threadTicket { / * 模拟高并发抢票线程不安全问题 */ public static void main(String[] args) { ticket ticket = new ticket(); for (int i = 0; i < 10; i++) { //开启10个线程抢票 new Thread(ticket).start(); } }}class ticket implements Runnable{// private int ticket=100; //抢100张票 private AtomicInteger atomicInteger=new AtomicInteger(5); @Override public void run() { while (true){ if(atomicInteger.get()<=0){ System.out.println("票被抢完了"); return; }// ticket--; int andDecrement = atomicInteger.getAndDecrement(); System.out.println(Thread.currentThread().getName()+"==>抢到票了,还剩"+andDecrement+"张票"); try { Thread.sleep(200); } catch (InterruptedException e) { e.printStackTrace(); } } }可见性(演示不出来)
有序性
多线程锁问题
锁对象不同不能同步
public class syncLockTest { //创建两个线程对象,synchronized(this)就无法发挥作用了,因为subthread1和subthread2是两个不同的对象 private static subThread1 subThread1=new subThread1(); private static subThread1 subThread2=new subThread1(); public static void main(String[] args) { Thread t1 = new Thread(subThread1); //传入两个不同的对象 Thread t2 = new Thread(subThread2); t1.setName("111"); t2.setName("222"); t1.start(); t2.start(); }}class subThread1 implements Runnable{ private int count=10; @Override public void run() { sm1(); } public synchronized void sm1(){ while (true){ if(count>0){ count--; System.out.println(Thread.currentThread().getName()+"===>还剩"+count); }else { break; } } }}这段代码虽然加了锁,但是也是有线程安全问题的
因为subthread1和subthread2是不同的对象,所以synchronized(this)就会无效,锁不住
解决方法:把sm1()方法定义为static方法,这样synchronized就会变成锁住这个线程类,而不是当前对象,不管是什么对象,只要是这个线程类创建的对象就共用一把锁,达到线程安全
public class syncLockTest { //创建两个线程对象,synchronized(this)就无法发挥作用了,因为subthread1和subthread2是两个不同的对象 private static subThread1 subThread1=new subThread1(); private static subThread1 subThread2=new subThread1(); public static void main(String[] args) { Thread t1 = new Thread(subThread1); //传入两个不同的对象 Thread t2 = new Thread(subThread2); t1.setName("111"); t2.setName("222"); t1.start(); t2.start(); }}class subThread1 implements Runnable{ private static int count=10; @Override public void run() { sm1(); } //相当于锁住类 public synchronized static void sm1(){ while (true){ if(count>0){ count--; System.out.println(Thread.currentThread().getName()+"===>还剩"+count); }else { break; } } } }多线程出现异常自动释放锁
public class lockException { //出现异常自动释放锁 private static subThread subThread=new subThread(); public static void main(String[] args) { for (int i = 0; i < 10; i++) { new Thread(subThread).start(); } }}class subThread implements Runnable{@Override public void run() { synchronized (this){ while (true){ try { Thread.sleep(200); } catch (InterruptedException e) { e.printStackTrace(); } throw new RuntimeException(); } } }}死锁(重要)
死锁的原理:有两个线程分别是线程A、B ,两把锁1、2 ,线程A拿到了锁1,线程B拿到了锁2,线程A没有释放锁1,且必须要拿到锁2才能释放锁1(也就是执行完线程A所有代码),反之,线程B没有释放锁2,但是有一定要获得锁1才能执行完线程B的代码,然后两个线程为了对方的锁一直在僵持,互不相让,这就造成了死锁
tryLock解决死锁
public class dieLock { //死锁 private static subThread3 subThread3=new subThread3(); public static void main(String[] args) { Thread t1 = new Thread(subThread3); Thread t2 = new Thread(subThread3); t1.setName("t1"); t2.setName("t2"); t1.start(); t2.start(); }}class subThread3 implements Runnable{ private static final Object obj1=new Object(); private static final Object obj2=new Object(); @Override public void run() { if(Thread.currentThread().getName().equals("t1")){ synchronized (obj1){ System.out.println(Thread.currentThread().getName()+"获得了锁1,想去获得锁2"); synchronized (obj2){ System.out.println(Thread.currentThread().getName()+"获得了锁2"); } } }else { synchronized (obj2){ System.out.println(Thread.currentThread().getName()+"获得了锁2,想去获得锁1"); synchronized (obj1){ System.out.println(Thread.currentThread().getName()+"获得了锁1"); } } } }}原子类AtomicXXX
让两个子线程和一个main线程去共同减少count
方式一:
输出的结果可能是子线程1一直在减少count,其他的线程在原地等待,其实这是正常现象,因为synchronized关键字是非公平锁,为了保证效率,它会让拿到锁的那个线程更容易再次拿到锁,只有公平锁才会让这些线程都拿到锁,Lock实现类可以通过构造方法去让锁变成公平锁
public class atomicIntegerTest { private static int count=20; private static final Object lock=new Object(); public static void main(String[] args) { Thread t1 = new Thread(new Runnable() { @Override public void run() { while (true){ synchronized (lock){ if(count<=0){System.out.println("子线程没有count了");break; } count--; System.out.println("子线程减值==还剩="+count); } } } }); t1.start(); Thread t2 = new Thread(new Runnable() { @Override public void run() { while (true){ synchronized (lock){ if(count<=0){System.out.println("子线程没有count了");break; } count--; System.out.println("子线程减值==还剩="+count); } } } }); t2.start(); while (true){synchronized (lock){ if(count<=0){ System.out.println("主线程没有count了"); break; } count--; System.out.println("主线程减值==还剩="+count);} } }}方式二:
原子类(AtomicInteger/AtomicLong)
public class atomicIntegerTest1 { private static AtomicInteger count=new AtomicInteger(10); public static void main(String[] args) {Thread t1 = new Thread(new Runnable() { @Override public void run() { while (true){ if(count.get()<=0){ System.out.println("子线程1没有count了"); break; } count.getAndDecrement(); System.out.println("子线程1减值==还剩="+count.get()); } }});t1.start();Thread t2 = new Thread(new Runnable() { @Override public void run() { while (true){ if(count.get()<=0){ System.out.println("子线程2没有count了"); break; } count.getAndDecrement(); System.out.println("子线程2减值==还剩="+count.get()); } }});t2.start();while (true){ if(count.get()<=0){ System.out.println("主线程没有count了"); break; } count.getAndDecrement(); System.out.println("主线程减值==还剩="+count.get());} }}多线程操作数组线程不安全
public class atomicIntegerArrayTest { public static void main(String[] args) { atomicArrayThread atomicArrayThread = new atomicArrayThread(); Thread t1 = new Thread(atomicArrayThread); Thread t2 = new Thread(atomicArrayThread); t1.start(); t2.start(); }}class atomicArrayThread implements Runnable{ private int arr[]=new int[5]; @Override public void run() { while (true){ if(arr[2]==10){ System.out.println("break"); break; } for (int i = 0; i < arr.length; i++) { arr[i]++; } System.out.println(Arrays.toString(arr)); } }}解决方案(加锁和原子数组)
方法一:加锁
public class atomicIntegerArrayTest { public static void main(String[] args) { atomicArrayThread atomicArrayThread = new atomicArrayThread(); Thread t1 = new Thread(atomicArrayThread); Thread t2 = new Thread(atomicArrayThread); t1.start(); t2.start(); }}class atomicArrayThread implements Runnable{ private int arr[]=new int[5]; @Override public void run() { while (true){ synchronized (this){ //因为new Thread传入的对象是相同的,所以this调用的对象也是一样,那么synchronized(this)就有效 if(arr[2]==10){ System.out.println("break"); break; } for (int i = 0; i < arr.length; i++) { arr[i]++; } System.out.println(Arrays.toString(arr)); } } }}方法二:采用原子数组(弄不出)
线程通信
线程通信有很多种,比如wait()/notify()机制,管道流(pipeXXX)通信,可重入锁的Condition对象的await()/signal()方法等等
wait()/notify()机制实现线程通信
wait()方法和sleep()方法都是阻塞方法,但是也有区别,wait()方法会释放锁、sleep()方法不会释放锁,并且wait方法必须要有锁对象,由锁对象进行调用wait方法,而sleep方法不用锁对象,wait方法是Object类的,sleep方法是Thread类的。
注意:notify/notifyAll和wait方法都是要用同一个锁对象去调用才能唤醒对方。。。。。。
生产者消费者模式
一个生产者和一个消费者操作值
需求:我们要实现一个生产者生产好一份菜(value值)就去通知消费者,消费者去拿菜,如果生产者没有生产好,那消费者就等待
public class ThreadCommunicationTest1 { / * 线程通信 * 一生产者一消费者模式 */ private static final Object lock = new Object(); //虽然对象不同,不能用锁this,但是可以锁住一个final对象 private static String value = ""; public static void main(String[] args) { setThread1 setThread = new setThread1(); getThread1 getThread = new getThread1(); Thread t1 = new Thread(setThread); Thread t2 = new Thread(getThread); t1.start(); t2.start(); } //生产者 static class setThread1 implements Runnable { @Override public void run() { while (true){ synchronized (lock) { if (value == null || value.equals("")) { value = "菜品:" + System.currentTimeMillis(); System.out.println(value+"====做好了"); try {Thread.sleep(50); //做好之后,不马上去通知顾客,先缓一缓 } catch (InterruptedException e) {e.printStackTrace(); } lock.notify(); } else { System.out.println("生产者等待菜被拿走"); try {lock.wait(); } catch (InterruptedException e) {e.printStackTrace(); } } } } } } //消费者 static class getThread1 implements Runnable { @Override public void run() { while (true){ synchronized (lock) { if (value == null || value.equals("")) { System.out.println("消费者等待上菜"); try {lock.wait(); } catch (InterruptedException e) {e.printStackTrace(); } } else { System.out.println("我收下了=="+value); value=""; try {Thread.sleep(50);//吃完之后,不马上点餐 } catch (InterruptedException e) {e.printStackTrace(); } lock.notify(); } } } } }}多个生产者和多个消费者操作值
多个线程的生产者消费者模式必须不能用notify了,要用notifyAll
多生产者多消费者模式下,不用notify而用notifyAll原因是,如果有三个厨师分别为ABC,A厨师上了一道菜,顾客看到自己的菜到了,然后就把菜拿走了,如果用notify意思就是只告诉厨师A,其他厨师不知道这个顾客拿走了菜,以为自己没有上这道菜,便再次为这个顾客做这道菜,这样显然是不可能的,所以我们要notifyAll,通知所有厨师,说明这个顾客已经拿走菜了,不用再上他的菜,这样问题就解决了。
public class ThreadCommunicationTest2 { private static String value=""; private static final Object lock=new Object(); public static void main(String[] args) { setValue2 setValue2 = new setValue2(); getValue2 getValue2 = new getValue2(); //生产者线程 Thread t1 = new Thread(setValue2); Thread t2 = new Thread(setValue2); Thread t3 = new Thread(setValue2); //消费者线程 Thread t4 = new Thread(getValue2); Thread t5 = new Thread(getValue2); Thread t6 = new Thread(getValue2); t1.start(); t2.start(); t3.start(); t4.start(); t5.start(); t6.start(); } //生产者线程 static class setValue2 implements Runnable{ @Override public void run() { while (true){ //这里用个死循环,让生产者消费者一直运作 synchronized (lock){ if(value==null||value.equals("")){ //值没有就生产 value="菜品:"+Thread.currentThread().getName()+"===>"+System.currentTimeMillis(); System.out.println(value+"=====>生产好了"); try {Thread.sleep(100); } catch (InterruptedException e) {e.printStackTrace(); } lock.notifyAll(); }else{ try {lock.wait(); //菜只能放一个,所以菜满了要等待顾客拿走 } catch (InterruptedException e) {e.printStackTrace(); } } } } } } static class getValue2 implements Runnable{ @Override public void run() { while (true){ synchronized (lock){ if(value==null||value.equals("")){ try {lock.wait();//如果没有菜就等待 } catch (InterruptedException e) {e.printStackTrace(); } }else { System.out.println("消费者拿走了"+value); value=""; //菜拿走了,让value等于空字符串 try {Thread.sleep(100); } catch (InterruptedException e) {e.printStackTrace(); } lock.notifyAll();//通知所有厨师 } } } } }}一个生产者和一个消费者操作栈(用List集合去模拟)
public class ThreadCommunicationTest3 { / * 一个生产者和一个消费者操作栈(List去模拟) */ private static List<String> list=new ArrayList<>(); private static final int MAX_SIZE=1; //指定list最大容量 private static final Object lock=new Object(); public static void main(String[] args) { setValue3 t1 = new setValue3(); getValue3 t2 = new getValue3(); new Thread(t1).start(); new Thread(t2).start(); } static class setValue3 implements Runnable{ @Override public void run() { while (true){ synchronized (lock){ if(list.size()<MAX_SIZE){ String value="(生产者)菜品:"+System.currentTimeMillis(); list.add(value); System.out.println(Thread.currentThread().getName()+"==>"+value); try {Thread.sleep(50); } catch (InterruptedException e) {e.printStackTrace(); } lock.notify(); }else { try {lock.wait(); //菜到达指定数量是就不上菜了,等待客人拿走菜 } catch (InterruptedException e) {e.printStackTrace(); } } } } } } static class getValue3 implements Runnable{ @Override public void run() { while (true){ synchronized (lock){ if(list.size()<=0){ try {lock.wait(); } catch (InterruptedException e) {e.printStackTrace(); } }else { String rm = list.remove(0); System.out.println(Thread.currentThread().getName()+"拿走了"+rm); try {Thread.sleep(50); } catch (InterruptedException e) {e.printStackTrace(); } lock.notify(); } } } } }}多个生产者和多个消费者操作栈(用List集合去模拟)
public class ThreadCommunicationTest4 { private static List<String> list=new ArrayList<>(); private static final Object lock=new Object(); private static final int MAX_SIZE=3; public static void main(String[] args) { setValue4 setValue4 = new setValue4(); getValue4 getValue4 = new getValue4(); Thread t1 = new Thread(setValue4); Thread t2 = new Thread(setValue4); Thread t3 = new Thread(setValue4); Thread t4 = new Thread(getValue4); Thread t5 = new Thread(getValue4); Thread t6 = new Thread(getValue4); t1.start(); t2.start(); t3.start(); t4.start(); t5.start(); t6.start(); } static class setValue4 implements Runnable{ @Override public void run() { while (true){ synchronized (lock){ if(list.size()<MAX_SIZE){ String value=Thread.currentThread().getName()+"==>"+"菜品:"+System.currentTimeMillis(); list.add(value); System.out.println(value+" 已经做好了"); try {Thread.sleep(50); } catch (InterruptedException e) {e.printStackTrace(); } lock.notifyAll(); }else { try {lock.wait(); } catch (InterruptedException e) {e.printStackTrace(); } } } } } } static class getValue4 implements Runnable{ @Override public void run() { while (true) { synchronized (lock){ if(list.size()==0){ try {lock.wait(); } catch (InterruptedException e) {e.printStackTrace(); } }else { String rm = list.remove(0); System.out.println("消费者已经拿走了"+rm); try {Thread.sleep(50); } catch (InterruptedException e) {e.printStackTrace(); } lock.notifyAll(); } } } } }}利用管道流通信
public class pipeStreamTest { / * 利用管道流通信 */ private static PipedInputStream inputStream=new PipedInputStream(); private static PipedOutputStream outputStream=new PipedOutputStream(); static { try { inputStream.connect(outputStream); //建立连接 } catch (IOException e) { e.printStackTrace(); } } public static void main(String[] args) throws IOException, InterruptedException { inputThread inputThread = new inputThread(); outputThread outputThread = new outputThread(); Thread t1 = new Thread(inputThread); Thread t2 = new Thread(outputThread); t2.start(); //执行写操作 Thread.sleep(10); t1.start(); } static class inputThread implements Runnable{ @Override public void run() { try { byte bytes[]=new byte[inputStream.available()]; inputStream.read(bytes); String str=new String(bytes,"UTF-8"); System.out.println("管道输入流已读取===>"+str); } catch (IOException e) { e.printStackTrace(); } } } static class outputThread implements Runnable{ @Override public void run() { String msg="hello world"; try { outputStream.write(msg.getBytes()); System.out.println("管道输出流已写入===>"+msg); } catch (IOException e) { e.printStackTrace(); } } }}Condition通信(用到了显式锁)
注意:======notify和signal其实差不多,都是用来通知正在等待的线程的,但是notify是随机通知,signal是定向通知
public class conditionTest { / * 利用lock锁里面的condition实现线程通信 * */ private static ReentrantLock reentrantLock=new ReentrantLock(); public static void main(String[] args) throws InterruptedException { Condition condition = reentrantLock.newCondition(); //得到condition对象 new Thread(new Runnable() { @Override public void run() { try { reentrantLock.lock(); //使用await和signal必须要锁起来,和wait/notify一样 System.out.println("正在等待=========await"); condition.await(); System.out.println("await结束"); }catch (Exception e){ }finally { if(reentrantLock.isHeldByCurrentThread()){ reentrantLock.unlock(); } } } }).start(); Thread.sleep(200); //让await先执行,这里模拟一下延时 new Thread(new Runnable() { @Override public void run() { try { reentrantLock.lock(); //使用await和signal必须要锁起来,和wait/notify一样 condition.signal();//相当于notify// condition.signalAll(); //相当于notifyAll System.out.println("已通知==="); }catch (Exception e){ }finally { if(reentrantLock.isHeldByCurrentThread()){ reentrantLock.unlock(); } } } }).start(); }}ThreadLocal
public class threadLocalTest { / * ThreadLocal(注意:只能存储一对键值对) * 原理:创建一个ThreadLocal容器。当我们往里面set值,他会把当前线程作为key去设置值 * 当我们通过get获取值,ThreadLocal底层会通过key值=Thread.currentThread,去找对应的value * =================== * 总的来说:也就是每个线程之间的threadLocal互不干扰,里面的值也独立 * * */ private static ThreadLocal<String> threadLocal=new ThreadLocal<>(); public static void main(String[] args) throws InterruptedException { threadLocal.set("主线程=====hello"); new Thread(new Runnable() { @Override public void run() { threadLocal.set("子线程====world"); System.out.println(threadLocal.get()); } }).start(); Thread.sleep(10); System.out.println(threadLocal.get()); }}Lock显式锁
我们使用Lock锁都是使用它的实现类,常用的:可重入锁,可重入读写锁(读锁、写锁)
注意:======显式锁最好在finally进行释放锁
synchronized和ReentrantLock都是可重入锁
ReentrantLock的使用
1.创建一个锁对象
private static ReentrantLock lock=new ReentrantLock(); //创建一个锁对象我们进入ReentrantLock源码里面看看。
public ReentrantLock() { sync = new NonfairSync(); //说明这个ReentrantLock默认是非公平锁,和synchronized一样。原因:公平锁会牺牲性能 } / * Creates an instance of {@code ReentrantLock} with the * given fairness policy. * * @param fair {@code true} if this lock should use a fair ordering policy */ public ReentrantLock(boolean fair) { //说明显式锁Lock可以去指定锁的公平性。通过构造方法去传入true或者false sync = fair ? new FairSync() : new NonfairSync(); }其实显式锁可以synchronized差不多,只是synchronized是自动释放锁,lock是手动释放,lock对我们技术水平要求的比较高而已,因为释放锁不是随便释放的,错误的释放锁会导致程序受到很大的影响
public class reentrantLockTest1 { / * 可重入锁ReentrantLock * @param args */ private static ReentrantLock lock=new ReentrantLock(); //创建一个锁对象 private static int count=10; public static void main(String[] args) { lockThread1 lockThread1 = new lockThread1(); Thread t1 = new Thread(lockThread1); Thread t2 = new Thread(lockThread1); t1.start(); t2.start(); } static class lockThread1 implements Runnable{ @Override public void run() { while (true){ lock.lock(); //给代码上锁 try { if(count<=0){ System.out.println("程序结束======"); break; } count--; System.out.println(Thread.currentThread().getName()+",count="+count); }catch (Exception e){ }finally { if(lock.isHeldByCurrentThread()){ //如果这个锁被当前线程拥有 lock.unlock(); //释放锁 } } } } }}可重入锁特性
public class reentrantLockTest2 { / * 可重入锁的特性:假如A线程获得了锁1,此时锁1还没有被释放,这个线程又可以继续去获得这个锁。这就是锁的可重入性 * =====获得了多少个锁就要释放多少次 */ private static ReentrantLock lock=new ReentrantLock(); public static void main(String[] args) { lockThread2 lockThread2 = new lockThread2(); Thread t1 = new Thread(lockThread2); Thread t2 = new Thread(lockThread2); t1.start(); t2.start(); } static class lockThread2 implements Runnable{ @Override public void run() { try { lock.lock(); System.out.println("获得了锁lock"); lock.lock(); System.out.println("再次获得锁lock"); }catch (Exception e){ }finally { if(lock.isHeldByCurrentThread()){ lock.unlock(); //获得了多少个锁就要释放多少次 lock.unlock(); } } } }}tryLock方法(解决死锁)
tryLock方法可以有效的解决死锁,因为他会在得不到锁的时候放弃获取,死锁的原因就是互相持有对方想要的锁,而都不肯释放
进入reentrantLock找到trylock构造方法
public boolean tryLock() { return sync.nonfairTryAcquire(1); }public boolean tryLock(long timeout, TimeUnit unit) throws InterruptedException { return sync.tryAcquireNanos(1, unit.toNanos(timeout)); }这两个方法的区别是,第一个不加参数的意思就是尝试获取锁,如果获取不到立刻放弃获取。第二个会等待指定时间,如果过了指定时间还是没有获取到这个锁的使用权,则放弃获取
public class trylockTest { private static ReentrantLock lock=new ReentrantLock(false); private static int count=20; public static void main(String[] args) { tryLockThread tryLockThread = new tryLockThread(); Thread t1 = new Thread(tryLockThread); Thread t2 = new Thread(tryLockThread); t1.start(); t2.start(); } static class tryLockThread implements Runnable{ @Override public void run() { try { out: while (true){ boolean flag = lock.tryLock(); //返回值就是获取到该锁没有 if(count<=0) break ;if(flag){ count--; System.out.println(Thread.currentThread().getName()+"获得锁了==="+count);}else { System.out.println(Thread.currentThread().getName()+"没有获得锁");} } }catch (Exception e){ }finally { if(lock.isHeldByCurrentThread()){ lock.unlock(); } } } }}public class trylockTest { private static ReentrantLock lock=new ReentrantLock(false); public static void main(String[] args) { tryLockThread tryLockThread = new tryLockThread(); Thread t1 = new Thread(tryLockThread); Thread t2 = new Thread(tryLockThread); t1.start(); t2.start(); } static class tryLockThread implements Runnable{ @Override public void run() { try { boolean flag = lock.tryLock(1, TimeUnit.SECONDS); System.out.println(Thread.currentThread().getName()+"==="+flag); Thread.sleep(1001); }catch (Exception e){ }finally { if(lock.isHeldByCurrentThread()){ lock.unlock(); } } } }}读写锁(ReadWriteLock)
读读共享
只有读锁时,是共享的,也就是可以同时多个线程进入readLock内
public class readLockTest { / * 只有读锁时,是共享的,也就是可以同时多个线程进入readLock内 */ //获取读锁 private static ReentrantReadWriteLock.ReadLock readLock=new ReentrantReadWriteLock().readLock(); public static void main(String[] args) { readThread1 readThread1 = new readThread1(); Thread t1 = new Thread(readThread1); Thread t2 = new Thread(readThread1); Thread t3 = new Thread(readThread1); t1.start(); t2.start(); t3.start(); } static class readThread1 implements Runnable{ @Override public void run() { try { readLock.lock(); System.out.println(Thread.currentThread().getName()+"===>"+System.currentTimeMillis()); Thread.sleep(1000); System.out.println("睡眠结束"); }catch (Exception e){ }finally { readLock.unlock(); } } }}写写互斥
写锁就相当于互斥锁(synchronized、lock)
public class writeLockTest { / * 写写互斥(写锁就相当于互斥锁(synchronized、lock)) */ //创建写锁 private static ReentrantReadWriteLock.WriteLock writeLock=new ReentrantReadWriteLock().writeLock(); public static void main(String[] args) { writeLockThread writeLockThread = new writeLockThread(); Thread t1 = new Thread(writeLockThread); Thread t2 = new Thread(writeLockThread); Thread t3 = new Thread(writeLockThread); t1.start(); t2.start(); t3.start(); } static class writeLockThread implements Runnable{ @Override public void run() { try { writeLock.lock(); System.out.println(Thread.currentThread().getName()+"====>"+System.currentTimeMillis()); Thread.sleep(200); System.out.println("睡眠结束"); } catch (Exception e) { e.printStackTrace(); }finally { if(writeLock.isHeldByCurrentThread()){ writeLock.unlock(); } } } }}读写互斥
同时有读锁和写锁就会互斥
public class readWriteLockTest { / * 读写锁最好是一个线程用读锁,一个线程用写锁,要是多一个线程用锁,可能会失效,也就是不具有排他性 */ private static ReentrantReadWriteLock readWriteLock=new ReentrantReadWriteLock(); private static Lock readlock=null; private static Lock writeLock=null; static { readlock=readWriteLock.readLock(); writeLock=readWriteLock.writeLock(); }// private static ReentrantReadWriteLock.ReadLock readlock=new ReentrantReadWriteLock().readLock();// private static ReentrantReadWriteLock.WriteLock writeLock=new ReentrantReadWriteLock().writeLock(); public static void main(String[] args) { readWriteThread readWriteThread = new readWriteThread(); Thread t1 = new Thread(readWriteThread); t1.start(); try { writeLock.lock(); System.out.println("===正在写==="); Thread.sleep(2000); } catch (Exception e) { e.printStackTrace(); }finally { System.out.println("===写完了==="); writeLock.unlock(); } } static class readWriteThread implements Runnable{ @Override public void run() { try { readlock.lock(); System.out.println(Thread.currentThread().getName()+"==读锁:"+System.currentTimeMillis()); Thread.sleep(2000); } catch (Exception e) { e.printStackTrace(); }finally { System.out.println(Thread.currentThread().getName()+"===释放锁"+System.currentTimeMillis()); readlock.unlock(); } } } }线程池ThreadPool
线程池的简单使用
固定大小的线程池
public class threadPoolTest01 { / * 线程池的作用:1.可以控制并发,通过设置线程池的线程数量 * 2.因为线程的创建和销毁是会耗性能的,线程池里面的线程是可以复用的,也就是假如线程池创建了1号2号线程。 * 里面有100个runnable方法,也就是要执行50次,一次2个线程去执行,在这过程中,线程1号2号不会被销毁 */ private static int i; public static void main(String[] args) { //线程池的使用 //固定线程数量的线程池 ExecutorService executorService = Executors.newFixedThreadPool(2); for (int j = 0; j < 100; j++) { executorService.execute(new Runnable() { //一个execute执行一个线程执行,所以我们为了演示,可以在外面用for @Override public void run() { System.out.println(Thread.currentThread().getId()+"====>"); try { Thread.sleep(500); } catch (InterruptedException e) { e.printStackTrace(); } } }); } executorService.shutdown(); //关闭线程池 } }缓存线程池和任务线程池
public class threadPoolTest02 { public static void main(String[] args) {// ExecutorService executorService = Executors.newCachedThreadPool();// for (int i = 0; i < 20; i++) {// executorService.execute(new Runnable() {// @Override// public void run() {// System.out.println(Thread.currentThread().getId());// try {// Thread.sleep(100);// } catch (InterruptedException e) {// e.printStackTrace();// }// }// });// }//// executorService.shutdown(); ScheduledExecutorService scheduledExecutorService = Executors.newScheduledThreadPool(5);// scheduledExecutorService.schedule(new Runnable() {// @Override// public void run() {// System.out.println(Thread.currentThread().getId());//// }// },2, TimeUnit.SECONDS); //推迟2秒执行线程方法 scheduledExecutorService.scheduleAtFixedRate(new Runnable() { @Override public void run() { System.out.println(Thread.currentThread().getId()); } },5,1,TimeUnit.SECONDS); //这里的意思是,开始等5秒才会第一次执行这个方法,过后一直都是1秒执行一次 }}
