【Harmony OS】【ArkUI】ets开发 简易视频播放器
前言:这一次我们来使用ets的Swiper组件、List组件和Video组件制作一个简易的视频播放器。本篇是以HarmonyOS官网的codelab简易视频播放器(eTS)为基础进行编写。本篇最主要的内容就是一个主界面包括顶部的视频海报轮播,中部的视频播放列表,以及点击海报和播放列表进入到播放界面完成视频播放的功能。师傅领进门,修行在个人,所以本篇只讲大概的组件使用,具体的细节和更详细的属性读者自己在学习中摸索。相信通过这次的学习,你能有所收获。希望能帮助你快速了解Harmony的ETS开发,学会简单的视频播放器制作学习。本篇最后会贴上参考原文链接。
首先讲一下大致的思路,我们要在主界面顶部使用Swiper组件完成视频海报轮播,下方使用List组件完成视频播放的列表,点击海报和播放列表进入视频播放界面使用Video组件制作,其他的属性就由读者自行探索。
1. 构建主界面。
1) 在default文件夹中创建data、image、video文件夹,在data文件夹中创建VideoData.ets文件,用来定义电影轮播图数组swiperVideos和视频列表图片数组horizontalVideos。Image文件夹中添加图片,video文件夹中添加视频,代码中的文件路径替换由读者自行替换。
const localSource: string = "/common/video/video1.mp4";const webSource: string = "https://ss0.bdstatic.com/-0U0bnSm1A5BphGlnYG/cae-legoup-video-target/93be3d88-9fc2-4fbd-bd14-833bca731ca7.mp4";export const swiperVideos:any[] = [ { "image":'/common/image/video_ad0.jpg', "source":localSource }, { "image":'/common/image/video_ad1.jpg', "source":localSource }, { "image":'/common/image/video_ad2.jpg', "source":localSource }]export const horizontalVideos:any[] = [ { "image":'/common/image/video_list0.jpg', "source":webSource }, { "image":'/common/image/video_list1.jpg', "source":webSource }, { "image":'/common/image/video_list2.jpg', "source":webSource }]2) 在index.ets中引入router和swiperVideos、horizontalVideos。
import router from '@system.router';import {swiperVideos,horizontalVideos} from '../common/data/VideoData.ets'3) 在index.ets中添加Swiper组件用于显示电影轮播图,使用Navigator实现页面跳转。
@Entry@Componentstruct Index { build() { Column() { Swiper() { ForEach(swiperVideos, item => { SwiperItem({ imageSrc: item.image, source: item.source }) }, item => item.image.toString()) } .autoPlay(true) .height(180) .itemSpace(15) } .backgroundColor("#EEEEEE") .padding({ left: 15, top: 15, right: 15, bottom: 15 }) }}@Componentstruct SwiperItem { private imageSrc: string private source: string build() { Navigator({ target: 'pages/Play', type: NavigationType.Push }) { Image(this.imageSrc).objectFit(ImageFit.Cover) } .params({ source: this.source }) }}4) 添加Flex组件用于显示电影列表上方的文本信息,添加List组件用于显示电影列表,使用router实现页面跳转。
@Entry @Component struct Index { build() { Column() { ...Flex({ direction: FlexDirection.Row }) { Text('Coming soon') .fontSize(20).fontWeight(FontWeight.Bold).margin({ left: 10 }) Image('/common/image/next.png').height(8).width(16)}.margin({ top: 20, bottom: 15 }) List({ space: 15 }) { ForEach(horizontalVideos, item => { ListItem() { HorizontalItem({ imageSrc: item.image, source: item.source }) } }, item => item.image.toString())}// 设置列表横向排列.listDirection(Axis.Horizontal) } .backgroundColor("#EEEEEE") .padding({ left: 15, top: 15, right: 15, bottom: 15 }) } } ... @Component struct HorizontalItem { private imageSrc: string private source: string build() { Image(this.imageSrc).width('80%').height('25%').onClick(() => { router.push({ uri: 'pages/Play', params: { source: this.source } })}) } } 5) 整个index.ets文件的代码如下:
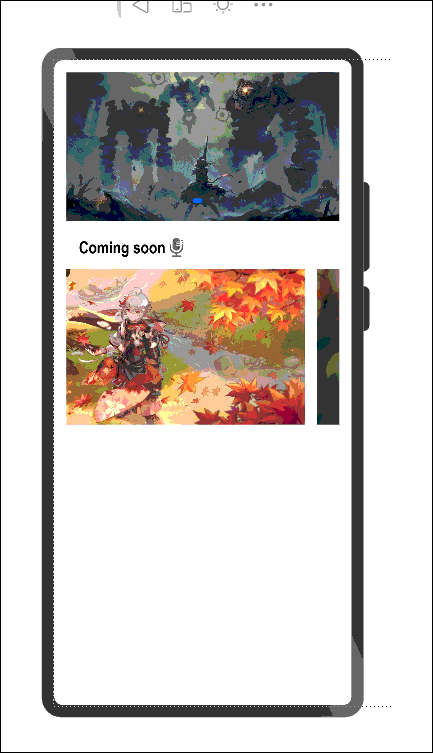
import router from '@system.router';import {swiperVideos,horizontalVideos} from '../common/data/VideoData.ets'@Entry@Componentstruct Index { build() { Column() { //轮播组件 Swiper(){ ForEach(swiperVideos, item => { SwiperItem({ imageSrc: item.image, source: item.source }) }, item => item.image.toString()) } .autoPlay(true) .height(180) .itemSpace(15) //文本信息 Flex({direction:FlexDirection.Row}){ Text('Coming soon') .fontSize(20).fontWeight(FontWeight.Bold).margin({left:10}) Image('/common/image/Record.png').height(8).width(16) } .margin({top:20, bottom:15}) List({space:15}){ ForEach(horizontalVideos, item =>{ ListItem(){ HorizontalItem({imageSrc:item.image,source:item.source}) } },item => item.image.toString()) } .listDirection(Axis.Horizontal) } .backgroundColor("#EEEEEE") .padding({ left: 15, top: 15, right: 15, bottom: 15 }) }}@Componentstruct SwiperItem{ private imageSrc:string private source:string build(){ Navigator({target:'pages/Play',type:NavigationType.Push}){ Image(this.imageSrc).objectFit(ImageFit.Cover) } .params({source:this.source}) }}@Componentstruct HorizontalItem{ private imageSrc:string private source:string build(){ Image(this.imageSrc) .width('80%') .height('25%') .onClick(()=>{ router.push({ uri:'pages/Play', params:{source:this.source} }) }) }}6) 打开预览器看一下效果:
欲了解更多更全技术文章,欢迎访问https://developer.huawei.com/consumer/cn/forum/?ha_source=zzh

