pytest及allure的使用
文章目录
前言
pytest及allure的使用
一、pytest的基本用法
1.测试文件、测试函数、测试方法用test_开头。
2.测试类以Test开头
3.测试类中不能包含构造方法(__init__)
4.运行测试文件 pytest -v -s 测试文件
二、使用步骤
1.安装插件库
1.失败重跑插件
pip install pytest-rerunfailures 2.指定案例执行顺序插件
pip install pytest-orderinag3.多线程执行插件
pip install pytest-xdist4.添加多条断言插件
pip install pytest-assume5.命令行美化插件
# 安装即可使用pip install pytest-sugar6.安装allur插件(须在本地安装allure且配置环境变量)
pip install allure-pytest2.引入库
代码如下(示例):
import pytestimport allure3.使用pytest
- 多次执行失败案例:
- 重跑次数:3 等待时间 1s
pytest -vs test_cal.py --reruns 3 -delay=1- 添加装饰器指定案例失败重跑
@pytest.mark.flaky(reruns=3, reruns_delay=1) def test_add(self): ...- 指定顺序执行案例:
@pytest.mark.run(order=2)def test_2(self):...@pytest.mark.run(order=1)def test_1(self):...-
多线程执行案例:
pytest test_cal.py -n 3
-
添加多条断言,断言都可执行:
pytest.assume(加入断言)pytest.assume(加入断言)...- pytest 参数使用:
pytest -v -s 详细输入每条案例的执行日志信息及print输出内容pytest -k 方法名 跳过该方法名的测试案例pytest -x 案例失败即停止运行pytest --maxfail=[3] 失败案例数达到3条即停止运行
- pytest前置条件及后置条件设置(类似与setup与teardown方法,但功能更加强大,可满足不同的测试前置条件)
以 @pytest.fixture() 装饰函数,将被装饰的函数名以参数形式参入测试方法中
@pytest.fixture()def login():print("测试开始")yiledprint("测试结束")class TestDemo:def test_1(self, login):...- pytest参数化设置(第一种)
以@pytest.mark.parametrize(" userid, password,...",[(),(),...]) 装饰测试方法,并传入具体的参数名称及具体参数
@pytest.mark.parametrize("a,b,c",[(1,2,3),(2,3,5)])def test_a(a,b,c)add_result = a+bassert add_result == c- pytest参数化设置(第二种)
以@pytest.fixture(params=[(1,2,3),(2,3,5),...])装饰函数,函数返回参数,将被装饰函数名以参数方式传入测试方法中
@pytest.fixture(params=[(1, 2, 3), (2, 3, 5)])def get_data(request): data = request.param return datadef test_b(get_data): add_result = get_data[0] + get_data[1] assert add_result == get_data[2]4.使用allure
- allure添加测试类名,方法名,步骤:
@allure.feature("测试类名")@allure.story("测试方法名")with allure.step("测试步骤")
- allure添加案例的等级:
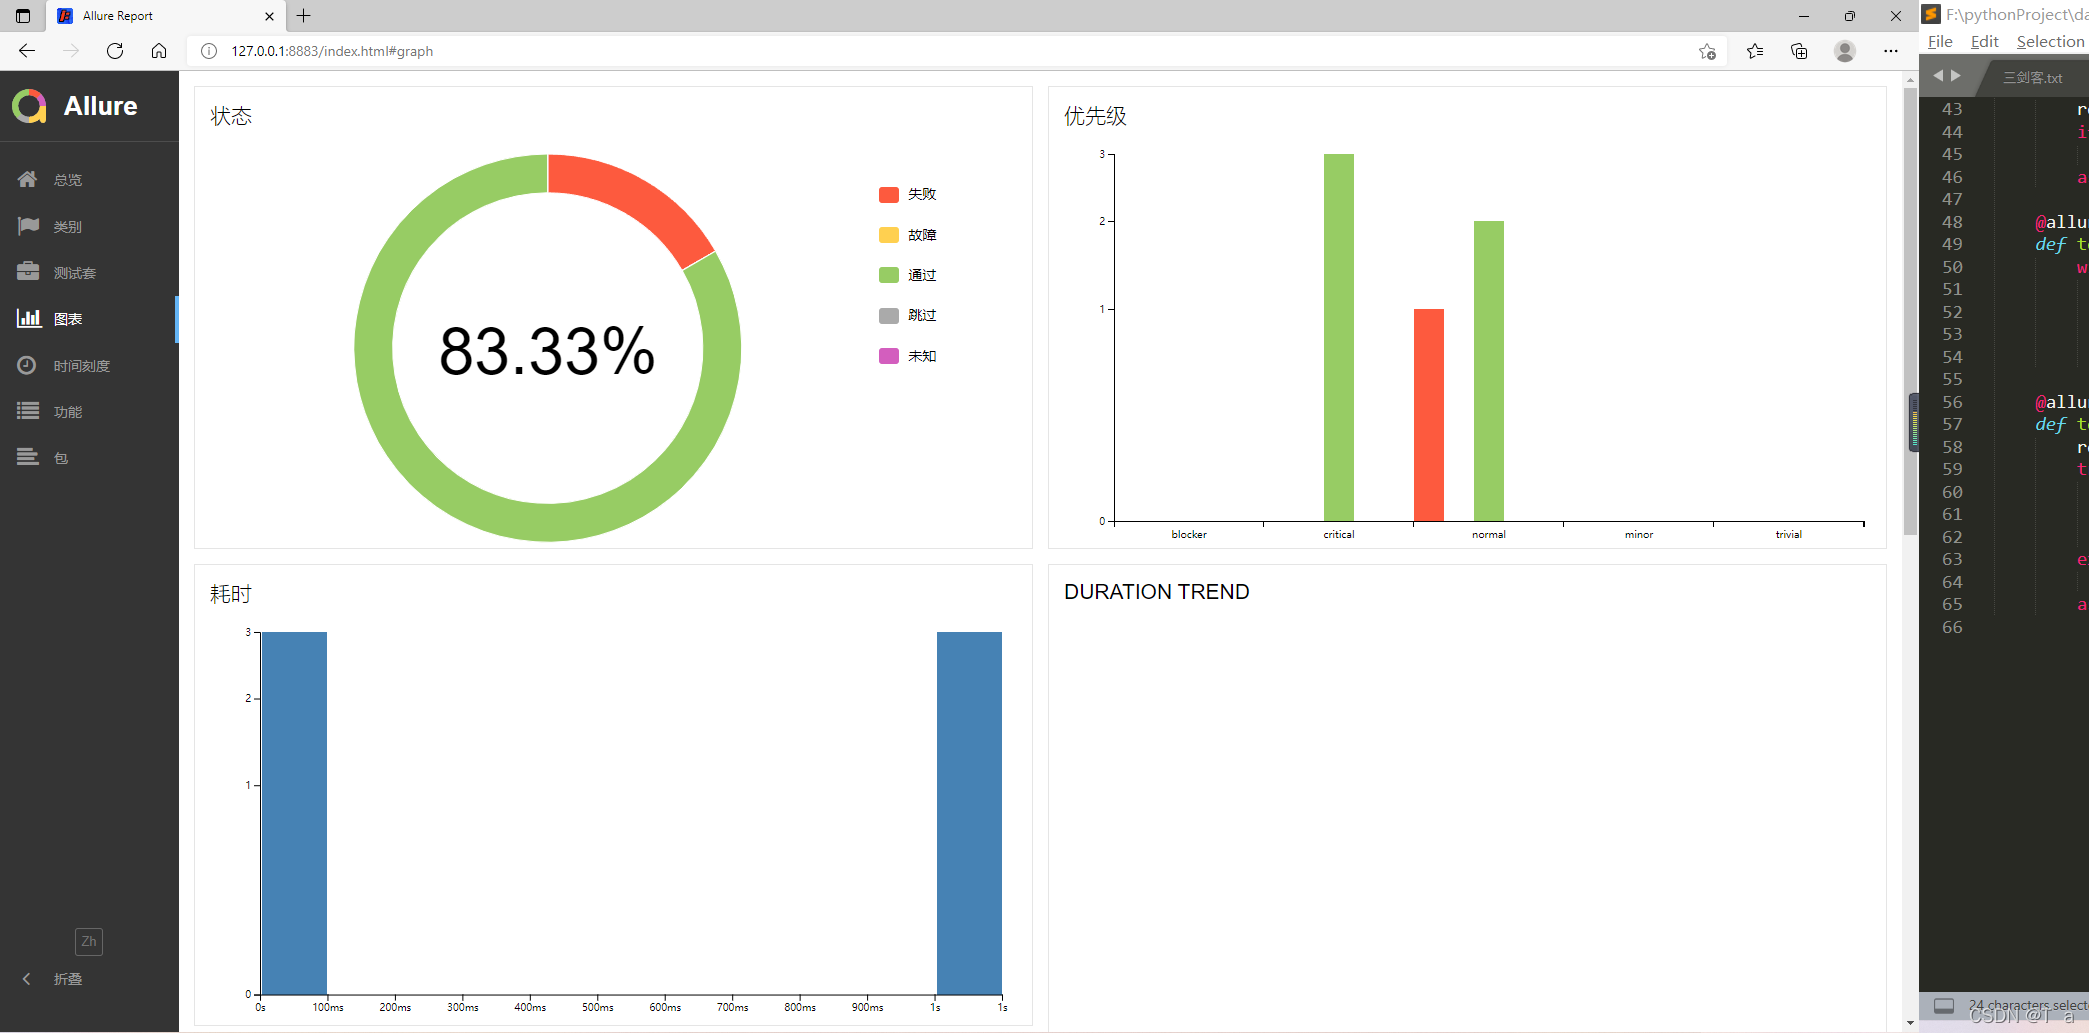
@allure.severity(allure.severity_level.CRITICAL)blocker:阻塞缺陷(功能未实现,无法下一步)critical:严重缺陷(功能点缺失normal: 一般缺陷(边界情况,格式错误)minor:次要缺陷(界面错误与ui需求不符)trivial: 轻微缺陷(必须项无提示,或者提示不规范)
可通过命令行执行设置了对应等级的案例:pytest test_cal.py --allure-severities=critical- allure添加测试链接:
@allure.testcase(url,"测试地址")
- 通过allure生成测试报告:
指定测试数据保存目录:pytest -vs test_cal.py --allure-features="计算器测试" --alluredir=./allure_result打开allure报告:allure serve ./allure_result生成html测试报告:allure generate ./allure_result -o ./report --clean启动web服务打开报告:allure open -h 127.0.0.1 -p 8883 ./report
5.pytest+allure生成的测试报告:
-
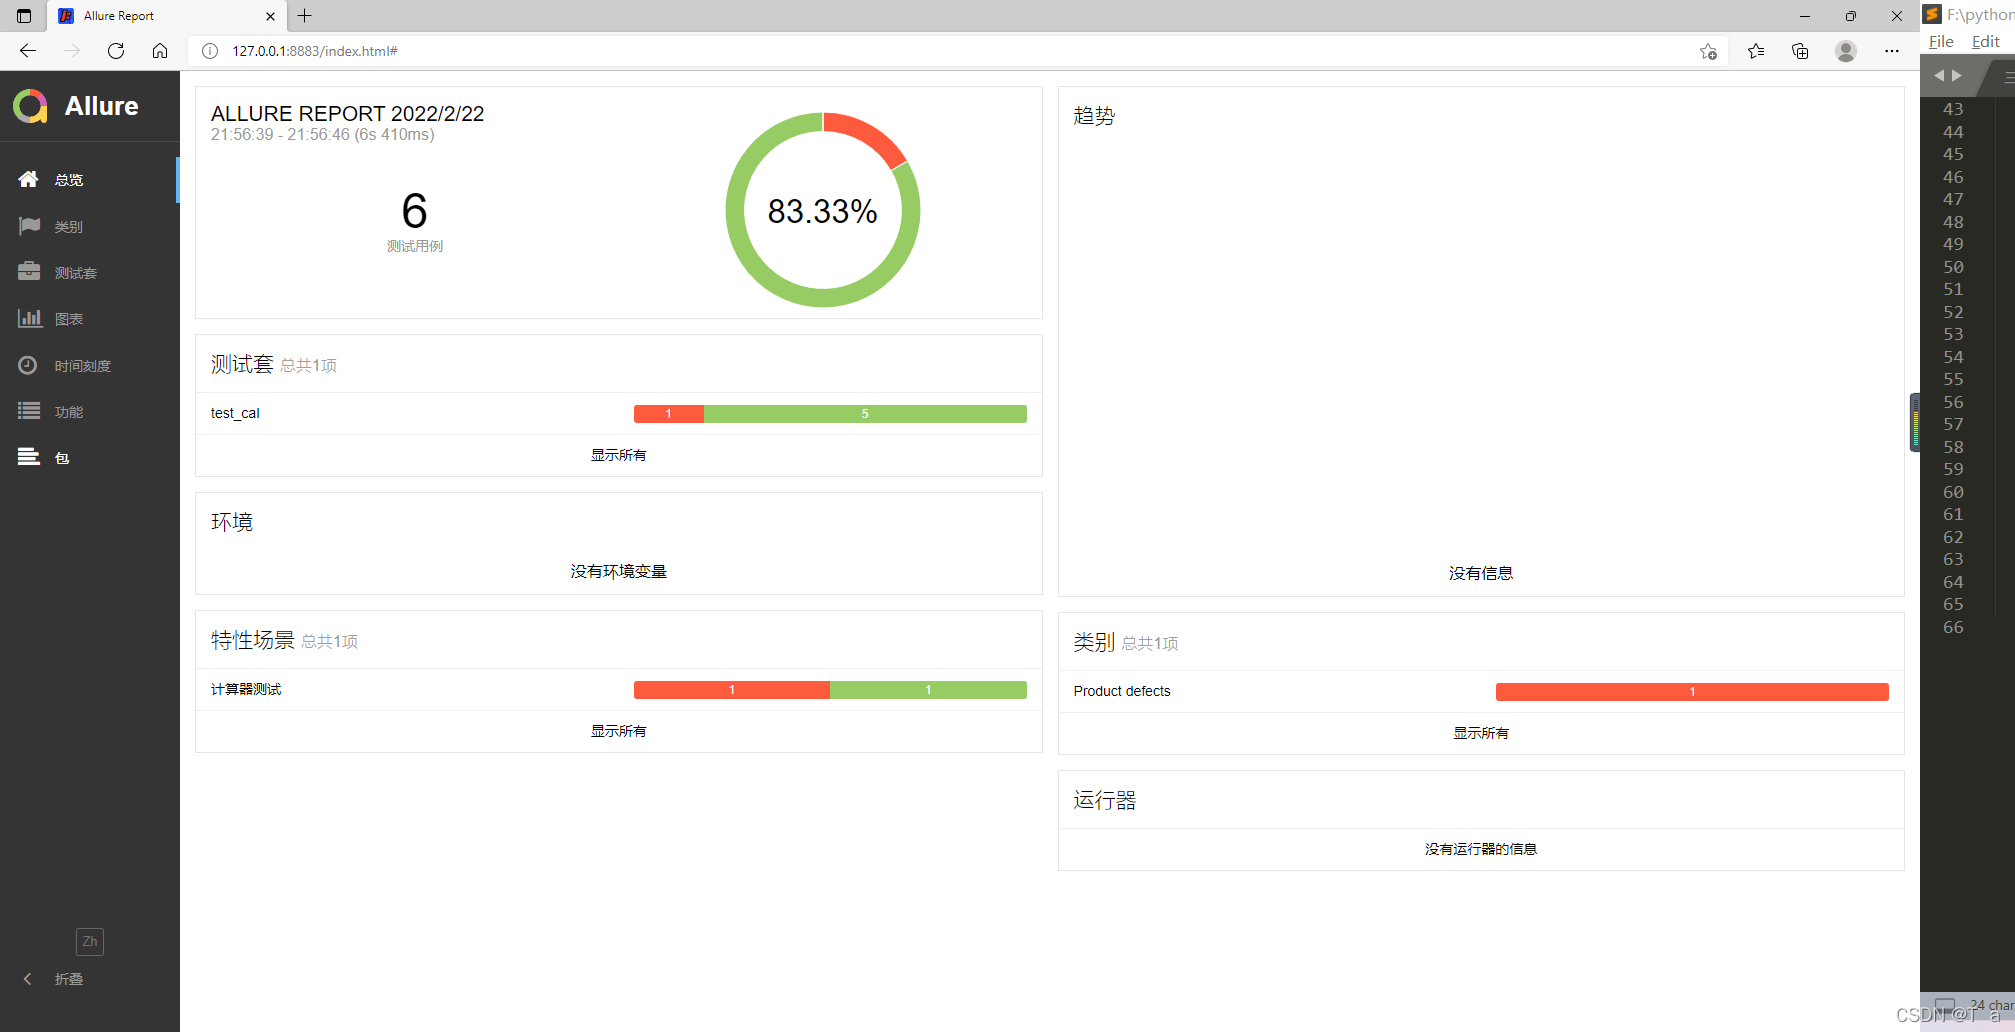
-
-
-
conftest.py主要代码:
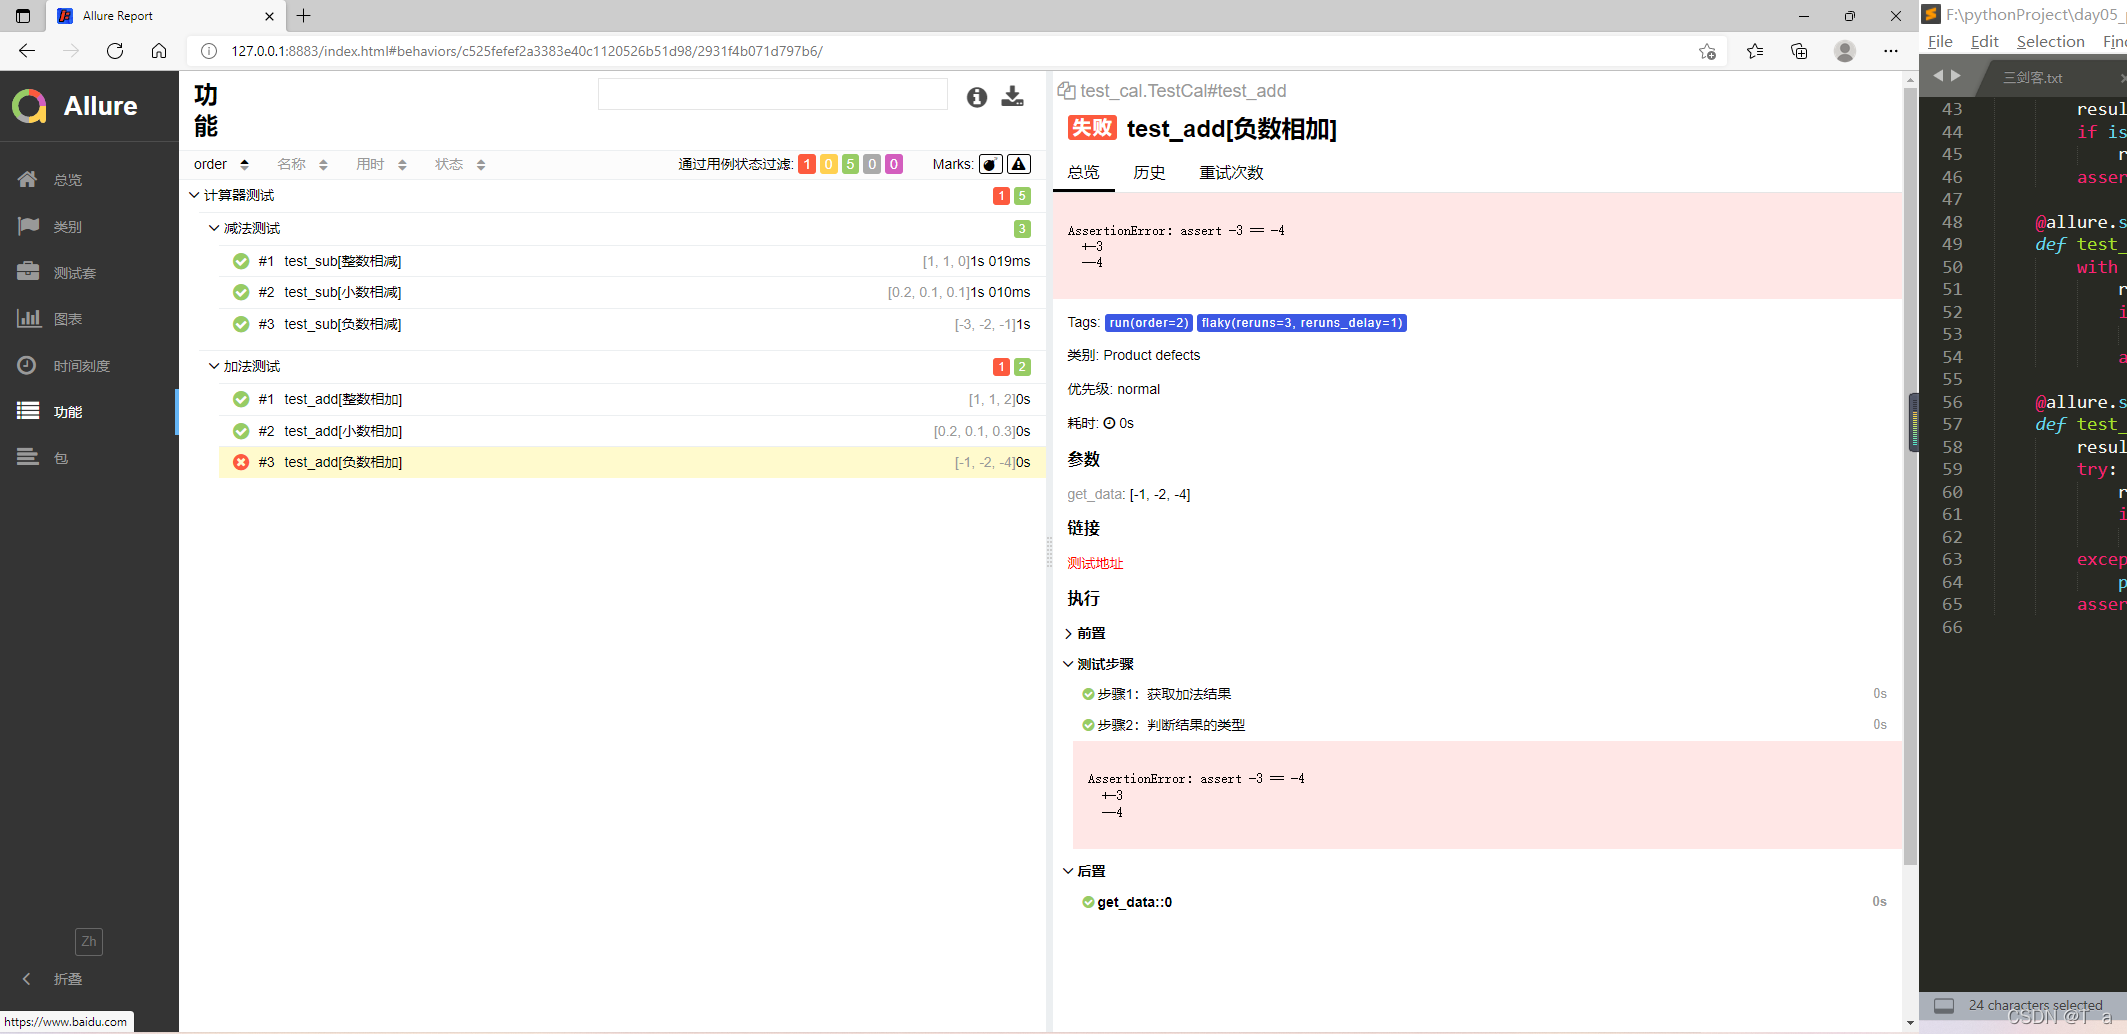
import pytestimport yamlfrom calculator.cal import CalculatorDemowith open("../datas.yaml", encoding="utf-8") as f: datas = yaml.safe_load(f) add_data = datas['add']['datas'] add_ids = datas['add']['ids'] sub_data = datas['sub']['datas'] sub_ids = datas['sub']['ids']@pytest.fixture()def start(): cal = CalculatorDemo() return cal@pytest.fixture(params=add_data, ids=add_ids)def get_data(request): print("测试开始") data = request.param yield data print("测试结束")@pytest.fixture(params=sub_data, ids=sub_ids)def get_sub(request): print("测试开始") data = request.param yield data print("测试结束")- 测试代码-test_cal.py:
import allureimport pytest@allure.testcase("https://www.baidu.com", "测试地址")@allure.feature("计算器测试")class TestCal: @allure.story("加法测试") # 设置失败案例来重跑次数,及重跑次数的时间间隔 @pytest.mark.flaky(reruns=3, reruns_delay=1) # 设置案例的执行顺序 @pytest.mark.run(order=2) def test_add(self, start, get_data): with allure.step("步骤1:获取加法结果"): result = start.add(get_data[0], get_data[1]) with allure.step("步骤2:判断结果的类型"): if isinstance(result, float): result = round(result, 2) print(f"测试结果是:{result}") assert result == get_data[2] @allure.story("减法测试") @allure.severity(allure.severity_level.CRITICAL) @pytest.mark.run(order=1) def test_sub(self, start, get_sub): with allure.step("步骤1:获取减法结果"): result = start.sub(get_sub[0], get_sub[1]) with allure.step("步骤2:判断结果的类型"): if isinstance(result, float): result = round(result, 2) assert result == get_sub[2]总结
pytest与allure的基本使用,工作中遇到更好的插件及方法,会继续更新,继续学习。

