【EdgeX(12)】 :摄像头使用device-onvif-camera服务接入EdgeX,参考官方视频,需要稍微操作下就可以接入成功,然后通过参数就可以获得TP-LINK摄像头的rtsp地址。
目录
- 前言
- 1,关于EdgeX加入摄像头
- 2,首先要增加docker-compose依赖
- 3,设置 device-onvif-camera 的 tp-link 摄像头用户名密码
- 4,认证完成之后就可以测试接口了,支持Get、Set有些接口有问题
- 5,使用总结
前言
相关EdgeX Foundry 全部分类:
https://blog.csdn.net/freewebsys/category_9437788.html
本文的原文连接是:
https://blog.csdn.net/freewebsys/article/details/127383355
未经博主允许不得转载。
博主地址是:http://blog.csdn.net/freewebsys
1,关于EdgeX加入摄像头
视频参考:
EdgeX ONVIF Camera Device Service Demo
项目地址:
https://github.com/edgexfoundry/device-onvif-camera
使用文档:
https://github.com/edgexfoundry/device-onvif-camera/blob/main/doc/running-guide.md
camera的配置文件
https://github.com/edgexfoundry/edgex-compose/blob/main/compose-builder/add-device-camera.yml
2,首先要增加docker-compose依赖
这里可以通过官方的命令,执行docker 增加,这里直接给下 docker-compose 带摄像头的配置就行:
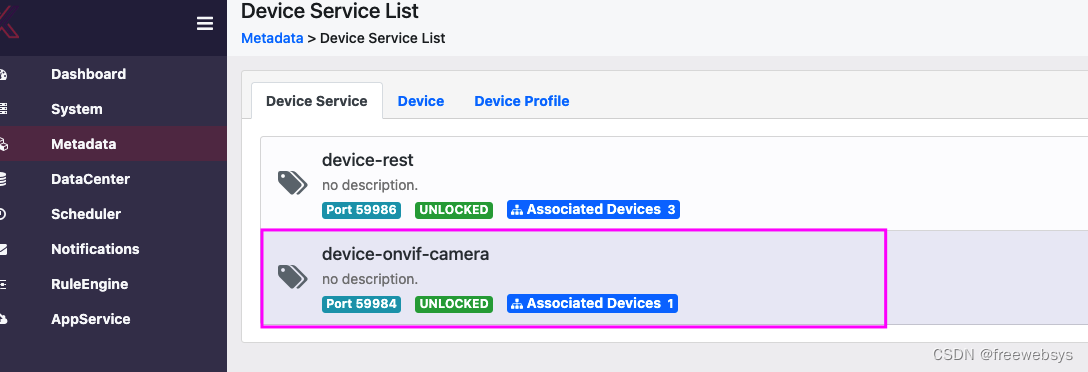
# * Copyright 2021 Intel Corporation.# *# * Licensed under the Apache License, Version 2.0 (the "License"); you may not use this file except# * in compliance with the License. You may obtain a copy of the License at# *# * http://www.apache.org/licenses/LICENSE-2.0# *# * Unless required by applicable law or agreed to in writing, software distributed under the License# * is distributed on an "AS IS" BASIS, WITHOUT WARRANTIES OR CONDITIONS OF ANY KIND, either express# * or implied. See the License for the specific language governing permissions and limitations under# * the License.# *# * EdgeX Foundry, Jakarta (2.1.0) release# */networks: edgex-network: driver: bridgeservices: app-service-rules: container_name: edgex-app-rules-engine depends_on: - consul - data environment: CLIENTS_CORE_COMMAND_HOST: edgex-core-command CLIENTS_CORE_DATA_HOST: edgex-core-data CLIENTS_CORE_METADATA_HOST: edgex-core-metadata CLIENTS_SUPPORT_NOTIFICATIONS_HOST: edgex-support-notifications CLIENTS_SUPPORT_SCHEDULER_HOST: edgex-support-scheduler DATABASES_PRIMARY_HOST: edgex-redis EDGEX_PROFILE: rules-engine EDGEX_SECURITY_SECRET_STORE: "false" REGISTRY_HOST: edgex-core-consul SERVICE_HOST: edgex-app-rules-engine TRIGGER_EDGEXMESSAGEBUS_PUBLISHHOST_HOST: edgex-redis TRIGGER_EDGEXMESSAGEBUS_SUBSCRIBEHOST_HOST: edgex-redis hostname: edgex-app-rules-engine image: edgexfoundry/app-service-configurable:2.1.1 networks: edgex-network: {} ports: - 127.0.0.1:59701:59701/tcp read_only: true restart: always security_opt: - no-new-privileges:true user: 2002:2001 command: container_name: edgex-core-command depends_on: - consul - database - metadata environment: CLIENTS_CORE_COMMAND_HOST: edgex-core-command CLIENTS_CORE_DATA_HOST: edgex-core-data CLIENTS_CORE_METADATA_HOST: edgex-core-metadata CLIENTS_SUPPORT_NOTIFICATIONS_HOST: edgex-support-notifications CLIENTS_SUPPORT_SCHEDULER_HOST: edgex-support-scheduler DATABASES_PRIMARY_HOST: edgex-redis EDGEX_SECURITY_SECRET_STORE: "false" REGISTRY_HOST: edgex-core-consul SERVICE_HOST: edgex-core-command hostname: edgex-core-command image: edgexfoundry/core-command:2.1.1 networks: edgex-network: {} ports: - 127.0.0.1:59882:59882/tcp read_only: true restart: always security_opt: - no-new-privileges:true user: 2002:2001 consul: command: agent -ui -bootstrap -server -client 0.0.0.0 container_name: edgex-core-consul hostname: edgex-core-consul image: consul:1.10.3 networks: edgex-network: {} ports: - 8500:8500/tcp read_only: true restart: always security_opt: - no-new-privileges:true user: root:root volumes: - consul-config:/consul/config:z - consul-data:/consul/data:z data: container_name: edgex-core-data depends_on: - consul - database - metadata environment: CLIENTS_CORE_COMMAND_HOST: edgex-core-command CLIENTS_CORE_DATA_HOST: edgex-core-data CLIENTS_CORE_METADATA_HOST: edgex-core-metadata CLIENTS_SUPPORT_NOTIFICATIONS_HOST: edgex-support-notifications CLIENTS_SUPPORT_SCHEDULER_HOST: edgex-support-scheduler DATABASES_PRIMARY_HOST: edgex-redis EDGEX_SECURITY_SECRET_STORE: "false" MESSAGEQUEUE_HOST: edgex-redis REGISTRY_HOST: edgex-core-consul SERVICE_HOST: edgex-core-data hostname: edgex-core-data image: edgexfoundry/core-data:2.1.1 networks: edgex-network: {} ports: - 127.0.0.1:5563:5563/tcp - 127.0.0.1:59880:59880/tcp read_only: true restart: always security_opt: - no-new-privileges:true user: 2002:2001 database: container_name: edgex-redis environment: CLIENTS_CORE_COMMAND_HOST: edgex-core-command CLIENTS_CORE_DATA_HOST: edgex-core-data CLIENTS_CORE_METADATA_HOST: edgex-core-metadata CLIENTS_SUPPORT_NOTIFICATIONS_HOST: edgex-support-notifications CLIENTS_SUPPORT_SCHEDULER_HOST: edgex-support-scheduler DATABASES_PRIMARY_HOST: edgex-redis EDGEX_SECURITY_SECRET_STORE: "false" REGISTRY_HOST: edgex-core-consul hostname: edgex-redis image: redis:6.2.6-alpine networks: edgex-network: {} ports: - 6379:6379/tcp read_only: true restart: always security_opt: - no-new-privileges:true user: root:root volumes: - db-data:/data:z device-rest: container_name: edgex-device-rest depends_on: - consul - data - metadata environment: CLIENTS_CORE_COMMAND_HOST: edgex-core-command CLIENTS_CORE_DATA_HOST: edgex-core-data CLIENTS_CORE_METADATA_HOST: edgex-core-metadata CLIENTS_SUPPORT_NOTIFICATIONS_HOST: edgex-support-notifications CLIENTS_SUPPORT_SCHEDULER_HOST: edgex-support-scheduler DATABASES_PRIMARY_HOST: edgex-redis EDGEX_SECURITY_SECRET_STORE: "false" MESSAGEQUEUE_HOST: edgex-redis REGISTRY_HOST: edgex-core-consul SERVICE_HOST: edgex-device-rest hostname: edgex-device-rest image: edgexfoundry/device-rest:2.1.1 networks: edgex-network: {} ports: - 127.0.0.1:59986:59986/tcp read_only: true restart: always security_opt: - no-new-privileges:true user: 2002:2001 metadata: container_name: edgex-core-metadata depends_on: - consul - database - notifications environment: CLIENTS_CORE_COMMAND_HOST: edgex-core-command CLIENTS_CORE_DATA_HOST: edgex-core-data CLIENTS_CORE_METADATA_HOST: edgex-core-metadata CLIENTS_SUPPORT_NOTIFICATIONS_HOST: edgex-support-notifications CLIENTS_SUPPORT_SCHEDULER_HOST: edgex-support-scheduler DATABASES_PRIMARY_HOST: edgex-redis EDGEX_SECURITY_SECRET_STORE: "false" NOTIFICATIONS_SENDER: edgex-core-metadata REGISTRY_HOST: edgex-core-consul SERVICE_HOST: edgex-core-metadata hostname: edgex-core-metadata image: edgexfoundry/core-metadata:2.1.1 networks: edgex-network: {} ports: - 127.0.0.1:59881:59881/tcp read_only: true restart: always security_opt: - no-new-privileges:true user: 2002:2001 notifications: container_name: edgex-support-notifications depends_on: - consul - database environment: CLIENTS_CORE_COMMAND_HOST: edgex-core-command CLIENTS_CORE_DATA_HOST: edgex-core-data CLIENTS_CORE_METADATA_HOST: edgex-core-metadata CLIENTS_SUPPORT_NOTIFICATIONS_HOST: edgex-support-notifications CLIENTS_SUPPORT_SCHEDULER_HOST: edgex-support-scheduler DATABASES_PRIMARY_HOST: edgex-redis EDGEX_SECURITY_SECRET_STORE: "false" REGISTRY_HOST: edgex-core-consul SERVICE_HOST: edgex-support-notifications hostname: edgex-support-notifications image: edgexfoundry/support-notifications:2.1.1 networks: edgex-network: {} ports: - 127.0.0.1:59860:59860/tcp read_only: true restart: always security_opt: - no-new-privileges:true user: 2002:2001 rulesengine: container_name: edgex-kuiper depends_on: - database environment: CONNECTION__EDGEX__REDISMSGBUS__PORT: 6379 CONNECTION__EDGEX__REDISMSGBUS__PROTOCOL: redis CONNECTION__EDGEX__REDISMSGBUS__SERVER: edgex-redis CONNECTION__EDGEX__REDISMSGBUS__TYPE: redis EDGEX__DEFAULT__PORT: 6379 EDGEX__DEFAULT__PROTOCOL: redis EDGEX__DEFAULT__SERVER: edgex-redis EDGEX__DEFAULT__TOPIC: rules-events EDGEX__DEFAULT__TYPE: redis KUIPER__BASIC__CONSOLELOG: "true" KUIPER__BASIC__RESTPORT: 59720 hostname: edgex-kuiper image: lfedge/ekuiper:1.4.4-alpine networks: edgex-network: {} ports: - 127.0.0.1:59720:59720/tcp read_only: true restart: always security_opt: - no-new-privileges:true user: kuiper:kuiper volumes: - kuiper-data:/kuiper/data:z scheduler: container_name: edgex-support-scheduler depends_on: - consul - database environment: CLIENTS_CORE_COMMAND_HOST: edgex-core-command CLIENTS_CORE_DATA_HOST: edgex-core-data CLIENTS_CORE_METADATA_HOST: edgex-core-metadata CLIENTS_SUPPORT_NOTIFICATIONS_HOST: edgex-support-notifications CLIENTS_SUPPORT_SCHEDULER_HOST: edgex-support-scheduler DATABASES_PRIMARY_HOST: edgex-redis EDGEX_SECURITY_SECRET_STORE: "false" INTERVALACTIONS_SCRUBAGED_HOST: edgex-core-data INTERVALACTIONS_SCRUBPUSHED_HOST: edgex-core-data REGISTRY_HOST: edgex-core-consul SERVICE_HOST: edgex-support-scheduler hostname: edgex-support-scheduler image: edgexfoundry/support-scheduler:2.1.1 networks: edgex-network: {} ports: - 127.0.0.1:59861:59861/tcp read_only: true restart: always security_opt: - no-new-privileges:true user: 2002:2001 system: container_name: edgex-sys-mgmt-agent depends_on: - command - consul - data - metadata - notifications - scheduler environment: CLIENTS_CORE_COMMAND_HOST: edgex-core-command CLIENTS_CORE_DATA_HOST: edgex-core-data CLIENTS_CORE_METADATA_HOST: edgex-core-metadata CLIENTS_SUPPORT_NOTIFICATIONS_HOST: edgex-support-notifications CLIENTS_SUPPORT_SCHEDULER_HOST: edgex-support-scheduler DATABASES_PRIMARY_HOST: edgex-redis EDGEX_SECURITY_SECRET_STORE: "false" EXECUTORPATH: /sys-mgmt-executor METRICSMECHANISM: executor REGISTRY_HOST: edgex-core-consul SERVICE_HOST: edgex-sys-mgmt-agent hostname: edgex-sys-mgmt-agent image: edgexfoundry/sys-mgmt-agent:2.1.1 networks: edgex-network: {} ports: - 127.0.0.1:58890:58890/tcp read_only: true restart: always security_opt: - label:disable - no-new-privileges:true user: root:root volumes: - /var/run/docker.sock:/var/run/docker.sock:z ui: container_name: edgex-ui-go environment: EDGEX_SECURITY_SECRET_STORE: "false" hostname: edgex-ui-go image: edgexfoundry/edgex-ui:2.1.0 networks: edgex-network: {} ports: - 4000:4000/tcp read_only: true restart: always security_opt: - no-new-privileges:true user: 2002:2001 device-onvif-camera: image: edgexfoundry/device-onvif-camera:2.2.0 ports: - "127.0.0.1:59984:59984" container_name: edgex-device-onvif-camera hostname: edgex-device-onvif-camera read_only: true restart: always networks: - edgex-network environment: EDGEX_SECURITY_SECRET_STORE: false REGISTRY_HOST: edgex-core-consul CLIENTS_CORE_DATA_HOST: edgex-core-data CLIENTS_CORE_METADATA_HOST: edgex-core-metadata CLIENTS_CORE_COMMAND_HOST: edgex-core-command CLIENTS_SUPPORT_NOTIFICATIONS_HOST: edgex-support-notifications CLIENTS_SUPPORT_SCHEDULER_HOST: edgex-support-scheduler DATABASES_PRIMARY_HOST: edgex-redis SERVICE_HOST: edgex-device-onvif-camera MESSAGEQUEUE_HOST: edgex-redis depends_on: - consul - data - metadata security_opt: - no-new-privileges:trueversion: '3.7'volumes: consul-config: {} consul-data: {} db-data: {} kuiper-data: {}启动项目之后就可以看到camera 的摄像头服务了:
接下来在配置 TP-Link 的摄像头,首先找了个路由器激活下,然后配置好账号密码。
使用的设备是
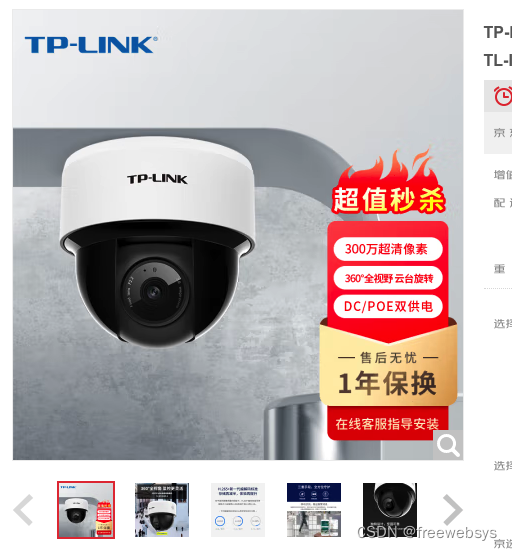
https://security.tp-link.com.cn/m/detail_article_4041.html
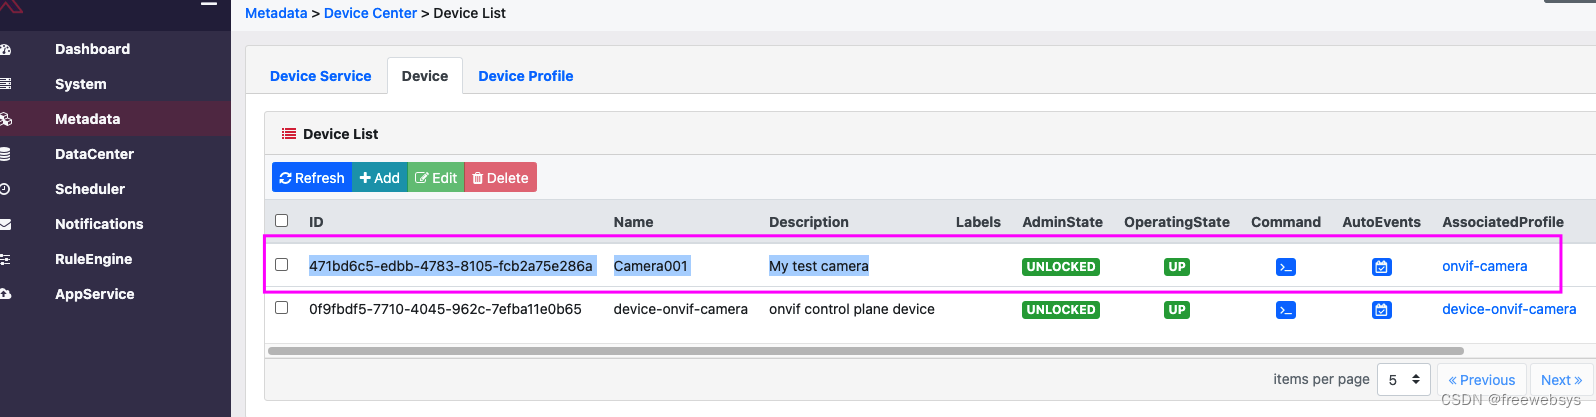
需要记住 admin 账号密码和 IP,比如我的是 192.168.1.110 ,还有设备的mac地址:
在机器上执行命令,需要设置 Onvif 的ip 地址,mac 信息,这个时候不需要输入用户名密码。
curl -X POST -H 'Content-Type: application/json' \http://localhost:59881/api/v2/device \-d '[ { "apiVersion": "v2", "device": { "name":"Camera001", "serviceName": "device-onvif-camera", "profileName": "onvif-camera", "description": "My test camera", "adminState": "UNLOCKED", "operatingState": "UP", "protocols": { "Onvif": {"Address": "192.168.1.110","Port": "80","MACAddress": "aa:bb:cc:11:22:33","FriendlyName":"Default Camera" }, "CustomMetadata": {"Location":"Front door" } } } }]'返回成功:
[{"apiVersion":"v2","statusCode":201,"id":"471bd6c5-edbb-4783-8105-fcb2a75e286a"}]然后在界面中看到设备,上面是新创建的。通过post 命令创建的。
3,设置 device-onvif-camera 的 tp-link 摄像头用户名密码
按照操作说明一步一步就可以执行了:
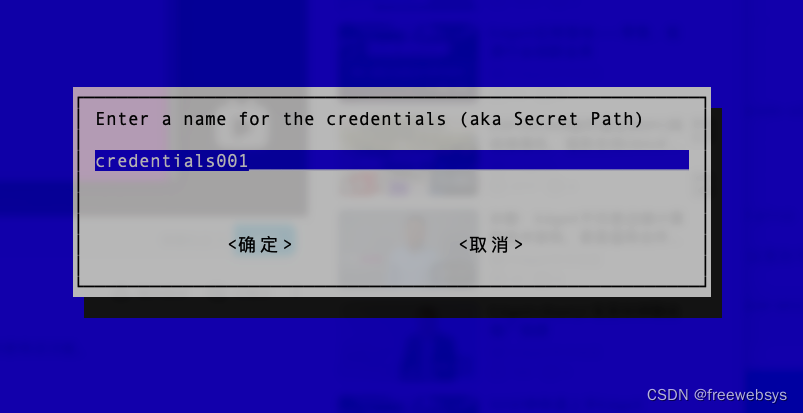
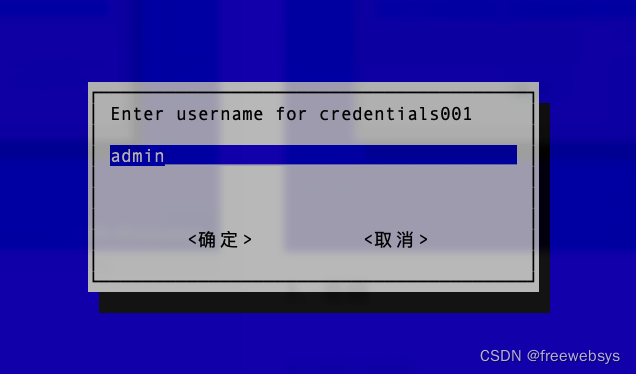
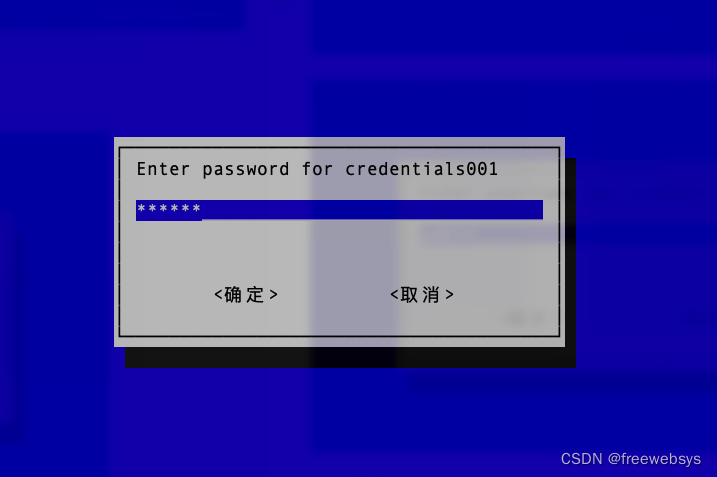
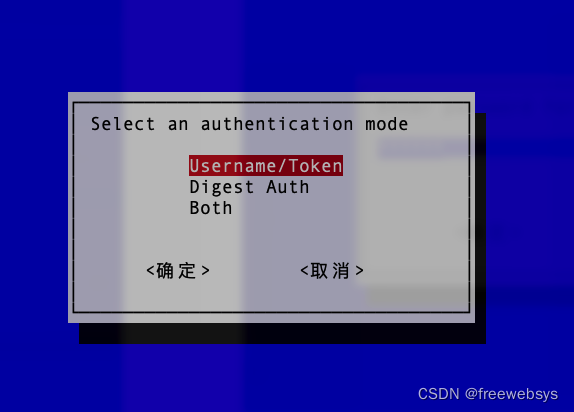
Map credentials using the map-credentials.sh script.
a. Run bin/map-credentials.sh
b. Select (Create New) c. Enter the Secret Path to associate with these credentials
d. Enter the username
e. Enter the password
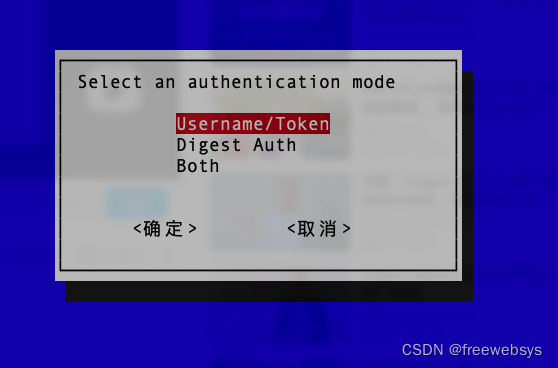
f. Choose the Authentication Mode
g. Assign one or more MAC Addresses to the credential group
需要下载项目到本地,执行bin/map-credentials.sh 脚本设置账号密码,这个脚本很神奇,可以弹出界面窗口。
git clone https://github.com/edgexfoundry/device-onvif-camera.git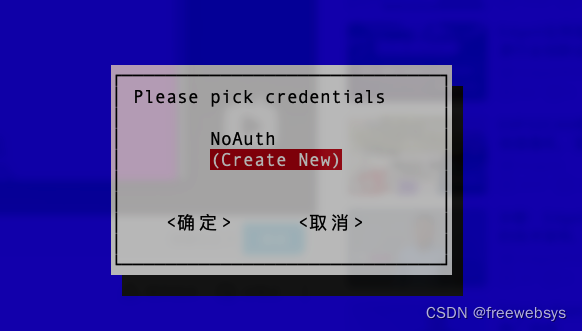
最后输入mac 地址,然后就可以了,可以看到这个脚本直接是通过命令行的方式去批量执行 POST接口信息。

可以看到,当把参数都输入之后,就会请求 post 数据:各种执行细节都有。
...$ bash bin/map-credentials.sh Dependencies Check: Success Consul Check: ... curl -X GET http://localhost:8500/v1/kv/edgex/devices/2.0/device-onvif-camera?keys=trueResponse [200] Successcurl -X GET http://localhost:8500/v1/kv/edgex/devices/2.0/device-onvif-camera/AppCustom/CredentialsMap?keys=trueResponse [200] Secret Path: credentials001Setting InsecureSecret: credentials001/Pathcurl --data 'credentials001' -X PUT http://localhost:8500/v1/kv/edgex/devices/2.0/device-onvif-camera/Writable/InsecureSecrets/credentials001/PathResponse [200] trueSetting InsecureSecret: credentials001/Secrets/usernamecurl --data 'admin' -X PUT http://localhost:8500/v1/kv/edgex/devices/2.0/device-onvif-camera/Writable/InsecureSecrets/credentials001/Secrets/usernameResponse [200] trueSetting InsecureSecret: credentials001/Secrets/passwordcurl --data '' -X PUT http://localhost:8500/v1/kv/edgex/devices/2.0/device-onvif-camera/Writable/InsecureSecrets/credentials001/Secrets/passwordResponse [200] trueSetting InsecureSecret: credentials001/Secrets/modecurl --data 'usernametoken' -X PUT http://localhost:8500/v1/kv/edgex/devices/2.0/device-onvif-camera/Writable/InsecureSecrets/credentials001/Secrets/modeResponse [200] trueSetting Credentials Map: credentials001 = ''curl -X PUT http://localhost:8500/v1/kv/edgex/devices/2.0/device-onvif-camera/AppCustom/CredentialsMap/credentials001Response [200] trueSecret Path: credentials001curl -X GET http://localhost:8500/v1/kv/edgex/devices/2.0/device-onvif-camera/AppCustom/CredentialsMap/credentials001?raw=trueResponse [200] Setting Credentials Map: credentials001 = 'mac xxx'curl --data 'mac xxx ' -X PUT http://localhost:8500/v1/kv/edgex/devices/2.0/device-onvif-camera/AppCustom/CredentialsMap/credentials001Response [200] trueSuccess4,认证完成之后就可以测试接口了,支持Get、Set有些接口有问题
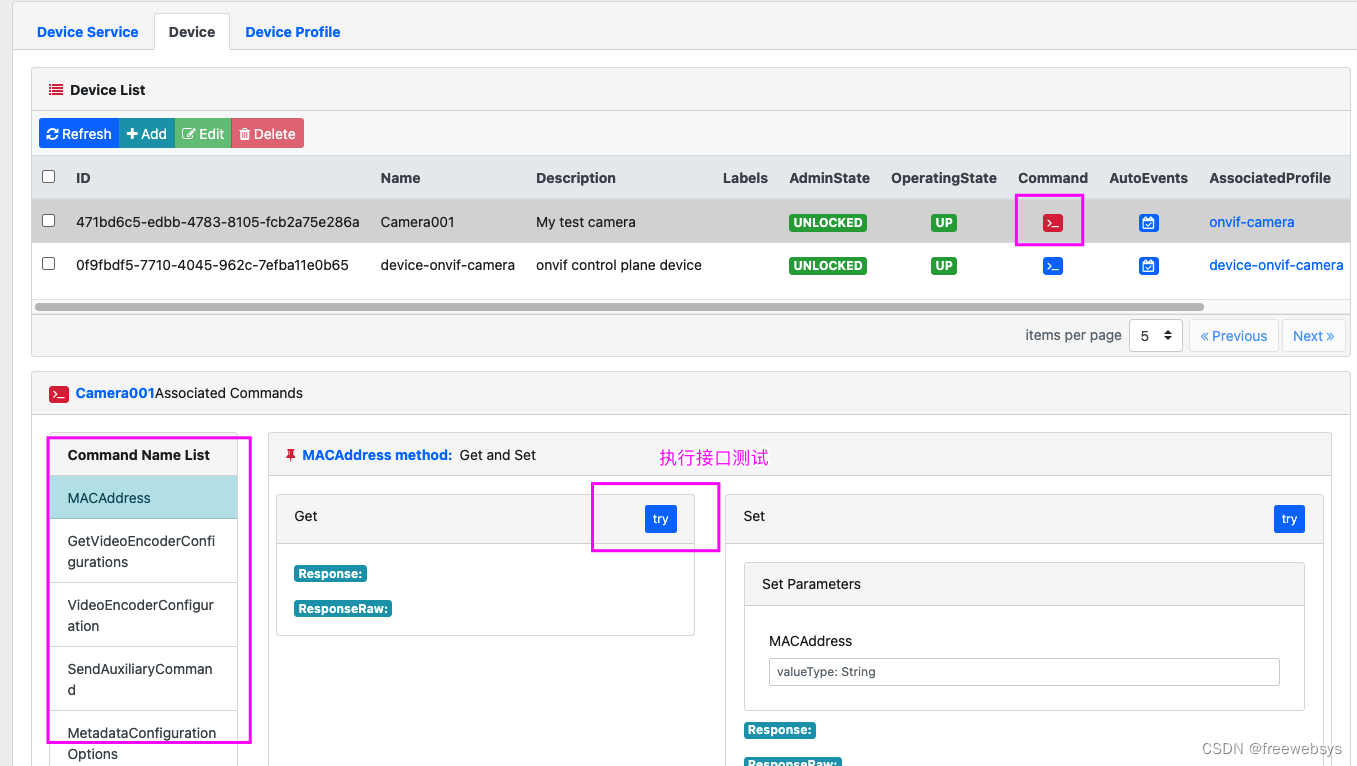
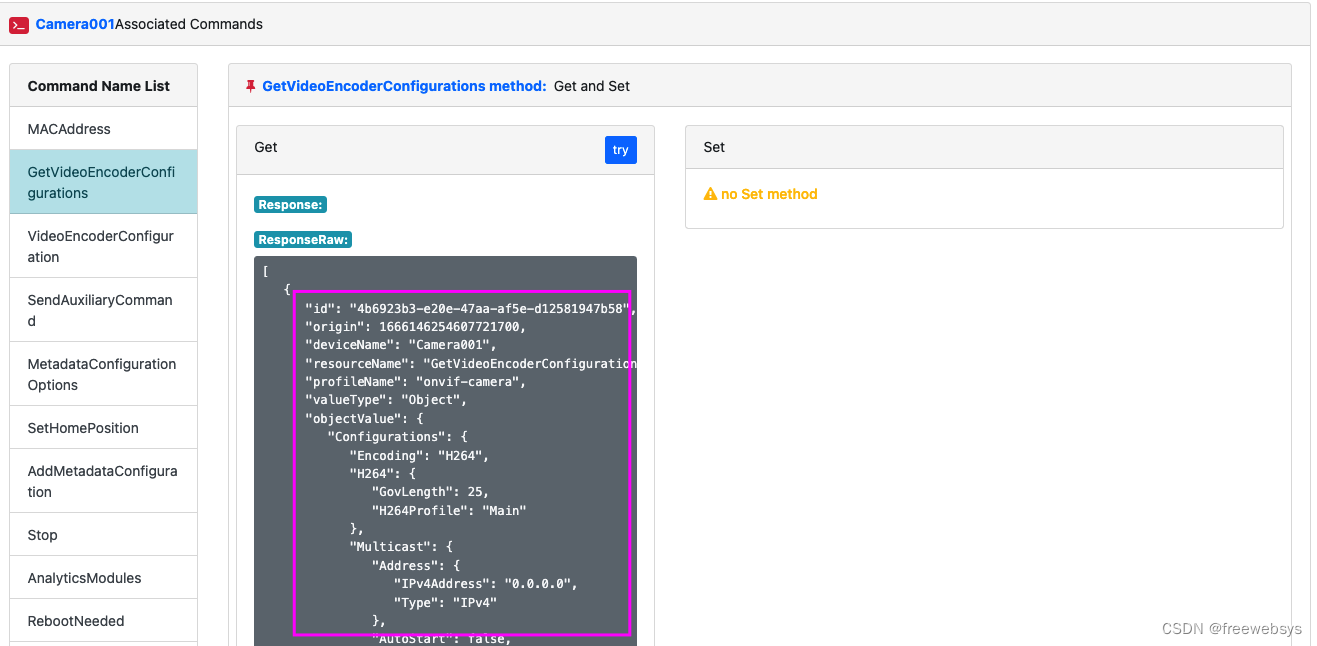
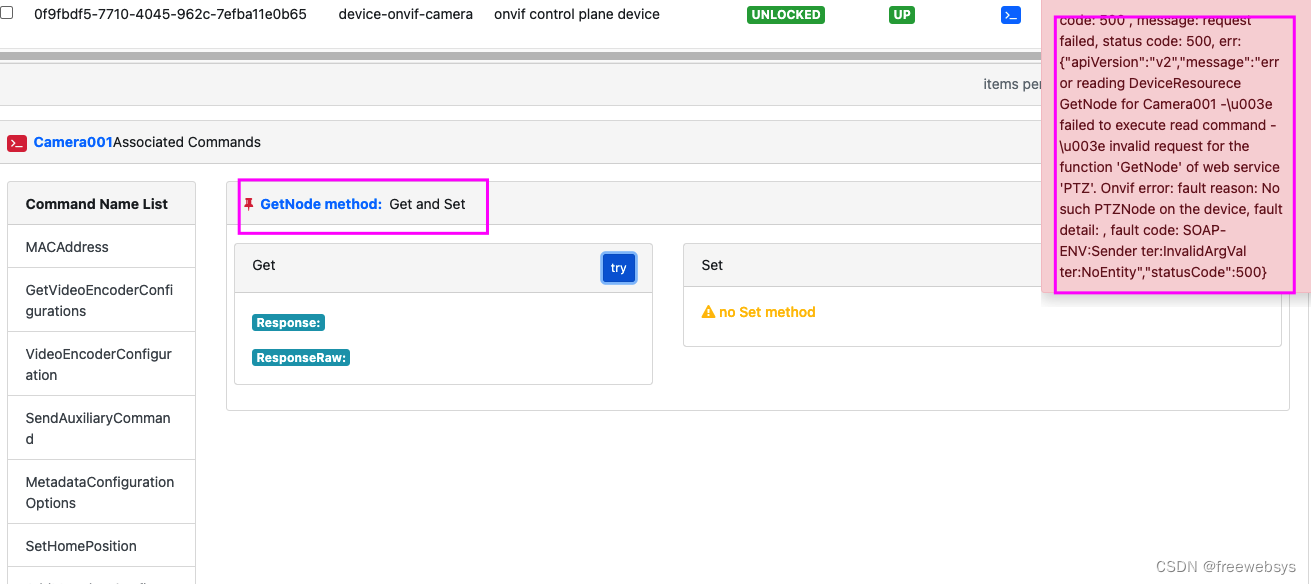
有些接口可以返回。
比如 getNode 接口就报错了。
然后通过接口查询,可以看到onvif的相关接口都可以了。
$ curl -s http://localhost:59882/api/v2/device/name/Camera001/Profiles | jq -r '"profileToken: " + '.event.readings[].objectValue.Profiles[].Token''# 返回两个配置:profileToken: profile_1profileToken: profile_2# 转换参数成 base64 ,请求第一个 profile$ echo -n '{> "ProfileToken": "profile_1"> }' | base64ewoiUHJvZmlsZVRva2VuIjogInByb2ZpbGVfMSIKfQ==# 请求接口,就可以看到可以正常返回 onvif 摄像头的 URI 地址了。$ curl -s http://localhost:59882/api/v2/device/name/Camera001/StreamUri?jsonObject=ewoiUHJvZmlsZVRva2VuIjogInByb2ZpbGVfMSIKfQ== | jq -r '"streamURI: " + '.event.readings[].objectValue.MediaUri.Uri''streamURI: rtsp://192.168.1.110:554/stream1其实这个就是 tplink 摄像头的流地址。和摄像头之前的 IP 地址一样。
5,使用总结
经过这几部操作设备就注册到 edgex 服务上了。然后就可以通过 EdgeX 的api 获得设备的url 流地址。
需要借助几个命令,操作下就可以了,还是非常的方便的。也可以识别出摄像头的版本、信息等。
非常方便。
本文的原文连接是:
https://blog.csdn.net/freewebsys/article/details/127383355
博主地址是:https://blog.csdn.net/freewebsys

