【GD32F427开发板试用】添加 shell 功能用于控制板载外设
这里是引用
本篇文章来自极术社区与兆易创新组织的GD32F427开发板评测活动,更多开发板试用活动请关注极术社区网站。作者:andeyqi
1.shell用途
我们在嵌入式开发调试过程中经常会用log打印的方式debug问题,不过难免有时需要和芯片交互获取一些运行现场的情况,这就用到了今天的所说的shell,通过shell我们可以创建命令和指定的功能绑定(绑定的函数可以是dump寄存器信息,也可以是我们想获取的芯片状态等),本次试验使用的shell物理层设备为开发过程中普遍使用的usart。
2.shell 的硬件接口
本次试验shell物理层使用的是usart,需要可以通过串口发送和接收数据用于和芯片进行交互,GD32的demo库里已经支持了printf的输出,我们把代码拷贝过来就可以了,demo 代码如下:
GD32F4xx_Firmware_Library_V3.0.2\GD32F4xx_Firmware_Library\Examples\USART\Printf
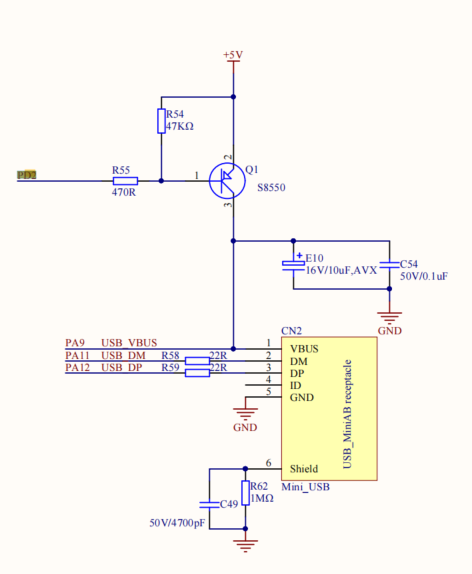
int main(void){ /* enable GPIO clock */ rcu_periph_clock_enable(RCU_GPIOA); /* enable USART clock */ rcu_periph_clock_enable(RCU_USART0); /* configure the USART0 TX pin and USART0 RX pin */ gpio_af_set(GPIOA, GPIO_AF_7, GPIO_PIN_9); gpio_af_set(GPIOA, GPIO_AF_7, GPIO_PIN_10); /* configure USART0 TX as alternate function push-pull */ gpio_mode_set(GPIOA, GPIO_MODE_AF, GPIO_PUPD_PULLUP, GPIO_PIN_9); gpio_output_options_set(GPIOA, GPIO_OTYPE_PP, GPIO_OSPEED_50MHZ, GPIO_PIN_9); /* configure USART0 RX as alternate function push-pull */ gpio_mode_set(GPIOA, GPIO_MODE_AF, GPIO_PUPD_PULLUP, GPIO_PIN_10); gpio_output_options_set(GPIOA, GPIO_OTYPE_PP, GPIO_OSPEED_50MHZ, GPIO_PIN_10); /* USART configure */ usart_deinit(USART0); usart_baudrate_set(USART0, 115200U); usart_receive_config(USART0, USART_RECEIVE_ENABLE); usart_transmit_config(USART0, USART_TRANSMIT_ENABLE); usart_enable(USART0); printf("a usart transmit test example!"); while(1);}/* retarget the C library printf function to the USART */int fputc(int ch, FILE *f){ usart_data_transmit(EVAL_COM0, (uint8_t)ch); while(RESET == usart_flag_get(EVAL_COM0, USART_FLAG_TBE)); return ch;}不过此段代码使用的PTA9 和 PTA10 作为USART0的输出,按照此demo代码配置后发现printf 无输出,试验发现PTA9这个端口不配置成串口功能的时候也是拉高的状态,查看了下原理图发现,PTA9 上是接在VBUS端口上,应该是硬件设计的原因,同样的代码USART0的PAD更新成配置成PTB6 和 PTB7后发现,peintf函数可以从串口输出了,PTA9异常的原因先搁置下后续在确认下。
3.shell 软件上的实现
shell 的设计借鉴了rt-thread的代码,通过在代码定义特定的section专门用于存储shell命令的命令名,及绑定的函数指针,每个shell 命令的数据结构如下:
/* system call table */struct littleshell_syscall{ const char* name;/* the name of system call */ const char* desc;/* description of system call */ syscall_func func; /* the function address of system call */};name:定义shell 命令
desc:shell 命令的描述信息
func:shell 命令绑定的动作函数,函数指针定义如下:
typedef unsigned int (*syscall_func)(char argc,char argv);
3.1 shell section 定义
本shell 的运行环境为IAR环境,因IAR 与 MDK GCC 的段定义的方式有些区别,以下描述的方法只适用于IAR环境。如何在代码中定义特定段用来连续存储shell 命令结构体。
DATA AND FUNCTION PLACEMENT IN SECTIONSThe following method can be used for placing data or functions in named sections otherthan default:● The @ operator, alternatively the #pragma location directive, can be used forplacing individual variables or individual functions in named sections. The namedsection can either be a predefined section, or a user-defined section.● The --section option can be used for placing variables and functions, which areparts of the whole compilation unit, in named sections.根据上述描述IAR 可以通过@ “sectionname” 或者 的方式放入指定section中,用法参照如下example。
Examples of placing variables in named sectionsIn the following examples, a data object is placed in a user-defined section. Note thatyou must as always ensure that the section is placed in the appropriate memory areawhen linking.__no_init int alpha @ "MY_NOINIT"; /* OK */#pragma location="MY_CONSTANTS"const int beta = 42; /* OK */const int gamma @ "MY_CONSTANTS" = 17;/* OK */int theta @ "MY_ZEROS"; /* OK */int phi @ "MY_INITED" = 4711; /* OK */The linker will normally arrange for the correct type of initialization for each variable.If you want to control or suppress automatic initialization, you can use the initializeand do not initialize directives in the linker configuration file.Examples of placing functions in named sectionsvoid f(void) @ "MY_FUNCTIONS";void g(void) @ "MY_FUNCTIONS"{ }#pragma location="MY_FUNCTIONS"void h(void);参照上述描述代码中通过宏让编译器将 shell 的命令结构体放入特定的数据结构中,相当于在rom区定义一张shell 命令的结构体,代码如下:
/* system call table */struct littleshell_syscall{ const char* name;/* the name of system call */ const char* desc;/* description of system call */ syscall_func func; /* the function address of system call */};#define LTSH_FUNCTION_EXPORT_CMD(name, cmd, desc) \ const char __fsym_##cmd##_name[] SECTION(".shellname") = #cmd; \ const char __fsym_##cmd##_desc[] SECTION(".shelldesc") = #desc; \ RT_USED const struct littleshell_syscall __fsym_##cmd SECTION("FSymTab")= \ { \ __fsym_##cmd##_name, \ __fsym_##cmd##_desc, \ (syscall_func)&name \ }; #define LTSH_FUNCTION_EXPORT(name, desc) \ LTSH_FUNCTION_EXPORT_CMD(name, name, desc)4.shell 使用验证
上述的shell 的主要数据结构已经介绍了,shell 的实现流程在此就不多描述了,具体实现可以参照如下代码,IAR 工程路径如下:
https://github.com/andeyqi/GD32F427-VSTART/tree/master/GD32F4xx_Demo_Suites_V2.6.1/GD32427V_START_Demo_Suites/Projects/02_GPIO_Key_Polling_mode/EWARM
https://github.com/andeyqi/GD32F427-VSTART
我们在代码中定义如下宏用于通过shell 控制板载的led 的控制。通过输入led on命令点亮led, 通过输入led off命令熄灭led。
测试代码如下:
unsigned int led(char argc,char argv){ if(argc != 2) return 0; if(strcmp("on",argv[1]) == 0) { /* turn on LED1 */ printf("led on \r\n"); gpio_bit_set(GPIOC, GPIO_PIN_6); } else if(strcmp("off",argv[1]) == 0) { printf("led off \r\n"); gpio_bit_reset(GPIOC, GPIO_PIN_6); } return 1;}LTSH_FUNCTION_EXPORT(led,"test led on/off");在shell 上输入命令已经有对应的log输出,说明该段代码已经正常的被调用,led 也已经同步的点亮熄灭。
GD32#GD32#GD32#led onled onGD32#led offled offGD32#led onled onGD32#
