【Vue插槽详解】
Vue插槽详解
- Vue插槽的作用
- 一、默认插槽:
-
-
-
- 完整代码:
-
-
- 二、具名插槽
-
-
-
- 完整代码:
-
-
- 三、作用域插槽
-
-
-
- 完整代码如下:
-
-
Vue插槽的作用
Vue插槽是Vue中常见的一种组件间的相互通信方式,作用是让父组件可以向子组件指定位置插入html结构,适用于父组件===>子组件,在要接收数据的组件页面通过标签来表示,简单来说,就是通过此标签来起到占位的作用,而要插入的内容也会对应到标签所在的位置。
一、默认插槽:
默认插槽是插槽最基本的方式:
首先在父组件App.Vue中引入子组件,并在引入的子组件标签内插入需要的html元素,在子组件中把需要用插槽的地方用标签替代:
在App.vue中引入子组件,使用子组件,并且声明需要的数据:
1.引入组件:
import StudyM from './components/StudyM.vue'2.使用组件:
<template> <div id="app"> <StudyM title="游戏列表"> <ul> <li v-for="game , index in games" :key="index">{{game}}</li> </ul> </StudyM> <StudyM title="推荐音乐"> <ul> <li v-for="music , index in musics" :key="index">{{music}}</li> </ul> </StudyM> <StudyM title="电影推荐"> <ul> <li v-for="movie , index in movies" :key="index">{{movie}}</li> </ul> </StudyM> </div></template>3.添加数据:
data(){ return{ games:['英雄联盟', '炉石传说', '穿越火线', 'QQ飞车', '吃鸡'], musics:['迷途羔羊', '红玫瑰', '富士山下', '麻雀', '妈妈的话', '故乡'], movies:['蜘蛛侠', '复仇者联盟', '金刚狼', '触不可及', '唐人街探案','当幸福来敲门'] } }完整代码:
App.vue:
<template> <div id="app"> <StudyM title="游戏列表"> <ul> <li v-for="game , index in games" :key="index">{{game}}</li> </ul> </StudyM> <StudyM title="推荐音乐"> <ul> <li v-for="music , index in musics" :key="index">{{music}}</li> </ul> </StudyM> <StudyM title="电影推荐"> <ul> <li v-for="movie , index in movies" :key="index">{{movie}}</li> </ul> </StudyM> </div></template><script> //引入组件 import StudyM from './components/StudyM.vue'export default { name: 'App', components: { StudyM }, data(){ return{ games:['英雄联盟', '炉石传说', '穿越火线', 'QQ飞车', '吃鸡'], musics:['迷途羔羊', '红玫瑰', '富士山下', '麻雀', '妈妈的话', '故乡'], movies:['蜘蛛侠', '复仇者联盟', '金刚狼', '触不可及', '唐人街探案','当幸福来敲门'] } }}</script><style scoped>#app{ display: inline-flex; justify-content: center;}</style>StudyM.vue:
<template> <div class="box"> <h4>{{title}}</h4> <slot></slot> </div></template><script>export default { name:'StudyM', props:['title'],}</script><style scoped>.box{ margin: 20px; width: 200px; height: 200px; background-color: aqua;}h4{ text-align: center; background-color: rgb(127, 236, 113);}</style>此时,我们已经完成了默认插槽的使用:
效果图: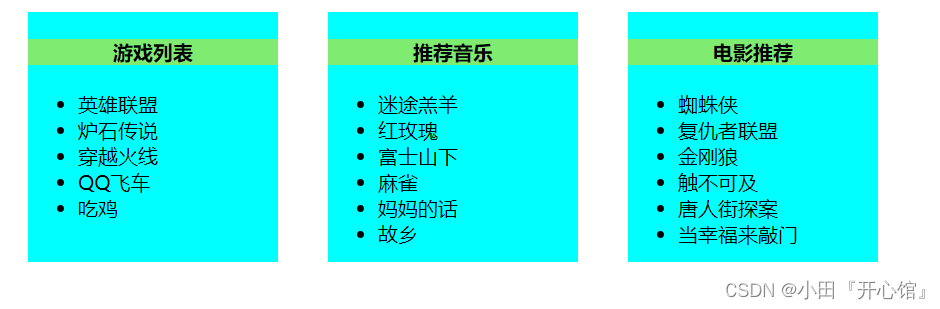
二、具名插槽
简单来说,所谓的具名插槽就是有名字的插槽
那它和默认插槽有什么不同呢?
有时候我们会遇到这种场景,在一个组件中,我们虽然可以复用组件的结构,但是往往,有时候我们会遇到一个组件多用,但是结构稍微有所差别的情况,这时,就会用得到具名插值。
首先在要插入html的部分需要用一个标签包裹住各个部分:
<template slot="one"> <ul> <li v-for="game , index in games" :key="index">{{game}}</li> </ul> </template>其次,当给标签绑定slot=“name” 属性时,需要在子组件中对应每个 给出一个 并且添加上name属性:
<div class="box"> <h4>{{title}}</h4> <slot name="one"></slot> <slot name="tow"></slot> </div>完整代码:
App.vue:
<template> <div id="app"> <StudyM title="游戏列表"> <template slot="one"> <ul> <li v-for="game , index in games" :key="index">{{game}}</li> </ul> </template> <template v-slot:tow> <a href="https://lol.qq.com/main.shtml">英雄联盟官网由此进入</a><br/><br> <a href="https://www.wegame.com.cn/">了解更多游戏</a> </template> </StudyM> <StudyM title="推荐音乐"> <template slot="one"> <ul> <li v-for="music , index in musics" :key="index">{{music}}</li> </ul> </template> <template slot="tow"> <button>点击进入QQ音乐</button> <button>点击进入网易云音乐</button> </template> </StudyM> <StudyM title="电影推荐"> <template slot="one"> <ul> <li v-for="movie , index in movies" :key="index">{{movie}}</li> </ul> </template> <template slot="tow"> <video controls src="https://www.oppo.com/content/dam/oppo/product-asset-library/find/find-n/v1/assets/tvc-preview-3d0357.mp4"></video> </template> </StudyM> </div></template><script> //引入组件 import StudyM from './components/StudyM.vue'export default { name: 'App', components: { StudyM }, data(){ return{ games:['英雄联盟', '炉石传说', '穿越火线', 'QQ飞车', '吃鸡'], musics:['迷途羔羊', '红玫瑰', '富士山下', '麻雀', '妈妈的话', '故乡'], movies:['蜘蛛侠', '复仇者联盟', '金刚狼', '触不可及', '唐人街探案','当幸福来敲门'] } }}</script><style scoped>#app{ display: inline-flex; justify-content: center;}video{ width: 100%;}</style>StudyM.vue:
<template> <div class="box"> <h4>{{title}}</h4> <slot name="one"></slot> <slot name="tow"></slot> </div></template><script>export default { name:'StudyM', props:['title'],}</script><style scoped>.box{ margin: 20px; width: 300px; padding: 20px; background-color: aqua;}h4{ text-align: center; background-color: rgb(127, 236, 113);}</style>此时,我们已经完成了具名插槽的使用
效果图如下:

值得注意的是,在具名插槽当中,我们不仅要使用到
标签,而且还要在其中声明slot="name"属性,在子组件中的标签中接收传过来的name
三、作用域插槽
数据在组件的自身,但根据数据生成的结构需要组件的使用者来决定,也就是说,作用域插槽的不同之处就在于,数据不在父组件身上,而是在子组件身上,且组件的结构和内容由父组件决定。作用域组件限定了组件内结构和数据的展示范围,以便在开发中我们可以根据一个组件而不断变换其中的内容和结构。
使用作用域插槽,数据在子组件中,需要通过数据绑定传给使用者插入html的部分:
<div class="box"> <h4>{{title}}</h4> <slot :movies="movies"></slot> </div>此时,在使用者组件中,使用 中的scope="Data"属性将数据传递过来:
<StudyM title="游戏列表"> <template scope="one"> <ul> <li v-for="m,index in one.movies" :key="index">{{m}}</li> </ul> </template> </StudyM>完整代码如下:
App.vue:
<template> <div id="app"> <StudyM title="游戏列表"> <template scope="one"> <ul> <li v-for="m,index in one.movies" :key="index">{{m}}</li> </ul> </template> </StudyM> <StudyM title="游戏列表"> <template scope="one"> <ol> <li v-for="m,index in one.movies" :key="index">{{m}}</li> </ol> </template> </StudyM> <StudyM title="游戏列表"> <template scope="one"> <h4 v-for="m,index in one.movies" :key="index">{{m}}</h4> </template> </StudyM> </div></template><script> //引入组件 import StudyM from './components/StudyM.vue'export default { name: 'App', components: { StudyM },}</script><style scoped>#app{ display: inline-flex; justify-content: center;}video{ width: 100%;}</style>StudyM.vue:
<template> <div class="box"> <h4>{{title}}</h4> <slot :movies="movies"></slot> </div></template><script>export default { name:'StudyM', props:['title'], data(){ return{ movies:['蜘蛛侠', '复仇者联盟', '金刚狼', '触不可及', '唐人街探案','当幸福来敲门'] } }}</script><style scoped>.box{ margin: 20px; width: 300px; padding: 20px; background-color: aqua;}h4{ text-align: center; background-color: rgb(127, 236, 113);}</style>此时,我们已经完成了作用域插槽的使用:
效果图如下:

以上内容就是Vue中插槽的三种不同类型的用法,在理解起来的时候,作用域插槽是相对来说难理解的,希望能够对大家有用,若有不对或是理解有偏差可以私信我
别忘记点个赞,加个关注再走哟!!!

