复制带随机指针的链表(力扣138题Java详解)
题目描述
>LeetCode138题 <
给你一个长度为 n 的链表,每个节点包含一个额外增加的随机指针 random ,该指针可以指向链表中的任何节点或空节点。
构造这个链表的 深拷贝。 深拷贝应该正好由 n 个 全新 节点组成,其中每个新节点的值都设为其对应的原节点的值。新节点的 next 指针和 random 指针也都应指向复制链表中的新节点,并使原链表和复制链表中的这些指针能够表示相同的链表状态。复制链表中的指针都不应指向原链表中的节点 。
例如,如果原链表中有 X 和 Y 两个节点,其中 X.random --> Y 。那么在复制链表中对应的两个节点 x 和 y ,同样有 x.random --> y 。
返回复制链表的头节点。
用一个由 n 个节点组成的链表来表示输入/输出中的链表。每个节点用一个 [val, random_index] 表示:
● val:一个表示 Node.val 的整数。
● random_index:随机指针指向的节点索引(范围从 0 到 n-1);如果不指向任何节点,则为 null 。
解题思路
给定一个长度为 n 的链表将其复制,此链表的每个节点除了有一个指向下一个节点的next指针外,还有一个指向链表中随机节点或者 null 的一个 random 指针。
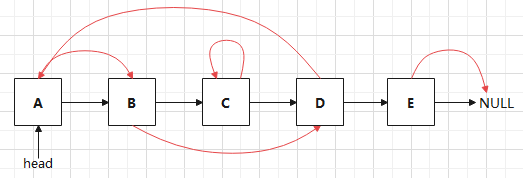
1.我们可以先将链表中的每个节点复制并插入到对应老节点的后面,此步是为了得到老节点与对应新节点的映射关系。
只是复制 next 和 val 关系,并没有复制 random 关系

public Node copyRandomList(Node head) { if (head == null) { return null; } Node cur = head; while (cur != null) { Node newNode = new Node(cur.val); newNode.next = cur.next; //将 newNode 插入到 cur 后 cur.next = newNode; cur = cur.next.next; //让 cur 一直指向原节点 } }2.复制完 next 和 val 关系后,需要考虑如何复制 random 关系
如果直接将原节点的 random 关系复制对应给新节点的话,并不能达到我们想要的效果
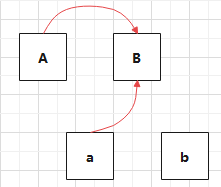
将 A.random --> B 复制给新节点 a
期望得到 a.random --> b
结果得到 a.random --> B
将原节点 A 的 random 关系复制给对应的新节点 a,那么新节点 a 的 random 还是指向原节点 A 指向的节点
所以这种复制方法是错误的!
正确的复制方法(深拷贝)
首先分析原节点和新节点的映射关系
oldNode : A
newNode : a
oldRandom = oldNode.random = B
newNode.random = oldRandom.next = b
找到如上的映射关系我们就可以开始进行random关系的复制
从前往后遍历整个链表,让cur.next.ranom = cur.random.next,这样就可以完成random关系的复制

public Node copyRandomList(Node head) { cur = head; //cur 一直都是原节点 while (cur != null) { Node newNode = cur.next; // newNode 是原节点对应的新节点 Node oldRandom = cur.random; //根据映射关系复制 random 关系 if (oldRandom == null) { newNode.random = null; } else { newNode.random = oldRandom.next; } cur = cur.next.next; } }3.复制完所有关系之后就可以将链表进行拆分,将其分为原链表和新链表

public Node copyRandomList(Node head) { cur = head; Node newHead = head.next; while (cur != null) { Node newNode = cur.next; cur.next = newNode.next; //连接每个原节点成原链表 if (newNode != null) { newNode.next = newNode.next.next; //连接每个新节点成新链表 } cur = cur.next; } retuen newHead; }总结
将带有随机指针的链表进行复制:
1.先复制原节点并插入到对应原节点的后面,然后复制next和val关系
2.再用深拷贝复制random随机指针关系
3.拆分链表成原链表和新链表
4.返回新链表的头结点
附上完整代码
public class Solution { public Node copyRandomList(Node head) { if (head == null) { return null; } // 1) 挨个复制结点,并插入对应的老结点后边,主要为了得到 老结点到对应新结点的映射关系 Node cur = head; while (cur != null) { Node newNode = new Node(cur.val); // 把 newNode 插入到 cur 的后边 newNode.next = cur.next; cur.next = newNode; // 让 cur 指向下一个老结点 cur = cur.next.next; } // 2) 专心处理 random 复制 cur = head; while (cur != null) { // cur 一定是老结点 Node newNode = cur.next; // newNode 是和 cur 对应的新结点 // 根据 cur 的 random 关系,复制出 newNode 的 random 关系 Node oldRandom = cur.random; if (oldRandom == null) { newNode.random = null; } else { newNode.random = oldRandom.next; } // 让 cur 指向下一个老结点 cur = cur.next.next; } // 3) 把链表拆开 老的链表、新的链表 cur = head; Node newHead = head.next; // 前提:head != null; while (cur != null) { Node newNode = cur.next; // 改变 cur.next 和 newNode.next cur.next = cur.next.next; // newNode.next if (newNode.next != null) { newNode.next = newNode.next.next; } // 让 cur 还指向下一个老结点 cur = cur.next; } // 4) 返回新链表的头结点 return newHead; }
