SpringBoot学习---SpringSecurity与Shiro
视频学习链接:
狂神说SpringBoot18:集成SpringSecurity
目录:
-
-
- 一.SpringSecurity
-
- 1.什么是SpringSecurity
- 2.实际操作
-
- (1) 项目框架
- (2) 项目使用的依赖(在pom.xml中)
- (3) 前端界面
- (4) controller层实现页面的跳转
- (5) SpringSecurity的使用
- (6) 运行效果
- 二.Apache Shiro
-
- 1.什么是Apache Shiro
- 2.三大核心组件
- 3.四大核心功能
- 4.实际操作
-
- (1) 项目结构
- (2) 导入依赖(在pom.xml中)
- (3) 前端界面
- (4) controller层实现页面的跳转
- (5) Dao层用户的数据从数据库中获取
- (6) Service层
- (7) Shiro的使用
- (8) 运行效果
-
一.SpringSecurity
1.什么是SpringSecurity
Spring Security是一个功能强大且高度可定制的身份验证和访问控制框架。它实际上是保护基于spring的应用程序的标准。
2.实际操作
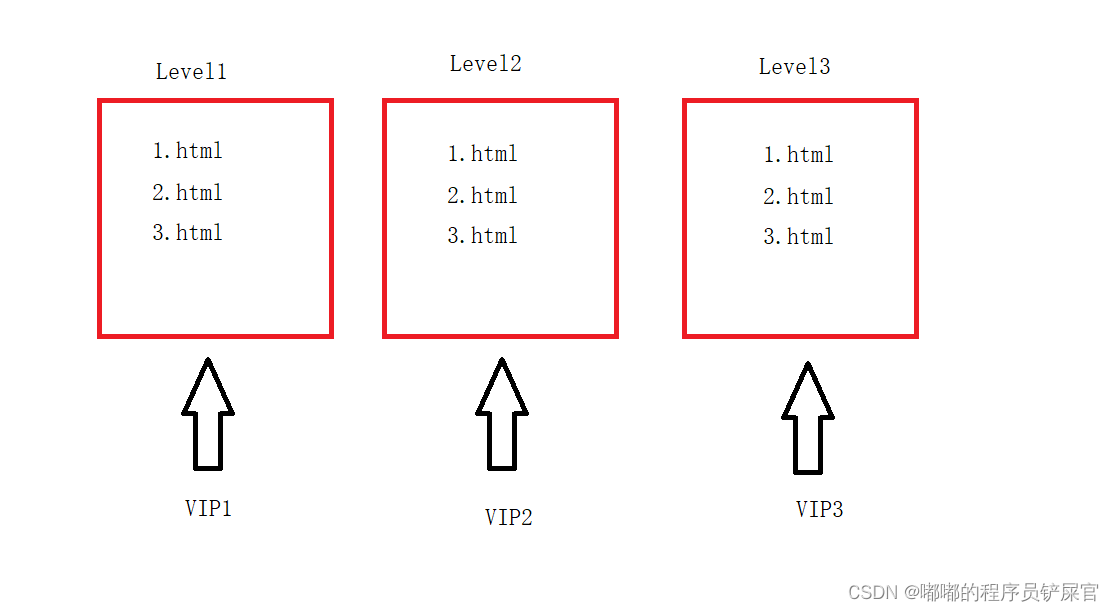
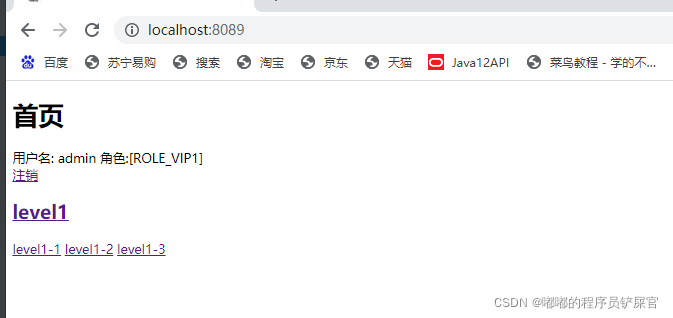
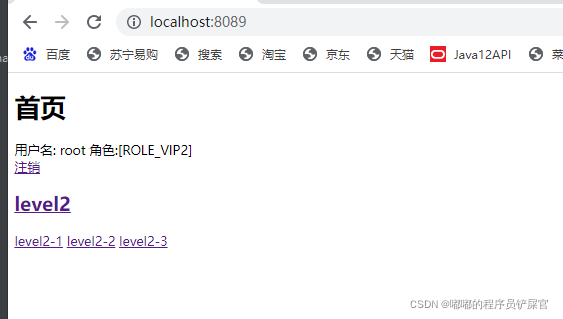
需求:根据用户的权限,限制用户可进入的页面,如用户权限为VIP1可以访问/level1/下的所有页面,用户权限为VIP2可以访问/level2/下的所有页面,用户权限为VIP3可以访问/level3/下的所有页面。
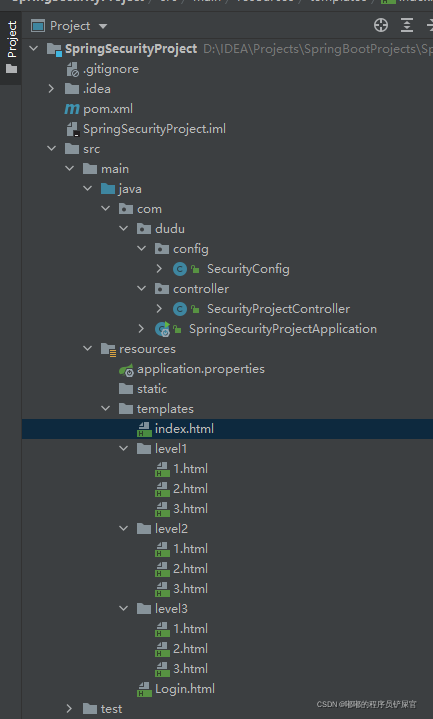
(1) 项目框架
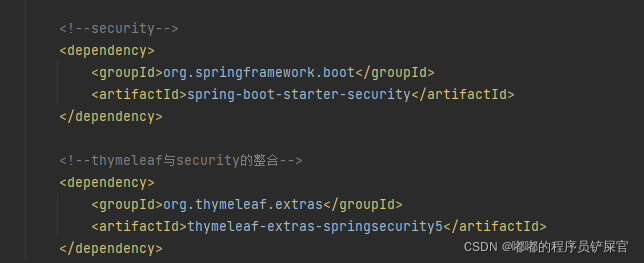
(2) 项目使用的依赖(在pom.xml中)
<dependency> <groupId>org.thymeleaf</groupId> <artifactId>thymeleaf-spring5</artifactId> </dependency> <dependency> <groupId>org.springframework.boot</groupId> <artifactId>spring-boot-starter-security</artifactId> </dependency> <dependency> <groupId>org.thymeleaf.extras</groupId> <artifactId>thymeleaf-extras-springsecurity5</artifactId> </dependency>(3) 前端界面
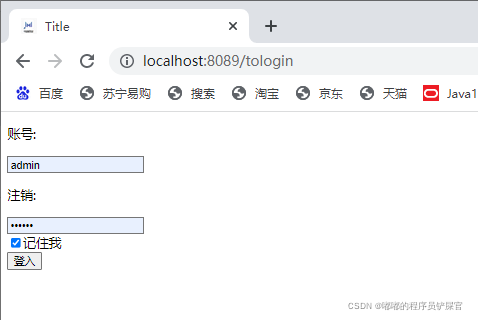
Login.html:用户登入页面
<!DOCTYPE html><html lang="en" xmlns="http://www.w3.org/1999/html"><head> <meta charset="UTF-8"> <title>Title</title></head><body><form action="/index" method="post"> <p>账号:</p><input type="text" placeholder="请输入账号" name="userName"> <p>注销:</p><input type="password" placeholder="请输入密码" name="passWord"> </br> <input type="checkbox" name="remember">记住我 </br> <input type="submit" value="登入"></form></body></html>index.html:网站主界面
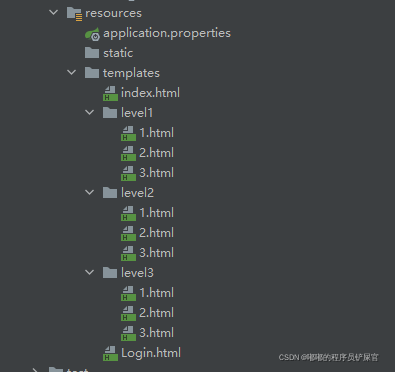
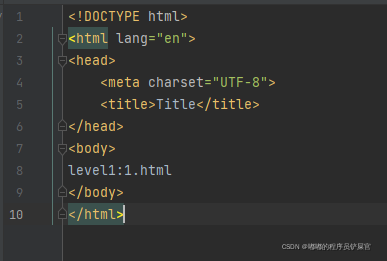
<!DOCTYPE html><html lang="en" xmlns:sec="http://www.thymeleaf.org/thymeleaf-extras-springsecurity5"><head> <meta charset="UTF-8"> <title>Title</title></head><body><H1>首页</H1><div class="right menu"> <div sec:authorize="!isAuthenticated()"> <a th:href="@{/tologin}" class="item"/>登入 </div> <div sec:authorize="isAuthenticated()"> <a class="item"> 用户名: <span sec:authentication="name"></span> 角色:<span sec:authentication="principal.authorities"></span> </a> </div> <div sec:authorize="isAuthenticated()"> <a th:href="@{/logout}" class="item"/>注销 </div></div><div sec:authorize="hasRole('VIP1')"> <h2>level1</h2> <a href="/level1/1">level1-1</a> <a href="/level1/2">level1-2</a> <a href="/level1/3">level1-3</a></div><div sec:authorize="hasRole('VIP2')"> <h2>level2</h2> <a href="/level2/1">level2-1</a> <a href="/level2/2">level2-2</a> <a href="/level2/3">level2-3</a></div><div sec:authorize="hasRole('VIP3')"> <h2>level3</h2> <a href="/level3/1">level3-1</a> <a href="/level3/2">level3-2</a> <a href="/level3/3">level3-3</a></div></body></html>/leve1/X.html随便写写即可
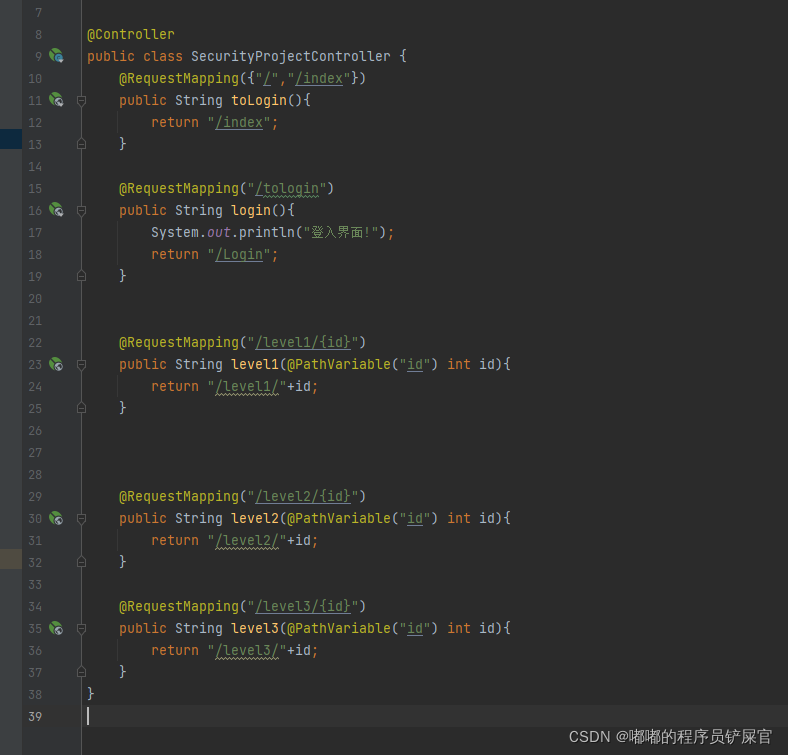
(4) controller层实现页面的跳转
SecurityProjectController类:
(5) SpringSecurity的使用
经过前面操作,基本上可以实现界面的跳转,但是还无法实现根据用户权限的不同,展示不同的页面,这个时候我们需要使用SpringSecurity。
- 导入SpringSecurity的依赖
- 在config中创建SecurityConfig类(自定义Spring Security 配置类)
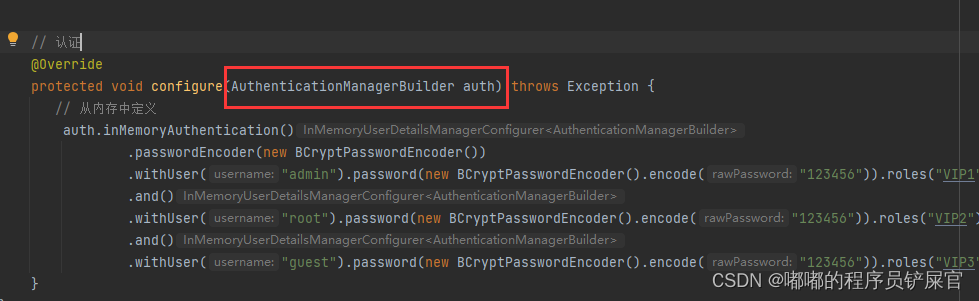
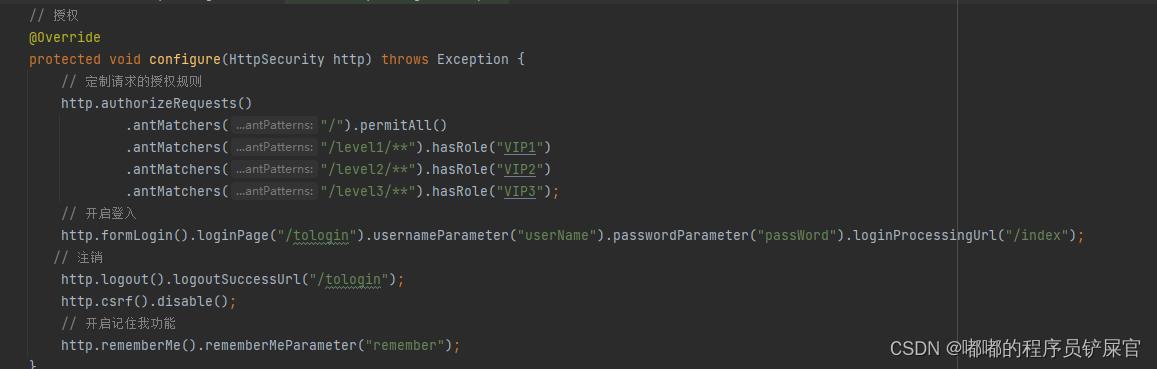
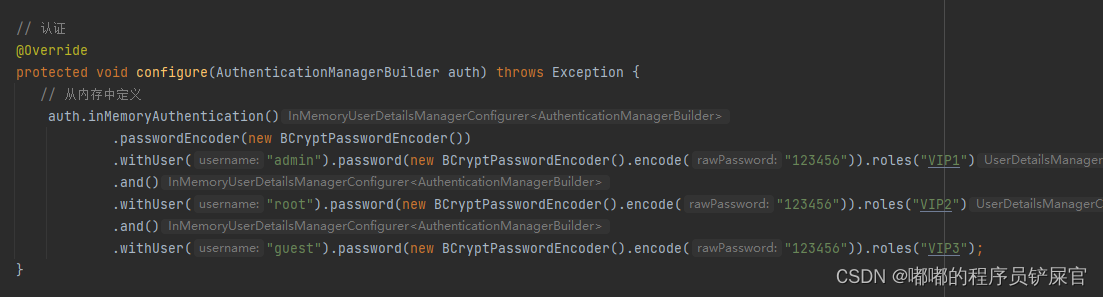
@EnableWebSecuritypublic class SecurityConfig extends WebSecurityConfigurerAdapter { // 授权 @Override protected void configure(HttpSecurity http) throws Exception { // 定制请求的授权规则 http.authorizeRequests() .antMatchers("/").permitAll() .antMatchers("/level1/").hasRole("VIP1") .antMatchers("/level2/").hasRole("VIP2") .antMatchers("/level3/").hasRole("VIP3"); // 开启登入 http.formLogin().loginPage("/tologin").usernameParameter("userName").passwordParameter("passWord").loginProcessingUrl("/index");// 注销 http.logout().logoutSuccessUrl("/tologin"); http.csrf().disable(); // 开启记住我功能 http.rememberMe().rememberMeParameter("remember"); } // 认证 @Override protected void configure(AuthenticationManagerBuilder auth) throws Exception {// 从内存中定义 auth.inMemoryAuthentication() .passwordEncoder(new BCryptPasswordEncoder()) .withUser("admin").password(new BCryptPasswordEncoder().encode("123456")).roles("VIP1") .and() .withUser("root").password(new BCryptPasswordEncoder().encode("123456")).roles("VIP2") .and() .withUser("guest").password(new BCryptPasswordEncoder().encode("123456")).roles("VIP3"); }}WebSecurityConfigurerAdapter:自定义Security策略(自定义Spring Security 配置类继承该类即可)

@EnableWebSecurity:开启WebSecurity模式

AuthenticationManagerBuilder:自定义认证策略
Spring Security的两个主要目标是 “认证” 和 “授权”(访问控制):
重写configure(HttpSecurity http)方法用于授权
重写configure(AuthenticationManagerBuilder auth)方法用于认证
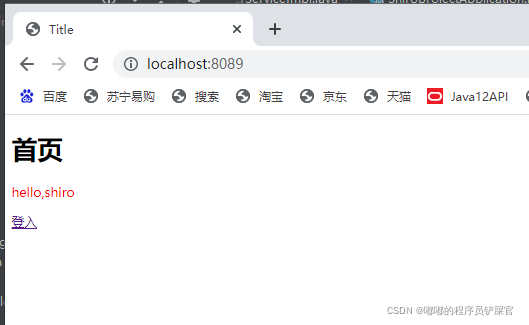
(6) 运行效果
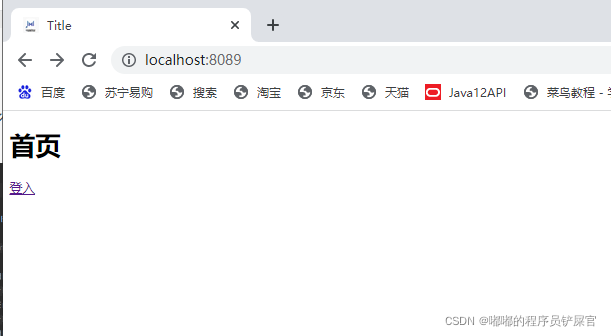
这个登入界面是使用自己编写的(SpringSecurity本身提供登入界面)

登入admin(权限为VIP1)
登入root(权限为VIP2)
登入guest用户(权限为VIP3)

二.Apache Shiro
1.什么是Apache Shiro
Apache Shiro是一个功能强大且易于使用的Java安全框架,提供了认证,授权,加密,和会话管理。如同 Spring security 一样都是是一个权限安全框架,但是与Spring Security相比,在于他使用了和比较简洁易懂的认证和授权方式。
2.三大核心组件
- subject:主体,可以是用户也可以是程序,主体要访问系统,系统需要对主体进行认证、授权。
- securityManager: 安全管理器,主体进行认证和授权都是通过它进行。
- realm:领域,可以理解为DAO,通过它存取认证、授权相关数据。
3.四大核心功能
- Authentication:认证即登录,用于用户身份识别。
- Authorization: 授权即访问控制,判断用户是否有权限去访问受保护的资源。
- Cryptography: 通过加密算法保护数据安全。
- Session Management:会话管理,即用户访问你应用自身携带的数据,甚至可以在非Web程序
4.实际操作
需求:通过查询用户的perms字段的值,如果为user:add表示该用户可以进入add.html;如果为user:update表示该用户进入update.html

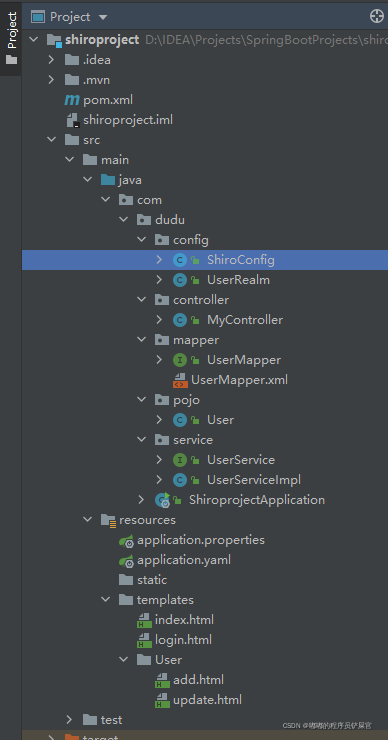
(1) 项目结构
(2) 导入依赖(在pom.xml中)
<!--导入shiro依赖--> <dependency> <groupId>org.apache.shiro</groupId> <artifactId>shiro-spring</artifactId> <version>1.4.1</version> </dependency> <!--数据库--> <dependency> <groupId>mysql</groupId> <artifactId>mysql-connector-java</artifactId> <version>8.0.19</version> </dependency> <dependency> <groupId>log4j</groupId> <artifactId>log4j</artifactId> <version>1.2.17</version> </dependency> <dependency> <groupId>com.alibaba</groupId> <artifactId>druid</artifactId> <version>1.1.12</version> </dependency> <dependency> <groupId>org.mybatis.spring.boot</groupId> <artifactId>mybatis-spring-boot-starter</artifactId> <version>2.1.1</version> </dependency> <dependency> <groupId>org.projectlombok</groupId> <artifactId>lombok</artifactId> </dependency> <dependency> <groupId>com.github.theborakompanioni</groupId> <artifactId>thymeleaf-extras-shiro</artifactId> <version>2.0.0</version> </dependency>(3) 前端界面
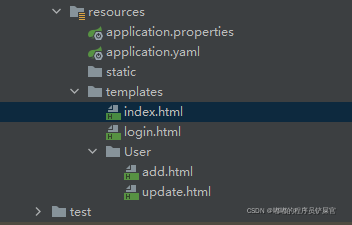
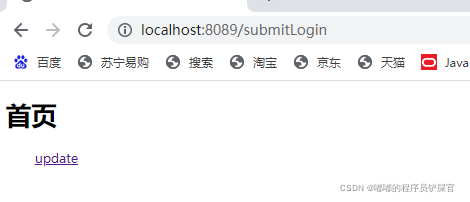
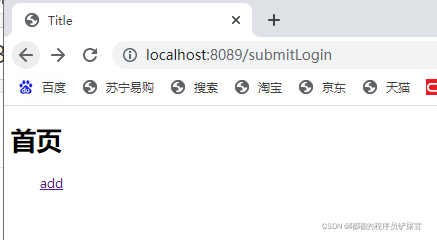
index.html:网站首页界面
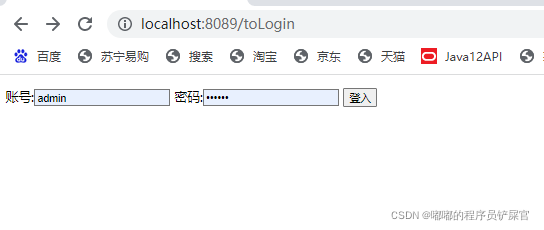
<!DOCTYPE html><html lang="en" xmlns:th="https://www.thymeleaf.org" xmlns:shiro="https://shiro.apache.org/jsp-tag-library.html"><head> <meta charset="UTF-8"> <title>Title</title></head><body><h1>首页</h1><p th:text="${msg}" style="color: red;"></p><shiro:notAuthenticated> <a th:href="@{/toLogin}">登入</a></shiro:notAuthenticated><shiro:authenticated> <shiro:haspermission name="user:add"> <a th:href="@{/user/add}">add</a> </shiro:haspermission> <shiro:haspermission name="user:update"> <a th:href="@{/user/update}">update</a> </shiro:haspermission></shiro:authenticated></body></html>login.html:用户登入界面
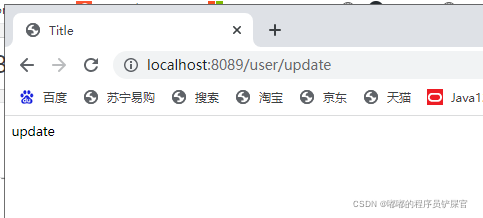
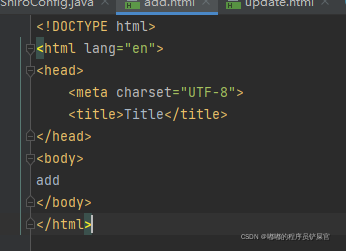
<!DOCTYPE html><html lang="en" xmlns:shiro="https://www.thymeleaf.org/thymeleaf-extras-shiro"><head> <meta charset="UTF-8"> <title>登入界面</title></head><body><form th:action="@{/submitLogin}" method="post"> <p th:text="${msg}" style="color: red;"></p> 账号:<input type="text" name="userName"> 密码:<input type="password" name="passWord"> <input type="submit" value="登入"></form></body></html>User下的add.html和update.html随便写写即可:
(4) controller层实现页面的跳转
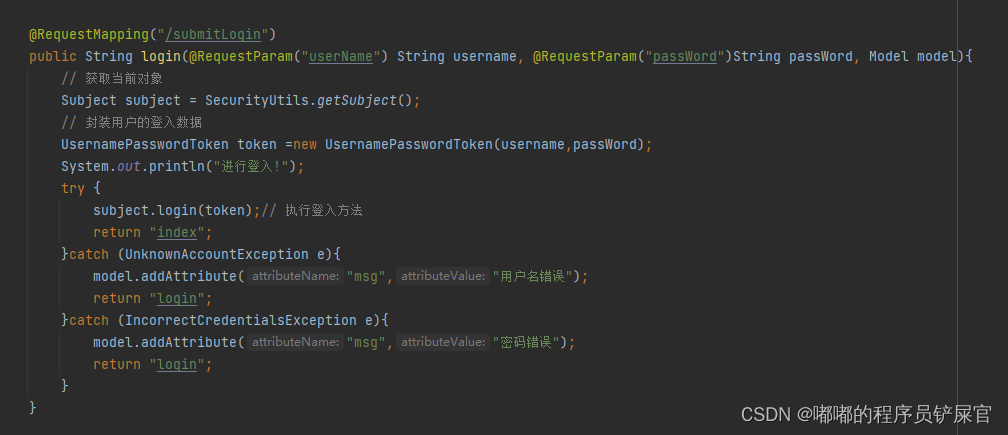
@Controllerpublic class MyController { @RequestMapping({"/","/index"}) public String toIndex(Model model){ model.addAttribute("msg","hello,shiro"); return "index"; } @RequestMapping("/user/add") public String add(){ return "/User/add"; } @RequestMapping("/user/update") public String update(){ return "/User/update"; } @RequestMapping("/toLogin") public String toLogin(){ return "login"; } @RequestMapping("/submitLogin") public String login(@RequestParam("userName") String username, @RequestParam("passWord")String passWord, Model model){ // 获取当前对象 Subject subject = SecurityUtils.getSubject(); // 封装用户的登入数据 UsernamePasswordToken token =new UsernamePasswordToken(username,passWord); System.out.println("进行登入!"); try { subject.login(token);// 执行登入方法 return "index"; }catch (UnknownAccountException e){ model.addAttribute("msg","用户名错误"); return "login"; }catch (IncorrectCredentialsException e){ model.addAttribute("msg","密码错误"); return "login"; } } @ResponseBody @RequestMapping("/auth") public String noauth(){ return "没有授权!"; }}这里注意登入使用的Subject对象进行登入:
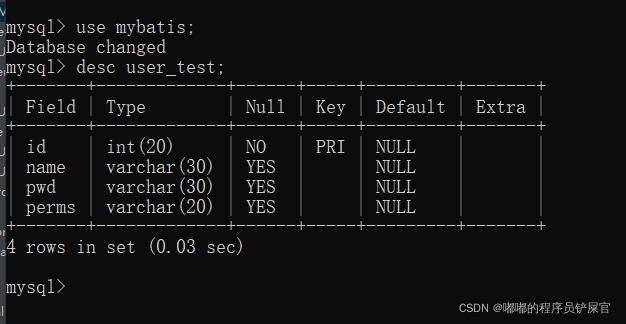
(5) Dao层用户的数据从数据库中获取
数据表结构:
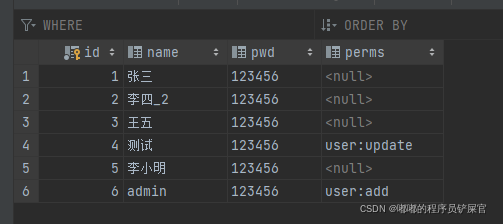
数据:
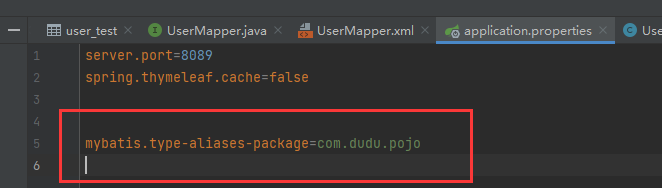
数据源配置application.yaml中:
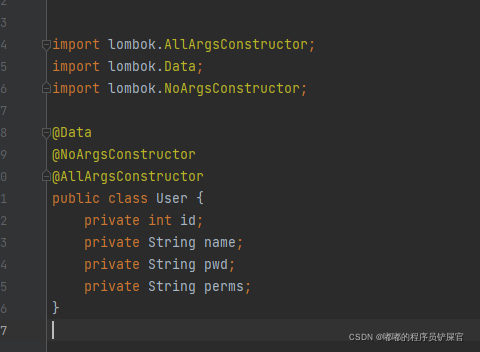
spring: datasource: username: root password: root url: jdbc:mysql://localhost:3306/mybatis?useUnicode=true&characterEncoding=UTF-8&serverTimezone=UTC driver-class-name: com.mysql.cj.jdbc.Driverpojo:
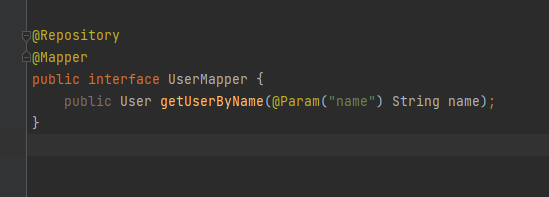
Mapper层:
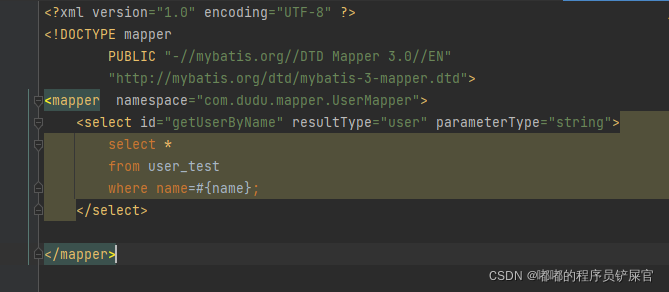
不要忘了扫描一下包:
application.properties中
由于映射文件UserMapper.xml放在Java文件中(资源过滤),不然无法生成该UserMapper.xml:
<resource> <directory>src/main/java</directory> <includes> <include>/*.xml</include> </includes> </resource>
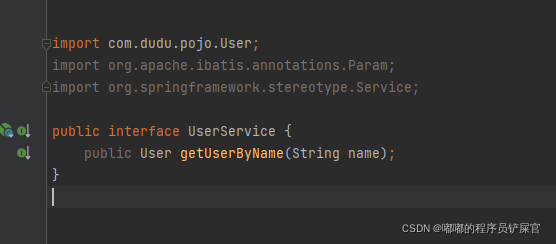
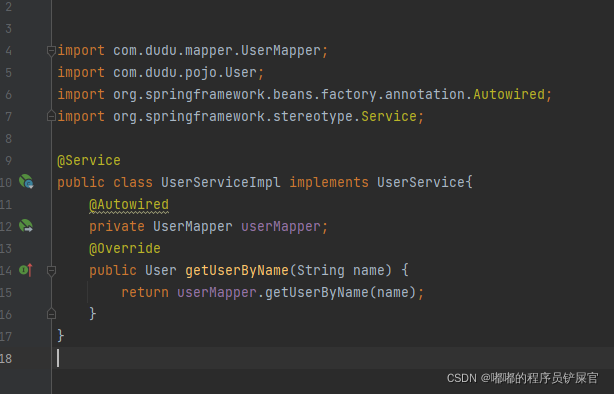
(6) Service层
UserService接口:
UserServiceImpl实现类:
(7) Shiro的使用
- ShiroConfig配置
三个bean对象:(userRealm,DefaultWebSecurityManager,ShiroFilterFactoryBean)
@Configurationpublic class ShiroConfig { // ShiroFilterFactoryBean @Bean public ShiroFilterFactoryBean getShiroFilterFactoryBean(@Qualifier("securityManager") DefaultWebSecurityManager defaultWebSecurityManager) { ShiroFilterFactoryBean bean = new ShiroFilterFactoryBean(); // 设置安全管理器 bean.setSecurityManager(defaultWebSecurityManager); // 添加shiro的内置过滤器 Map<String,String> filterMap =new LinkedHashMap<>(); filterMap.put("/user/add","perms[user:add]"); filterMap.put("/user/update","perms[user:update]"); filterMap.put("/user/*","authc"); bean.setFilterChainDefinitionMap(filterMap); // 设置登入页面 bean.setLoginUrl("/toLogin"); bean.setUnauthorizedUrl("/auth"); return bean; } // DefaultWebSecurityManager @Bean(name = "securityManager") public DefaultWebSecurityManager getDefaultWebSecurityManager(@Qualifier("userRealm") UserRealm userRealm) { // 关联UserRealm DefaultWebSecurityManager securityManager = new DefaultWebSecurityManager(); securityManager.setRealm(userRealm); return securityManager; } // 创建realm对象 @Bean public UserRealm userRealm() { return new UserRealm(); } @Bean public ShiroDialect shiroDialect(){ return new ShiroDialect(); }}- 授权与认证userService类
public class UserRealm extends AuthorizingRealm { @Autowired private UserServiceImpl userService; // 授权 @Override protected AuthorizationInfo doGetAuthorizationInfo(PrincipalCollection principalCollection) {System.out.println("执行了=>授权doGetAuthorizationInfo");// 进行授权 SimpleAuthorizationInfo info = new SimpleAuthorizationInfo(); // 通过数据库授权 Subject subject = SecurityUtils.getSubject(); User user = (User) subject.getPrincipal(); info.addStringPermission(user.getPerms()); return info; } // 认证 @Override protected AuthenticationInfo doGetAuthenticationInfo(AuthenticationToken token) throws AuthenticationException { System.out.println("执行了=>验证doGetAuthenticationInfo");// // 获取用户名,密码 UsernamePasswordToken userToken = (UsernamePasswordToken) token; User user = userService.getUserByName(userToken.getUsername()); if (user == null){ return null; } // 密码验证 return new SimpleAuthenticationInfo(user,user.getPwd(),""); }}(8) 运行效果
登入admin用户(只有add权限):

登入测试(只有update权限):