Pytrch爬虫实战学习笔记_6 网络请求request模块:基本请求方式+设置请求头+获取cookies+模拟登陆+会话请求+验证请求+上传文件+超时异常

1 requests
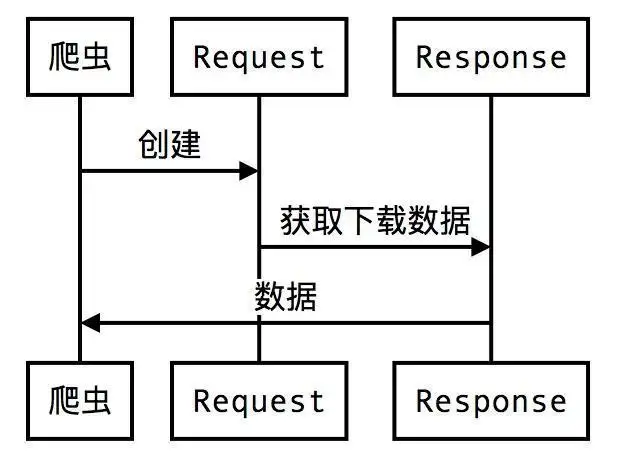
requests是Python中实现HTTP请求的一种方式,requests是第三方模块,该模块在实现HTTP请求时要比urlib、urllib3模块简化很多,操作更加人性化。

2 基本请求方式
由于requests模块为第三方模块,所以在使用requests模块时需要通过执行“pipinstallrequests”代码进行该模块的安装。
如果使用了Anaconda,则不需要单独安装requests模块。
2.1 requests发送GET请求+获取网站页面时,设置编码防止乱码
import requests # 导入网络请求模块requests# 发送网络请求response = requests.get('https://www.baidu.com')print('响应状态码:',response.status_code) # 响应状态码: 200print('请求网络地址',response.url) # 请求网络地址 https://www.baidu.com/print('头部信息',response.headers) # 头部信息 {'Cache-Control': 'private, no-cache, no-store, proxy-revalidate, no-transform', 'Connection': 'keep-alive', 'Content-Encoding': 'gzip', 'Content-Type': 'text/html', 'Date': 'Mon, 28 Mar 2022 13:01:40 GMT', 'Last-Modified': 'Mon, 23 Jan 2017 13:23:55 GMT', 'Pragma': 'no-cache', 'Server': 'bfe/1.0.8.18', 'Set-Cookie': 'BDORZ=27315; max-age=86400; domain=.baidu.com; path=/', 'Transfer-Encoding': 'chunked'}print('cookie信息',response.cookies) # cookie信息 <RequestsCookieJar[]>response.encoding = 'utf-8' # 设置编码 防止乱码print(response.text) # 文本的形式打印2.2 requests模块获取图片信息并保存
import requests # 导入网络请求模块requests# 发送网络请求,下载百度logoresponse = requests.get('https://www.baidu.com/img/bd_logo1.png')print(response.content)# 打印二进制数据with open('百度logo.png','wb')as f: # 通过open函数将二进制数据写入本地文件 f.write(response.content) # 写入2.3 requests模块的POST请求
import requests # 导入网络请求模块requestsimport json # 导入json模块# 字典类型的表单参数data = {'1':'好运常伴', '2':'平安喜乐'}# 发送网络请求response = requests.post('http://httpbin.org/post',data=data)response_dict = json.loads(response.text) # 将响应数据转换为字典类型print(response_dict) # 打印转换后的响应数据3 高级请求方式
requests模块将复杂的请求头、Cookie以及网络超时请求方式进行了简化,只要在发送请求时设置对应的参数即可实现复杂的网络请求。
3.1 设置请求头
请求一个网页内容时,发现通过GET或者POST以及其他请求方式,都会出现403错误。原因在于服务器拒绝了用户的访问,因为通过检测头部信息的方式防止恶意采集。解决方案:模拟浏览器的头部信息来进行访问。
3.1.1 代码实现:requests模块设置请求头
import requests # 导入网络请求模块requestsurl = 'https://www.baidu.com/' # 创建需要爬取网页的地址# 创建头部信息headers = {'User-Agent':'Mozilla/5.0 (Windows NT 10.0; Win64; x64; rv:72.0) Gecko/20100101 Firefox/72.0'}response = requests.get(url, headers=headers) # 发送网络请求print(response.status_code) # 打印响应状态码 2003.2 获取cookies
在爬取某些数据时,需要进行网页的登录,才可以进行数据的抓取工作。Cookie登录就像很多网页中的自动登录功能一样,可以让用户在第二次登录时不需要验证账号和密码直接登录。
在使用requests模块实现Cookie登录时,首先在浏览器的开发者工具页面中找到可以实现登录的Cookie信息,然后将Cookie信息处理并添加至RequestsCookieJar的对象中,最后将RequestsCookieJar对象作为网络请求的Cookie参数,发送网络请求即可。
3.2.1 代码实现:requests模块获取cookies
import requests # 导入网络请求模块from lxml import etree # 导入lxml模块cookies = '此处填写登录后网页中的cookie信息'headers = {'Host': 'www.XXXXX.com', 'Referer': 'https://www.baidu.com/', 'User-Agent': 'Mozilla/5.0 (Windows NT 10.0; Win64; x64) ' 'AppleWebKit/537.36 (KHTML, like Gecko) ' 'Chrome/72.0.3626.121 Safari/537.36'}# 创建RequestsCookieJar对象,用于设置cookies信息cookies_jar = requests.cookies.RequestsCookieJar()for cookie in cookies.split(';'): key, value = cookie.split('=', 1) cookies_jar.set(key, value) # 将cookies保存RequestsCookieJar当中# 发送网络请求response = requests.get('https://www.douban.com/',headers=headers, cookies=cookies_jar)if response.status_code == 200: # 请求成功时 html = etree.HTML(response.text) # 解析html代码 # 获取用户名 name = html.xpath('//*[@id="db-global-nav"]/div/div[1]/ul/li[2]/a/span[1]/text()') print(name[0]) # 打印用户名3.3 会话请求
设置Cookie的方式先实现模拟登录,然后再获取录后页面的信息内容,比较繁琐。
3.3.1 会话请求功能
requests模块中的Session对象实现在同一会话内发送多次网络请求。即创建一个登陆好的对象,在该对象的属性中进行登陆操作,登陆完成后该对象就是已登陆成功的模拟用户,可以随意发送请求进行数据的收集。
3.3.1 代码实现:requests模块会话请求
import requests # 导入requests模块# 原理:使用同一个对象获取,分别从这个对象读取不同的页面信息s = requests.Session() # 创建会话对象data={'username': 'LiBiGor', 'password': '123456'} # 创建用户名、密码的表单数据# 发送登录请求response_1 = s.post('http://site.XXXX.com:8001/index/checklogin.html',data=data)response_2 = s.get('http://site.XXXX.com:8001') # 发送登录后页面请求print('登录信息:',response_1.text) # 打印登录信息print('登录后页面信息如下:\n',response_2.text) # 打印登录后的页面信息3.4 验证请求页面
3.4.1 验证请求简述
在查看文章时,会突然弹出要求登陆账号密码的情况,防止恶意爬取。
requests模块自带了验证功能,只需要在请求方法中填写auth参数,该参数的值是一个带有验证参数(用户名与密码)的HTTPBasicAuth对象。
3.4.2 代码实现:requests模块解决验证请求
import requests # 导入requests模块from requests.auth import HTTPBasicAuth # 导入HTTPBasicAuth类url = 'http://sck.XXX.com:8001/spider/auth/' # 定义请求地址ah = HTTPBasicAuth( 'LiBiGor', '123456') #创建HTTPBasicAuth对象,参数为用户名与密码response = requests.get(url=url,auth=ah) # 发送网络请求if response.status_code==200: # 如果请求成功 print(response.text) # 打印验证后的HTML代码3.5 网络超时与异常
在访问一个网页时,如果该网页长时间未响应,系统就会判断该网页超时,所以无法打开网页。
3.5.1 代码实现:requests模块模拟超时异常
import requests # 导入网络请求模块# 循环发送请求50次for a in range(0, 50): try: # 捕获异常 # 设置超时为0.5秒 response = requests.get('https://www.baidu999.com/', timeout=0.1) print(response.status_code) # 打印状态码 except Exception as e:# 捕获异常 print('异常'+str(e)) # 打印异常信息3.5.2 代码实现:requests模块判断网络异常
import requests # 导入网络请求模块# 导入requests.exceptions模块中的三种异常类from requests.exceptions import ReadTimeout,HTTPError,RequestException# 循环发送请求50次for a in range(0, 50): try: # 捕获异常 # 设置超时为0.1秒 response = requests.get('https://www.baidu999.com/', timeout=0.1) print(response.status_code) # 打印状态码 except ReadTimeout:# 超时异常 print('timeout') except HTTPError: # HTTP异常 print('httperror') except RequestException: # 请求异常 print('reqerror')3.6 上传文件
3.6.1 上传图片文件
使用requests模块实现向服务器上传文件也是非常简单的,只需要指定post()函数中的files参数可以指定一个BufferedReader对象,该对象可以使用内置的open()函数返回。
3.6.2 代码实现:requests模块上传图片文件
import requests # 导入网络请求模块bd = open('百度logo.png','rb') # 读取指定文件file = {'file':bd} # 定义需要上传的图片文件# 发送上传文件的网络请求response = requests.post('http://httpbin.org/post',files = file)print(response.text) # 打印响应结果3.7 设置IP代理
在爬取网页的过程中,IP被爬取网站的服务器所屏蔽经常导致失败。此时代理服务可以解决这一麻烦。设置代理时,首先需要找到代理地址,
例如,1788.176.38对应的端口号为3000,完整的格式为117.88.176.38:3000
3.7.1 代码实现:requests模块设置IP代理
import requests # 导入网络请求模块# 头部信息headers = {'User-Agent': 'Mozilla/5.0 (Windows NT 10.0; Win64; x64) ' 'AppleWebKit/537.36 (KHTML, like Gecko) ' 'Chrome/72.0.3626.121 Safari/537.36'}proxy = {'http': 'http://117.88.176.38:3000', 'https': 'https://117.88.176.38:3000'} # 设置代理ip与对应的端口号try: # 对需要爬取的网页发送请求 response = requests.get('http://baidu.com', headers= headers,proxies=proxy,verify=False,timeout=3) print(response.status_code) # 打印响应状态码except Exception as e: print('错误异常信息为:',e) # 打印异常信息


