无所遁形——快把你的口罩戴上(口罩识别)
人脸识别,是基于人的脸部特征信息进行身份识别的一种生物识别技术。用摄像机或摄像头采集含有人脸的图像或视频流,并自动在图像中检测和跟踪人脸,进而对检测到的人脸进行脸部识别的一系列相关技术,通常也叫做人像识别、面部识别。
疫情当下,学校封校,教室上网课,食堂就餐等等环境,口罩佩戴依旧十分有意义,单靠人员监测效率太过低下,笔者就在考虑能否让计算机完成相关工作,就查阅了相关资料,在开源训练集的基础上,设计了本款口罩识别。
图片:

视频:
口罩识别案例
配置环境:
windows10 系统
pyCharm
Anaconda环境下的python3.7
tenforflow1.15.0
cuda10.0
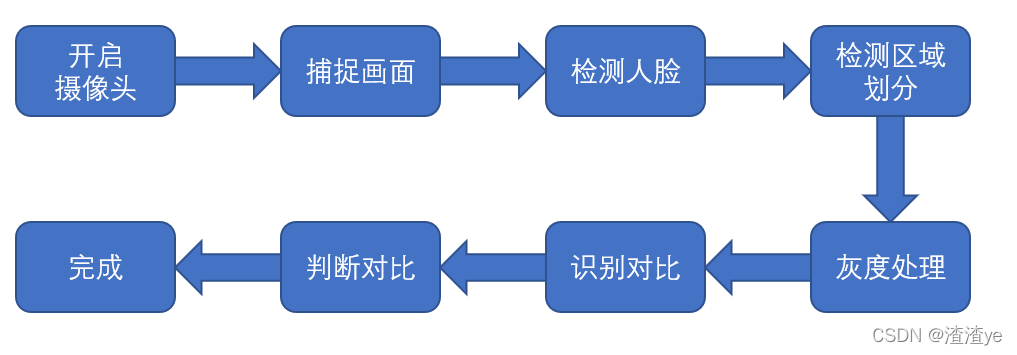
整体流程:
相信小伙伴们已经迫不及待了,上代码走起!
from tkinter import *from tkinter.filedialog import askdirectoryfrom tkinter.messagebox import showinfoimport cv2import numpy as npfrom PIL import Image, ImageTkfrom tkinter import ttkimport pygameimport timeimport tensorflow_infer as flowpygame.mixer.init(frequency=16000, size=-16, channels=2, buffer=4096)detector = cv2.CascadeClassifier('haarcascades\\haarcascade_frontalface_default.xml')mask_detector = cv2.CascadeClassifier('xml\\cascade.xml')class GUI:def __init__(self):self.camera = None # 摄像头self.root = Tk()self.root.title('maskdetection')self.root.geometry('%dx%d' % (800, 600))self.createFirstPage()mainloop()def createFirstPage(self):self.page1 = Frame(self.root)self.page1.pack()Label(self.page1, text='口罩追踪系统', font=('粗体', 20)).pack()image = Image.open("14.jpg") # 随便使用一张图片做背景界面 不要太大photo = ImageTk.PhotoImage(image = image)self.data1 = Label(self.page1, width=780,image = photo)self.data1.image = photoself.data1.pack(padx=5, pady=5)self.button11 = Button(self.page1, width=18, height=2, text="深度学习算法", bg='red', font=("宋", 12), relief='raise',command = self.createSecondPage1)self.button11.pack(side=LEFT, padx=25, pady = 10)self.button13.pack(side=LEFT, padx=25, pady = 10)self.button14 = Button(self.page1, width=18, height=2, text="退出系统", bg='gray', font=("宋", 12), relief='raise',command = self.quitMain)self.button14.pack(side=LEFT, padx=25, pady = 10)def createSecondPage1(self):self.camera = cv2.VideoCapture(0)self.page1.pack_forget()self.page2 = Frame(self.root)self.page2.pack()Label(self.page2, text='实时追踪口罩佩戴情况', font=('粗体', 20)).pack()self.data2 = Label(self.page2)self.data2.pack(padx=5, pady=5)self.button21 = Button(self.page2, width=18, height=2, text="返回", bg='gray', font=("宋", 12), relief='raise',command = self.backFirst)self.button21.pack(padx=25,pady = 10)self.video_loop1(self.data2)def video_loop1(self, panela):def slogan_short():timeplay = 1.5global playflag_shortplayflag_short = 1while playflag_short:track = pygame.mixer.music.load(file_slogan_short)print("------------请您戴好口罩")pygame.mixer.music.play()time.sleep(timeplay)playflag_short = 0time.sleep(0)success, img = self.camera.read() # 从摄像头读取照片if success:img = cv2.cvtColor(img, cv2.COLOR_BGR2RGB)num,c,img = flow.inference(img, conf_thresh=0.5, iou_thresh=0.4, target_shape=(260, 260), draw_result=True, show_result=False)# 语音提示# if(isinstance(num/5,int)& (c=='NoMask')):# slogan_short()# cv2.imshow('image', img)# img = flow.inference(img, show_result=True, target_shape=(260, 260))img = cv2.cvtColor(img, cv2.COLOR_BGR2RGB)cv2image = cv2.cvtColor(img, cv2.COLOR_BGR2RGBA) # 转换颜色从BGR到RGBAcurrent_image = Image.fromarray(cv2image) # 将图像转换成Image对象imgtk = ImageTk.PhotoImage(image=current_image)panela.imgtk = imgtkpanela.config(image=imgtk)self.root.after(1, lambda: self.video_loop1(panela))def select_path(self):self.pash_= askdirectory()path = StringVar()path.set(self.pash_)def createSecondPage(self):self.camera = cv2.VideoCapture(0)self.page1.pack_forget()self.page2 = Frame(self.root)self.page2.pack()Label(self.page2, text='实时追踪口罩佩戴情况', font=('粗体', 20)).pack()self.data2 = Label(self.page2)self.data2.pack(padx=5, pady=5)self.button21 = Button(self.page2, width=18, height=2, text="返回", bg='gray', font=("宋", 12), relief='raise',command = self.backFirst)self.button21.pack(padx=25,pady = 10)self.video_loop(self.data2)def video_loop(self, panela):success, img = self.camera.read() # 从摄像头读取照片if success:faces = detector.detectMultiScale(img, 1.1, 3)for (x, y, w, h) in faces:# 参数分别为 图片、左上角坐标,右下角坐标,颜色,厚度face = img[y:y + h, x:x + w] # 裁剪坐标为[y0:y1, x0:x1]mask_face = mask_detector.detectMultiScale(img, 1.1, 5)for (x2, y2, w2, h2) in mask_face:cv2.putText(img, 'mask', (x2 - 2, y2 - 2),cv2.FONT_HERSHEY_SIMPLEX, 1, (0, 255, 255))cv2.rectangle(img, (x2, y2), (x2 + w2, y2 + h2), (0, 0, 255), 2)#img = mask.facesdetecter(img)cv2image = cv2.cvtColor(img, cv2.COLOR_BGR2RGBA) # 转换颜色从BGR到RGBA #faces = detector.detectMultiScale(cv2image, 1.1, 3)current_image = Image.fromarray(cv2image) # 将图像转换成Image对象imgtk = ImageTk.PhotoImage(image=current_image)panela.imgtk = imgtkpanela.config(image=imgtk)self.root.after(1, lambda: self.video_loop(panela))def backFirst(self):self.page2.pack_forget()self.page1.pack()# 释放摄像头资源self.camera.release()cv2.destroyAllWindows()def backMain(self):self.root.geometry('900x600')self.page3.pack_forget()self.page1.pack()def quitMain(self):sys.exit(0)if __name__ == '__main__':demo = GUI()插播一句,深度学习的项目目前完全开源,大家可以先体验体验:
https://demo.aizoo.com/face-mask-detection.html
深度学习(DL, Deep Learning)是机器学习(ML, Machine Learning)领域中一个新的研究方向,它被引入机器学习使其更接近于最初的目标——人工智能(AI, Artificial Intelligence)。
深度学习是学习样本数据的内在规律和表示层次,这些学习过程中获得的信息对诸如文字,图像和声音等数据的解释有很大的帮助。它的最终目标是让机器能够像人一样具有分析学习能力,能够识别文字、图像和声音等数据。 深度学习是一个复杂的机器学习算法,在语音和图像识别方面取得的效果,远远超过先前相关技术。
深度学习在搜索技术,数据挖掘,机器学习,机器翻译,自然语言处理,多媒体学习,语音,推荐和个性化技术,以及其他相关领域都取得了很多成果。深度学习使机器模仿视听和思考等人类的活动,解决了很多复杂的模式识别难题,使得人工智能相关技术取得了很大进步。
#!/usr/bin/env python # -*- coding:utf-8 -*-import cv2# 测试打开摄像头检测跟踪人脸# 识别人脸的xml文件,构建人脸检测器detector = cv2.CascadeClassifier('haarcascades\\haarcascade_frontalface_default.xml')# 获取0号摄像头的实例cap = cv2.VideoCapture(0)while True: # 就是从摄像头获取到图像,这个函数返回了两个变量,第一个为布尔值表示成功与否,以及第二个是图像。 ret, img = cap.read() #转为灰度图 gray = cv2.cvtColor(img, cv2.COLOR_BGR2GRAY) # 获取人脸坐标 faces = detector.detectMultiScale(gray, 1.1, 3) for (x, y, w, h) in faces: # 参数分别为 图片、左上角坐标,右下角坐标,颜色,厚度 cv2.rectangle(img, (x, y), (x + w, y + h), (0, 0, 255), 2) cv2.imshow('Mask', img) cv2.waitKey(3)cap.release()cv2.destroyAllWindows()#!/usr/bin/env python# -*- coding:utf-8 -*-# -*- coding:utf-8 -*-import cv2import timeimport argparseimport pygameimport numpy as npfrom PIL import Imagefrom tensorflow.keras.models import model_from_jsonfrom utils.anchor_generator import generate_anchorsfrom utils.anchor_decode import decode_bboxfrom utils.nms import single_class_non_max_suppressionfrom load_model.tensorflow_loader import load_tf_model, tf_inference# sess, graph = load_tf_model('FaceMaskDetection-master\models\face_mask_detection.pb')sess, graph = load_tf_model('models/face_mask_detection.pb')# anchor configurationfeature_map_sizes = [[33, 33], [17, 17], [9, 9], [5, 5], [3, 3]]anchor_sizes = [[0.04, 0.056], [0.08, 0.11], [0.16, 0.22], [0.32, 0.45], [0.64, 0.72]]anchor_ratios = [[1, 0.62, 0.42]] * 5file_slogan = r'video/slogan.mp3'file_slogan_short = r'video/slogan_short.mp3'pygame.mixer.init(frequency=16000, size=-16, channels=2, buffer=4096)# generate anchorsanchors = generate_anchors(feature_map_sizes, anchor_sizes, anchor_ratios)# 用于推断,批大小为1,模型输出形状为[1,N,4],因此将锚点的dim扩展为[1,anchor_num,4]anchors_exp = np.expand_dims(anchors, axis=0)id2class = {0: 'Mask', 1: 'NoMask'}def inference(image, conf_thresh=0.5, iou_thresh=0.4, target_shape=(160, 160), draw_result=True, show_result=True): n = 0 n = n+1 ''' 检测推理的主要功能 # :param image:3D numpy图片数组 # :param conf_thresh:分类概率的最小阈值。 # :param iou_thresh:网管的IOU门限 # :param target_shape:模型输入大小。 # :param draw_result:是否将边框拖入图像。 # :param show_result:是否显示图像。 ''' # image = np.copy(image) output_info = [] height, width, _ = image.shape image_resized = cv2.resize(image, target_shape) image_np = image_resized / 255.0 # 归一化到0~1 image_exp = np.expand_dims(image_np, axis=0) y_bboxes_output, y_cls_output = tf_inference(sess, graph, image_exp) # remove the batch dimension, for batch is always 1 for inference. y_bboxes = decode_bbox(anchors_exp, y_bboxes_output)[0] y_cls = y_cls_output[0] # 为了加快速度,请执行单类NMS,而不是多类NMS。 bbox_max_scores = np.max(y_cls, axis=1) bbox_max_score_classes = np.argmax(y_cls, axis=1) # keep_idx是nms之后的活动边界框。 keep_idxs = single_class_non_max_suppression(y_bboxes, bbox_max_scores, conf_thresh=conf_thresh,iou_thresh=iou_thresh) for idx in keep_idxs: conf = float(bbox_max_scores[idx]) class_id = bbox_max_score_classes[idx] bbox = y_bboxes[idx] # 裁剪坐标,避免该值超出图像边界。 xmin = max(0, int(bbox[0] * width)) ymin = max(0, int(bbox[1] * height)) xmax = min(int(bbox[2] * width), width) ymax = min(int(bbox[3] * height), height) if draw_result: if class_id == 0: color = (0, 255, 0) else: color = (255, 0, 0) cv2.rectangle(image, (xmin, ymin), (xmax, ymax), color, 2) cv2.putText(image, "%s: %.2f" % (id2class[class_id], conf), (xmin + 2, ymin - 2), cv2.FONT_HERSHEY_SIMPLEX, 1, color) output_info.append([class_id, conf, xmin, ymin, xmax, ymax]) if show_result: Image.fromarray(image).show() # return output_info return n,id2class,image# 读取摄像头或者本地视频路径并处理def run_on_video(video_path, output_video_name, conf_thresh): cap = cv2.VideoCapture(video_path) height = cap.get(cv2.CAP_PROP_FRAME_HEIGHT) width = cap.get(cv2.CAP_PROP_FRAME_WIDTH) fps = cap.get(cv2.CAP_PROP_FPS) fourcc = cv2.VideoWriter_fourcc(*'XVID') # writer = cv2.VideoWriter(output_video_name, fourcc, int(fps), (int(width), int(height))) total_frames = cap.get(cv2.CAP_PROP_FRAME_COUNT) if not cap.isOpened(): raise ValueError("Video open failed.") return status = True idx = 0 while status: start_stamp = time.time() status, img_raw = cap.read() img_raw = cv2.cvtColor(img_raw, cv2.COLOR_BGR2RGB) read_frame_stamp = time.time() if (status): inference(img_raw, conf_thresh, iou_thresh=0.5, target_shape=(260, 260), draw_result=True, show_result=False) cv2.imshow('image', img_raw[:, :, ::-1]) cv2.waitKey(1) inference_stamp = time.time() # writer.write(img_raw) write_frame_stamp = time.time() idx += 1 print("%d of %d" % (idx, total_frames)) print("read_frame:%f, infer time:%f, write time:%f" % (read_frame_stamp - start_stamp, inference_stamp - read_frame_stamp, write_frame_stamp - inference_stamp)) # writer.release()'''if __name__ == "__main__": parser = argparse.ArgumentParser(description="Face Mask Detection") parser.add_argument('--img-mode', type=int, default=0, help='set 1 to run on image, 0 to run on video.') # 这里设置为1:检测图片;还是设置为0:视频文件(实时图像数据)检测 parser.add_argument('--img-path', type=str, help='path to your image.') parser.add_argument('--video-path', type=str, default='0', help='path to your video, `0` means to use camera.') # parser.add_argument('--hdf5', type=str, help='keras hdf5 file') args = parser.parse_args() if args.img_mode: imgPath = args.img_path # img = cv2.imread("imgPath") img = cv2.imread(imgPath) img = cv2.cvtColor(img, cv2.COLOR_BGR2RGB) inference(img, show_result=True, target_shape=(260, 260)) else: video_path = args.video_path if args.video_path == '0': video_path = 0 run_on_video(video_path, '', conf_thresh=0.5)'''由于代码过多无法详细展开,如有疑问欢迎大家在评论区留言,共同探讨问题。
代码源码地址:
基于tenforflow的口罩识别项目-Python文档类资源-CSDN下载
本项目仅供学习参考,如有侵权告知立删

