spring authorization server授权服务器教程,集成jdbc,使用版本0.2.2
文章目录
- 前言
- 一、创建授权服务器
-
- 1.引入库
- 2.创建相关数据表
- 3.配置文件
- 4.放入官方认证html页面
- 5.生成jks文件
- 6.配置KeyPair
- 7.配置AuthorizationServerConfig授权服务器配置
- 8.配置WebSecurityConfig基础security配置
- 三 启动项目,这里我们测试授权码模式
- 总结
前言
spring authorization server是spring团队最新的认证授权服务器,之前的oauth2后面会逐步弃用。不过目前项目还没有到可生产阶段。
springsecurityoauth迁移到新的授权服务器指南 https://github.com/spring-projects/spring-security/wiki/OAuth-2.0-Migration-Guide
spring authorization server官方demo https://github.com/spring-projects/spring-authorization-server
本文基于官方demo修改
一、创建授权服务器
创建springboot启动项目,版本2.6.3
1.引入库
代码如下(示例):
<dependency> <groupId>org.springframework.boot</groupId> <artifactId>spring-boot-starter-web</artifactId> </dependency> <dependency> <groupId>org.springframework.boot</groupId> <artifactId>spring-boot-starter-test</artifactId> <scope>test</scope> </dependency> <dependency> <groupId>org.springframework.security</groupId> <artifactId>spring-security-oauth2-authorization-server</artifactId> <version>0.2.2</version> </dependency> <dependency> <groupId>org.springframework.boot</groupId> <artifactId>spring-boot-starter-oauth2-resource-server</artifactId> </dependency> <dependency> <groupId>mysql</groupId> <artifactId>mysql-connector-java</artifactId> </dependency> <dependency> <groupId>com.alibaba</groupId> <artifactId>druid-spring-boot-starter</artifactId> <version>1.2.8</version> </dependency> <dependency> <groupId>org.springframework.boot</groupId> <artifactId>spring-boot-starter-jdbc</artifactId> </dependency> <dependency> <groupId>org.springframework.boot</groupId> <artifactId>spring-boot-starter-thymeleaf</artifactId> </dependency>2.创建相关数据表
sql示例:
CREATE TABLE oauth2_registered_client ( id varchar(100) NOT NULL, client_id varchar(100) NOT NULL, client_id_issued_at timestamp DEFAULT CURRENT_TIMESTAMP NOT NULL, client_secret varchar(200) DEFAULT NULL, client_secret_expires_at timestamp DEFAULT NULL, client_name varchar(200) NOT NULL, client_authentication_methods varchar(1000) NOT NULL, authorization_grant_types varchar(1000) NOT NULL, redirect_uris varchar(1000) DEFAULT NULL, scopes varchar(1000) NOT NULL, client_settings varchar(2000) NOT NULL, token_settings varchar(2000) NOT NULL, PRIMARY KEY (id));CREATE TABLE oauth2_authorization_consent ( registered_client_id varchar(100) NOT NULL, principal_name varchar(200) NOT NULL, authorities varchar(1000) NOT NULL, PRIMARY KEY (registered_client_id, principal_name));/*IMPORTANT: If using PostgreSQL, update ALL columns defined with 'blob' to 'text', as PostgreSQL does not support the 'blob' data type.*/CREATE TABLE oauth2_authorization ( id varchar(100) NOT NULL, registered_client_id varchar(100) NOT NULL, principal_name varchar(200) NOT NULL, authorization_grant_type varchar(100) NOT NULL, attributes blob DEFAULT NULL, state varchar(500) DEFAULT NULL, authorization_code_value blob DEFAULT NULL, authorization_code_issued_at timestamp DEFAULT NULL, authorization_code_expires_at timestamp DEFAULT NULL, authorization_code_metadata blob DEFAULT NULL, access_token_value blob DEFAULT NULL, access_token_issued_at timestamp DEFAULT NULL, access_token_expires_at timestamp DEFAULT NULL, access_token_metadata blob DEFAULT NULL, access_token_type varchar(100) DEFAULT NULL, access_token_scopes varchar(1000) DEFAULT NULL, oidc_id_token_value blob DEFAULT NULL, oidc_id_token_issued_at timestamp DEFAULT NULL, oidc_id_token_expires_at timestamp DEFAULT NULL, oidc_id_token_metadata blob DEFAULT NULL, refresh_token_value blob DEFAULT NULL, refresh_token_issued_at timestamp DEFAULT NULL, refresh_token_expires_at timestamp DEFAULT NULL, refresh_token_metadata blob DEFAULT NULL, PRIMARY KEY (id));3.配置文件
server: port: 9500spring: security: oauth2: resourceserver: jwt: issuer-uri: http://127.0.0.1:9500 #认证中心端点,作为资源端的配置 application: name: oauth2-auth datasource: driver-class-name: com.mysql.cj.jdbc.Driver url: jdbc:mysql://192.168.3.150:31736/ry-cloud?useUnicode=true&characterEncoding=utf8&zeroDateTimeBehavior=convertToNull&useSSL=true&serverTimezone=GMT%2B8 username: root password: root druid: stat-view-servlet: enabled: true loginUsername: admin loginPassword: 123456 initial-size: 5 min-idle: 5 maxActive: 20 maxWait: 60000 timeBetweenEvictionRunsMillis: 60000 minEvictableIdleTimeMillis: 300000 validationQuery: SELECT 1 FROM DUAL testWhileIdle: true testOnBorrow: false testOnReturn: false poolPreparedStatements: true maxPoolPreparedStatementPerConnectionSize: 20 filters: stat,slf4j connectionProperties: druid.stat.mergeSql\=true;druid.stat.slowSqlMillis\=50004.放入官方认证html页面
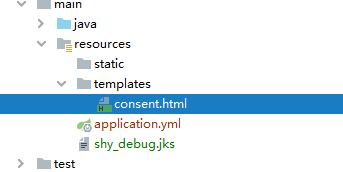
在这个目录下,代码如下
<html lang="en"><head> <meta charset="utf-8"> <meta name="viewport" content="width=device-width, initial-scale=1, shrink-to-fit=no"> <link rel="stylesheet" href="https://stackpath.bootstrapcdn.com/bootstrap/4.5.2/css/bootstrap.min.css" integrity="sha384-JcKb8q3iqJ61gNV9KGb8thSsNjpSL0n8PARn9HuZOnIxN0hoP+VmmDGMN5t9UJ0Z" crossorigin="anonymous"> <title>Custom consent page - Consent required</title> <style> body { background-color: aliceblue; } </style><script>function cancelConsent() {document.consent_form.reset();document.consent_form.submit();}</script></head><body><div class="container"> <div class="py-5"> <h1 class="text-center text-primary">App permissions</h1> </div> <div class="row"> <div class="col text-center"> <p> The application <span class="font-weight-bold text-primary" th:text="${clientId}"></span> wants to access your account <span class="font-weight-bold" th:text="${principalName}"></span> </p> </div> </div> <div class="row pb-3"> <div class="col text-center"><p>The following permissions are requested by the above app.<br/>Please review these and consent if you approve.</p></div> </div> <div class="row"> <div class="col text-center"> <form name="consent_form" method="post" action="/oauth2/authorize"> <input type="hidden" name="client_id" th:value="${clientId}"> <input type="hidden" name="state" th:value="${state}"> <div th:each="scope: ${scopes}" class="form-group form-check py-1"> <input class="form-check-input" type="checkbox" name="scope" th:value="${scope.scope}" th:id="${scope.scope}"> <label class="form-check-label font-weight-bold" th:for="${scope.scope}" th:text="${scope.scope}"></label> <p class="text-primary" th:text="${scope.description}"></p> </div> <p th:if="${not #lists.isEmpty(previouslyApprovedScopes)}">You have already granted the following permissions to the above app:</p> <div th:each="scope: ${previouslyApprovedScopes}" class="form-group form-check py-1"> <input class="form-check-input" type="checkbox" th:id="${scope.scope}" disabled checked> <label class="form-check-label font-weight-bold" th:for="${scope.scope}" th:text="${scope.scope}"></label> <p class="text-primary" th:text="${scope.description}"></p> </div> <div class="form-group pt-3"> <button class="btn btn-primary btn-lg" type="submit" id="submit-consent"> Submit Consent </button> </div> <div class="form-group"> <button class="btn btn-link regular" type="button" id="cancel-consent" onclick="cancelConsent();"> Cancel </button> </div> </form> </div> </div> <div class="row pt-4"> <div class="col text-center"> <p> <small> Your consent to provide access is required. <br/>If you do not approve, click Cancel, in which case no information will be shared with the app. </small> </p> </div> </div></div></body></html>5.生成jks文件
windows下CMD命令窗口输入
keytool -genkeypair -alias shy_debug.jks -keyalg RSA -validity 7 -keystore shy_debug.jksalias别名
然后根据提示输入相关信息,记好密码和别名,后面要用到
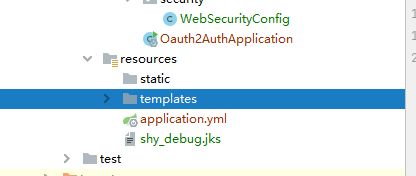
把生成的jks文件放到这里
6.配置KeyPair
@Configurationpublic class KeyPairConfig { @Bean public KeyPair keyPair() throws Exception { ClassPathResource ksFile = new ClassPathResource("shy_debug.jks");//文件名 KeyStoreKeyFactory ksFactory = new KeyStoreKeyFactory(ksFile, "haiwei".toCharArray()); //第二个参数就是生成时候的密码 return ksFactory.getKeyPair("shy_debug.jks"); }}7.配置AuthorizationServerConfig授权服务器配置
@Configuration(proxyBeanMethods = false)public class AuthorizationServerConfig {private static final String CUSTOM_CONSENT_PAGE_URI = "/oauth2/consent";@Autowiredprivate KeyPair keyPair;@Bean@Order(Ordered.HIGHEST_PRECEDENCE)public SecurityFilterChain authorizationServerSecurityFilterChain(HttpSecurity http) throws Exception {OAuth2AuthorizationServerConfigurer<HttpSecurity> authorizationServerConfigurer =new OAuth2AuthorizationServerConfigurer<>();authorizationServerConfigurer.authorizationEndpoint(authorizationEndpoint ->authorizationEndpoint.consentPage(CUSTOM_CONSENT_PAGE_URI));RequestMatcher endpointsMatcher = authorizationServerConfigurer.getEndpointsMatcher();http.requestMatcher(endpointsMatcher).authorizeRequests(authorizeRequests -> authorizeRequests.anyRequest().authenticated()).csrf(csrf -> csrf.ignoringRequestMatchers(endpointsMatcher)).apply(authorizationServerConfigurer);return http.formLogin(Customizer.withDefaults()).build();}// @formatter:off jdbc相关@Beanpublic RegisteredClientRepository registeredClientRepository(JdbcTemplate jdbcTemplate) {// Save registered client in db as if in-jdbcRegisteredClient registeredClient = RegisteredClient.withId(UUID.randomUUID().toString()).clientId("messaging-client").clientSecret("{noop}secret").clientAuthenticationMethod(ClientAuthenticationMethod.CLIENT_SECRET_BASIC).authorizationGrantType(AuthorizationGrantType.AUTHORIZATION_CODE).authorizationGrantType(AuthorizationGrantType.REFRESH_TOKEN).authorizationGrantType(AuthorizationGrantType.CLIENT_CREDENTIALS).redirectUri("http://127.0.0.1:8080/login/oauth2/code/messaging-client-oidc").redirectUri("http://www.baidu.com").scope(OidcScopes.OPENID).scope("message.read").scope("message.write").clientSettings(ClientSettings.builder().requireAuthorizationConsent(true).build()).build();// Save registered client in db as if in-memoryJdbcRegisteredClientRepository registeredClientRepository = new JdbcRegisteredClientRepository(jdbcTemplate);registeredClientRepository.save(registeredClient);return registeredClientRepository;}// @formatter:on@Beanpublic OAuth2AuthorizationService authorizationService(JdbcTemplate jdbcTemplate, RegisteredClientRepository registeredClientRepository) {return new JdbcOAuth2AuthorizationService(jdbcTemplate, registeredClientRepository);}@Beanpublic OAuth2AuthorizationConsentService authorizationConsentService(JdbcTemplate jdbcTemplate, RegisteredClientRepository registeredClientRepository) {return new JdbcOAuth2AuthorizationConsentService(jdbcTemplate, registeredClientRepository);}@Beanpublic JWKSource<SecurityContext> jwkSource() {RSAKey rsaKey = generateRsa();JWKSet jwkSet = new JWKSet(rsaKey);return (jwkSelector, securityContext) -> jwkSelector.select(jwkSet);}public RSAKey generateRsa() {RSAPublicKey publicKey = (RSAPublicKey) keyPair.getPublic();RSAPrivateKey privateKey = (RSAPrivateKey) keyPair.getPrivate();// @formatter:offreturn new RSAKey.Builder(publicKey).privateKey(privateKey).keyID(UUID.randomUUID().toString()).build();// @formatter:on}@Beanpublic ProviderSettings providerSettings() {return ProviderSettings.builder().issuer("http://127.0.0.1:9500").build();}}8.配置WebSecurityConfig基础security配置
@Configuration@EnableWebSecurity(debug = true)public class WebSecurityConfig { @Bean public SecurityFilterChain httpSecurityFilterChain(HttpSecurity httpSecurity) throws Exception { httpSecurity .authorizeRequests(authorizeRequests -> authorizeRequests.anyRequest().authenticated() ) .formLogin(withDefaults()); return httpSecurity.build(); } /*private Converter customJwtAuthenticationTokenConverter() { return jwt -> { List userAuthorities = jwt.getClaimAsStringList("authorities"); List scopes = jwt.getClaimAsStringList("scope"); List combinedAuthorities = Stream.concat(userAuthorities.stream(),scopes.stream().map(scope -> "SCOPE_" + scope)) .map(SimpleGrantedAuthority::new) .collect(Collectors.toList()); String username = jwt.getClaimAsString("user_name"); return new UsernamePasswordAuthenticationToken(username, null, combinedAuthorities); }; }*/ // @formatter:off @Bean UserDetailsService users() { UserDetails user = User.withDefaultPasswordEncoder() .username("admin") .password("111111") .roles("USER").authorities("test") .build(); return new InMemoryUserDetailsManager(user); } // @formatter:on}至此配置完毕
三 启动项目,这里我们测试授权码模式
浏览器输入 http://127.0.0.1:9500/oauth2/authorize?client_id=messaging-client&response_type=code&scope=message.read&redirect_uri=http://www.baidu.com
会转到登陆页面
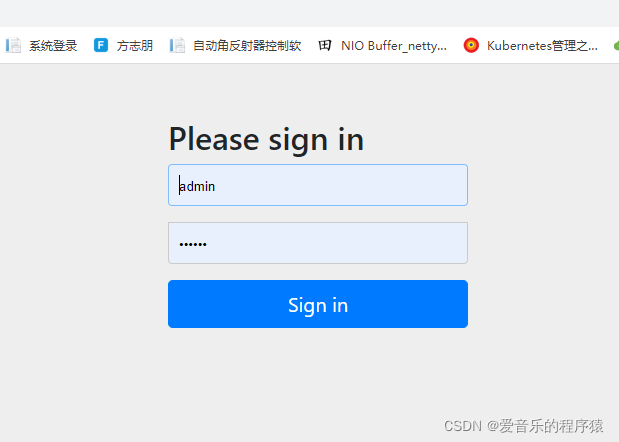
输入账号密码会跳转到认证授权页面
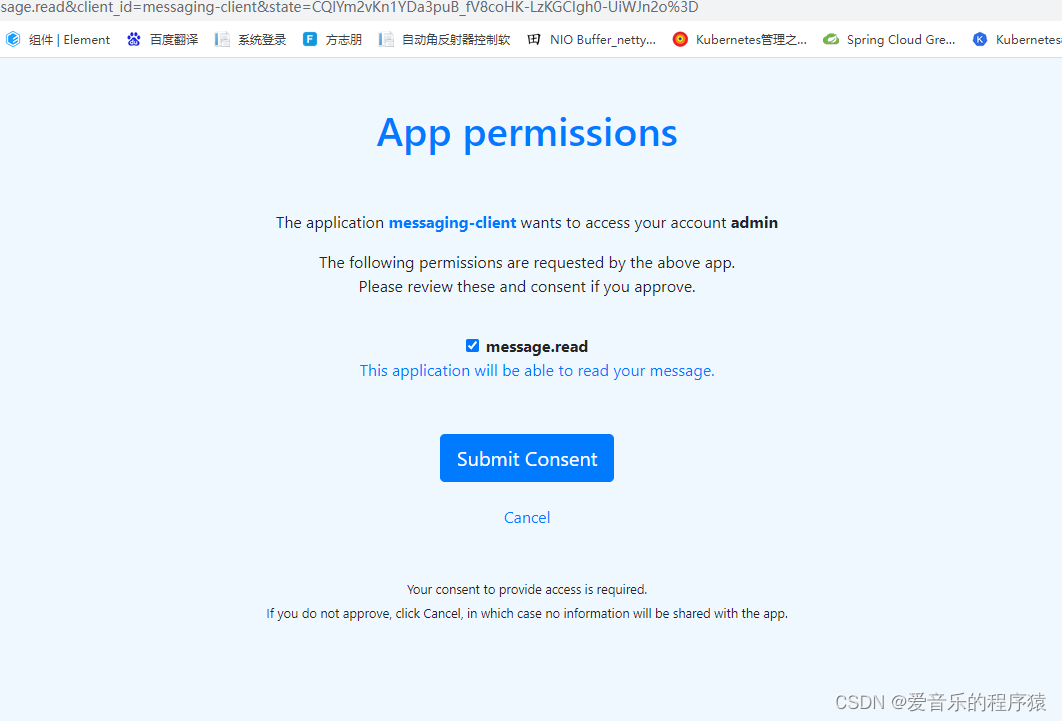
勾选上scope,点认证

这样就获取到code了
然后用postman请求

这样就获取到token了
总结
spring authorization server搭建完成,后面一篇文章我会说明资源服务器端如何接入认证服务器,资源服务器文章链接
spring authorization server授权服务器教程,资源服务器搭建接入认证服务器https://blog.csdn.net/qq_35270805/article/details/123146959

