Linux 下安装 Mysql
Linux 下安装 Mysql
Mysql 版本:
- MySQL Community Server 社区版本,开源免费,但不提供官方技术支持。这也是我们通常用的MySQL的版本。根据不同的操作系统平台细分为多个版本
- MySQL Enterprise Edition 企业版本,需付费,可以试用30天。
- MySQL Cluster 集群版,开源免费。可将几个MySQL Server封装成一个Server。
- MySQL Cluster CGE 高级集群版,需付费。
官网下载地址:MySQL :: Download MySQL Community Server
TAR:安装包安装
Compressed TAR Archive:是源码,必须用源码方式安装
Minimal Install :最小安装
Test Suite:含自动测试套件
-
安装包的下载和解压
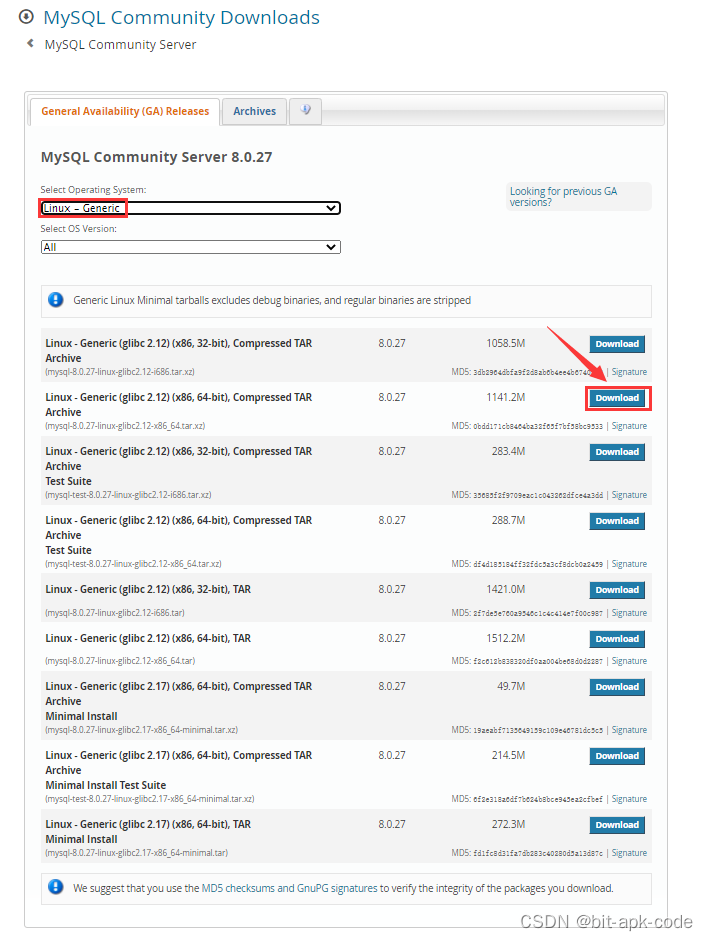
#检测系统是否已经安装 MySQ[root@centos8 opt]# rpm -qa | grep mysql#进入 opt 目录[root@centos8 opt]# wget https://cdn.mysql.com//Downloads/MySQL-8.0/mysql-8.0.27-linux-glibc2.12-x86_64.tar.xz#创建 mysql 目录[root@centos8 opt]# mkdir mysql[root@centos8 opt]# mv mysql-8.0.27-linux-glibc2.12-x86_64.tar.xz ./mysql[root@centos8 opt]# cd mysql[root@centos8 mysql]# lsmysql-8.0.27-linux-glibc2.12-x86_64.tar.xz#解压安装包[root@centos8 mysql]# tar -xvJf mysql-8.0.27-linux-glibc2.12-x86_64.tar.xz#更改文件夹名称[root@centos8 mysql]# mv mysql-8.0.27-linux-glibc2.12-x86_64 mysql-8.0.27[root@centos8 mysql]# lsmysql-8.0.27#创建data文件夹 存储文件 mkdir data [root@centos8 mysql-8.0.27]# mkdir /opt/mysql/mysql-8.0.27/data[root@centos8 mysql-8.0.27]# lsbin data docs include lib LICENSE man README share support-files -
创建用户组以及用户和密码
#创建用户组[root@centos8 mysql]# groupadd mysql#创建用户和密码[root@centos8 mysql]# useradd -g mysql mysql#查看用户[root@centos8 mysql]# id mysqluid=1001(mysql) gid=1001(mysql) groups=1001(mysql) -
授权用户
[root@centos8 mysql]# chown -R mysql.mysql /opt/mysql/mysql-8.0.27 -
初始化基础信息
#切换到bin目录下[root@centos8 mysql-8.0.27]# cd /opt/mysql/mysql-8.0.27/bin#初始化基础信息[root@centos8 bin]# ./mysqld --user=mysql --basedir=/opt/mysql/mysql-8.0.27 --datadir=/opt/mysql/mysql-8.0.27/data/ --initialize2021-11-11T23:56:48.026483Z 0 [System] [MY-013169] [Server] /opt/mysql/mysql-8.0.27/bin/mysqld (mysqld 8.0.27) initializing of server in progress as process 32682021-11-11T23:56:48.066584Z 1 [System] [MY-013576] [InnoDB] InnoDB initialization has started.2021-11-11T23:56:54.430407Z 1 [System] [MY-013577] [InnoDB] InnoDB initialization has ended.2021-11-11T23:57:00.197497Z 0 [Warning] [MY-013746] [Server] A deprecated TLS version TLSv1 is enabled for channel mysql_main2021-11-11T23:57:00.198137Z 0 [Warning] [MY-013746] [Server] A deprecated TLS version TLSv1.1 is enabled for channel mysql_main2021-11-11T23:57:00.299283Z 6 [Note] [MY-010454] [Server] A temporary password is generated for root@localhost: pau?3H6i,da) -
Mysql配置(按照自己的文件路径配置,关于其他配置,可自行搜索,若有【mysql-safe】的配置,可以先注释掉)
[root@centos8 bin]# vim /etc/my.cnf[mysqld]basedir=/opt/mysql/mysql-8.0.27datadir=/opt/mysql/mysql-8.0.27/mysql-8.0/datasocket=/tmp/mysql.sockcharacter-set-server=UTF8MB4#[mysqld_safe]#log-error=/opt/mysql/mysql-8.0.27#pid-file=/tmp/myqld.pid -
添加mysql服务到系统
[root@centos8 bin]# cp /opt/mysql/mysql-8.0.27/support-files/mysql.server /etc/init.d/mysql -
授权以及添加服务
[root@centos8 bin]# chmod +x /etc/init.d/mysql[root@centos8 bin]# chkconfig --add mysql -
启动mysql
[root@centos8 bin]# service mysql startStarting MySQL.Logging to '/opt/mysql/mysql-8.0.27/data/centos8.localdomain.err'.... SUCCESS![root@centos8 bin]# -
查看启动状态
[root@centos8 bin]# service mysql status SUCCESS! MySQL running (1724) -
将mysql命令添加到服务
ln -s /opt/mysql/mysql-8.0.27/bin/mysql /usr/bin -
登录 MySQL
密码使用之前随机生成的密码
发现出现如下错误
[root@centos8 lib]# mysql -uroot -pmysql: error while loading shared libraries: libtinfo.so.5: cannot open shared object file: No such file or directory解决办法
[root@centos8 lib]# yum install libncurses.so.5[root@centos8 lib64]# sudo ln -s /usr/lib64/libtinfo.so.6.1 /usr/lib64/libtinfo.so.5[root@centos8 lib64]# mysql -uroot -pEnter password:Welcome to the MySQL monitor. Commands end with ; or \g.Your MySQL connection id is 9Server version: 8.0.27Copyright (c) 2000, 2021, Oracle and/or its affiliates.Oracle is a registered trademark of Oracle Corporation and/or itsaffiliates. Other names may be trademarks of their respectiveowners.Type 'help;' or '\h' for help. Type '\c' to clear the current input statement.mysql> -
修改root密码
其中 root 是新的密码自己设置
mysql> ALTER USER 'root'@'localhost' IDENTIFIED WITH mysql_native_password BY 'root';Query OK, 0 rows affected (0.00 sec) -
执行
flush privileges;使密码生效mysql> flush privileges;Query OK, 0 rows affected (0.01 sec) -
修改远程连接并生效
-
选择mysql数据库
mysql> use mysql;Reading table information for completion of table and column namesYou can turn off this feature to get a quicker startup with -ADatabase changed -
修改远程连接
mysql> update user set host='%' where user='root';Query OK, 1 row affected (0.01 sec)Rows matched: 1 Changed: 1 Warnings: 0 -
是远程连接生效
mysql> flush privileges;Query OK, 0 rows affected (0.01 sec) -
退出客户端
mysql> exitBye
-
-
配置全局环境变量
[root@centos8 lib64]# vim /etc/profile在 profile 文件底部添加如下两行配置,保存后退出
#mysqlexport PATH=$PATH:/opt/mysql/mysql-8.0.27/bin:/opt/mysql/mysql-8.0.27/libexport PATH设置环境变量立即生效
service mysql start -
开放3306端口
[root@centos8 mysql-8.0.27]# firewall-cmd --add-port=3306/tcp --permanentsuccess重启防火墙
[root@centos8 mysql-8.0.27]# firewall-cmd --reloadsuccess -
设置 MySQL 开机自启
[root@centos8 mysql-8.0.27]# chkconfig mysql on
备注:
mysql 默认配置文件
[client]port=3306# mysql socket 文件存放地址socket=/tmp/mysql.sock# 默认字符集default-character-set=utf8[mysqld]server-id=1# 端口port=3306# 运行用户user=mysql# 最大连接max_connections=200socket=/tmp/mysql.sock# mysql 安装目录(解压后文件的目录)basedir=/usr/local/mysql# 数据目录(这里放在我们新建的 /data/mysql 下)datadir=/data/mysqlpid-file=/data/mysql/mysql.pidinit-connect='SET NAMES utf8'character-set-server=utf8# 数据库引擎default-storage-engine=INNODBlog_error=/data/mysql/mysql-error.logslow_query_log_file=/data/mysql/mysql-slow.log# 跳过验证密码#skip-grant-tables[mysqldump]quickmax_allowed_packet=16MEOF可能会有好几个地方有 mysql 的配置文件,它的读取顺序是这样的
/etc/my.cnf
basedir/my.cnf
datadir/my.cnf
–defaults-extra-file #在读取全局配置文件之后,读取用户配置文件 (~/.my.cnf)之前,读取extra指定的参数文件
~/.my.cnf
所以我们在 /etc 下的配置文件 my.cnf 是第一个读取的文件,读到这个文件后就不会在读后面路劲中的配置文件。

