鸿蒙HarmonyOS APP开发入门3——组件(八 输入框组件 )——TextField组件
鸿蒙HarmonyOS APP开发入门3——组件(八 输入框组件 )——TextField组件
文章目录
- 鸿蒙HarmonyOS APP开发入门3——组件(八 输入框组件 )——TextField组件
-
- XML属性
- 创建TextField
- 设置TextField
-
- 设置TextField的背景
- 设置TextField的提示文字
- 设置Bubble
- 设置TextField的内边距
- 设置TextField的多行显示
- 设置TextField不可用状态
- 响应焦点变化
- 设置基线
- 实践运用
-
- 实践1
- 实践2
XML属性
TextField的共有XML属性继承自:Text
常见属性:
| 属性名称 | 功能说明 |
|---|---|
| hint | 提示文字 |
| basement | 输入框基线的颜色 |
| element_cursor_bubble | 设置提示气泡 |
| element_selection_left_bubble | 设置选中之后左边的气泡 |
| element_selection_right_bubble | 设置选中之后右边的气泡 |
| text_input_type | 输入框中的输入类型(pattern_password密文展示) |
| selection_color | 选中文字的颜色 |
创建TextField
在layout目录下的xml文件中创建一个TextField。
<TextField ... ohos:id="$+id:text_field" ohos:height="40vp" ohos:width="200vp" ohos:top_margin="100vp" ohos:left_margin="80vp" ohos:left_padding="20vp" />获取输入框的内容:
TextField textField = (TextField) findComponentById(ResourceTable.Id_text_field);String content = textField.getText();设置TextField
设置TextField的背景
layout目录下xml文件的代码示例如下:
<TextField ... ohos:background_element="$graphic:background_text_field" />graphic目录下xml文件(例:background_text_field.xml)的代码示例如下:
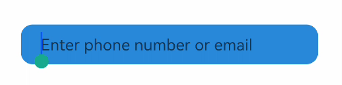
<shape xmlns:ohos="http://schemas.huawei.com/res/ohos"ohos:shape="rectangle"> <corners ohos:radius="40"/> <solid ohos:color="#2788d9"/></shape><shape xmlns:ohos="http://schemas.huawei.com/res/ohos"ohos:shape="rectangle"> <corners ohos:radius="40"/> <solid ohos:color="#2788d9"/></shape>设置TextField的提示文字
<TextField ... ohos:hint="Enter pho<TextField ... ohos:hint="Enter phone number or email" ohos:text_alignment="vertical_center"/>ne number or email" ohos:text_alignment="vertical_center"/>创建后的TextField效果

设置Bubble
<TextField ... ohos:element_cursor_bubble="$graphic:ele_cursor_bubble" />其中ele_cursor_bubble.xml
<shape xmlns:ohos="http://schemas.huawei.com/res/ohos"ohos:shape="rectangle"> <corners ohos:radius="40"/> <solid ohos:color="#17a98e"/> <stroke ohos:color="#17a98e" ohos:width="10"/></shape>设置bubble的效果
设置TextField的内边距
<TextField ... ohos:left_padding="24vp" ohos:right_padding="24vp" ohos:top_padding="8vp" ohos:bottom_padding="8vp"/>设置TextField的多行显示
<TextField ... ohos:multiple_lines="true"/>设置TextField不可用状态
通过TextField的Enable属性来控制文本框是否可用,当设置成false后,文本框输入功能不可用。
textField.setEnabled(false);响应焦点变化
textField.setFocusChangedListener((component, isFocused) -> { if (isFocused) { // 获取到焦点 ... } else { // 失去焦点 ... }});设置基线
<TextField ... ohos:basement="#ff0000" />设置基线的效果

实践运用
实践1
当点击登录按钮,将会出现错误提示,同时将会改变TextField的状态。
演示TextField错误提示效果
-
ability_text_field.xml代码示例:
<DirectionalLayout xmlns:ohos="http://schemas.huawei.com/res/ohos" ohos:width="match_parent" ohos:height="match_parent" ohos:background_element="#FF000000" ohos:orientation="vertical"> <StackLayout ohos:top_margin="60vp" ohos:width="match_parent" ohos:height="match_content" ohos:layout_alignment="center"> <TextField ohos:id="$+id:name_textField" ohos:width="600vp" ohos:height="match_content" ohos:multiple_lines="false" ohos:left_padding="24vp" ohos:right_padding="24vp" ohos:top_padding="8vp" ohos:bottom_padding="8vp" ohos:min_height="44vp" ohos:text_size="18fp" ohos:layout_alignment="center" ohos:text_alignment="vertical_center" ohos:background_element="$graphic:background_text_field" ohos:hint="Enter phone number or email" /> <Text ohos:visibility="hide" ohos:id="$+id:error_tip_text" ohos:width="match_content" ohos:height="match_content" ohos:top_padding="8vp" ohos:bottom_padding="8vp" ohos:right_margin="20vp" ohos:text="Incorrect account or password" ohos:text_size="18fp" ohos:text_color="red" ohos:layout_alignment="right"/> </StackLayout> <TextField ohos:top_margin="40vp" ohos:id="$+id:password_text_field" ohos:width="600vp" ohos:height="match_content" ohos:multiple_lines="false" ohos:left_padding="24vp" ohos:right_padding="24vp" ohos:top_padding="8vp" ohos:bottom_padding="8vp" ohos:min_height="44vp" ohos:text_size="18fp" ohos:layout_alignment="center" ohos:text_alignment="vertical_center" ohos:background_element="$graphic:background_text_field" ohos:hint="Enter password" /> <Button ohos:top_margin="40vp" ohos:id="$+id:ensure_button" ohos:width="120vp" ohos:height="35vp" ohos:background_element="$graphic:background_btn" ohos:text="Log in" ohos:text_size="20fp" ohos:layout_alignment="horizontal_center"/></DirectionalLayout>background_text_field.xml代码示例:
<shape xmlns:ohos="http://schemas.huawei.com/res/ohos"ohos:shape="rectangle"> <corners ohos:radius="40"/> <solid ohos:color="white"/> <stroke ohos:color="black" ohos:width="6"/></shape>background_btn.xml代码示例:
<shape xmlns:ohos="http://schemas.huawei.com/res/ohos"ohos:shape="rectangle"> <corners ohos:radius="35"/> <solid ohos:color="white"/></shape> -
Java代码示例:
// 当点击登录,改变相应组件的样式Button button = (Button) findComponentById(ResourceTable.Id_ensure_button);button.setClickedListener((component -> { // 显示错误提示的Text Text text = (Text) findComponentById(ResourceTable.Id_error_tip_text); text.setVisibility(Component.VISIBLE); // 显示TextField错误状态下的样式 ShapeElement errorElement = new ShapeElement(this, ResourceTable.Graphic_background_text_field_error); TextField textField = (TextField) findComponentById(ResourceTable.Id_name_textField); textField.setBackground(errorElement); // TextField失去焦点 textField.clearFocus();}));其中background_text_field_error.xml代码示例:
<shape xmlns:ohos="http://schemas.huawei.com/res/ohos"ohos:shape="rectangle"> <corners ohos:radius="40"/> <solid ohos:color="gray"/> <stroke ohos:color="#E74C3C" ohos:width="6"/></shape>
实践2
获取文本输入框中的内容并进行吐司提示
xml文件
<DirectionalLayout xmlns:ohos="http://schemas.huawei.com/res/ohos" ohos:height="match_parent" ohos:width="match_parent" ohos:background_element="#F2F2F2" ohos:orientation="vertical" > <TextField ohos:id="$+id:text" ohos:height="50vp" ohos:width="319vp" ohos:background_element="#FFFFFF" ohos:hint="请输入信息" ohos:hint_color="#999999" ohos:layout_alignment="horizontal_center" ohos:text_alignment="center" ohos:text_size="17fp" ohos:top_margin="100vp"/> <Button ohos:id="$+id:but" ohos:height="47vp" ohos:width="319vp" ohos:background_element="#21a8FD" ohos:layout_alignment="center" ohos:text="获取信息" ohos:text_alignment="center" ohos:text_color="#FEFEFE" ohos:text_size="24vp" ohos:top_margin="77vp"/> </DirectionalLayout>Java代码
public class MainAbilitySlice extends AbilitySlice implements Component.ClickedListener { TextField tf; Button but; @Overridepublic void onStart(Intent intent) { super.onStart(intent); super.setUIContent(ResourceTable.Layout_ability_main); //1.找到文本输入框组件对象 tf = (TextField) findComponentById(ResourceTable.Id_text); //找到按钮组件对象 but = (Button) findComponentById(ResourceTable.Id_but); //2.给按钮绑定一个点击事件 //当点击了按钮之后,就要获取文本输入框中的内容but.setClickedListener(this); } @Overridepublic void onActive() { super.onActive(); } @Overridepublic void onForeground(Intent intent) { super.onForeground(intent); } @Overridepublic void onClick(Component component) { //当点击了按钮之后,获取文本输入框中的内容 String message = tf.getText(); //利用一个吐司将信息弹出 ToastDialog td = new ToastDialog(this); //大小不用设置,默认就是包裹内容的 //自动关闭不用设置,默认到了时间之后就自动关闭 //持续时间可以不用设置,默认2秒 //设置吐司的背景。 td.setTransparent(true); //位置(默认居中) td.setAlignment(LayoutAlignment.BOTTOM); //设置一个偏移 td.setOffset(0,200); //设置吐司的内容 td.setText(message); //让吐司出现 td.show(); } }喜欢本博文可以关注一下哦!!!!

