自定义starter
下面我们来做一个案列来完成
学过springboot的小伙伴肯定都知道在我们引入一些依赖的时候我们通常会引入这样形式的坐标
org.springframework.boot spring-boot-starter-web 这是最经典的我们引入web依赖的坐标
com.baomidou mybatis-plus-boot-starter 3.4.2 这是我们引入mybatis-plus的坐标
那么我们可以仿照这个做一个我们自己的starter吗
当然我们要利用springboot的自动装配
首先我们实现一个starter案例当我们在引入这个自定义得的starter我们可以获取ip,可以监控访问次数,并且可以在配置文件中进行配置
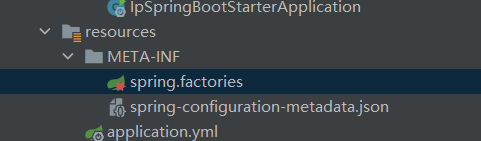
我们先来创建一个基本springboot的工程

这就是这个项目的基本架构
接下来我们先来实现业务方法
我们在service层进行业务的编写
public class IpCountService { private HashMap ipcount=new HashMap(); @Autowired //说明一下这里的自动装配由使用当前starter的工程提供 private HttpServletRequest httpServletRequest; public void ipCount(){ //实现每次当前的操作就调用当前ip,并将访问次数累加起来 //首先获取ip地址,通过httpServletRequest获取请求参数 String ip= httpServletRequest.getRemoteAddr(); //再根据ip从map中取值然后再进行递增 Integer count = ipcount.get(ip); //做判断当count等于0的情况如何处理,不等于如何处理 if (count==null){ ipcount.put(ip,1); }else { ipcount.put(ip,count+1); } }在这个方法中我们可以利用Map集合先模拟我们的数据存储在以后的利用中我们利用我们的缓存技术比如redis。刚好符合我们的key-value数据格式
我们利用httpServletRequest获取当前的ip地址
但有有一点是要我们注意的
@Autowired
//说明一下这里的自动装配由使用当前starter的工程提供
private HttpServletRequest httpServletRequest;
这样根据我们上面的代码我们就完成了数据的存储,和访问次数的累加
下面我们就要考虑我们把数据存放进来了,要如何进行展示呢。
这里我们仿照mysql的数据展示的格式
System.out.println("ip访问监控"); System.out.println("+------ipaddress------+---num-----+"); //将map的中的key value取出 for (Map.Entry entry : ipcount.entrySet()) { System.out.println(String.format("|%18s |%5d |", entry.getKey(), entry.getValue())); } System.out.println("+---------------------+-----------+");效果如下 :
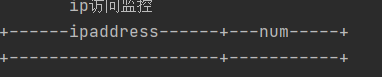
这里我们得数据展示格式也完成了
下面我们要实现的是如何利用在配置文件中通过配置参数的方式来修改我们的ip日志显示周期。以及切换展示数据的格式。和是否重置的功能
其实这就很简单了。我们可以利用配置文件的参数和我们参数类相互绑定的方式
@Component("ipproperties")@ConfigurationProperties(prefix = "tools.ip")public class Ipproperties { / * 日志显示周期 cycle */ private Long cycle=5L; / * 日志是否在周期内进行重置 */ private boolean cycleReset=false; / * 打印日志使用的模式 simple 简单模式 detail详细模式 */ private String model=LogModel.DETAIL.value; //使用枚举 public enum LogModel{ DETAIL("detail"), SIMPLE("simple"); private String value; LogModel(String value) { this.value=value; } public String getValue() { return value; } public void setValue(String value) { this.value = value; } } public Long getCycle() { return cycle; } public void setCycle(Long cycle) { this.cycle = cycle; } public boolean getCycleReset() { return cycleReset; } public void setCycleReset(boolean cycleReset) { this.cycleReset = cycleReset; } public String getModel() { return model; } public void setModel(String model) { this.model = model; }}@ConfigurationProperties(prefix = "tools.ip")通过这个类我们和配置文件进行绑定
还有一点需要注意的是我们这里采用了一个枚举类;
然后我们下面要考虑的问题就是如何让我们的参数生效呢
这里就是要进行我们的业务编写了
//注入Ipproperties参数 @Autowired private Ipproperties ipproperties; / * 实现修改日志显示周期 */ @Scheduled(cron = "0/#{ipproperties.cycle} * * * * ?") //定时报表功能 public void print(){ / * 实现明细模式和简单模式的切换 * */ if(ipproperties.getModel().equals(Ipproperties.LogModel.DETAIL.getValue())) { System.out.println("ip访问监控"); System.out.println("+------ipaddress------+---num-----+"); //将map的中的key value取出 for (Map.Entry entry : ipcount.entrySet()) { System.out.println(String.format("|%18s |%5d |", entry.getKey(), entry.getValue())); } System.out.println("+---------------------+-----------+"); }else if(ipproperties.getModel().equals(Ipproperties.LogModel.SIMPLE.getValue())){ System.out.println("ip访问监控"); System.out.println("+------ipaddress---------+"); //将map的中的key value取出 for (Map.Entry entry : ipcount.entrySet()) { System.out.println(String.format("|%18s |", entry.getKey())); } System.out.println("+------------------------+"); } / * 实现周期内是否重置监控数据 */ if(ipproperties.getCycleReset()){ ipcount.clear(); } }到现在我们这些业务功能基本完成了
还有一个功能我们要实现就是当我们的starter被别人引用时可以自动完成这些方法的调用
实现这个功能也很简单我们只需要完成一个拦截器功能就可以了
public class IpcountInterceptor implements HandlerInterceptor { @Autowired private IpCountService ipCountService; @Override public boolean preHandle(HttpServletRequest request, HttpServletResponse response, Object handler) throws Exception { ipCountService.ipCount(); return true; }}拦截器编写好了我们还要将拦截器注册到我们的容器中去
@Configurationpublic class SpringMVCConfig implements WebMvcConfigurer { @Override public void addInterceptors(InterceptorRegistry registry) { registry.addInterceptor(ipcountInterceptor()).addPathPatterns(); } @Bean public IpcountInterceptor ipcountInterceptor(){ return new IpcountInterceptor(); }}现在我们就基本完成了
但是还有最重要的我们要将我我们的这些功能实现自动装配
@EnableScheduling@ComponentScan(basePackages = "cn.hb")//@EnableConfigurationProperties(Ipproperties.class)public class ipAutoConfig {@Bean public IpCountService ipAutoConfig(){ return new IpCountService();}}这样就将我我们刚刚编写的装载到了这个配置类中
下面我们就要实现当我们这个starter被引用或启动。这个配置类可以完成自动配置
我们只需要建立一个META-INFO包在这个下面创建一个spring.factories文件中声名我们的配置类
org.springframework.boot.autoconfigure.EnableAutoConfiguration=cn.hb.AutoConfig.ipAutoConfig配置这样一句话就OK了
好了到这里我们真正的基本完成了。但是还有最重要的一步就是我我们要将这个starter下载到我们的maven仓库中。

现在我们就来测试一下 在我编写的另外一个工程中去测试
首先引入这个坐标,
cn.hb ip-spring-boot-starter 0.0.1-SNAPSHOT然后我们试试在配置文件中可不可以配置

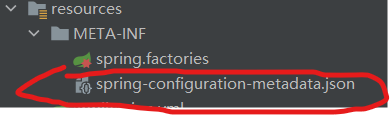
这个提示功能是也是可以完成的,我们在我们自定义starter中首先引入这个坐标
org.springframework.boot spring-boot-configuration-processor true 在METE-INFO下创建一个配置文件:
在这里面配置
"hints": [ { "name": "tools.ip.model", "values": [ { "value": "detail", "description": "明细模式." }, { "value": "simple", "description":"简单模式." } ] } ]就可以了
下面来验证一下功能

好了这个功能我们就完成了
如果想要源码私信我,或者评论一下。快就可以获得
这篇文章还有很多不足。这是我学习阶段的总结和复习

