尚硅谷java入门b站零基础 异常处理 +多线程+部分项目三 2022.3.26
380 如何自定义异常
/* * 如何自定义异常类? * 1.继承于现有的异常结构:RuntimeException 、Exception * 2.提供全局常量:serialVersionUID * 3.提供重载的构造器 * */public class MyException extends RuntimeException{static final long serialVersionUID = -7034897193246939L;public MyException(){}public MyException(String msg){super(msg);}}381 基本使用
public class ReturnExceptionDemo {static void methodA() {try {System.out.println("进入方法A");throw new RuntimeException("制造异常");} finally {System.out.println("用A方法的finally");}}static void methodB() {try {System.out.println("进入方法B");return;} finally {System.out.println("调用B方法的finally");}}public static void main(String[] args) {try {methodA();} catch (Exception e) {System.out.println(e.getMessage());}methodB();}}382 综合练习
编写应用程序EcmDef.java,接收命令行的两个参数,
* 要求不能输入负数,计算两数相除。
* 对 数 据 类 型 不 一 致(NumberFormatException)、
* 缺 少 命 令 行 参 数(ArrayIndexOutOfBoundsException、
* 除0(ArithmeticException)及输入负数(EcDef自定义的异常)进行异常处理。
*
* 提示:
* (1)在主类(EcmDef)中定义异常方法(ecm)完成两数相除功能。
* (2)在main()方法中使用异常处理语句进行异常处理。
* (3)在程序中,自定义对应输入负数的异常类(EcDef)。
* (4)运行时接受参数java EcmDef2010//args[0]=“20”args[1]=“10”
* (5)Interger类的static方法parseInt(Strings)将s转换成对应的int值。
* 如:int a=Interger.parseInt(“314”);//a=314;
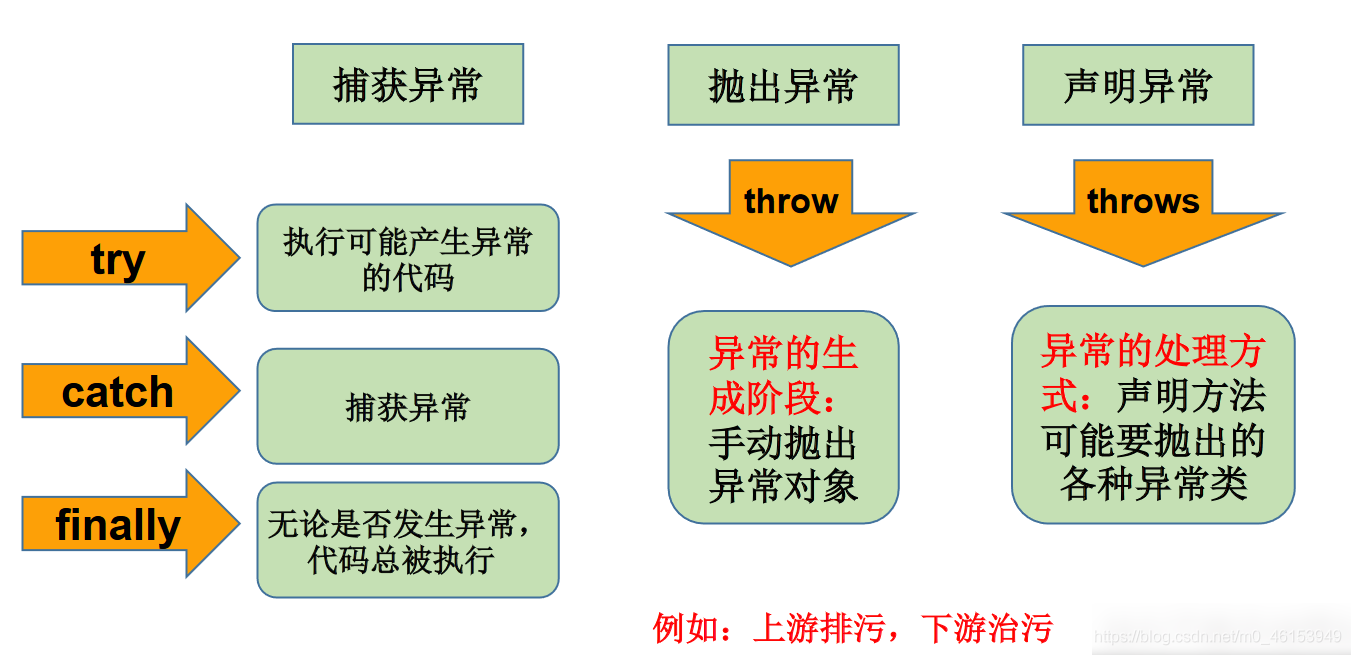
public class EcmDef{ public static void main(String[] args){ try{ int i=Integer.parseInt(args[0]); int j=Integer.parseInt(args[1]); int result=ecm(i,j); System.out.println(result); }catch(NumberFormatException e){ System.out.println("数据类型不一致"); }catch(ArrayIndexOutOfBoundsException e){ System.out.println("缺少命令行参数"); }catch(ArithmeticException e){ System.out.println("除0"); }catch(EcDef e){ System.out.println(e.getMessage()); } } public int ecm(int i,int j){ if(i<0||j<0){ throw new EcDef("分子或分母为负数了"); } return i/j; }}public class EcDef extends Expection{ static final long serialVersionUID = -33875164229948L; public EcDef(){ } public EcDef(String msg){ super(msg); }} 383 异常处理关键字
385 项目三介绍与演示
模拟实现一个基于文本界面的开发团队调度软件
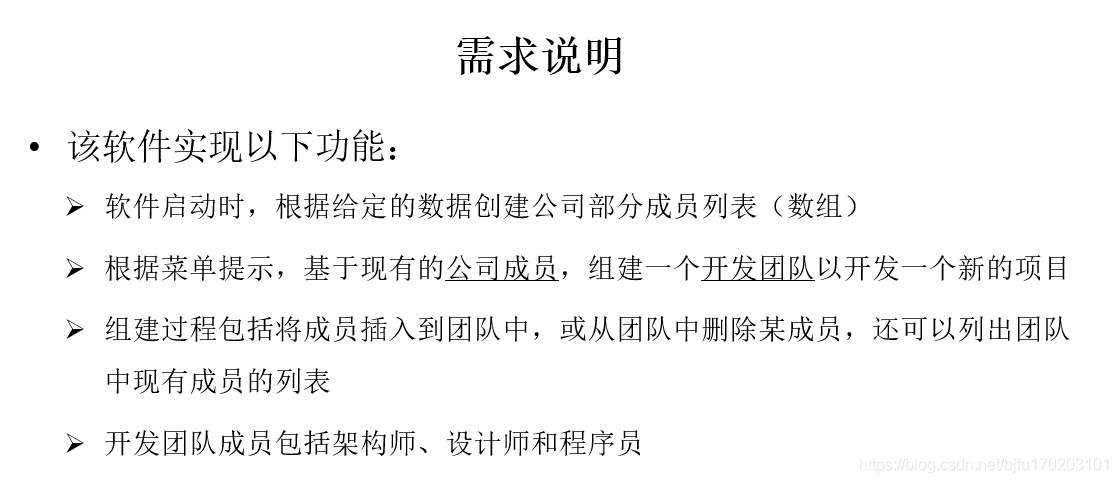


386 项目三设计架构
387 项目三TSUtiliity和Data类的说明
388 项目三中Equipment及其实现类的说明
public interface Equipment{ String getDescription();}public class PC implements Equipment{ private String model; private String display; public PC(){super(); } public PC(String model,String display){super();this.model=model;this.dispaly=display; } public String getModel(){return model; } public void setModel(String model){this.model=model; } public String getDisplay(){return display; } public void setDisplay(String display){ this.display=display; } public String getDescription(){ return null; }}public class NoteBook implements Equipment{ private String model; private double price; public String getModel(){ return model; } public void setModel(String model){ this.model=model; } public double getPrice(){ return price; } public void setPrice(double price){ this.price=price; } public NoteBook(){ super(); } public NoteBook(String model,double price){ super(); this.model=model; this.price=price; } public String getDescription(){ return model +"("+price+")"; }}public class Printer implements Equipment{ private String name; private String type; public String getName(){ return name; } public void setName(String name){ this.name=name; } public String getType(){ return type; } public void setType(String type){ this.type=type; } public Printer(){ super(); } public Priner(String name,String type){ super(); this.name=name; this.type=type; } public String getDescription(){ return name+"("+type+")"; } }package kx.domain;/ * @Description * @author 作者 KX* @version * @date 创建时间:2020年10月27日 下午2:08:03 */public class Printer implements Equipment{private String name,type;public Printer() {super();} public Printer(String name, String type) {super();this.name = name;this.type = type;} public String getName() {return name;} public void setName(String name) {this.name = name;} public String getType() {return type;} public void setType(String type) {this.type = type;} @Overridepublic String getDescription() {return type + "(" + name + ")";}}public class Programmer extends Employee{ private int memberId; private Status status; private Equipment equipment; public Programmer(int id,String name,int age,double salary){ super(id,name,age,salary); this.equipment=equipment; } public int getMemberId() {return memberId;}public void setMemberId(int memberId) {this.memberId = memberId;}public Status getStatus() {return status;}public void setStatus(Status status) {this.status = status;}public Equipment getEquipment() {return equipment;}public void setEquipment(Equipment equipment) {this.equipment = equipment;}}public class Status{ private final String NAME; private Status(String name){ this.NAME=name; } public static final Status FREE=new Status("FREE"); public static final Status BUSY=new Status("BUSY"); public static final Status VOCATION=new Status("VOCATION); public String getNAME(){ return NAME; }public class Designer extends Programmer{ private double bonus; public Designer(){super(); } public Designer(int id,String name,int age,double salary,Equipment equipment,double bonus){ super(id,name,age,salary,equipment); this.bonus=bonus; } public double getBonus(){ return bonus; } public void setBonus(double bonus){ this.bonus=bonus; }public class Architect extends Designer{ private int stock; public Architect(){ super(); } public Architect(int id,String name,int age,double salary,Equipment equipment,double bonus,int stock){ super(id,name,age,salary,equipment,bonus); this.stock=stock; } public int getStovk(){return stock; } public void setStock(int stock){this.stock=stock; }}public class NamelistService{ private Employee[] employees; public NameListService(){ employees=new Employee[EMPLOYEES.length]; for(int i=0;i<employees.length;i++){ int type=Integer.parseInt(EMPLOYEES[i][0]); int id=Integer.parseInt(EMPLOYEES[i][1]); String name=EMPLOYEES[i][2]; int age=Integer.parseInt(EMPLOYEES[i][3]); double salary=Double.parseDouble(EMPLOYEES[i][4]); switch(type){ case EMPLOYEE: employees[i]=new Employee(id,name,age,salary); break; case PROGRAMMER: employees[i]=new Employee(id,name,age,salary); break; case DESIGNER: employees[i]=new Employee(id,name,age,salary); break; case ARCHITECT: employees[i]=new Employee(id,name,age,salary); break; } } public Employee[] getAllEmployee(){ return null; } public Employee[] getAllEmployee(int id){ return null; } 太难了。。。先不写了
413 idea的使用与多线程 程序进程线程的概念
01、基本概念:程序、进程、线程
程序(program):为完成特定任务、用某种语言编写的一组指令的集合。即指一段静态的代码,静态对象。
进程(process):程序的一次执行过程,或是正在运行的一个程序。是一个动态的过程:有它自身的产生、存在和消亡的过程。——生命周期
如:运行中的QQ,运行中的MP3播放器程序是静态的,进程是动态的
进程作为资源分配的单位,系统在运行时会为每个进程分配不同的内存区域
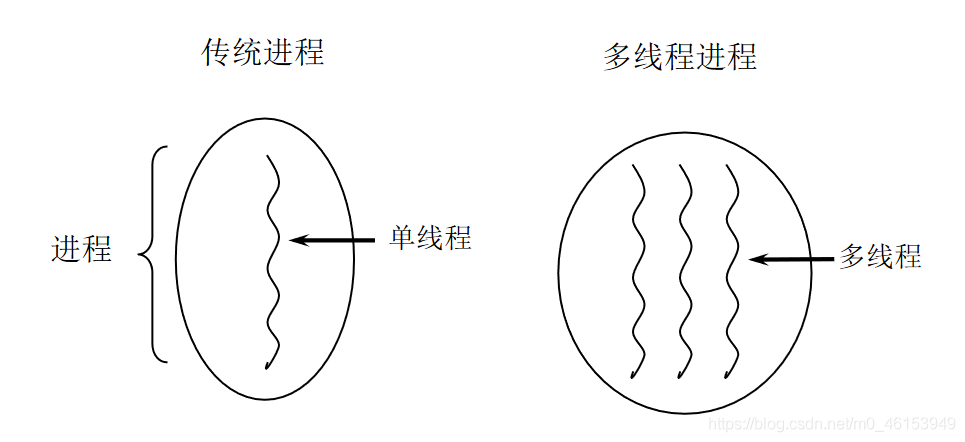
线程(thread),进程可进一步细化为线程,是一个程序内部的一条执行路径。
若一个进程同一时间并行执行多个线程,就是支持多线程的
线程是调度和执行的单位,每个线程拥有独立的运行栈和程序计数器(pc),线程切换的开销小
一个进程中的多个线程共享相同的内存单元/内存地址空间—》它们从同一堆中分配对象,可以访问相同的变量和对象。这就使得线程间通信更简便、高效。但多个线程操作共享的系统资源可能就会带来安全的隐患。
414 单核与多核CPU的任务执行-并行与并发
单核CPU和多核CPU的理解
单核CPU,其实是一种假的多线程,因为在一个时间单元内,也只能执行一个线程的任务。例如:虽然有多车道,但是收费站只有一个工作人员在收费,只有收了费才能通过,那么CPU就好比收费人员。如果有某个人不想交钱,那么收费人员可以把他“挂起”(晾着他,等他想通了,准备好了钱,再去收费)。但是因为CPU时间单元特别短,因此感觉不出来。
如果是多核的话,才能更好的发挥多线程的效率。(现在的服务器都是多核的)
一个Java应用程序java.exe,其实至少有三个线程:main()主线程,gc()垃圾回收线程,异常处理线程。当然如果发生异常,会影响主线程。
并行:多个CPU同时执行多个任务。比如:多个人同时做不同的事。
并发:一个CPU(采用时间片)同时执行多个任务。比如:秒杀、多个人做同一件事。
415 多线程的优点
以单核CPU为例,只使用单个线程先后完成多个任务(调用多个方法),肯定比用多个线程来完成用的时间更短,为何仍需多线程呢?
- 提高应用程序的响应。对图形化界面更有意义,可增强用户体验。
- 提高计算机系统CPU的利用率
- 改善程序结构。将既长又复杂的进程分为多个线程,独立运行,利于理解和修改
何时需要多线程
- 程序需要同时执行两个或多个任务。
- 程序需要实现一些需要等待的任务时,如用户输入、文件读写操作、网络操作、搜索等。
- 需要一些后台运行的程序时。
416 创建多线程方式一:继承thread类
线程的创建和启动
Java语言的JVM允许程序运行多个线程,它通过java.lang.Thread类来体现。
Thread类的特性
每个线程都是通过某个特定Thread对象的run()方法来完成操作的,经常把run()方法的主体称为线程体
通过该Thread对象的start()方法来启动这个线程,而非直接调用run()
多线程的创建,方式一:继承于Thread类
1.创建一个继承于Thread类的子类
2.重写Thread类的run()----将此线程执行的操作声明在run()中
3.创建Thread类的子类的对象
4.通过此对象调用start()
例子:遍历100以内的偶数
//创建一个继承于Thread的子类class MyThread extends Thread{ //重写Thread类的run() public void run(){ for(int i=0;i<100;i++0{ if(i%2==0){ System.out.println(i); } } }}public class ThreadTest{ public static void main(String[] args){ //3.创建Thread类的子类的对象 MyThread t1=new MyThread(); //4.通过此对象调用start() t1.start(); }}417 创建过程中两个问题的说明
4.通过此对象调用start()
1.启动当前线程
2.调用当前线程的run()
问题一:我们不能通过直接调用run()的方式启动线程
问题二:再启动一个线程,遍历100以内的偶数
不可以还让已经start()的线程去执行,我们需要重新创建一个线程的对象
MyThread t2=new MyThread();
t2.start();
418 继承方式的课后练习
练习:创建两个分线程,其中一个遍历100以内的偶数,另一个遍历100以内的奇数
public class ThreadDemo{ public static void main(String[] args){ //3.创建Thread类的子类的对象 MyThread m1=new MyThread1(); MyThread m2=new MyThread1(); //4.通过此对象调用start() m1.start(); m2.start(); }}class MyThread1 extends Thread{ //重写Thread类的run() public void run(){ for(int i=0;i<100;i++0{ if(i%2==0){ System.out.println(Thread.currentThread().getName()+":"+i); } } }}class MyThread2 extends Thread{ //重写Thread类的run() public void run(){ for(int i=0;i<100;i++0{ if(i%2!=0){ System.out.println(Thread.currentThread().getName()+":"+i); } } }}方式二
/ * 练习:创建两个分线程,其中一个遍历100以内的偶数,另一个遍历100以内的奇数 */public class ThreadDemo { public static void main(String[] args) { //创建Thread类的匿名子类的方式 new Thread(){ @Override public void run() { for(int i = 0;i < 100;i++){ if(i % 2 == 0){ System.out.println(Thread.currentThread().getName() + ":" + i); } } } }.start(); new Thread(){ @Override public void run() { for(int i = 0;i < 100;i++){ if(i % 2 != 0){ System.out.println(Thread.currentThread().getName() + ":" + i); } } } }.start(); }}419 线程的常用方法
测试Thread中的常用方法
1.start():启动当前线程,调用当前线程的run()
2.run():通常需要重写Thread类中的此方法,将创建的线程要执行的操作声明在此方法中
3.currentThread():静态方法,返回执行当前代码的线程
4.getName():获取当前线程的名字
5.setName():设置当前线程的名字
6.yield():释放当前CPU的执行权
7.join():在线程a中调用线程b的join(),此时线程a就进入阻塞状态,直到线程b完全执行之后,线程a才结束阻塞状态
8.stop():已过时。当执行此方法时,强制结束当前线程
9.sleep(long millitime):让当前线程睡眠指定的millitime毫秒,在指定的millitime毫秒时间内,当前线程是阻塞状态
10.isAlive():判断当前线程是否还存活
class HelloThread extends Thread{ //重写Thread类的run() public void run(){ for(int i=0;i<100;i++0{ if(i%2==0){ try{ sleep(millis:10); }catch(InterruptedExpection e){ e.printStackTrace(); } System.out.println(Thread.currentThread().getName()+":"+i); } if(i%20==0){yield(); } } } public HelloThread(String name){ super(name); }}public class ThreadMethodTest{ public static void main(String[] args){ HelloThread h1=new HelloThread(name:"Thread:1"); //h1.setName("线程一"); h1.start(); //给主线程命名 Thread.currentThread().setName(); for(int i=0;i<100;i++0{ if(i%2==0){ System.out.println(Thread.currentThread().getName()+":"+i); } if(i==20){ try{ h1.join(); }catch(InterruptedException e){ e.printStackTrace(); } } System.out.println(h1.isAlive()); }}420 线程优先级的设置
- 调度策略
- 时间片

- 抢占式:高优先级的线程抢占CPU
- 时间片
- Java的调度方法
- 同优先级线程组成先进先出队列(先到先服务),使用时间片策略
- 对高优先级,使用优先调度的抢占式策略
线程的优先级等级
* - MAX_PRIORITY:10
* - MIN _PRIORITY:1
* - NORM_PRIORITY:5 --->默认优先级
* - 涉及的方法
* - getPriority() :返回线程优先值
* - setPriority(intnewPriority) :改变线程的优先级
说明:高优先级的线程要抢占低优先级cpu的执行权,但是只是从概率上讲,高优先级的线程高概率的情况下被执行,并不意味着只有当高优先级的线程执行完以后,低优先级的线程才会被执行。
class HelloThread extends Thread{ //重写Thread类的run() public void run(){ for(int i=0;i<100;i++0{ if(i%2==0){ try{ sleep(millis:10); }catch(InterruptedExpection e){ e.printStackTrace(); } System.out.println(Thread.currentThread().getName()+":"+Thread.currentThread().getPriority()+":"+i); } if(i%20==0){yield(); } } } public HelloThread(String name){ super(name); }}public class ThreadMethodTest{ public static void main(String[] args){ HelloThread h1=new HelloThread(name:"Thread:1"); //h1.setName("线程一"); //设置分线程的优先级 h1.setPriority(Thread.MAX_PRIORITY); h1.start(); //给主线程命名 Thread.currentThread().setName("主线程"); Thread.currentThread().setPriority(Thread.MIN_PRIORITY); for(int i=0;i<100;i++0{ if(i%2==0){ System.out.println(Thread.currentThread().getName()+":"+Thread.currentThread().getPriority()+":"+i); } if(i==20){ try{ h1.join(); }catch(InterruptedException e){ e.printStackTrace(); } } System.out.println(h1.isAlive()); }}421 例题:继承Thread方式,多窗口卖票
报错:无效的源发行版:1.9
SDK默认版本,版本问题
例子:创建三个窗口卖票,总票数为100张
存在线程的安全问题,待解决
class Window extends Thread{ private static int ticket=100; public void run(){ while(true){ if(ticket>0){ System.out.println(getName()+":卖票,票号为:"+ticket); ticket--; }else{ break; } } }}public class WindowTest{ public static void main(String[] args){ Windows t1=new Window(); Windows t2=new Window(); Windows t3=new Window(); t1.setName("窗口1"); t2.setName("窗口2"); t3.setName("窗口3"); t1.start(); t2.start(); t3.start(); }}422 创建多线程的方式之二:实现Runnable接口
1.创建一个实现了Runnable接口的类
2,实现类去实现Runnable中的抽象方法:run()
3,创建实现类的对象
4.将此对象作为参数传递到Thread类的构造器中,创建Thread类的对象
5.通过Thread类的对象调用start()
1.启动线程
2.调用当前线程的run()----调用了Runnable类型的target
//1.创建一个实现了Runnable接口得类class MThread implements Runnable{ //2.实现类去实现Runnable中的抽象方法:run() public void run(){for(int i=0;i<100;i++){ if(i%2==0){System.out.println(Thread.currentThread().getName()+":"+i); }} }}public class ThreadTest1{ public static void main(String[] args){ //3.创建实现类的对象 MThread mThread=new MThread(); //4.将此对象作为参数传递到Thread类的构造器中,创建Thread类的对象 Thread t1=new Thread(mThread); t1.setName("线程1"); //5.通过Thread类的对象调用start() t1.start(); //再启动一个线程,遍历100以内的偶数 Thread t2=new Thread(mThread); t2.setName("线程2"); t2.start();}423 实现Runnable方式,多窗口卖票
多窗口卖票使用继承Thread类的方法
class Window1 implements Runnable{ private int ticket=100; public void run(){ while(true){ if(ticket>0){ System.out.println(Thread.currentThread().getName()+":卖票,票号为:"+ticket); ticket--; }else{ break; }} }}public class WindowTest1{ public static void main(String[] args){ Window1 w=new Window1(); Thread t1=new Thread(w); Thread t2=new Thread(w); Thread t3=new Thread(w); t1.setName("窗口1"); t2.setName("窗口2"); t3.setName("窗口3"); t1.start(); t2.start(); t3.start(); }}424 两种创建方式的对比
比较创建线程的两种方式
开发当中,优先选择实现Runnable接口的方式
原因:1.实现的方式没有类的单继承性的局限性
2.实现的方式更适合来处理多个线程有共享数据的情况
联系:public class Thread implements Runnable
相同点:两种方式都需要重写run(),将线程要执行的逻辑声明在run()中
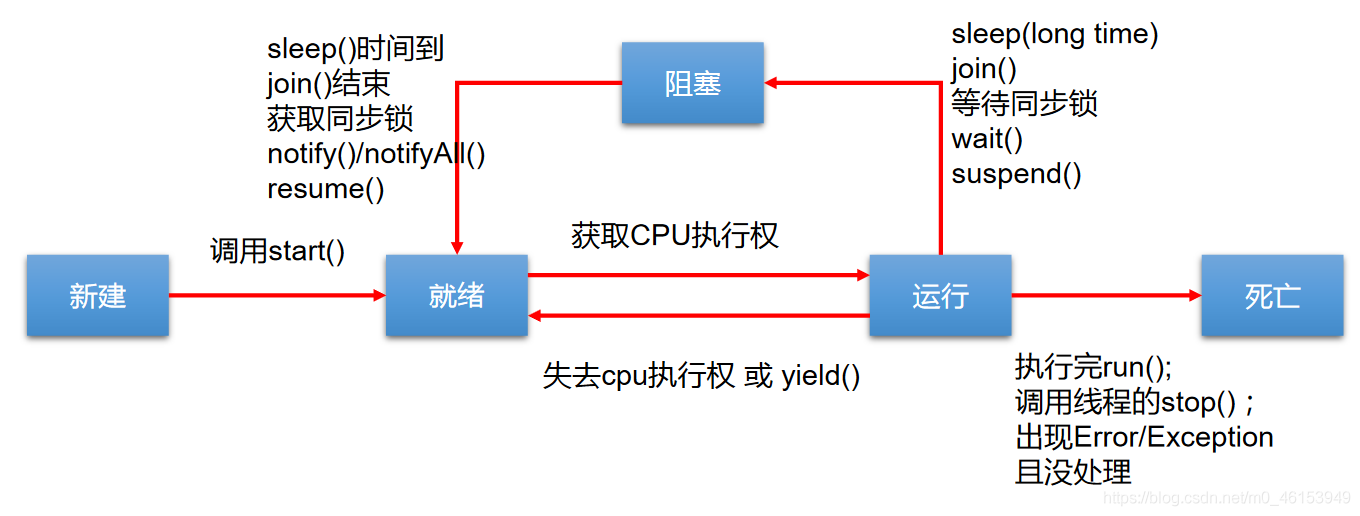
428 线程的生命周期
新建:当一个Thread类或其子类的对象被声明并创建时,新生的线程对象处于新建状态
就绪:处于新建状态的线程被start()后,将进入线程队列等待CPU时间片,此时它已具备了运行的条件,只是没分配到CPU资源
运行:当就绪的线程被调度并获得CPU资源时,便进入运行状态,run()方法定义了线程的操作和功能
阻塞:在某种特殊情况下,被人为挂起或执行输入输出操作时,让出CPU并临时中止自己的执行,进入阻塞状态
死亡:线程完成了它的全部工作或线程被提前强制性地中止或出现异常导致结束
线程的生命周期