Java基础篇异常处理总结
异常处理目录
-
- 1.异常概述
-
- 1.1概念
- 1.2异常的体系结构
- 1.3异常的分类
- 2.异常的处理
-
- 2.1异常处理的“抓抛模型”
- 2.2异常处理的方式一:try-catch-finally
- 2.3异常处理的方式二:throws + 异常类型
- 2.4如何选择异常处理方式
- 3.手动处理异常
-
- 3.1throw和throws之间的区别
- 3.2throw典型例题
- 3.3自定义异常类的实现
1.异常概述
1.1概念
在Java语言中,将程序执行中发生的不正常情况称为“异常”。 (开发过程中的语法错误和逻辑错误不是异常)
1.2异常的体系结构
异常主要分为编译时异常和运行时异常
java.lang.Throwable
|-----java.lang.Error:一般不编写针对性的代码进行处理。
|-----java.lang.Exception:可以进行异常的处理
|------编译时异常(checked)
|-----IOException
|-----FileNotFoundException
|-----ClassNotFoundException
|------运行时异常(unchecked,RuntimeException)
|-----NullPointerException
|-----ArrayIndexOutOfBoundsException
|-----ClassCastException
|-----NumberFormatException
|-----InputMismatchException
|-----ArithmeticException
1.3异常的分类
运行时异常:是指编译器不要求强制处置的异常。一般是指编程时的逻辑错误,是程序员应该积极避免其出现的异常,对于此类异常一般不做处理
编译时异常:是指编译器要求必须处置的异常。即程序在运行时由于外界因素造成的一般性异常。
2.异常的处理
2.1异常处理的“抓抛模型”
过程一:“抛”:程序正在执行的过程中,一旦抛出异常,就会在异常代码处生成一个对应的异常类对象 并将此对象抛出。
一旦抛出对象以后,其后的代码就不再执行。关于异常对象的产生:
①系统自动生成一个异常对象
②手动的生成一个异常对象,并抛出throw过程二:“抓”:可以理解为异常的处理方式:①try-catch-finally ② throws
2.2异常处理的方式一:try-catch-finally
使用的方式:
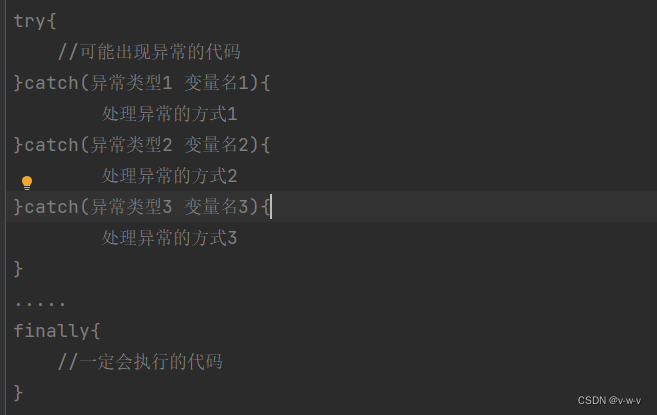
说明(理解很重要):
1.finally是可选的
2.使用try将可能出现的异常代码包装起来,在执行过程中,一旦出现异常,就会生成一个异常类的对象,根据此对象的类型,去catch中进行匹配
3.一旦try中的异常对象对象匹配到某一个catch时,就会进入catch中进行异常处理,一旦处理完成,就跳出try-catch结构,继续执行其后的代码
4.catch中的异常类型如果没有子父类关系,则谁声明在上,谁声明在下无所谓catch中的异常类型如果有子父类关系,则子类要声明在父类上面
5.常见的异常处理方式:
①getMessage() ②e.printStackTrace();
6.使用try-catch处理编译异常时,使得程序在编译时不报错,运行时还可能会报错, 相当于将一个编译时出现的错误,延时到运行时出现
7.try-catch-finally结构可以再次嵌套try-catch
在开发中,针对运行时异常一般不做处理,对于编译时异常使用try-catch-finally进行处理
使用样例:
public class ExceptionTest1 { public static void main(String[] args) { }//ArithmeticException 算术运算异常 @Test public void Test6() { try { int a = 10; int b = 0; System.out.println(a / b); }catch (ArithmeticException e){ e.printStackTrace(); } } @Test public void Test2(){ try{ File file = new File("hello.txt"); FileInputStream fis = new FileInputStream(file); int data = fis.read(); while(data != -1){ System.out.print((char) data); data = fis.read(); } fis.close(); }catch (FileNotFoundException e){ e.printStackTrace(); }catch (IOException e){ e.printStackTrace(); } } //NumberFormatException数据格式异常 @Test public void Test4() { String str = "123"; str = "abc"; try { int number = Integer.parseInt(str);//把字符串转为整型 }catch (NumberFormatException e){ // System.out.println("出现数值转换异常了"); e.printStackTrace(); System.out.println(e.getMessage());//获取异常信息 }catch (NullPointerException e){ System.out.println("出现空指针异常了"); }catch (Exception e){ System.out.println("出现异常了"); } }}🍀finally的使用
说明:
1.finally是可以选择写,也可以选择不写的,具体情况具体分析,如果有必须要执行的就需要写
2.finally中声明的是一定会被执行的代码,即使catch中又出现异常了,try中有return语句,catch中有return语句等情况。
3.像数据库连接、数据输入输出流、网络编程Socket等资源,JVM是不能进行自动回收的,我们需要自己手动的进行资源的释放。此时的资源释放,就需要声明在finally中。
使用样例一:
public int test2() { try { int[] arr = new int[10]; System.out.println(arr[10]); return 1; } catch (ArrayIndexOutOfBoundsException e) { e.printStackTrace(); return 2; } finally { System.out.println("一定会被执行"); } }使用样例二:
@Test public void test3() { FileInputStream fis = null;//需要初始化 try { File file = new File("C:\\Users\\Administrator\\Desktop\\com.java.li\\src\\day10\\com\\it\\java0\\hello.txt"); fis = new FileInputStream(file); //可能此处出现异常,所以他会直接到第一个异常处理机制里面,因此fis.close()可能不会被关闭 //--》fis.close()放在while下面显然有些不合适,他是一定会执行的语句,所以放在finally里比较好 //异常套异常 int data = fis.read(); while (data != -1) { System.out.print((char) data); data = fis.read(); } //fis.close(); } catch (FileNotFoundException e) { e.printStackTrace(); } catch (IOException e) { e.printStackTrace(); } finally { try { if (fis != null){ fis.close(); } } catch (IOException e) { e.printStackTrace(); } } }2.3异常处理的方式二:throws + 异常类型
1.概述:
“throws + 异常类型”写在方法的声明处,指明此方法在执行时可能会出现的异常类型。
当方法体执行出现异常时,仍会在异常代码处生成一个一场类的对象,此时对象满足throws后的异常类型时,就会被抛出,异常代码的后续代码就不会被执行!
2.两种方式之间的区别:
“try-catch-finally”真正的将异常处理掉了
“throws + 异常类型”只是将异常抛出给方法的调用者,并没有将异常真正处理掉
注意:子类的异常类型不大于父类的异常类型
throws使用样例:
public class ExceptionTest2 { public static void main(String[] args) { try { method2(); } catch (IOException e) { e.printStackTrace(); } } public static void method2()throws IOException{ method1(); } public static void method1()throws IOException { File file = new File("C:\\Users\\Administrator\\Desktop\\com.java.li\\src\\day10\\com\\it\\java0\\hello.txt"); FileInputStream fis = new FileInputStream(file); int data = fis.read(); while(data != -1){ System.out.print((char) data); data = fis.read(); } fis.close(); }}2.4如何选择异常处理方式
方式一:
如果父类中被重写的方法没有throws的方式处理异常,则子类被重写的方法也不能使用throws的方式,意味着子类重写方法的异常必须使用try-catch-finally的方式处理异常
方式二:
执行的方法a中,先后又调用了另外几个方法,这几个方法是递进的关系,(方法一的结果传递给方法二,方法二的结果传递给方法三),建议这几个方法使用throws的方式进行处理。而执行的方法a可以考虑使用try-catch-finally的方式处理异常
3.手动处理异常
1.概述:
在程序执行的过程中,除了自动抛出异常对象的情况之外,我们还可以手动的throw一个异常对象。
3.1throw和throws之间的区别
throw:表示抛出一个异常类的对象,生成异常类的对象的过程;声明在方法体内
throws属于异常处理方式的一种,声明在方法体外。
3.2throw典型例题
测试类:
public class StudentTest { public static void main(String[] args) { try { Student student = new Student(); student.regist(-100); System.out.println(student); } catch (Exception e) { e.printStackTrace(); e.getMessage(); } }}Student类:
class Student { private int id; public void regist(int id) throws Exception{//处理方法二抛出一个异常 if (id > 0) { this.id = id; } else {//手动抛出一个异常处理方法1 //throw new RuntimeException("输入的数据有误"); //方式二 //throw new Exception("输入的数据有误"); //方式三,使用自定义异常 throw new MyException("输入的数据为负数"); } } @Override public String toString() { return "Student{" + "id=" + id + '}'; }}手写异常类:
public class MyException extends RuntimeException{ static final long serialVersionUID = 7034897101145766939L; public MyException(){ } public MyException(String msg){ super(msg); }}3.3自定义异常类的实现
实现自定义异常类的步骤:
1.继承于现有的异常结构,RuntimeException,Exception
2.提供全局常量:serialVersionUID
3.提供重载的构造器
样例:
public class MyException extends RuntimeException{ static final long serialVersionUID = 7034897101145766939L; public MyException(){ } public MyException(String msg){ super(msg); }}