Springboot实战:Scheduled优雅的开启定时任务,并配置线程池异步执行(附源码下载)
Springboot-cli 开发脚手架系列
Springboot优雅的开启定时任务Scheduled,并配置线程池异步执行(附源码下载)
文章目录
- Springboot-cli 开发脚手架系列
- 简介
- 前言
-
- 1. 环境
- 2. 开始定时任务
- 3. @Async异步执行定时任务
- 4. 定时任务封装,优雅的执行定时任务
- 5. 最终效果
- 6. 源码分享
简介
Springboot优雅的开启定时任务Scheduled,并配置线程池异步执行,外加封装管理教学,解决定时任务太多,影响性能难管理问题。
前言
我们致力于让开发者快速搭建基础环境并让应用跑起来,提供使用示例供使用者参考,让初学者快速上手。
本博客项目源码地址:
- 项目源码github地址
- 项目源码国内gitee地址
1. 环境
<dependency> <groupId>org.springframework.boot</groupId> <artifactId>spring-boot-starter</artifactId> </dependency>2. 开始定时任务
- 创建定时任务
ScheduleRunner.java
@Component@Slf4jpublic class ScheduleRunner { /** * 每秒 */ @Scheduled(cron = "*/1 * * * * ?") public void everySecond() { log.info("(每秒)定时任务执行了"); }}- 启动类加上
@EnableScheduling
@SpringBootApplication@Slf4j@EnableSchedulingpublic class SchedulerApplication { public static void main(String[] args) { SpringApplication.run(SchedulerApplication.class, args); }}@Scheduled使用说明
我们可以通过在线工具生成cron https://cron.qqe2.com/
# cron : {秒数} {分钟} {小时} {日期} {月份} {星期} {年份(可为空)}# 如:# 每秒@Scheduled(cron = "*/1 * * * * ?")# 每分钟@Scheduled(cron = "0 */1 * * * ?")# 每五分钟@Scheduled(cron = "0 */5 * * * ?")# 每小时@Scheduled(cron = "0 0 */1 * * ?")# 每天上午8点@Scheduled(cron = "0 0 8 * * ?")- 到这里我们的定时任务就基本启动来了,但是当我们需要执行的任务很多时,这种阻塞的写法是不行的,并不能满足我们的性能要求,接下来教大家如何配置异步定时任务。
3. @Async异步执行定时任务
- 首先我们需要开启Springboot线程池
ExecutorConfig.java
/** * 配置我们定时任务的线程池 * * @author ding */@Configuration@EnableAsync@Slf4jpublic class ExecutorConfig implements AsyncConfigurer { /** * 设置核心线程数 */ private static final int CORE_POOL_SIZE = 4; /** * 设置最大线程数,只有在缓冲队列满了之后才会申请超过核心线程数的线程 */ private static final int MAX_POOL_SIZE = 8; /** * 设置缓冲队列大小 */ private static final int QUEUE_CAPACITY = 100; /** * 设置线程的最大空闲时间,超过了核心线程数之外的线程,在空闲时间到达之后会被销毁 */ private static final int KEEP_ALIVE_SECONDS = 60; /** * 设置线程名字的前缀,设置好了之后可以方便我们定位处理任务所在的线程池 */ private static final String NAME_PREFIX = "定时任务线程"; @Bean(name = "scheduleExecutor") public Executor asyncServiceExecutor() { log.info("开启SpringBoot的线程池!"); ThreadPoolTaskExecutor executor = new ThreadPoolTaskExecutor(); executor.setCorePoolSize(CORE_POOL_SIZE); executor.setMaxPoolSize(MAX_POOL_SIZE); executor.setQueueCapacity(QUEUE_CAPACITY); executor.setKeepAliveSeconds(KEEP_ALIVE_SECONDS); executor.setThreadNamePrefix(NAME_PREFIX); // 设置拒绝策略:当线程池达到最大线程数时,如何处理新任务 // CALLER_RUNS:在添加到线程池失败时会由主线程自己来执行这个任务, // 当线程池没有处理能力的时候,该策略会直接在execute方法的调用线程中运行被拒绝的任务;如果执行程序已被关闭,则会丢弃该任务 executor.setRejectedExecutionHandler(new ThreadPoolExecutor.CallerRunsPolicy()); executor.initialize(); return executor; } @Override public Executor getAsyncExecutor() { return asyncServiceExecutor(); } @Override public AsyncUncaughtExceptionHandler getAsyncUncaughtExceptionHandler() { return (ex, method, params) -> log.error(String.format("执行异步任务'%s'", method), ex); }}- 然后我们在定时任务上加
@Async("scheduleExecutor")启动异步就可以啦
@Component@Slf4jpublic class ScheduleRunner { /** * 每秒 */ @Scheduled(cron = "*/1 * * * * ?") @Async("scheduleExecutor") public void everySecond() { log.info("(每秒)定时任务执行了"); }}4. 定时任务封装,优雅的执行定时任务
- 创建接口
ScheduleService.java,具体的执行时间自行修改
/** * 定时任务 * * @author qiding */public interface ScheduleService { /** * 每秒 */ default void everySecond(){} /** * 每分钟 */ default void everyMinute(){} /** * 每五分钟 */ default void everyFiveMinute(){} /** * 每小时 */ default void everyHour(){} /** * 每天上午8点 */ default void everyDayEightClock(){}}- 修改我们的
ScheduleRunner.java
这里我们利用了多态的原理,让springboot加载所有实现了ScheduleService的bean,然后统一执行。
/** * 统一执行定时任务,减少系统开销 * {秒数} {分钟} {小时} {日期} {月份} {星期} {年份(可为空)} * @author qiding */@Component@Slf4j@RequiredArgsConstructorpublic class ScheduleRunner { /** * 装配所有定时任务 */ private final List<ScheduleService> scheduleServiceList; /** * 每秒 */ @Scheduled(cron = "*/1 * * * * ?") @Async("scheduleExecutor") public void everySecond() { scheduleServiceList.forEach(ScheduleService::everySecond); } /** * 每分钟 */ @Scheduled(cron = "0 */1 * * * ?") @Async("scheduleExecutor") public void everyMinute() { scheduleServiceList.forEach(ScheduleService::everyMinute); } /** * 每五分钟 */ @Scheduled(cron = "0 */5 * * * ?") @Async("scheduleExecutor") public void everyFiveMinute() { scheduleServiceList.forEach(ScheduleService::everyFiveMinute); } /** * 每小时 */ @Scheduled(cron = "0 0 */1 * * ?") @Async("scheduleExecutor") public void everyHour() { scheduleServiceList.forEach(ScheduleService::everyHour); } /** * 每天上午8点 */ @Scheduled(cron = "0 0 8 * * ?") @Async("scheduleExecutor") public void everyDayEightClock() { scheduleServiceList.forEach(ScheduleService::everyDayEightClock); }}- 接下来在我们需要创建定时任务的时候,只要重写
ScheduleService.java接口编写我们的业务逻辑就可以啦 - 示例1
/** * 执行示例 * * @author ding */@Component@Slf4jpublic class Test1TaskImpl implements ScheduleService { @Override public void everySecond() { log.info("(每秒)定时任务执行了"); }}- 示例2
/** * * 执行示例 * * @author ding */@Component@Slf4jpublic class Test2TaskImpl implements ScheduleService { @Override public void everyMinute() { log.info("(每分钟)定时任务执行了"); }}5. 最终效果
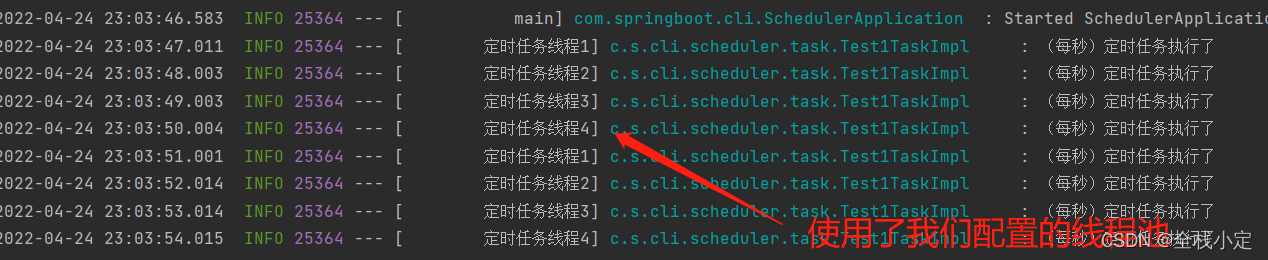
6. 源码分享
本项目已收录
- Springboot-cli开发脚手架,集合各种常用框架使用案例,完善的文档,致力于让开发者快速搭建基础环境并让应用跑起来,并提供丰富的使用示例供使用者参考,帮助初学者快速上手。
- 项目源码github地址
- 项目源码国内gitee地址
 创作打卡挑战赛
  赢取流量/现金/CSDN周边激励大奖天天排行榜