跨域处理(个人方案 nginx +网络方案)
个人方案
目前公司在开发web应用时,普遍采取的是前后端分离的方式,将前后端的开发人员开发代码分开,后台使用java语言,前端使用node.js环境,vue语言开发,初期开发使用mock数据不依赖后台服务;一个项目评审后各自搭建工程,后端开发接口,前端开发页面,两者互不影响,等到开发完成花几天的时间进行联调,部署发布上线时,前端静态资源放在CDN,将编译后的静态html页面提供给后端,部署;好处是解放了前端和后端在一套工程中开发时出现的各种模糊职责,刷锅的问题,调试问题……那后端在整合前端静态html页面时有哪几种方式呢 ?
一种是将html放在后台程序中;一种是另外搭建一个应用只放前端的html页面;还有一种是在nginx服务器上部署;
nginx反向代理
nginx是一个反向代理服务器,主要功能为实现负载均衡和动静分离。nginx将 后台本地接口转 发到服务器,前端只要调用动态数据接口,就可以请求到第三方的json数据进行界面的渲染。
windows下安装nginx
参考文档https://www.cnblogs.com/xishaohui/p/8664814.html
下载nginx:http://nginx.org/en/download.html Stable version(稳定版)
双击nginx.exe运行(运行即安装),如果报错:“nginx: [emerg] bind() to 0.0.0.0:80 failed (10013: An attempt was made to access a socket in a way forbidden by its access permissions)”,说明80端口被占用了,cmd ==> netstat -aon|findstr “80” 查询谁占了80端口,到任务管理器关闭对应的进程(tasklist|findstr “80端口对应的任务进程”),重新双击nginx.exe。
运行nginx.exe。
测试http://localhost:端口/ 或者任务管理器可以看到进程
nginx如何配置可以访问远程主机资源
例如:
nginx安装在192.168.64.100上 图片 1.png 在192.168.64.102主机的路径为/tmp/images/1.png
现在需要使用image.xyz.com/images/1.png访问1.png这张图片 。upstream + 代理名字 upstream模块中即指定反向代理的ip跟端口 对应你的应该写192.168.64.100+端口 ftp服务的话是 61 端口 web服务的话是 80 端口。
- 192.168.64.102上需要一台webservice 或者ftp service 来应答你的文件请求
- 192.168.64.100 也就是你的nginx服务器, 需要开启反向代理功能, 将请求静态文件的请求分发到192.168.64.102上
- nginx反向代理的配置很简单 以下是我的一段代理node.js的配置
http { includemime.types; default_type application/octet-stream; access_log /var/log/nginx/error.log combined; sendfile on; keepalive_timeout 65; gzip on; upstream sample {server 127.0.0.1:8000; } server {server_name server.waji.com;location / { index index.jsp index.html index.htm; proxy_redirect off; proxy_set_header Host $host; proxy_set_header X-Real-IP $remote_addr; proxy_set_header X-Forwarded-For $proxy_add_x_forwarded_for; proxy_pass http://servershost;} error_page 500 502 503 504 /50x.html; location = /50x.html { root html; } } server { listen 80;server_name supplier.rainbow.com; location / { proxy_pass http://localhost:8081; #前端项目 } location ~ \.do$ { rewrite ^(.*)$ /supplier$1 break; proxy_pass http://localhost:10000; #后台 } } }- 你需修改location后边 /代表所有类型的请求 假设你只想把png的分发出去 使用正则匹配 *.png即可
- nginx配置文件中有用#注释的 里面就有匹配规则 如果你能给加上缓存 那样就更好了
nginx提供的反向代理服务很稳定,只要修改下nginx.conf文件就可以,如图:
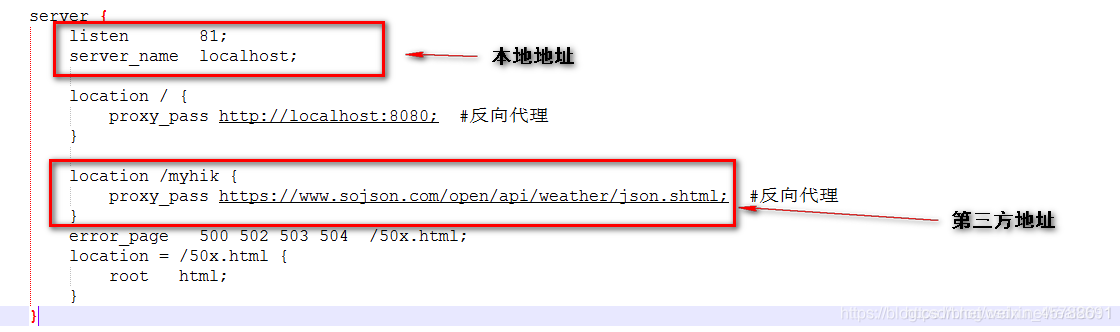
本地调用的服务都走localhost:81这个地址,访问第三方接口可走localhost:81/myhik,访问本地其他资源走localhost:81/即可,最后输入命令nginx -s reload 重新加载下就可以。
//登录dologin: function() {const that = thisconsole.log(that.userAccount,that.userPassword)if(that.empty) {uni.showToast({title: "账号/密码不能为空",icon: "none",duration: 2000})return}util.ajax({url: '/system/login.do',data: {userAccount: that.userAccount,userPassword: that.userPassword},success: function(result) {const user = result.data.useruni.setStorage({key: "useruuid",data: user.useruuid})getApp({allowDefault: true}).globalData.user = userconsole.log("用户已登录")that.goyemian()}})},网络方案
方案1.后台更改header
#协议跨域
http://a.baidu.com访问https://a.baidu.com;
#端口跨域
http://a.baidu.com:8080访问http://a.baidu.com:80;
#域名跨域
http://a.baidu.com访问http://b.baidu.com;
header('Access-Control-Allow-Origin:*');//允许所有来源访问 header('Access-Control-Allow-Method:POST,GET');//允许访问的方式 方案2.使用JQuery提供的jsonp
methods: { getData () { var self = this $.ajax({url: 'http://f.apiplus.cn/bj11x5.json',type: 'GET',dataType: 'JSONP',success: function (res) { self.data = res.data.slice(0, 3) self.opencode = res.data[0].opencode.split(',')} }) } } 方案3.用http-proxy-middleware 代理解决(vue-cli脚手架搭建)
例如请求的url:“http://f.apiplus.cn/bj11x5.json”
- 打开config/index.js,在proxyTable中添写如下代码
此处方法较为传统
proxyTable: { '/api': { //使用"/api"来代替"http://f.apiplus.c" target: 'http://f.apiplus.cn', //源地址 changeOrigin: true, //改变源 pathRewrite: {'^/api': 'http://f.apiplus.cn' //路径重写} } }- 使用axios请求数据时直接使用“/api”:
getData () { axios.get('/api/bj11x5.json', function (res) { console.log(res) })通过这中方法去解决跨域,打包部署时还按这种方法会出问题。解决方法如下:
let serverUrl = '/api/' //本地调试时 // let serverUrl = 'http://f.apiplus.cn/' //打包部署上线时 export default { dataUrl: serverUrl + 'bj11x5.json' }**方案4.插件处理~jquery **
1.下载依赖
cnpm install jquery --save-dev2.在webpack.base.conf.js文件中加入
plugins: [ new webpack.ProvidePlugin({ $: "jquery", jQuery: "jquery" }) ],3.在需要的temple里引入也可以在main.js里全局引入
import $ from 'jquery'eg:
<template> <div class="source"> source{{data}} </div></template><script>import $ from 'jquery' export default({ name:"source", data(){ return{ data:"" } }, created(){ this.getData() }, methods:{ getData () { var self = this $.ajax({ url: '你要请求的url', type: 'GET', dataType: 'JSONP', success: function (res) { self.data = res.result } }) } } })</script><style></style>