鸿蒙网络数据传输案例实战_鸿蒙应用怎么写一个网络传输的demo
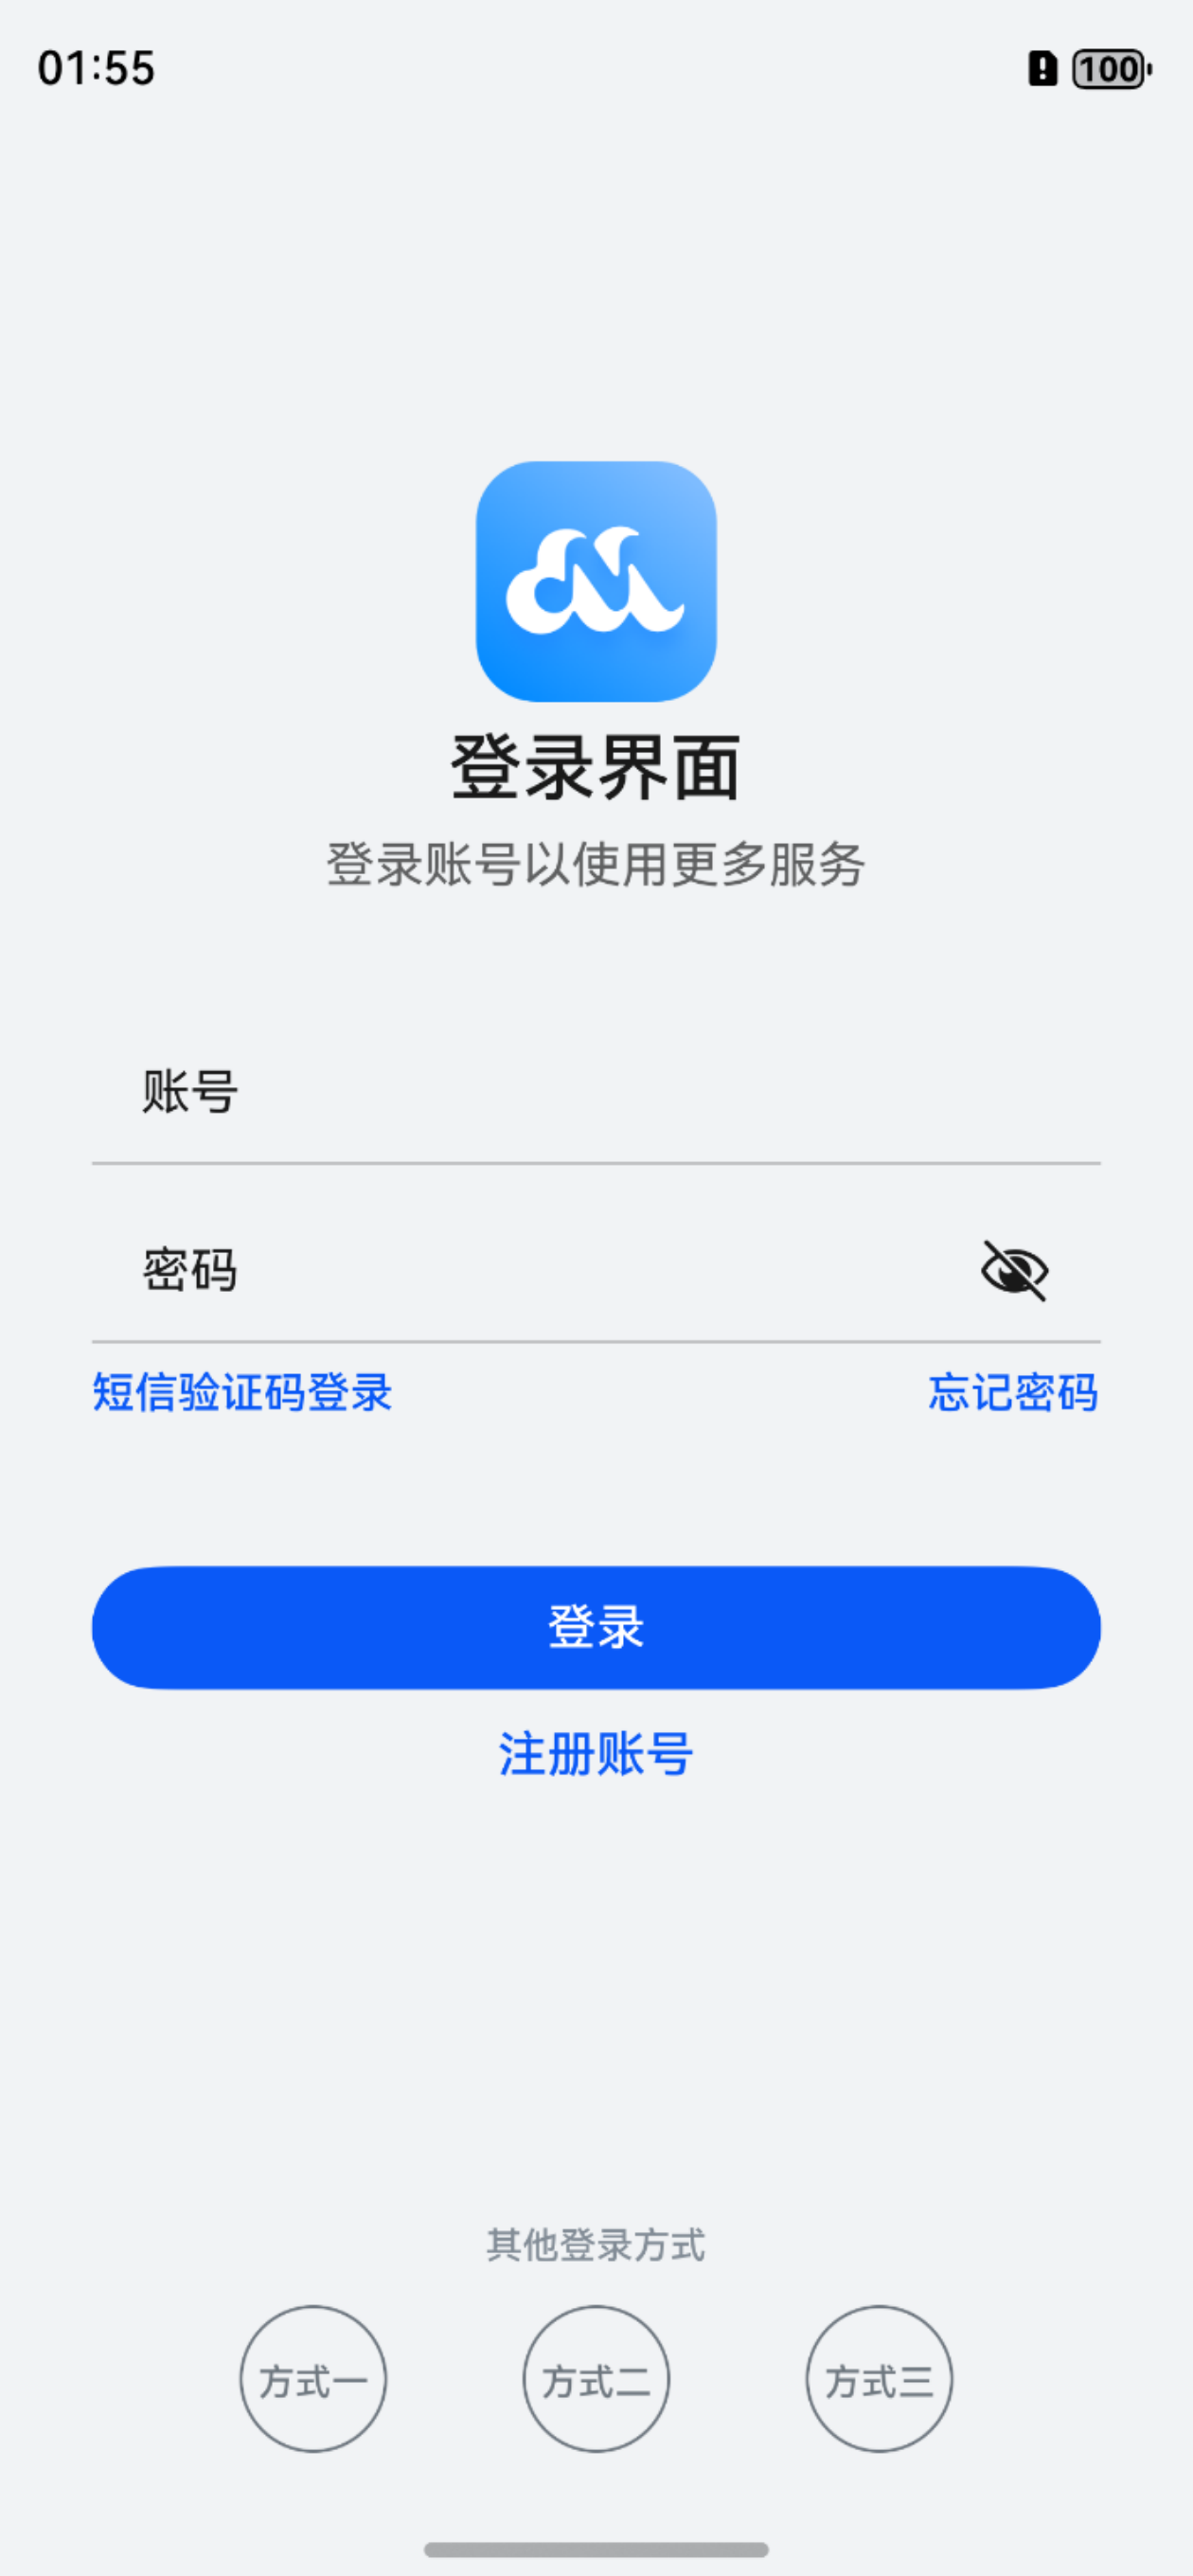
一、案例效果截图

二、案例运用到的知识点
- 核心知识点
- 网络连接管理:connection模块
- HTTP数据请求:http模块
- RPC数据请求:rcp模块
- 文件管理能力:fileIo模块、fileUri模块
- 其他知识点
- ArkTS 语言基础
- V2版状态管理:@ComponentV2/@Local
- 渲染控制:if/ForEach
- 自定义组件和组件生命周期
- 自定义构建函数@Builder
- @Extend:定义扩展样式
- Navigation:导航组件
- 内置组件:Stack/TabBar/Progress/Image/Column/Row/Text/TextInput/Button/Line/Blank/SymbolGlyph
- 常量与资源分类的访问
- MVVM模式
三、代码结构
├──entry/src/main/ets // 代码区│ ├──common│ │ └──network│ │ ├──ConnectionUtils.ets│ │ ├──HttpUtils.ets│ │ └──RCPUtils.ets│ ├──entryability │ │ └──EntryAbility.ets // 程序入口类│ ├──pages│ │ ├──LoginPage.ets // 登录页面│ │ └──MainPage.ets // 主页面│ ├──view│ │ ├──Home.ets // 首页组件│ │ └──Setting.ets // 我的组件│ └──viewmodel│ ├──ResponseData│ │ ├──ListInfo.ets // 列表数据模型│ │ ├──ResponseData.ets // 响应结果模型│ │ └──Value.ets // 响应数据模型│ ├──ItemData.ets // 页面数据模型│ └──MainViewModel.ets // 绑定数据到组件并提供接口└──entry/src/main/resources ├──base │ ├──element // 尺寸、颜色、文字等资源文件存放位置 │ ├──media // 媒体资源存放位置 │ └──profile // 页面配置文件存放位置 └──rawfile // 本地html代码存放位置 四、公共文件与资源
本案例涉及到的资源文件如下:
- entry/src/main/resources/base/element/string.json
- entry/src/main/resources/base/element/float.json
- entry/src/main/resources/base/element/color.json
其他资源请到源码中获取。
五、网络状态监听的实现
我们希望在首页登录时,不仅对账号和密码进行非空校验,还需要对网络状态进行检测。在没有网络的情况下,拒绝登录操作,并提示用户网络未连接。
- 网络连接工具类
首先,我们可以在ets目录下创建一个common文件夹,用于存放一些公共能力。
随后在common文件夹下创建network文件夹,并创建ConnectionUtils.ets文件(网络连接工具类),我们将在该文件实现网络状态监听的功能。
// entry/src/main/ets/common/network/ConnectionUtils.etsimport { connection } from \'@kit.NetworkKit\'import { BusinessError } from \'@kit.BasicServicesKit\'import { promptAction } from \'@kit.ArkUI\'import { hilog } from \'@kit.PerformanceAnalysisKit\'const TAG: string = \'ConnectionUtils\'/** * ConnectionUtils 提供网络监听功能。 */export class ConnectionUtils { netConnection = connection.createNetConnection() /** * 检查网络是否连接的方法。 */ async isNetworkConnected(): Promise { let result: boolean = false await connection.getDefaultNet().then(async (data: connection.NetHandle) => { if (data.netId === 0) { hilog.info(0x0000, TAG, \'网络错误\') return } await connection.getNetCapabilities(data).then( (data: connection.NetCapabilities) => { let bearerTypes: Set = new Set(data.bearerTypes) let bearerTypesNum = Array.from(bearerTypes.values()) for (let item of bearerTypesNum) { if (item === 0) { result = true hilog.info(0x0000, TAG, \'蜂窝网络\') } else if (item === 1) { result = true hilog.info(0x0000, TAG, \'WiFi\') } else if (item === 3) { result = true hilog.info(0x0000, TAG, \'以太网\') } else { return } } }) }) return result } /** * 打开网络注册的方法。 */ openRegister() { this.netConnection.register((error: BusinessError) => { hilog.info(0x0000, TAG, JSON.stringify(error)) }) } /** * 监听网络状态变化的方法。 */ registerNetworkAvailableStatus() { this.netConnection.on(\'netAvailable\', () => { promptAction.showToast({ message: $r(\'app.string.Network_Available\'), duration: 2000 }) }) this.netConnection.on(\'netUnavailable\', () => { promptAction.showToast({ message: $r(\'app.string.Network_Unavailable\'), duration: 2000 }) }) this.netConnection.on(\'netLost\', () => { promptAction.showToast({ message: $r(\'app.string.Network_Lost\'), duration: 2000 }) }) } /** * 关闭网络注册的方法。 */ closeRegister() { this.netConnection.unregister((error: BusinessError) => { hilog.info(0x0000, TAG, JSON.stringify(error)) }) }}export default new ConnectionUtils()关键代码说明:
- 实现是否有网络的校验,需要使用@kit.NetworkKit的connection模块,首先我们定义一个名为isNetworkConnected()的方法用于判断是否有网络连接,所以该函数应该返回一个布尔值。而具体的方法实现,需要使用connection模块提供的connection.getDefaultNet()方法,该方法可以获取到当前连接网络的信息,同时也可以判断是否有网络连接。connection模块还提供了connection.getNetCapabilities()方法,可以获取当前网络的具体信息,包括网络类型、网络具体能力等。
- 监听网络状态的registerNetworkAvailableStatus()方法中,我们主要通过模块提供的on(\'netAvailable\')、on(\'netUnavailable\')和on(\'netLost\')三个方法,分别监听网络可用、网络不可用、网络丢失三种状态,并在监听到网络状态改变时,弹窗提醒用户。
- 添加访问权限
在实现网络连接工具类的封装前,首先需要申请权限,在entry/src/main目录下的module.json5中,添加网络访问权限和网络信息查看权限。
{ \"module\": { // ... \"requestPermissions\": [ { \"name\": \"ohos.permission.INTERNET\", \"reason\": \"$string:Internet\", \"usedScene\": { \"abilities\": [ \"EntryAbility\" ], \"when\": \"inuse\" } }, { \"name\": \"ohos.permission.GET_NETWORK_INFO\", \"reason\": \"$string:network_info\", \"usedScene\": { \"abilities\": [ \"EntryAbility\" ], \"when\": \"inuse\" } } ] }}- 登录页面实现监听逻辑
// entry/src/main/ets/pages/LoginPage.etsimport { promptAction } from \'@kit.ArkUI\'import ConnectionUtils from \'../common/network/ConnectionUtils\'@Extend(TextInput)function inputStyle() { .placeholderColor($r(\'sys.color.font_primary\')) .height(\'45vp\') .fontSize(\'18fp\') .backgroundColor(\'#F1F3F5\') .width(\'328vp\') .margin({ top: 12 })}@Extend(Line)function lineStyle() { .width(\'328vp\') .height(\'1vp\') .backgroundColor($r(\'sys.color.font_fourth\'))}@Extend(Text)function blueTextStyle() { .fontColor($r(\'sys.color.brand\')) .fontSize(\'14fp\') .fontWeight(FontWeight.Medium)}@Entry@Componentstruct LoginPage { @State account: string = \'\' @State password: string = \'\' @State isShowProgress: boolean = false private timeOutId: number = -1 pathStack: NavPathStack = new NavPathStack() @Builder imageButton(src: Resource) { Button({ type: ButtonType.Circle, stateEffect: true }) { Image(src) } .height(\'48vp\') .width(\'48vp\') .backgroundColor(\'#F1F3F5\') } login(result: boolean): void { if (this.account === \'\' || this.password === \'\') { promptAction.showToast({ message: $r(\'app.string.input_empty_tips\') }) } else { this.isShowProgress = true if (this.timeOutId === -1) { this.timeOutId = setTimeout(async () => { this.isShowProgress = false this.timeOutId = -1 if (result) { this.pathStack.pushPathByName(\'MainPage\', null) } else { promptAction.showToast({ message: $r(\'app.string.Network_Lost\') }) } }, 2000) } } } aboutToDisappear() { clearTimeout(this.timeOutId) this.timeOutId = -1 } build() { Navigation(this.pathStack) { Column() { Image($r(\'app.media.logo\')) .width(\'78vp\') .height(\'78vp\') .margin({ top: \'150vp\', bottom: \'8vp\' }) Text($r(\'app.string.login_page\')) .fontSize(\'24fp\') .fontWeight(FontWeight.Medium) .fontColor($r(\'sys.color.font_primary\')) Text($r(\'app.string.login_more\')) .fontSize(\'16fp\') .fontColor($r(\'sys.color.font_secondary\')) .margin({ bottom: \'30vp\', top: \'8vp\' }) TextInput({ placeholder: $r(\'app.string.account\') }) .maxLength(11) .type(InputType.Number) .inputStyle() .onChange((value: string) => { this.account = value }) Line() .lineStyle() TextInput({ placeholder: $r(\'app.string.password\') }) .maxLength(8) .type(InputType.Password) .inputStyle() .onChange((value: string) => { this.password = value }) Line() .lineStyle() Row() { Text($r(\'app.string.message_login\')) .blueTextStyle() Text($r(\'app.string.forgot_password\')) .blueTextStyle() } .justifyContent(FlexAlign.SpaceBetween) .width(\'328vp\') .margin({ top: \'8vp\' }) Button($r(\'app.string.login\'), { type: ButtonType.Capsule }) .width(\'328vp\') .height(\'40vp\') .fontSize(\'16fp\') .fontWeight(FontWeight.Medium) .backgroundColor($r(\'sys.color.brand\')) .margin({ top: \'48vp\', bottom: \'12vp\' }) .onClick(async () => { await ConnectionUtils.isNetworkConnected().then((value) => { this.login(value) }) }) Text($r(\'app.string.register_account\')) .fontColor($r(\'sys.color.brand\')) .fontSize(\'16fp\') .fontWeight(FontWeight.Medium) if (this.isShowProgress) { LoadingProgress() .color($r(\'sys.color.font_primary\')) .width(\'30vp\') .height(\'30vp\') .margin({ top: \'20vp\' }) } Blank() Text($r(\'app.string.other_login_method\')) .fontColor(\'#838D97\') .fontSize(\'12fp\') .fontWeight(FontWeight.Medium) .margin({ top: \'50vp\', bottom: \'12vp\' }) Row({ space: 44 }) { this.imageButton($r(\'app.media.login_method1\')) this.imageButton($r(\'app.media.login_method2\')) this.imageButton($r(\'app.media.login_method3\')) } .margin({ bottom: \'16vp\' }) } .height(\'100%\') .width(\'100%\') .padding({ left: \'12vp\', right: \'12vp\', bottom: \'24vp\' }) } .backgroundColor(\'#F1F3F5\') .width(\'100%\') .height(\'100%\') .hideTitleBar(true) .hideToolBar(true) }}关键代码说明:
- ConnectionUtils.isNetworkConnected(),检查网络连接情况。
- login(result: boolean): void {...},登录按钮点击的回调方法。
- if (result) { this.pathStack.pushPathByName(\'MainPage\', null) },当网络连接正常(result值为true)时,跳转到MainPage页面。
六、使用HTTP请求网络数据
完成了网络状态的校验后,接下来需要进行网络请求了。我们可以通过@kit.NetworkKit中的http模块,完成网络请求的实现。
- 页面路由
本案例通过Navigation组件实现登录页到主要页的跳转,路由配置如下:
// entry/src/main/resources/base/profile/route_map.json{ \"routerMap\": [ { \"name\": \"MainPage\", \"pageSourceFile\": \"src/main/ets/pages/MainPage.ets\", \"buildFunction\": \"MainPageBuilder\", \"data\": { \"description\" : \"this is mainPage\" } } ]}引用配置文件的设置:
// entry/src/main/module.json5{ \"module\": { //... \"routerMap\": \"$profile:route_map\"}- MainPage首页
// entry/src/main/ets/pages/MainPage.etsimport Home from \'../view/Home\'import Setting from \'../view/Setting\'@Builderexport function MainPageBuilder() { MainPage()}@Componentexport struct MainPage { @State currentIndex: number = 0 private tabsController: TabsController = new TabsController() @Builder tabBuilder(title: Resource, index: number, selectedImg: Resource) { Column() { SymbolGlyph(selectedImg) .fontSize(\'24fp\') .renderingStrategy(SymbolRenderingStrategy.MULTIPLE_OPACITY) .symbolEffect( new BounceSymbolEffect(EffectScope.WHOLE, EffectDirection.UP), this.currentIndex === index ? true : false ) .fontColor(this.currentIndex === index ? [\'#0a59f7\'] : [\'#66000000\']) Text(title) .margin({ top: \'4vp\' }) .fontSize(\'10fp\') .fontWeight(500) .fontColor(this.currentIndex === index ? \'#0a59f7\' : \'#66000000\') } .backgroundColor(\'#F1F3F5\') .justifyContent(FlexAlign.Center) .height(\'56vp\') .width(\'100%\') .onClick(() => { this.currentIndex = index this.tabsController.changeIndex(this.currentIndex) }) } build() { NavDestination() { Tabs({ barPosition: BarPosition.End, controller: this.tabsController }) { TabContent() { Home() } .padding({ left: \'12vp\', right: \'12vp\' }) .backgroundColor(\'#F1F3F5\') .tabBar(this.tabBuilder( $r(\'app.string.Tab_Bar_One\'), 0, $r(\'sys.symbol.house_fill\') )) TabContent() { Setting() } .padding({ left: \'12vp\', right: \'12vp\' }) .backgroundColor(\'#F1F3F5\') .tabBar(this.tabBuilder( $r(\'app.string.Tab_Bar_Two\'), 1, $r(\'sys.symbol.person_crop_circle_fill_1\') )) } .margin({ bottom: \'64vp\' }) .width(\'100%\') .height(\'100%\') .barHeight(\'80vp\') .barMode(BarMode.Fixed) .onChange((index: number) => { this.currentIndex = index }) } .height(\'100%\') .hideTitleBar(true) .backgroundColor(\'#F1F3F5\') }}关键代码说明:
- TabContent() { Home() },第一个tab页面内容为Home组件。
- TabContent() { Setting() },第二个tab页面内容为Setting组件。
- 实现HTTP工具类
首先,我们可以继续在network文件夹下,创建一个HttpUtils.ets文件(HTTP工具类),我们将在该文件中实现关于HTTP网络请求的主要功能。
简单分析一下该工具类需要完成的主要功能:
- 使用HTTP发起get请求,获取一张箭头图片并保存在沙箱路径中,并返回其沙箱路径对应的uri,以便使用箭头图片作为首页列表的布局元素。
- 使用HTTP发起post请求,获取官网中的图片与文本信息,并将其封装在实体类数组中,以便将这些信息作为首页列表的布局元素。
具体代码如下:
// entry/src/main/ets/common/network/HttpUtils.etsimport { http } from \'@kit.NetworkKit\'import { fileIo, fileUri } from \'@kit.CoreFileKit\'import { hilog } from \'@kit.PerformanceAnalysisKit\'import ResponseData from \'../../viewmodel/ResponseData/ResponseData\'import ListInfo from \'../../viewmodel/ResponseData/ListInfo\'const TAG: string = \'HttpUtils\'const IMAGE_URL: string = \'https://developer.huawei.com/system/modules/\' + \'org.opencms.portal.template.core/\' + \'resources/harmony/img/jiantou_right.svg\'const RESOURCE_URL: string = \'https://svc-drcn.developer.huawei.com/\' + \'community/servlet/consumer\' + \'/partnerActivityService/v1/developer/activity/terminalActivities/list\'/** * 头部信息类。 */class Header { contentType: string constructor(contentType: string) { this.contentType = contentType }}/** * HttpUtils 提供通过 HTTP 访问网络的能力。 */export class HttpUtils { httpRequest: http.HttpRequest constructor() { this.httpRequest = http.createHttp() } /** * 通过 HTTP 发起 GET 请求的方法。 */ async getHttpRequest(cacheDir: string): Promise { let responsePictureUri: string = \'\' await this.httpRequest.request(IMAGE_URL, { method: http.RequestMethod.GET }) .then((data: http.HttpResponse) => { let filePath = cacheDir + \'/test.svg\' let file = fileIo.openSync( filePath, fileIo.OpenMode.CREATE | fileIo.OpenMode.READ_WRITE ) responsePictureUri = fileUri.getUriFromPath(filePath) fileIo.writeSync(file.fd, data.result as ArrayBuffer) fileIo.closeSync(file.fd) }) return responsePictureUri } /** * 通过 HTTP 发起 POST 请求的方法。 */ async postHttpRequest(): Promise { let responseData: Array = [] await this.httpRequest.request(RESOURCE_URL, { method: http.RequestMethod.POST, extraData: { \'status\': \'1\', \'belong\': \'1\', \'language\': \'cn\', \'needTop\': 1, \'displayChannel\': [1, 3], \'count\': 4, \'pagestart\': 1, \'type\': \'1,4,5,6\' }, header: new Header(\'application/jsoncharset=UTF-8\') }).then((data: http.HttpResponse) => { let result: ResponseData = JSON.parse(data.result as string) responseData = result.value.list }).catch((err: Error) => { hilog.info(0x0000, TAG, JSON.stringify(err)) }) return responseData } /** * 销毁 httpRequest 的方法。 */ destroyHttpRequest() { this.httpRequest.destroy() }}关键代码说明:
- 通过http模块提供的createHttp()方法获取一个HttpRequest对象,HttpRequest类是发起HTTP请求的关键,其中包括request()、requestInStream()、destroy()、on()和off()方法。所以我们封装一个名为HttpUtils的类,并为其添加一个对象httpRequest,并在构造方法中使用createHttp()方法为其赋值,以便后续封装的get请求和post请求能方便的使用到该对象。
- 成功获取到HttpRequest对象并通过构造方法为对象属性httpRequest赋值后,我们将基于该对象属性实现HTTP请求方法的封装,首先是get请求,主要通过request()方法实现,参数主要包括请求的url,发起请求可选参数HttpRequestOptions,以及一个回调函数。所以我们可以通过封装request()方法来实现通过get请求网络图片。
- 在成功使用request()方法发起get请求后,我们可以在回调函数中得到一个HttpResponse类型的对象data。为了将get请求得到的图片资源保存至沙箱路径,我们需要使用@kit.CoreFileKit提供的文件管理能力,创建一个test.svg并写入数据,并将其沙箱文件的uri返回以便后续使用。
- 与get请求一致,我们实现了一个名为postHttpRequest()的方法,其本质依旧是对request()方法的封装,传入网络请求地址url以及网络请求配置参数HttpRequestOptions,并在HttpRequestOptions中规定请求方法为post请求。
- 自定义Header类来为HttpRequestOptions补充响应头的参数,为其配置请求返回类型以及编码格式。
- 将request()方法的参数配置好后,我们可以通过回调函数中的HttpResponse类型的对象data获取返回值,由于响应头配置了返回类型为json格式,我们可以通过JSON.parse()将该json字符串转化为实体类,由于json字符串的结构较为复杂,所以我们需要自定义实体类用于承接,具体我们在viewmodel中创建了一个名为ResponseData的文件夹,并在其中封装了三个实体类,其中的属性名与json字符串中的命名保持一致。
- 在完成了实体类的封装之后,我们只需提取实体类对象中Value属性的list作为返回值。这样,我们就完成postHttpRequest()方法的实现。
- 在最后,我们使用完HttpRequest对象后,需要主动调用destroy()方法进行销毁,这里我们封装了一个destroyHttpRequest()方法来实现。
- 三个实体类
// entry/src/main/ets/viewmodel/ResponseData/ResponseData.etsimport Value from \'./Value\'export default class ResponseData { public code: string public value: Value constructor(code: string, value: Value) { this.code = code this.value = value }}// entry/src/main/ets/viewmodel/ResponseData/Value.etsimport ListInfo from \'./ListInfo\'export default class Value { public list: Array constructor(list: Array) { this.list = list }}// entry/src/main/ets/viewmodel/ResponseData/ListInfo.etsexport default class ListInfo { public activityName: string public theme: string public indexNavPic: string constructor(activityName: string, theme: string, indexNavPic: string) { this.activityName = activityName this.theme = theme this.indexNavPic = indexNavPic }}- Home组件
完成工具类的封装后,我们要通过使用工具类提供的方法来实现首页的列表部分。
// entry/src/main/ets/view/Home.etsimport { common } from \'@kit.AbilityKit\'import mainViewModel from \'../viewmodel/MainViewModel\'import ItemData from \'../viewmodel/ItemData\'import ListInfo from \'../viewmodel/ResponseData/ListInfo\'import { HttpUtils } from \'../common/network/HttpUtils\'/** * Home tab 内容 */@Componentexport default struct Home { @State httpGridItems: Array = [] @State pictureUri: string = \'\' private swiperController: SwiperController = new SwiperController() private context = getContext(this) as common.UIAbilityContext private applicationContext = this.context.getApplicationContext() private cacheDir = this.applicationContext.filesDir async aboutToAppear(): Promise { let httpUtil: HttpUtils = new HttpUtils() await httpUtil.postHttpRequest().then((value : Array)=>{ this.httpGridItems = value }) await httpUtil.getHttpRequest(this.cacheDir).then((value: string) => { this.pictureUri = value }) httpUtil.destroyHttpRequest() } build() { Column() { Text($r(\'app.string.mainPage_tabTitles_home\')) .width(\'100%\') .margin({ top: \'48vp\', bottom: \'12vp\' }) .fontWeight(700) .fontSize(\'26fp\') Scroll() { Column() { Swiper(this.swiperController) { ForEach(mainViewModel.getSwiperImages(), (img: Resource) => { Image(img) .width(\'100%\') .borderRadius(\'16vp\') }, (img: Resource) => JSON.stringify(img.id)) } .autoPlay(true) Grid() { ForEach(mainViewModel.getFirstGridData(), (item: ItemData) => { GridItem() { Column() { Image(item.img) .width(\'40vp\') .height(\'40vp\') Text(item.title) .fontSize(\'12fp\') .margin({ top: \'4vp\' }) } } }, (item: ItemData) => JSON.stringify(item)) } .backgroundImage($r(\'app.media.backgroundImage\')) .backgroundImageSize({ width: \'100%\', height: \'156vp\' }) .columnsTemplate(\'1fr 1fr 1fr 1fr\') .rowsTemplate(\'1fr 1fr\') .columnsGap(\'8vp\') .rowsGap(\'12vp\') .margin({ top: \'12vp\' }) .padding({ top: \'12vp\', bottom: \'12vp\' }) .height(\'156vp\') .backgroundColor(Color.White) .borderRadius(\'16vp\') Text($r(\'app.string.home_list\')) .fontSize(\'18fp\') .fontWeight(700) .width(\'100%\') .margin({ top: \'18vp\', bottom: \'8vp\' }) List() { ForEach(this.httpGridItems, (secondItem: ListInfo) => { ListItem() { Row() { Image(secondItem.indexNavPic) .width(\'130vp\') .height(\'80vp\') .objectFit(ImageFit.TOP_START) .borderRadius(\'8vp\') .margin({ right: \'12vp\' }) Column() { Text(secondItem.activityName).width(\'190vp\').textOverflow({ overflow: TextOverflow.Ellipsis }).maxLines(1).fontSize(\'16fp\').fontWeight(FontWeight.Medium) Text(secondItem.theme).width(\'190vp\').textOverflow({ overflow: TextOverflow.Ellipsis }).maxLines(2).margin({ top: \'4vp\' }).fontSize(\'12fp\').fontColor(\'#99182431\') Row() {Image(this.pictureUri) .width(\'20vp\') .opacity(0.5) } .width(\'170vp\') .margin({ top: \'10.5vp\' }) .justifyContent(FlexAlign.End) .alignItems(VerticalAlign.Bottom) } .alignItems(HorizontalAlign.Start) } .width(\'100%\') .padding({ left: \'12vp\', right: \'12vp\', top: \'12vp\', bottom: \'12vp\' }) .justifyContent(FlexAlign.SpaceBetween) } .margin({ bottom: \'8vp\' }) .borderRadius(\'16vp\') .backgroundColor(\'#ffffff\') .borderRadius($r(\'app.float.home_backgroundImage_borderRadius\')) .align(Alignment.TopStart) .width(\'100%\') }, (secondItem: ListInfo) => JSON.stringify(secondItem)) } .scrollBar(BarState.Off) .width(\'100%\') } } .height(\'660vp\') .align(Alignment.TopStart) .scrollBar(BarState.Off) } .justifyContent(FlexAlign.Start) .alignItems(HorizontalAlign.Start) .width(\'100%\') .height(\'100%\') }}关键代码说明:
- 在Home组件的aboutToAppear生命周期中,通过postHttpRequest()和getHttpRequest()方法,分别获取到列表项中的文字以及图片数据源,和箭头图片的uri,并定义两个状态变量httpGridItems和pictureUri用来获取返回的结果。注意,使用完记得通过封装好的destroyHttpRequest()方法销毁HttpRequest对象。
- 获取到List所需资源并存储到状态变量后,我们通过List组件配合ForEach进行循环渲染,从而实现首页List的渲染。
七、使用RCP请求网络数据
我们不仅可以通过HTTP访问网络,还可以通过RCP发起网络请求实现相同的功能。
- 实现思路
同样的,我们可以在network目录下创建一个RCP工具类(RCPUtils.ets),在该文件下实现RCP请求网络数据的功能。
与HTTP工具类实现类似,我们也简单分析一下该工具类需要完成的主要功能:
- 使用RCP发起get请求,获取一张箭头图片并保存在沙箱路径中,并返回其沙箱路径对应的uri,以便使用箭头图片作为首页列表的布局元素。
- 使用RCP发起post请求,获取官网中的图片与文本信息,并将其封装在实体类数组中,以便将这些信息作为首页列表的布局元素。
- RCP工具类
// entry/src/main/ets/common/network/RCPUtils.etsimport { rcp } from \'@kit.RemoteCommunicationKit\'import { fileIo, fileUri } from \'@kit.CoreFileKit\'import { BusinessError } from \'@kit.BasicServicesKit\'import { hilog } from \'@kit.PerformanceAnalysisKit\'import ResponseData from \'../../viewmodel/ResponseData/ResponseData\'import ListInfo from \'../../viewmodel/ResponseData/ListInfo\'const TAG: string = \'RCPUtils\'const list_source: string = \'https://svc-drcn.developer.huawei.com/\' + \'community/servlet/consumer/\' + \'partnerActivityService/v1/developer/activity/terminalActivities/list\'/** * RCPUtils 提供通过 RCP 访问网络的能力 */export class RCPUtils { rcpSession: rcp.Session constructor() { this.rcpSession = rcp.createSession() } /** * 通过 RCP 发起 GET 请求的方法 */ async getRCPRequest(cacheDir: string): Promise { let responsePictureUri: string = \'\' await this.rcpSession.get(\'https://developer.huawei.com/system/\' + \'modules/org.opencms.portal.template.core/\' + \'resources/harmony/img/jiantou_right.svg\') .then((response) => { let filePath = cacheDir + \'/test.svg\' let file = fileIo.openSync( filePath, fileIo.OpenMode.CREATE | fileIo.OpenMode.READ_WRITE ) responsePictureUri = fileUri.getUriFromPath(filePath) fileIo.writeSync(file.fd, response.body) fileIo.closeSync(file.fd) }).catch((err: BusinessError) => { hilog.error( 0x0000, TAG, `错误: 错误代码 ${err.code}, 错误信息 ${JSON.stringify(err)}` ) }) return responsePictureUri } /** * 通过 RCP 发起 POST 请求的方法 */ async postRCPRequest(): Promise { let responseData: Array = [] let requestContent: rcp.RequestContent = { \'status\': \'1\', \'belong\': \'1\', \'language\': \'cn\', \'needTop\': 1, \'displayChannel\': [1, 3], \'count\': 4, \'pagestart\': 1, \'type\': \'1,4,5,6\' } await this.rcpSession.post(list_source, requestContent).then((response) => { let result: ResponseData = response.toJSON() as ResponseData responseData = result.value.list }).catch((err: BusinessError) => { hilog.error( 0x0000, TAG, `错误: 错误代码 ${err.code}, 错误信息 ${JSON.stringify(err)}` ) }) return responseData } /** * 关闭 RCP 会话的方法 */ destroySession() { this.rcpSession.close() }}关键代码说明:
- 通过@kit.RemoteCommunicationKit中的rcp模块来使用RCP能力。
- 在使用RCP发起网络请求前,首先需要获取一个Session类型的网络会话对象,在这里,我们将该类型的对象作为工具类的对象属性,并在构造方法中通过模块提供的rcp.createSession()方法为该对象属性赋值,以便后续方便的使用它。
- 完成了获取网络会话对象Session后,我们就可以进一步封装get请求和post请求获取网络信息的方法了。网络会话对象Session提供了get()方法与post()方法,可以用于实现发起get请求和post请求,具体实现与http模块类似。
- 最后,我们还需要像HTTP工具类一样,封装一个销毁会话对象的方法,需要使用会话对象的close()方法。
- 使用RCP工具类实现首页列表
完成RCP工具类的封装后,我们也可以通过RCP请求网络数据。
// entry/src/main/ets/view/Home.etsimport { rcp } from \'@kit.RemoteCommunicationKit\'import { fileIo, fileUri } from \'@kit.CoreFileKit\'import { BusinessError } from \'@kit.BasicServicesKit\'import { hilog } from \'@kit.PerformanceAnalysisKit\'import ResponseData from \'../../viewmodel/ResponseData/ResponseData\'import ListInfo from \'../../viewmodel/ResponseData/ListInfo\'const TAG: string = \'RCPUtils\'const list_source: string = \'https://svc-drcn.developer.huawei.com/\' + \'community/servlet/consumer/\' + \'partnerActivityService/v1/developer/activity/terminalActivities/list\'/** * RCPUtils 提供通过 RCP 访问网络的能力 */export class RCPUtils { rcpSession: rcp.Session constructor() { this.rcpSession = rcp.createSession() } /** * 通过 RCP 发起 GET 请求的方法 */ async getRCPRequest(cacheDir: string): Promise { let responsePictureUri: string = \'\' await this.rcpSession.get(\'https://developer.huawei.com/system/modules\' + \'/org.opencms.portal.template.core/\' + \'resources/harmony/img/jiantou_right.svg\') .then((response) => { let filePath = cacheDir + \'/test.svg\' let file = fileIo.openSync( filePath, fileIo.OpenMode.CREATE | fileIo.OpenMode.READ_WRITE ) responsePictureUri = fileUri.getUriFromPath(filePath) fileIo.writeSync(file.fd, response.body) fileIo.closeSync(file.fd) }).catch((err: BusinessError) => { hilog.error( 0x0000, TAG, `err: err code is ${err.code}, err message is ${JSON.stringify(err)}` ) }) return responsePictureUri } /** * 通过 RCP 发起 POST 请求的方法 */ async postRCPRequest(): Promise { let responseData: Array = [] let requestContent: rcp.RequestContent = { \'status\': \'1\', \'belong\': \'1\', \'language\': \'cn\', \'needTop\': 1, \'displayChannel\': [1, 3], \'count\': 4, \'pagestart\': 1, \'type\': \'1,4,5,6\' } await this.rcpSession.post(list_source, requestContent).then((response) => { let result: ResponseData = response.toJSON() as ResponseData responseData = result.value.list }).catch((err: BusinessError) => { hilog.error( 0x0000, TAG, `err: err code is ${err.code}, err message is ${JSON.stringify(err)}` ) }) return responseData } /** * 关闭 RCP 会话的方法 */ destroySession() { this.rcpSession.close() }}关键代码说明:
- 与HTTP实现渲染类似,只需要在生命周期aboutToAppear中,创建工具类对象,使用工具类封装好的方法发起请求并存储在在状态变量中,然后通过List渲染即可。
- 这里我们注释掉之前使用HTTP获取网络数据的部分,使用RCP实现相同的功能。
八、视频和代码资源
资源请访问:《HarmonyOS应用开发实战指南(进阶篇)》


