【代理是什么?】nginx快速入门+反向代理hexo个人博客
文章目录
-
- 前言
- 本文说明 `请大家务必查看`
- 工作原理
-
- 正向代理
- 反向代理
- 环境准备
- 详细版
-
- 入门:搭建步骤
-
- 配置阿里云epel源:
- yum安装nginx:
- 启动nginx:
- 配置default.conf文件
- 卸载
- 简洁版
-
- 搭建步骤
- 卸载
前言
-
什么是nginx?
Nginx是一款轻量级的Web 服务器/反向代理服务器及电子邮件(IMAP/POP3)代理服务器。特点是占有内存少,并发能力特别强。 -
nginx作用?
http代理,如:正向代理、反向代理
本文说明 请大家务必查看
本文有两个版本,详细版、简洁版。
前者适合新手,后者适合老手(方便大家查找,从而过滤掉某些步骤,节约时间成本) 所以大家按需查看哟。
| 详细版 | 简洁版 |
|---|
简洁版:包含所有步骤,以及命令的执行过程(适合新手)
简洁版:只包含命令(适合有一定熟练度的人)
工作原理
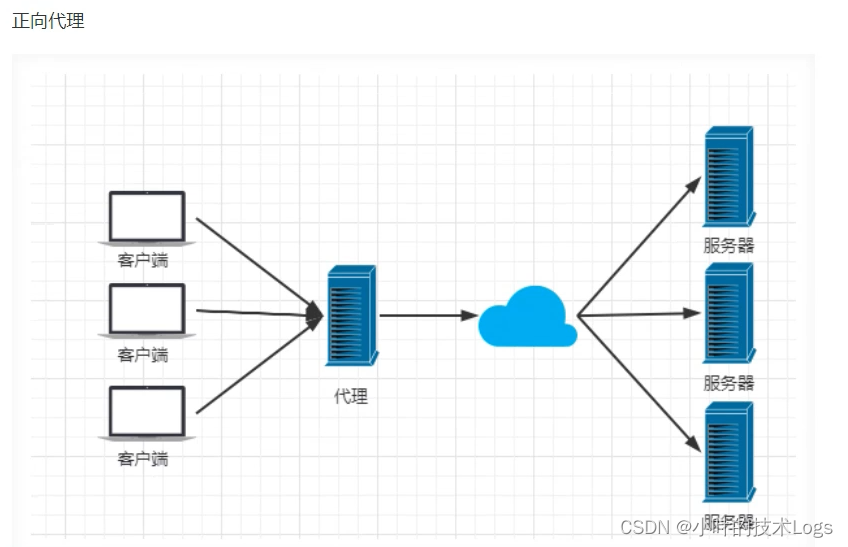
正向代理
- 客户端—>代理服务器—>访问的域名—>访问的服务器
- 客户端<—代理服务器<—访问的域名<—访问的服务器
简单总结:正向代理是到客户端
举个栗子:我们打韩服的LOL有延迟,我们就可以找一个代理(香港的vpn),代理访问国外的服务器,然后返回给代理,最后返回给我们。可以理解成加速器。
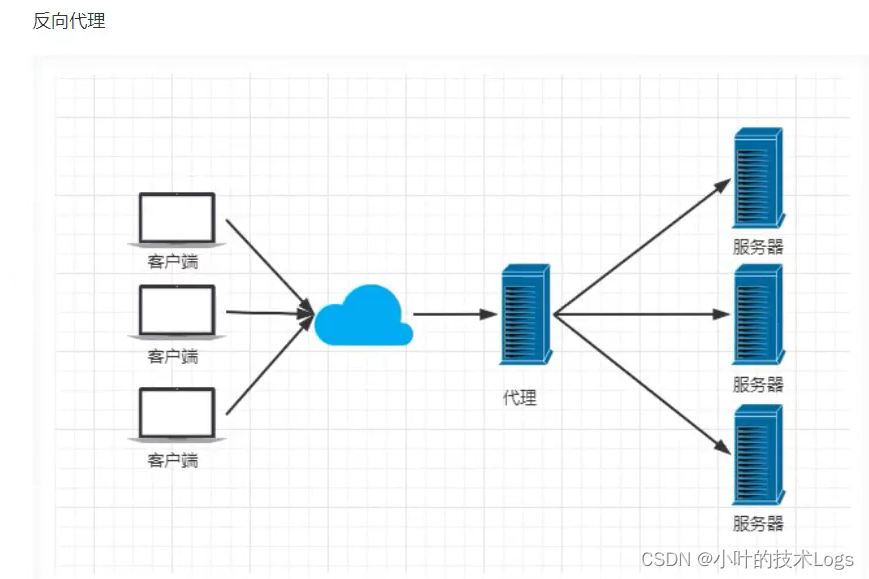
反向代理
- 客户端—>访问的域名—>代理服务器—>访问的服务器
- 客户端<—访问的域名<—代理服务器<—访问的服务器
简单总结:反向代理是到服务端
举个栗子:我们在访问百度的时候一直都是www.baidu.com这个域名,其实域名后面有很多服务器(ip地址),访问域名–>代理服务器后到百度的服务器,最后返回给我们html页面。
环境准备
| 系统 | Vcpu | Memory | 网卡类型 |
|---|---|---|---|
| centos7 | 2 | 4 | NAT模式 |
没有hexo博客环境看这里:还不会搭建博客吗?centos7系统部署hexo博客新手入门-进阶,看这一篇就够了_小叶的技术Logs的博客-CSDN博客
详细版
入门:搭建步骤
配置阿里云epel源:
[root@localhost ~]# wget -O /etc/yum.repos.d/epel.repo http://mirrors.aliyun.com/repo/epel-7.repo #下载epel源,否则没有nginx包--2022-04-18 21:54:35-- http://mirrors.aliyun.com/repo/epel-7.repoResolving mirrors.aliyun.com (mirrors.aliyun.com)... 113.207.38.89, 113.207.38.90, 113.207.38.85, ...Connecting to mirrors.aliyun.com (mirrors.aliyun.com)|113.207.38.89|:80... connected.HTTP request sent, awaiting response... 200 OKLength: 664 [application/octet-stream]Saving to: ‘/etc/yum.repos.d/epel.repo’100%[======================================================================================>] 664 --.-K/s in 0s2022-04-18 21:54:36 (131 MB/s) - ‘/etc/yum.repos.d/epel.repo’ saved [664/664]yum安装nginx:
[root@localhost ~]# yum install -y nginx #yum安装nginx软件Loaded plugins: fastestmirrorLoading mirror speeds from cached hostfile * base: mirrors.aliyun.com * extras: mirrors.aliyun.com * updates: mirrors.aliyun.comResolving Dependencies--> Running transaction check---> Package nginx.x86_64 1:1.20.1-9.el7 will be installed--> Processing Dependency: nginx-filesystem = 1:1.20.1-9.el7 for package: 1:nginx-1.20.1-9.el7.x86_64--> Processing Dependency: libcrypto.so.1.1(OPENSSL_1_1_0)(64bit) for package: 1:nginx-1.20.1-9.el7.x86_64--> Processing Dependency: libssl.so.1.1(OPENSSL_1_1_0)(64bit) for package: 1:nginx-1.20.1-9.el7.x86_64--> Processing Dependency: libssl.so.1.1(OPENSSL_1_1_1)(64bit) for package: 1:nginx-1.20.1-9.el7.x86_64--> Processing Dependency: nginx-filesystem for package: 1:nginx-1.20.1-9.el7.x86_64--> Processing Dependency: redhat-indexhtml for package: 1:nginx-1.20.1-9.el7.x86_64--> Processing Dependency: libcrypto.so.1.1()(64bit) for package: 1:nginx-1.20.1-9.el7.x86_64--> Processing Dependency: libprofiler.so.0()(64bit) for package: 1:nginx-1.20.1-9.el7.x86_64--> Processing Dependency: libssl.so.1.1()(64bit) for package: 1:nginx-1.20.1-9.el7.x86_64启动nginx:
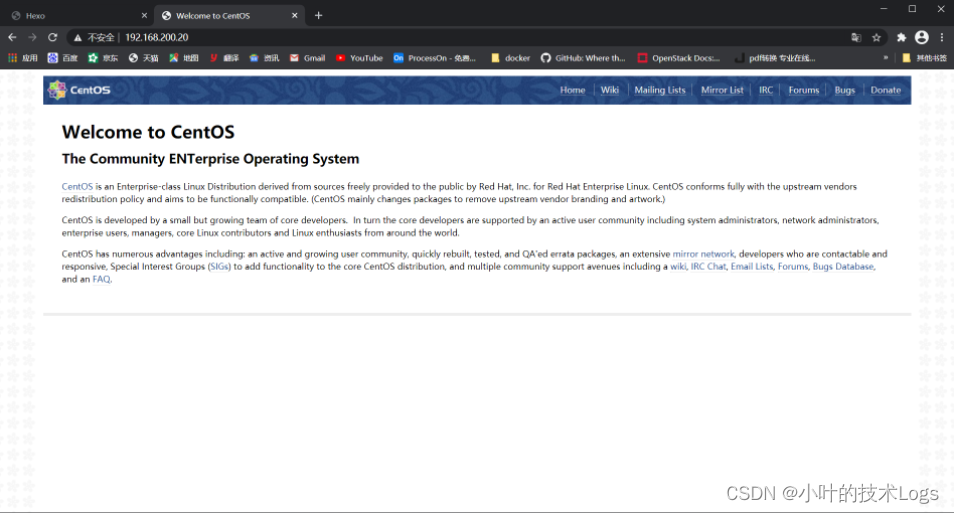
[root@localhost ~]# systemctl stop firewalld && systemctl disabel firewalld #关闭防火墙、开机不自启防火墙[root@localhost ~]# setenforce 0 #临时关闭selinux[root@localhost ~]# systemctl start nginx #启动nginx[root@localhost ~]# systemctl enable nginx #开机自启nginx浏览器验证访问nginx如图所示:
配置default.conf文件
实现反向代理:
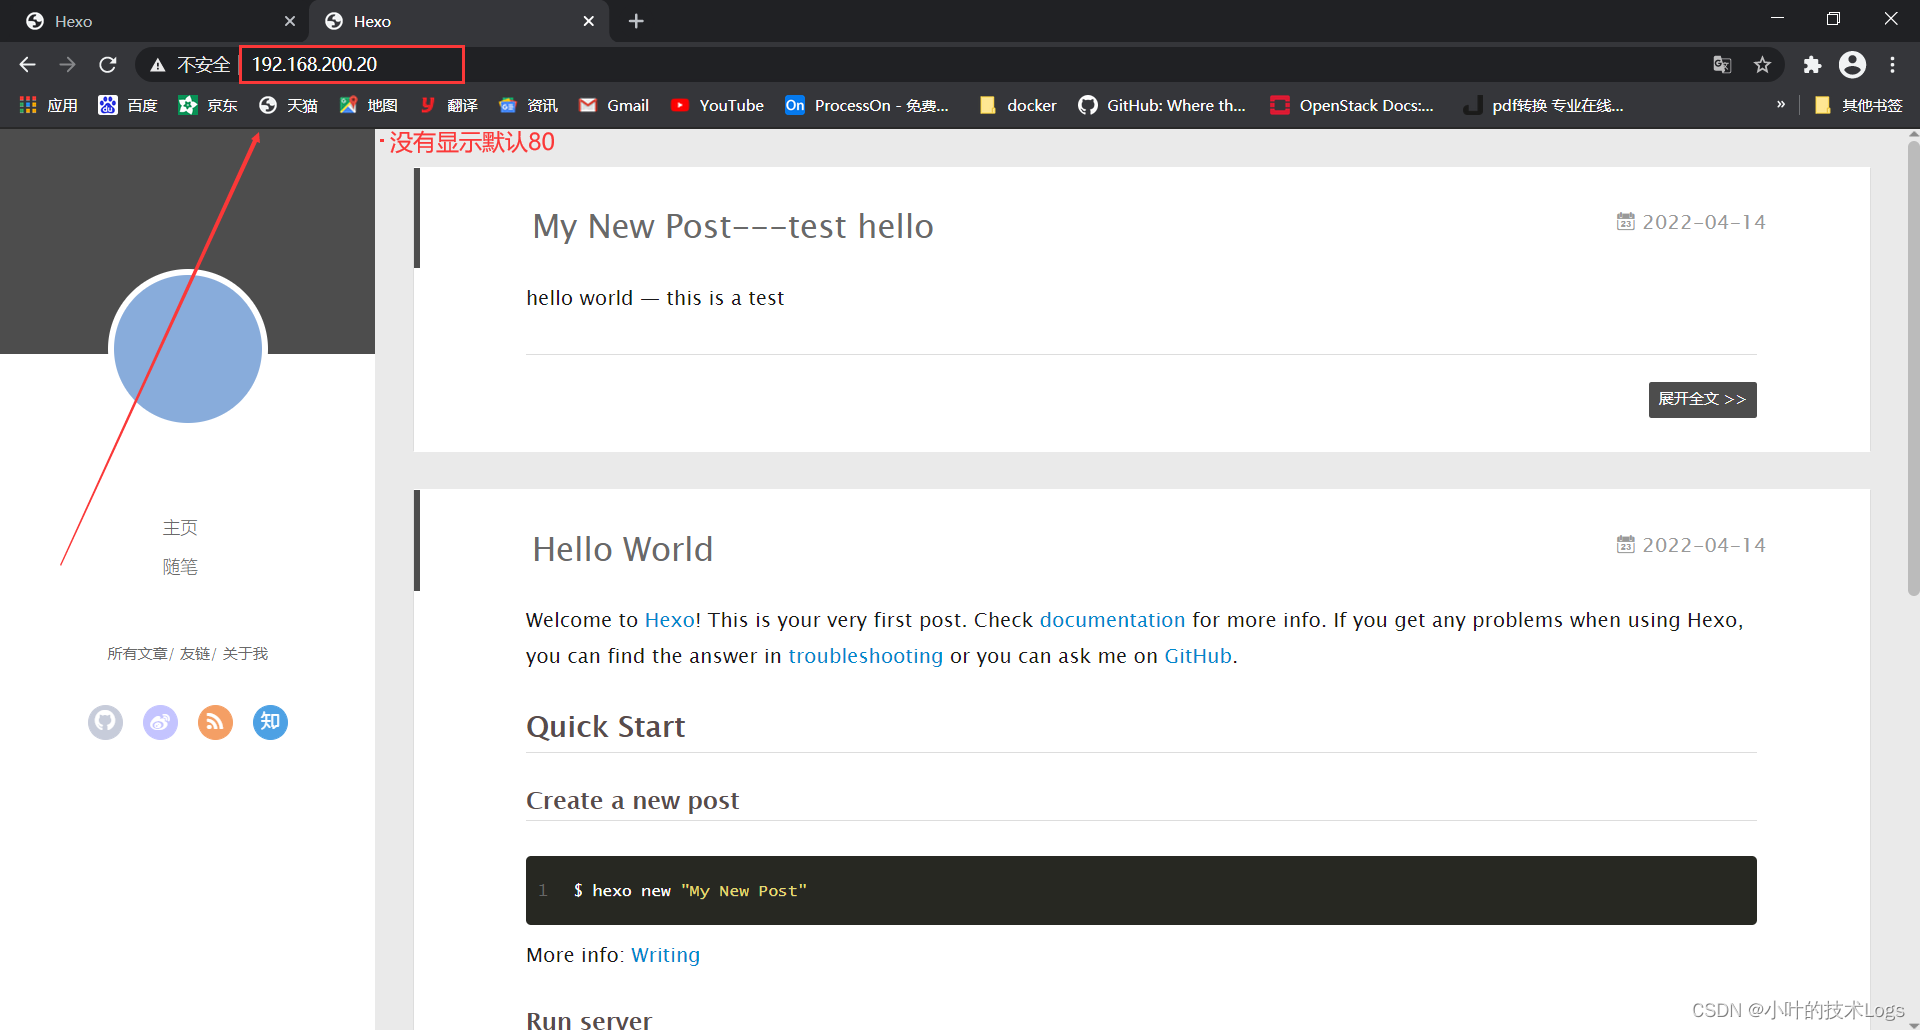
[root@localhost ~]# cat /etc/nginx/conf.d/default.conf # 如果没有conf.d目录需要创建,默认我们这里下载的nginx版本没有default.conf,创建即可server { listen80; server_name localhost; #charset koi8-r; #access_log logs/host.access.log main; location / { # root html; # index index.html index.htm; proxy_pass http://127.0.0.1:4000; #http根/目录,代理到http://127.0.0.1:4000 }}[root@localhost ~]# systemctl restart nginx最后验证
你会发现直接浏览器输入ip,不输入4000端口也实现了访问
over如下图所示:

卸载
[root@localhost ~]# yum remove -y nginx #yum卸载nginxLoaded plugins: fastestmirrorResolving Dependencies--> Running transaction check---> Package nginx.x86_64 1:1.20.1-9.el7 will be erased--> Finished Dependency ResolutionDependencies Resolved================================================================================================================================ Package Arch Version Repository Size================================================================================================================================Removing: nginx x86_64 1:1.20.1-9.el7 @epel 1.7 MTransaction Summary================================================================================================================================Remove 1 PackageInstalled size: 1.7 MDownloading packages:Running transaction checkRunning transaction testTransaction test succeededRunning transaction Erasing : 1:nginx-1.20.1-9.el7.x86_64 1/1warning: /etc/nginx/nginx.conf saved as /etc/nginx/nginx.conf.rpmsave Verifying : 1:nginx-1.20.1-9.el7.x86_64 1/1Removed: nginx.x86_64 1:1.20.1-9.el7Complete![root@localhost ~]# rm -rf /etc/nginx* #删除相关配置文件目录简洁版
搭建步骤
wget -O /etc/yum.repos.d/epel.repo http://mirrors.aliyun.com/repo/epel-7.repo yum install -y nginx [root@localhost ~]# systemctl stop firewalld && systemctl disabel firewalld浏览器 验证[root@localhost ~]# setenforce 0[root@localhost ~]# systemctl start nginx[root@localhost ~]# systemctl enable nginx[root@localhost ~]# cat /etc/nginx/conf.d/default.confserver { listen80; server_name localhost; #charset koi8-r; #access_log logs/host.access.log main; location / { # root html; # index index.html index.htm; proxy_pass http://127.0.0.1:4000; }}[root@localhost ~]# systemctl restart nginx浏览器 验证卸载
[root@localhost ~]*# yum remove -y nginx*[root@localhost ~]*# rm -rf /etc/nginx
