自动化测试——同一个项目下共用3种方法 ( pytest + allure 、unitest + HTMLTestRunner、unitest + unittestreport )实践记录
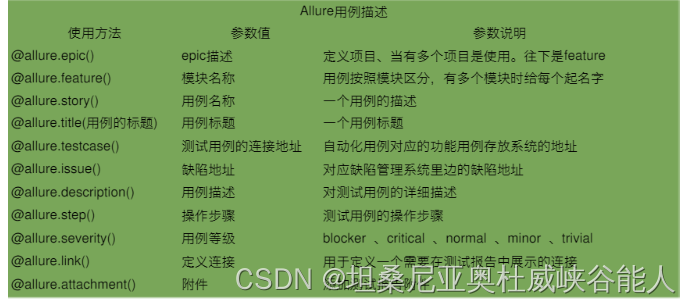
allure常用功能:
pytest、unitest 可以写到同一个脚本里,pytest 也可以执行unitest脚本,具体case代码如下
# -*- coding: utf-8 -*-# 导包import jsonimport requestsimport unittestimport pytestimport allure@allure.feature("自动化测试")@allure.story('平台:登录测试')@allure.description('测试case')@allure.severity('normal') # 标记用例登记class TestCase(unittest.TestCase): # # 初始化 # def setUp(self): # print("测试开始。。。") # # 卸载 # def tearDown(self): # print("测试结束。。。") # 测试函数2:登录成功函数 @allure.title("case: 成功") def test_001(self): # 直接发送请求 print('测试用例。。。') # 断言判断 self.assertEqual(200, 200) # 测试函数2:登录成功函数 @allure.title("case: 失败") def test_002(self): # 直接发送请求 print('测试用例。。。') # 断言判断 self.assertEqual(201, 200)if __name__ == "__main__": # unittest.main() pytest.main()pytest+allure执行并生成报告方式:
- 命令行里执行:
alluredir:指定报告数据路径 --clean-alluredir:每次生成报告前先删除掉原来的在生成新的pytest -s --alluredir=./reportfiles --clean-alluredir 启动allure服务,会自动弹出浏览器并访问报告allure serve ./reportfiles- 代码里执行,需要在项目根目录下创建py文件去执行(两种写法)
# -*- coding: utf-8 -*-'''文件说明:pytest 执行入口'''import os, sysimport pytestimport warningswarnings.filterwarnings("ignore")if __name__ == "__main__":# pytest.main()常见用法注释 # pytest.main(["-s","-v",os.path.abspath(__file__)]) # pytest.main(["-m", "test"]) # 指定用例标记类型执行 # pytest.main(["--ff"]) # --failed-first失败用例先执行 # pytest.main(["--lf"]) # --last-failed只执行上次失败的测试用例 # pytest.main(["-x"]) # --exitfirst遇到测试用例fail,就结束测试 # pytest.main(["--maxfail=2"]) # 遇到num条测试用例fail, 就结束测试 # 执行方式 1 # reportpath = os.getcwd() # cmdstr1 = "pytest -s --alluredir=./reportfiles --clean-alluredir" # alluredir:指定报告数据路径 --clean-alluredir:每次生成报告前先删除掉原来的在生成新的 # os.system(cmdstr1) # cmdstr2 = "allure serve ./reportfiles" # 启动allure服务,会自动弹出浏览器并访问报告 # os.system(cmdstr2) # 执行方式 2 argsstr = ['-s', './case', '--alluredir=./reportfiles', '--clean-alluredir'] pytest.main(argsstr) cmdstr2 = "allure serve ./reportfiles" # 启动allure服务,会自动弹出浏览器并访问报告 os.system(cmdstr2)unitest + HTMLTestRunner 执行并生成报告
# -*- coding: utf-8 -*-# @Time : 2020/3/1# @Author : andy""" 测试收藏与取消收藏实现时: 1.二者的前提条件,都是登录成功后 2.使用测试套件组织登录、收藏与取消收藏实现"""# 导包import unittestfrom tools.HTMLTestRunner import HTMLTestRunner# 创建suite对象from case.TestArticleCollection import TestArticlesCollectionsfrom case.TestUser import TestLogindef rununitest(): suite = unittest.TestSuite() # suite对象添加测试函数 方式一 # 1.登录成功函数 # suite.addTest(TestLogin("test_login_success")) # 2.收藏函数 # suite.addTest(TestArticlesCollections("test_collections")) # 3.取消收藏函数 # suite.addTest(TestArticlesCollections("test_cancel")) # 方式二 # suite.addTest(unittest.TestLoader().loadTestsFromTestCase(TestArticlesCollections)) # 方式三 suite = unittest.defaultTestLoader.discover("./case/") # 方式四 # suite = unittest.TestLoader().discover('case', '*case1.py') # 普通执行 suite 对象 runner = unittest.TextTestRunner() # 生成測試報告 fp = open('reportfiles/report.html', 'wb') runner = HTMLTestRunner(stream=fp, title="測試報告", description="商城測試報告") runner.run(suite)if __name__ == "__main__": rununitest()unitest + unittestreport 执行并生成报告
# -*- coding: utf-8 -*-# @Time : 2020/3/1# @Author : andyimport sys, ossys.path.append(os.path.abspath(os.path.dirname(os.path.dirname(__file__))))sys.path.append('')import os, timeimport unittestfrom unittestreport import TestRunnerfrom case.TestArticleCollection import TestArticlesCollectionsdef rununitest(): # 创建suite对象 suite = unittest.TestSuite() # suite对象添加测试函数 # 方式一 # suite.addTest(TestArticlesCollections("test_cancel")) # 方式二 # suite.addTest(unittest.TestLoader().loadTestsFromTestCase(TestArticlesCollections)) # 方式三 suite = unittest.defaultTestLoader.discover("case/") # 方式四 # suite = unittest.TestLoader().discover('case', '*case1.py') # 将用例集加载到运行函数中,然后执行run函数 runner = TestRunner(suite, filename='测试报告', report_dir='./reportfiles', title='测试报告') runner.run() if __name__ == "__main__": rununitest()3种报告对比:
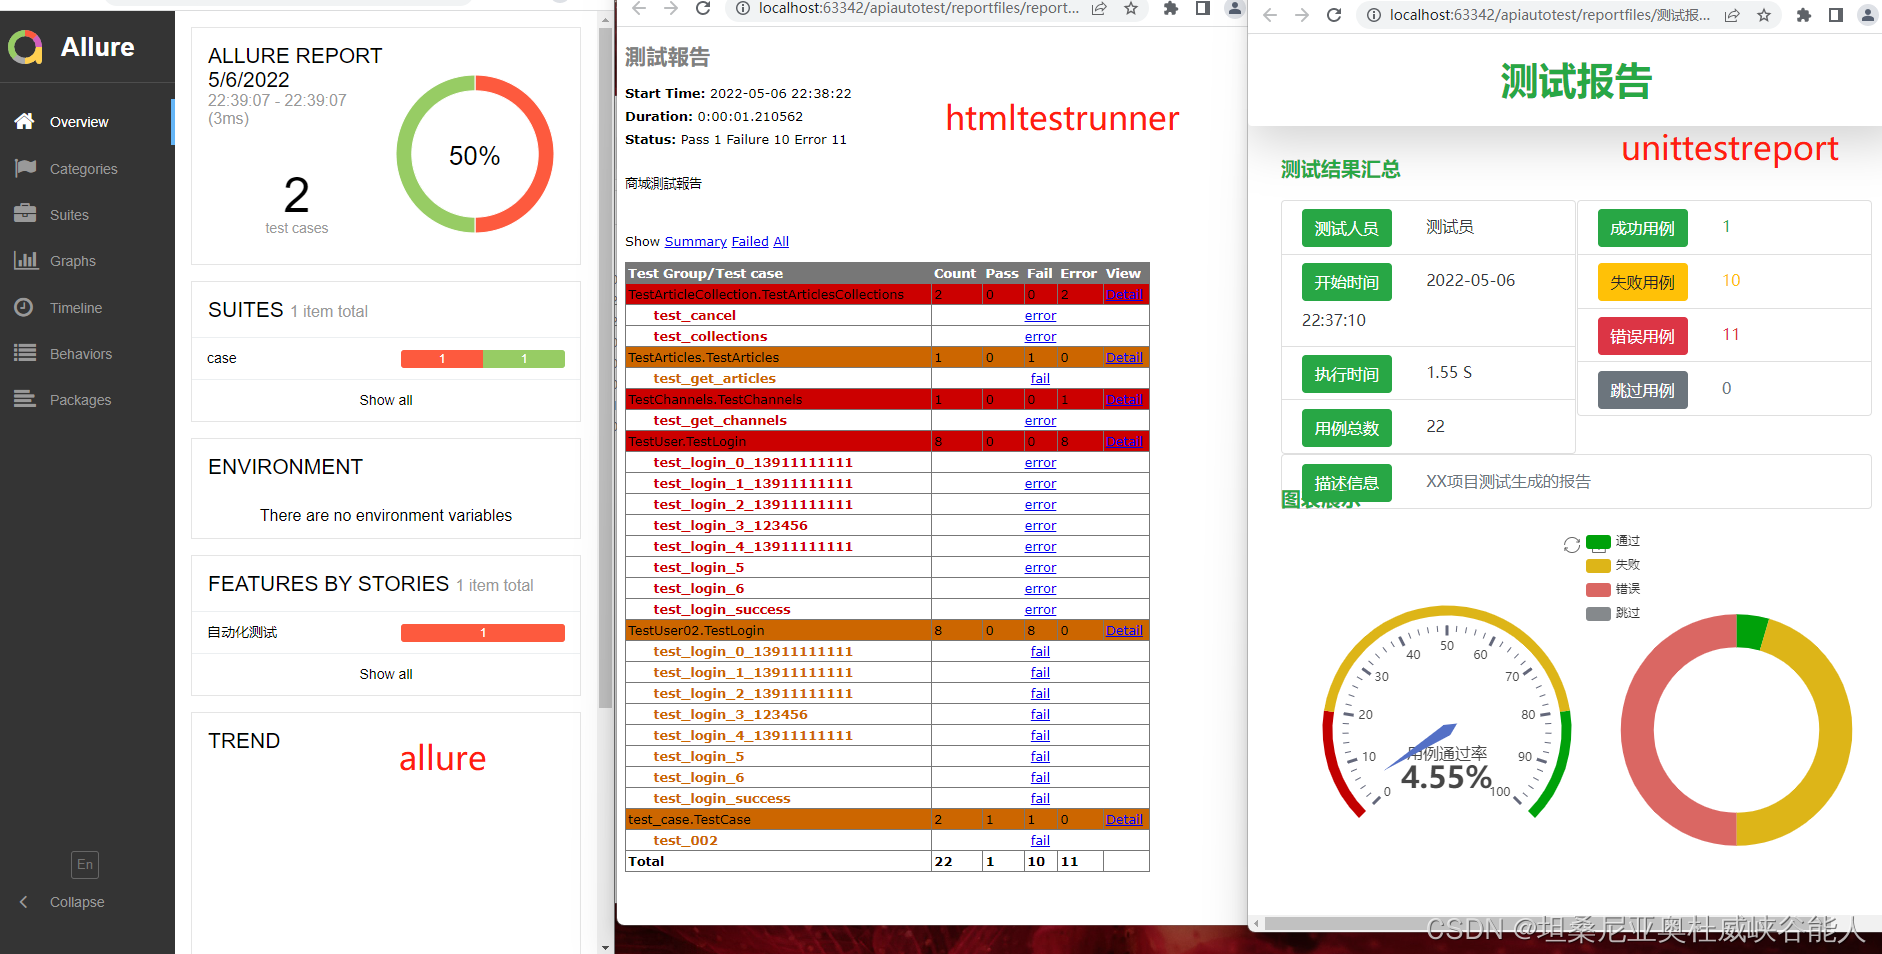
附文:unitest与pytest不同之处
https://blog.csdn.net/xuyandics/article/details/114022578
原文如下:
一、用例编写规则 1.unittest提供了test cases、test suites、test fixtures、test runner相关的类,让测试更加明确、方便、可控。使用unittest编写用例,必须遵守以下规则: (1)测试文件必须先import unittest (2)测试类必须继承unittest.TestCase (3)测试方法必须以“test_”开头 (4)测试类必须要有unittest.main()方法 2.pytest是python的第三方测试框架,是基于unittest的扩展框架,比unittest更简洁,更高效。使用pytest编写用例,必须遵守以下规则: (1)测试文件名必须以“test_”开头或者"_test"结尾(如:test_ab.py) (2)测试方法必须以“test_”开头。 (3)测试类命名以"Test"开头。 总结: pytest可以执行unittest风格的测试用例,无须修改unittest用例的任何代码,有较好的兼容性。 pytest插件丰富,比如flask插件,可用于用例出错重跑;还有xdist插件,可用于设备并行执行。 二、用例前置和后置1.unittest提供了setUp/tearDown,每个用例运行前、结束后运行一次。setUpClass和tearDownClass,用例执行前、结束后,只运行一次。2.pytest提供了模块级、函数级、类级、方法级的setup/teardown,比unittest的setUp/tearDown更灵活。模块级(setup_module/teardown_module)开始于模块始末,全局的函数级(setup_function/teardown_function)只对函数用例生效(不在类中)类级(setup_class/teardown_class)只在类中前后运行一次(在类中)方法级(setup_method/teardown_method)开始于方法始末(在类中)类里面的(setup/teardown)运行在调用方法的前后pytest还可以在函数前加@pytest.fixture()装饰器,在测试用例中装在fixture函数。fixture的使用范围可以是function,module,class,session。firture相对于setup和teardown来说有以下几点优势:命名方式灵活,不局限于setup和teardown这几个命名conftest.py 配置里可以实现数据共享,不需要import就能自动找到一些配置,可供多个py文件调用。scope="module" 可以实现多个.py跨文件共享前置scope="session" 以实现多个.py跨文件使用一个session来完成多个用例用yield来唤醒teardown的执行 三、断言 1.unittest提供了assertEqual、assertIn、assertTrue、assertFalse。 2.pytest直接使用assert 表达式。 四、报告 1.unittest使用HTMLTestRunnerNew库。 2.pytest有pytest-HTML、allure插件。 五、失败重跑 1、unittest无此功能。 2、pytest支持用例执行失败重跑,pytest-rerunfailures插件。 六、参数化 1、unittest需依赖ddt库,2、pytest直接使用@pytest.mark.parametrize装饰器。 七、用例分类执行 1、unittest默认执行全部用例,也可以通过加载testsuit,执行部分用例。 2、pytest可以通过@pytest.mark来标记类和方法,pytest.main加入参数("-m")可以只运行标记的类和方法。
