这么简单的单链表,你会了吗?
前言
上一篇文章中我们学习了顺序表【数据结构】——顺序表的基本实现_爱偷懒的猫(๑><๑)的博客-CSDN博客
顺序表是用数组实现的,优势是:物理空间连续并且支持下标随机访问
劣势是:1、空间不够,需要扩容。但是扩容有一定的性能消耗,其次一般扩容2倍,存在一些空间浪费。
2、头部和中间位置插入删除效率低下
链表正好可以解决这些劣势
目录
前言
一、单链表的概念和结构
二、单链表接口实现
2.1 打印
2.2 开辟结点
2.3 尾插
2.4 头插
2.5 尾删
2.6 头删
2.7 查找
2.8 在pos位置之前插入
2.9 在pos位置之前删除
2.10 在pos位置之后插入
2.11 在pos位置之后删除
三、完整代码
SList.h
SList.c
test.c
一、单链表的概念和结构
概念:链表是一种物理存储结构上非连续、非顺序的存储结构,数据元素的逻辑顺序是通过链表
中的指针链接次序实现的 。
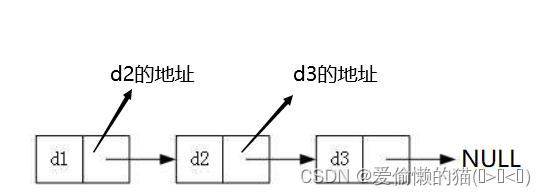
结构:单链表的结构类似于火车一样链起来的。

看代码
typedef int SLTDataType;typedef struct SListNode{SLTDataType* data;struct SListNode* next;}SLTNode;首先我们定义了一个结构体,结构体里的data被叫做数据域用来存放数据,next是指针域用来存放下一个结点的地址。
我们一般的图示是下面这样子的:
还不好理解,直接上代码分析
SLTNode* n1 = (SLTNode*)malloc(sizeof(SLTNode));assert(n1);SLTNode* n2 = (SLTNode*)malloc(sizeof(SLTNode));assert(n2);SLTNode* n3 = (SLTNode*)malloc(sizeof(SLTNode));assert(n3);SLTNode* n4 = (SLTNode*)malloc(sizeof(SLTNode));assert(n4);n1->data = 1;n2->data = 2;n3->data = 3;n4->data = 4;n1->next = n2;n2->next = n3;n3->next = n4;n4->next = NULL;我在这里开辟了四个结点, 图示为下面的样子:
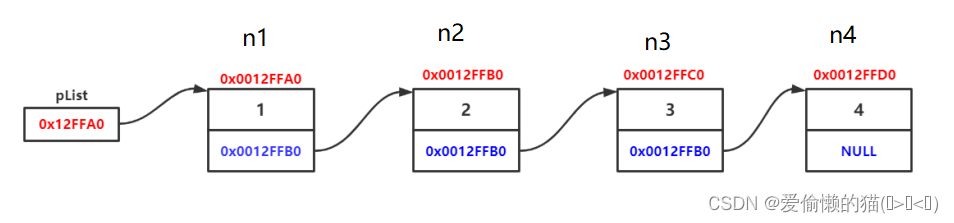 n1的data用来存放数据,next用来存放n2的地址,n2、n3、n4以此类推。
我这里的地址只是举个例子,可不是错误哦。
看调试结果如下:

二、单链表接口实现
我们要实现如下一些接口:
#include #include #include //断言头文件typedef int SLTDataType;//将int重命名typedef struct SListNode//将结构体重命名{SLTDataType* data;struct SListNode* next;}SLTNode;//打印void SListPrint(SLTNode* phead);//尾插void SListPushBack(SLTNode pphead, SLTDataType x);//头插void SListPushFront(SLTNode pphead, SLTDataType x);//开辟结点SLTNode* BuySListNode(SLTDataType x);//尾删void SListPopBack(SLTNode pphead);//头删void SListPopFront(SLTNode pphead);//查找SLTNode* SListFind(SLTNode* pphead, SLTDataType x);//在pos位置之前插入void SListInsert(SLTNode pphead, SLTNode* pos, SLTDataType x);//在pos位置删void SListErase(SLTNode pphead, SLTNode* pos);//在pos位置之后插入void SListInsertAfter(SLTNode* pos, SLTDataType x);//在pos位置之后删void SListEraseAfter(SLTNode* pos);2.1 打印
注: 头指针的位置不要轻易的去改动,所以我在这定义了一个cur来代替我们的头指针。

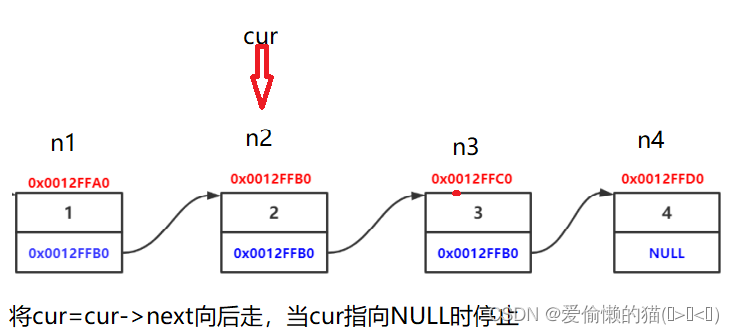
以此类推
代码实现:
void SListPrint(SLTNode* phead){SLTNode* cur=phead;while (cur != NULL){printf("%d->", cur->data);cur = cur->next;}printf("NULL\n");}这里打印一个箭头是为了更形象的说明,可不要对它有什么误解。
这里还可以通过调试来帮助理解

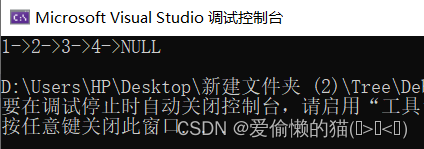
运行结果:
2.2 开辟结点
当我们插入的时候需要开辟结点,而我们有头插、尾插和任意位置插,每次写这些插入的时候都要申请结点,所以我们不妨写一个函数就直接申请结点,后面只要调用就行啦。
代码实现:
SLTNode* BuySListNode(SLTDataType x){SLTNode* newnode = (SLTNode*)malloc(sizeof(SLTNode));//开辟结点if (newnode == NULL){printf("malloc fail\n");exit(-1);//malloc开辟失败就直接结束程序}newnode->data = x;newnode->next = NULL;return newnode;}2.3 尾插
首先我们思考一下传参是传链表地址呢?还是传链表就行了?
不知道,我们先把这个问题放在这,继续往下看
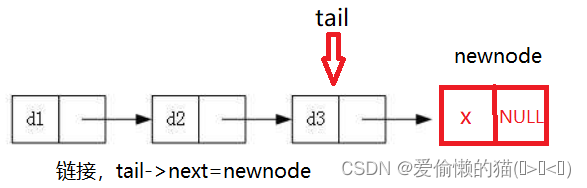
要尾插的话,我们首先得要开辟一个结点才能插啊,其次是要找到尾结点,那么如何找到尾结点呢?很简单,一个while循环就搞定了。
代码实现:
void SListPushBack(SLTNode* phead, SLTDataType x){SLTNode* newnode= BuySListNode(x);//直接调用开辟结点的函数//判断一下链表是否为空//为空直接插if (phead == NULL){phead = newnode;}//不为空找尾结点再插else{SLTNode* tail = phead;while (tail->next != NULL){tail = tail->next;}tail->next = newnode;}}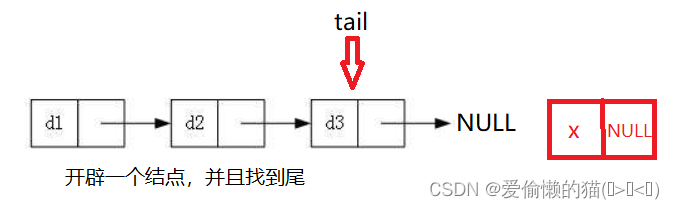
写好了,我们调试一下。
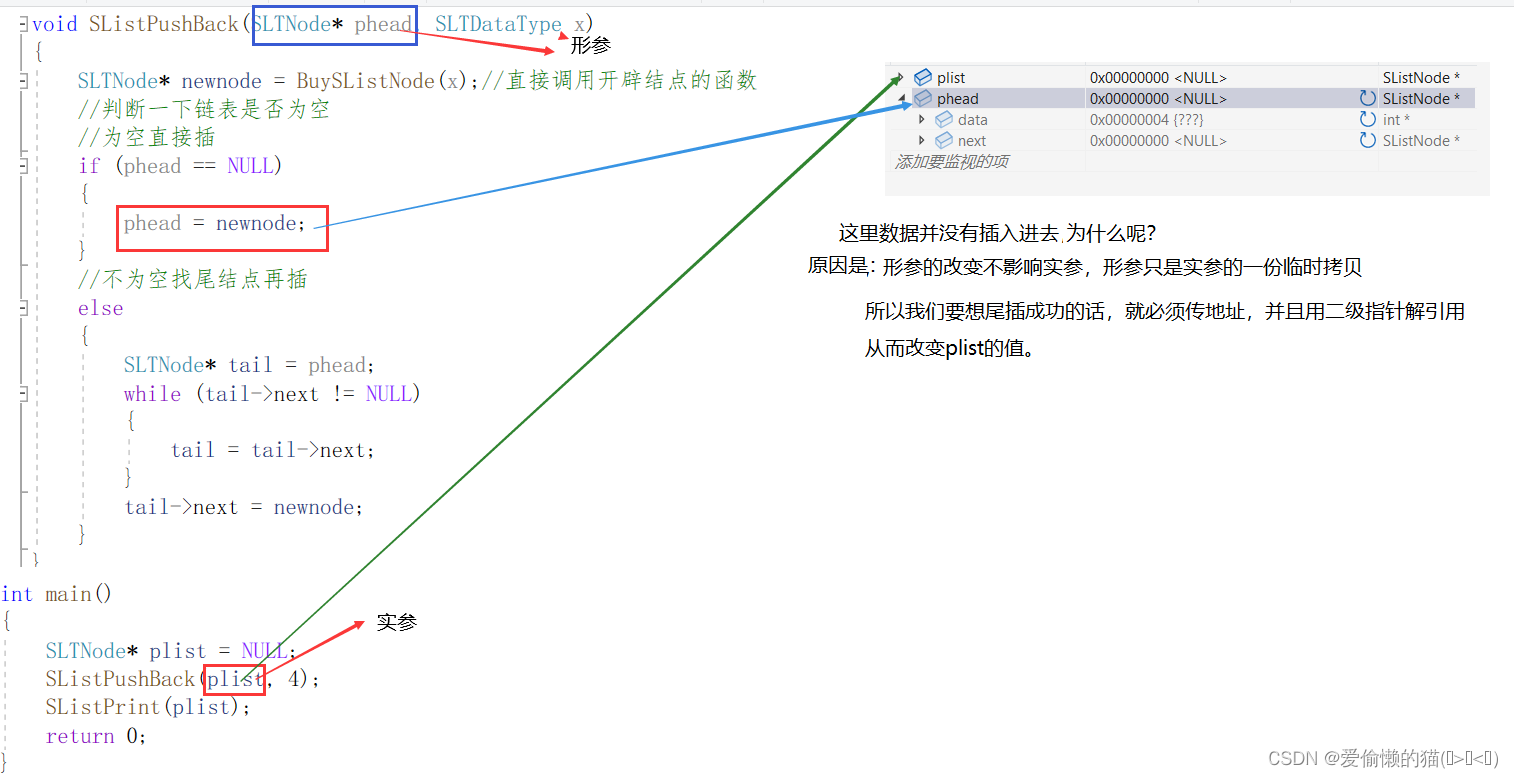
所以刚开始我们提出的那个问题就解决了,我们要传地址并且要用二级指针解引用,而我们前面的打印函数不需要改变plist的值所以不用二级指针也行。
正确的代码如下:
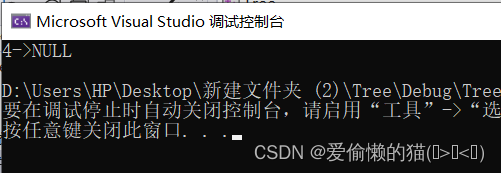
void SListPushBack(SLTNode pphead, SLTDataType x)//用二级指针{assert(pphead);SLTNode* newnode = BuySListNode(x);//直接调用开辟结点的函数//判断一下链表是否为空//为空直接插if (*pphead == NULL){*pphead = newnode;}//不为空找尾结点再插else{SLTNode* tail = *pphead;while (tail->next != NULL){tail = tail->next;}tail->next = newnode;}}运行结果:
2.4 头插
这里我们也是需要用到二级指针的。那么头插我们应该怎么头插呢?
头插相比于尾插来说是更简单的。看图
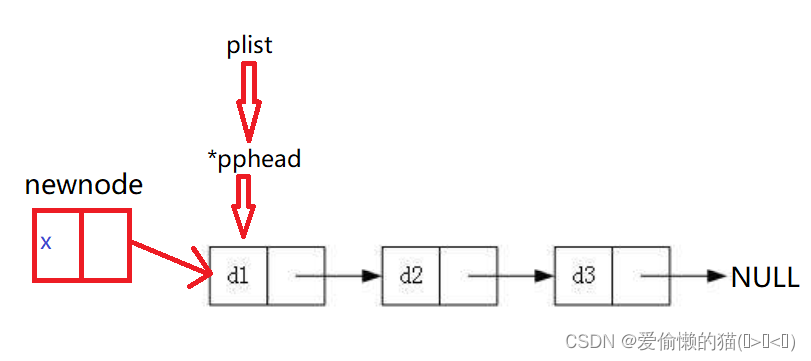
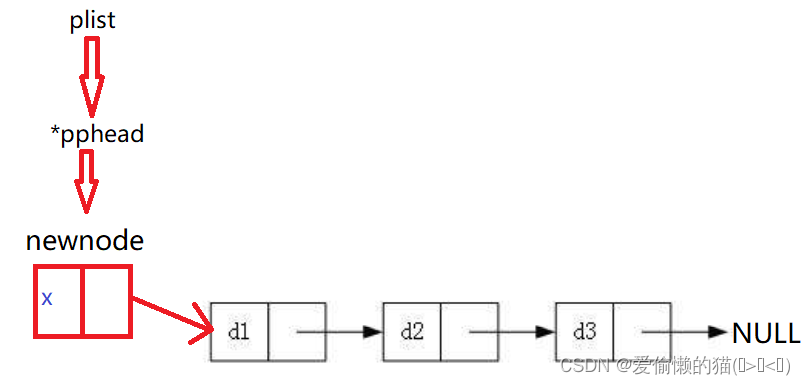 代码实现如下:
void SListPushFront(SLTNode pphead, SLTDataType x){assert(pphead);SLTNode* newnode = BuySListNode(x);newnode->next = *pphead;*pphead = newnode;}这个代码链表为空的话,头插也成立的。
2.5 尾删
尾删分两种情况:1、只有一个结点就不用找尾了。2、有多个结点就要找尾之后再删除
在写有多个节点的情况的代码时可不能像下面这样写:
SLTNode* tail = *pphead;while (tail->next != NULL){tail = tail->next;}free(tail);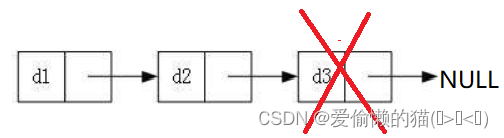
这是一个经典的野指针问题,你把尾释放掉了,而尾的前一个没有做处理,所以尾的前一个就成了野指针 。
当然你可以将尾的前一个先保存起来,free掉尾后再置成空,不过你也可以像我下面这种写法也是可以的。还有一个问题就是链表为NULL的话就不能删了,所以直接加一个断言assert(*pphead)。
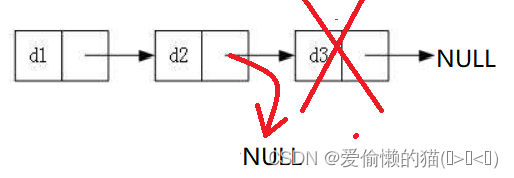
代码实现:
void SListPopBack(SLTNode pphead){assert(*pphead);assert(pphead);//只有一个节点if ((*pphead)->next == NULL){free(*pphead);*pphead = NULL;}//有多个节点else{SLTNode* tail = *pphead;while (tail->next->next != NULL){tail = tail->next;}free(tail->next);tail->next = NULL;}}2.6 头删
可不能像下面代码这样写,这样写是错误的。
void SListPopFront(SLTNode pphead){assert(*pphead);//在Debug下才有用assert(pphead);free(*pphead);*pphead = (*pphead)->next;}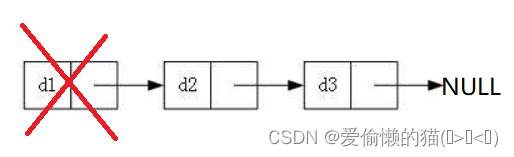
你直接free掉这个结点就找不到下一个结点了。所以你要先把下一个结点保存起来再free掉。
还有一个问题就是链表为NULL的话就不能删了,所以直接加一个断言assert(*pphead)。
下面的代码才是正确的:
void SListPopFront(SLTNode pphead){assert(*pphead);//在Debug下才有用assert(pphead);SLTNode* next = (*pphead)->next;free(*pphead);*pphead = next;}2.7 查找
这里可以不用二级指针,因为查找和打印一样它是不会改变你传过来的值的。
SLTNode* SListFind(SLTNode* pphead, SLTDataType x){SLTNode* cur = pphead;while (cur != NULL){if (cur->data == x){return cur;//返回结点的指针}cur = cur->next;}return NULL;//没找到返回NULL}这里返回结点指针的好处是不仅可以查找还可以充当修改。
SLTNode* ret = SListFind(plist, 2);if (ret){ printf("找到了\n"); ret->data = 20; SListPrint(plist);}else{ printf("没找到\n");}2.8 在pos位置之前插入
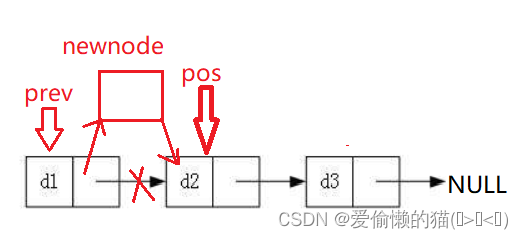
如果pos的位置是头的话就直接调用头插就行了,如果不是头那就要先遍历找到pos位置的前一个然后再进行链接。相信前面头插和尾插都没问题的话,这里应该也没有多大的问题吧。
代码实现:
void SListInsert(SLTNode pphead, SLTNode* pos, SLTDataType x){assert(pos);assert(pphead);//头插if (pos == *pphead){SListPushFront(pphead, x);}else{SLTNode* prev = *pphead;while (prev->next != pos){prev = prev->next;}SLTNode* newnode = BuySListNode(x);prev->next = newnode;newnode->next = pos;}}2.9 在pos位置之前删除
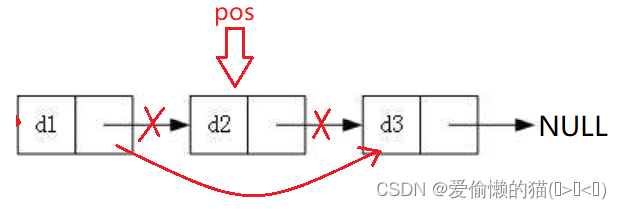
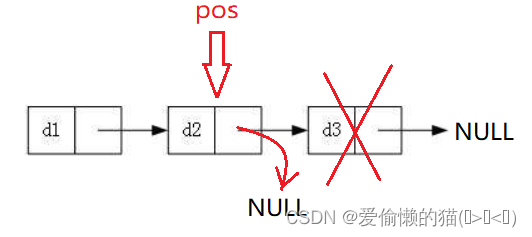
如果pos位置是头就直接调用头删就可以了,如果不是头那就要先遍历找到pos位置的前一个然后将pos的前一个和后一个进行链接最后再free掉pos就可以了。
代码实现:
void SListErase(SLTNode pphead, SLTNode* pos){assert(pphead);assert(pos);if (*pphead == pos){SListPopFront(pphead);}else{SLTNode* prev = *pphead;while (prev->next != pos){prev = prev->next;}prev->next = pos->next;free(pos);pos = NULL;}}2.10 在pos位置之后插入
在pos位置之前插入会了的话,在pos位置之后插入就是小菜一碟。
这里就不用考虑pos是头的情况了,反正是在pos位置之后插入。
把图画出来,代码就很好写了。
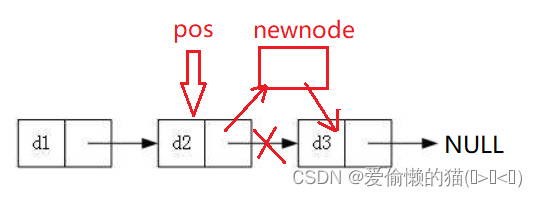
在这里你可以再定义一个next,这样就不用考虑链接顺序问题了。
代码实现:
void SListInsertAfter(SLTNode* pos, SLTDataType x){assert(pos);SLTNode* newnode = BuySListNode(x);SLTNode* next = pos->next;pos->next = newnode;newnode->next = next;}2.11 在pos位置之后删除
如果pos位置是尾的话,直接返回就行了,因为pos位置之后没有什么可以删的了。
代码实现:
void SListEraseAfter(SLTNode* pos){assert(pos);if (pos->next == NULL){return;}SLTNode* del = pos->next;pos->next = del->next;free(del);del = NULL;}三、完整代码
SList.h
#pragma once//防止头文件重复包含#include #include #include typedef int SLTDataType;typedef struct SListNode{SLTDataType* data;struct SListNode* next;}SLTNode;//打印void SListPrint(SLTNode* phead);//尾插void SListPushBack(SLTNode pphead, SLTDataType x);//头插void SListPushFront(SLTNode pphead, SLTDataType x);//开辟结点SLTNode* BuySListNode(SLTDataType x);//尾删void SListPopBack(SLTNode pphead);//头删void SListPopFront(SLTNode pphead);//查找SLTNode* SListFind(SLTNode* pphead, SLTDataType x);//在pos位置之前插入void SListInsert(SLTNode pphead, SLTNode* pos, SLTDataType x);//在pos位置删void SListErase(SLTNode pphead, SLTNode* pos);//在pos位置之后插入void SListInsertAfter(SLTNode* pos, SLTDataType x);//在pos位置之后删void SListEraseAfter(SLTNode* pos);SList.c
这里我有些写了多种写法
#define _CRT_SECURE_NO_WARNINGS 1#include "SList.h"void SListPrint(SLTNode* phead){SLTNode* cur=phead;while (cur != NULL){printf("%d->", cur->data);cur = cur->next;}printf("NULL\n");}SLTNode* BuySListNode(SLTDataType x){SLTNode* newnode = (SLTNode*)malloc(sizeof(SLTNode));//开辟结点if (newnode == NULL){printf("malloc fail\n");exit(-1);}newnode->data = x;newnode->next = NULL;return newnode;}void SListPushBack(SLTNode pphead, SLTDataType x){assert(pphead);SLTNode* newnode = BuySListNode(x);if (*pphead == NULL){*pphead = newnode;}else{//找尾节点SLTNode* tail = *pphead;while (tail->next != NULL){tail = tail->next;}tail->next = newnode;}}void SListPushFront(SLTNode pphead, SLTDataType x){assert(pphead);SLTNode* newnode = BuySListNode(x);newnode->next = *pphead;*pphead = newnode;}void SListPopFront(SLTNode pphead){assert(*pphead);//在Debug下才有用assert(pphead);/*if (*pphead == NULL){return;}*/SLTNode* next = (*pphead)->next;free(*pphead);*pphead = next;}void SListPopBack(SLTNode pphead){assert(*pphead);assert(pphead);//只有一个节点if ((*pphead)->next == NULL){free(*pphead);*pphead = NULL;}//有多个节点else{/*SLTNode* tailprev = NULL;SLTNode* tail = *pphead;while (tail->next != NULL){tailprev = tail;tail = tail->next;}free(tail);tailprev->next = NULL;*/SLTNode* tail = *pphead;while (tail->next->next != NULL){tail = tail->next;}free(tail->next);tail->next = NULL;}}SLTNode* SListFind(SLTNode* pphead, SLTDataType x){SLTNode* cur = pphead;while (cur != NULL){if (cur->data == x){return cur;}cur = cur->next;}return NULL;}void SListInsert(SLTNode pphead, SLTNode* pos, SLTDataType x){assert(pos);assert(pphead);//头插if (pos == *pphead){SListPushFront(pphead, x);}else{SLTNode* prev = *pphead;while (prev->next != pos){prev = prev->next;}SLTNode* newnode = BuySListNode(x);prev->next = newnode;newnode->next = pos;}}void SListErase(SLTNode pphead, SLTNode* pos){assert(pphead);assert(pos);if (*pphead == pos){SListPopFront(pphead);}else{SLTNode* prev = *pphead;while (prev->next != pos){prev = prev->next;}prev->next = pos->next;free(pos);pos = NULL;}}void SListInsertAfter(SLTNode* pos, SLTDataType x){assert(pos);//1.考虑链接顺序/*SLTNode* newnode = BuySListNode(x);newnode->next = pos->next;pos->next = newnode;*///2.不用考虑链接顺序SLTNode* newnode = BuySListNode(x);SLTNode* next = pos->next;/*newnode->next = next;pos->next = newnode; */pos->next = newnode;newnode->next = next;}void SListEraseAfter(SLTNode* pos){assert(pos);if (pos->next == NULL){return;}SLTNode* del = pos->next;pos->next = del->next;free(del);del = NULL;}test.c
这一部分也没有什么好看的,主要是测试前面的功能。
#define _CRT_SECURE_NO_WARNINGS 1#include "SList.h"void TestSList1(){SLTNode* n1 = (SLTNode*)malloc(sizeof(SLTNode));assert(n1);SLTNode* n2 = (SLTNode*)malloc(sizeof(SLTNode));assert(n2);SLTNode* n3 = (SLTNode*)malloc(sizeof(SLTNode));assert(n3);SLTNode* n4 = (SLTNode*)malloc(sizeof(SLTNode));assert(n4);SLTNode* n5 = (SLTNode*)malloc(sizeof(SLTNode));assert(n5);n1->data = 1;n2->data = 2;n3->data = 3;n4->data = 4;n5->data = 5;n1->next = n2;n2->next = n3;n3->next = n4;n4->next = n5;n5->next = NULL;SLTNode* plist = n1;SListPrint(plist);SListPushBack(&plist, 6);SListPushBack(&plist, 7);SListPushBack(&plist, 8);SListPushBack(&plist, 9);SListPrint(plist);}void TestSList2(){SLTNode* plist = NULL;SListPushBack(&plist, 6);//必须要传地址SListPushBack(&plist, 7);SListPushBack(&plist, 8);SListPushBack(&plist, 9);SListPrint(plist);}void TestSList3(){SLTNode* plist = NULL;SListPushFront(&plist, 0);SListPushFront(&plist, 1);SListPushFront(&plist, 2);SListPushFront(&plist, 3);SListPrint(plist);}void TestSList4(){SLTNode* plist = NULL;SListPushFront(&plist, 0);SListPushFront(&plist, 1);SListPushFront(&plist, 2);SListPushFront(&plist, 3);SListPrint(plist);SListPopFront(&plist);SListPrint(plist);SListPopFront(&plist);SListPrint(plist);SListPopFront(&plist);SListPrint(plist);SListPopFront(&plist);SListPrint(plist);SListPopFront(&plist);SListPrint(plist);}void TestSList5(){SLTNode* plist = NULL;SListPushFront(&plist, 0);SListPushFront(&plist, 1);SListPushFront(&plist, 2);SListPushFront(&plist, 3);SListPrint(plist);SListPopBack(&plist);SListPrint(plist);SListPopBack(&plist);SListPrint(plist);SListPopBack(&plist);SListPrint(plist);SListPopBack(&plist);SListPrint(plist);}void TestSList6(){SLTNode* plist = NULL;SListPushFront(&plist, 0);SListPushFront(&plist, 1);SListPushFront(&plist, 2);SListPushFront(&plist, 3);SListPrint(plist);SLTNode* ret = SListFind(plist, 2);if (ret){printf("找到了\n");ret->data = 20;SListPrint(plist);}else{printf("没找到\n");}}void TestSList7(){SLTNode* plist = NULL;SListPushFront(&plist, 0);SListPushFront(&plist, 1);SListPushFront(&plist, 2);SListPushFront(&plist, 3);SListPrint(plist);SLTNode* pos = SListFind(plist, 2);if (pos){SListErase(&plist, pos);}SListPrint(plist);}int main(){//TestSList7();return 0;}其实单链表还不是最好的,还有一些缺陷,那就需要用到双链表,想知道知道如何写,请期待博主的下一篇新作。
码字不易,如果觉得内容有用的话,就给博主三连吧!!!