Spring Boot + vue-element 开发个人博客项目实战教程(二十、登录日志、用户、分类管理页面开发)
文章目录
- 前言
- 一、登录日志页面
-
- 1、设置api
- 2、页面
- 二、路由管理
-
- (1)用户管理路由
- (2)公告管理路由
- (3)标签管理
- (4)分类管理
- (5)文章管理
- 三、分类管理
-
- 1、创建api
- 2、分类列表
- 3、添加和修改
- 4、删除
- 四、用户功能
-
- 1、列表
- 2、删除
- 3、添加和修改
前言
有小伙伴开始催更了,最近我也在补充知识,我在有空的时候重新学习下Redis,有想要学的小伙伴可以来找我要笔记,后期看情况要不要分享出来,对于这个教程最基本的后端写完了,我们再搞搞前端争取快点结束掉,然后还是去重点搞java,目录我列了一些。
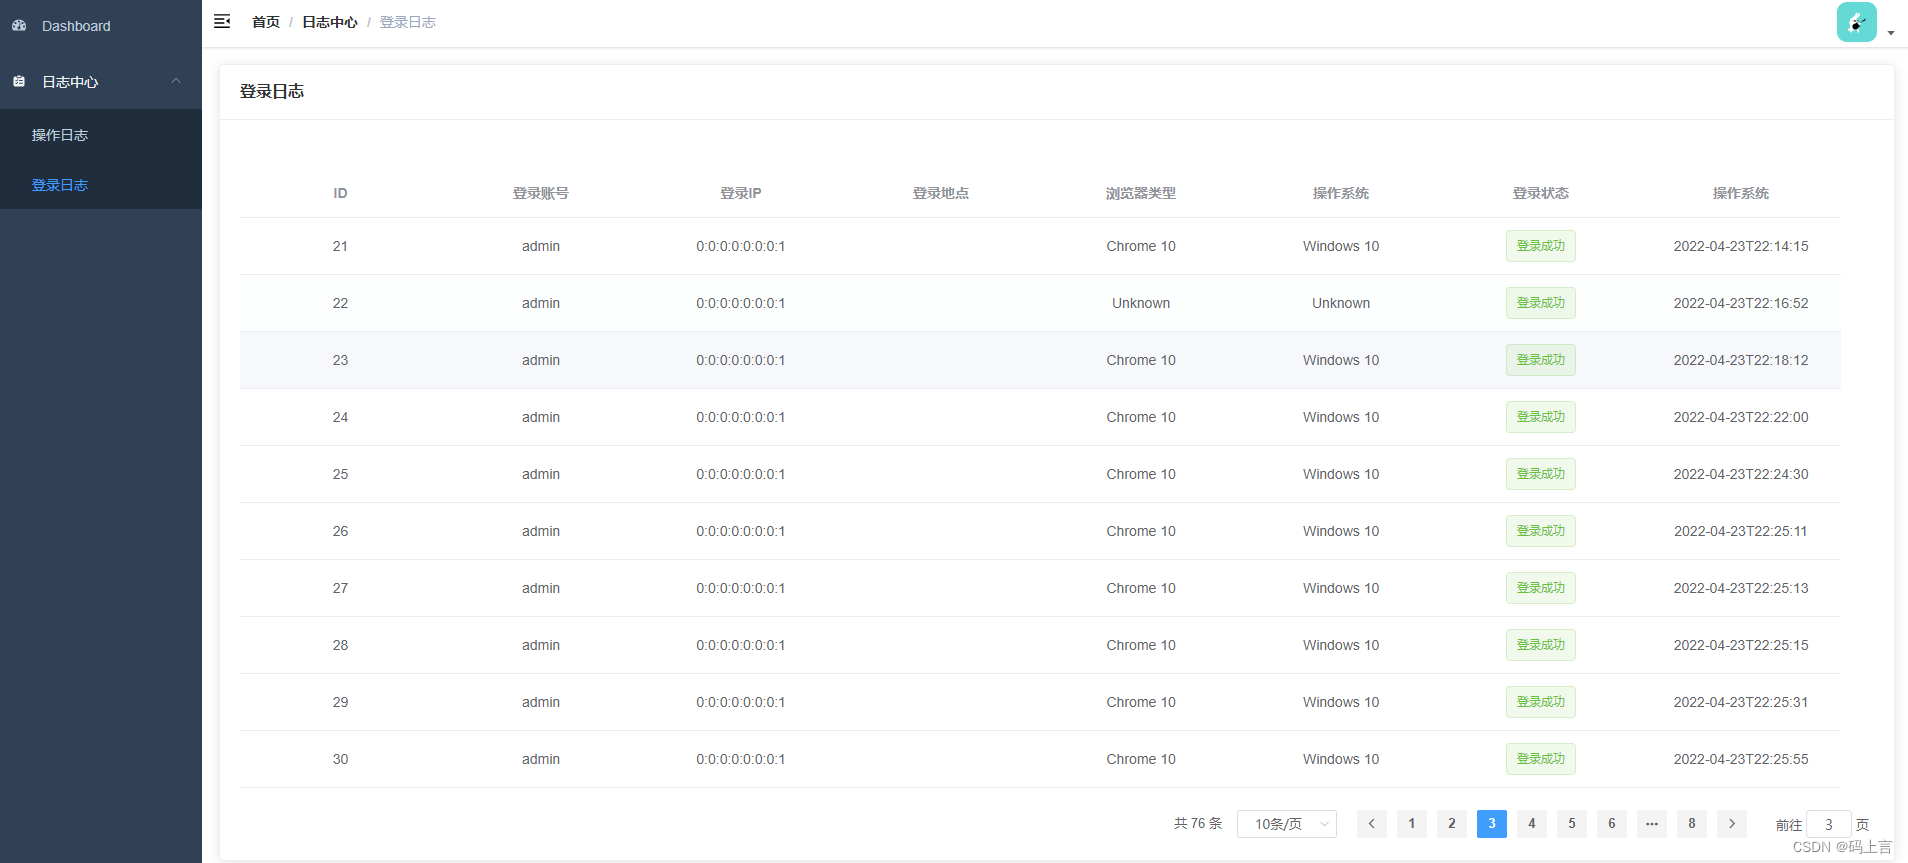
一、登录日志页面
上一篇我们只完成了操作日志的页面,我们首先完成剩下的登录日志。这个和我们操作日志的页面基本上差不多,我们的日志数据不支持删除,只能后台数据库进行删除。
1、设置api
在src/api文件下找到operation.js文件,和操作日志一个,我们加一个请求的接口,这里和我们后台写的接口地址保持一致。
export function fetchLoginLogList(query) { return request({ url: '/log/loginOperationLog/list', method: 'post', data: query })}由于我们一开始就设置了这个的路由,所以我们现在就直接去画页面。
2、页面
在src/views/operation目录下,找到loginlog.vue,如果没有你就新建一个。以下是全部的代码,这里基本上和操作日志的页面一样,就改了一些展示的内容。
<template> <el-card class="box-card"> <!-- 设置标题登录日志 --> <div slot="header" class="clearfix"> <span>登录日志</span> </div> <el-table v-loading="listLoading" :data="list" fit highlight-current-row style="width: 98%; margin-top:30px;"> <el-table-column align="center" label="ID" > <template slot-scope="scope"> <span>{{ scope.row.id }}</span> </template> </el-table-column> <el-table-column align="center" label="登录账号"> <template slot-scope="scope"> <span>{{ scope.row.loginName}}</span> </template> </el-table-column> <el-table-column align="center" label="登录IP"> <template slot-scope="scope"> <span>{{ scope.row.ipAddress}}</span> </template> </el-table-column> <el-table-column align="center" label="登录地点"> <template slot-scope="scope"> <span>{{ scope.row.loginLocation}}</span> </template> </el-table-column> <el-table-column align="center" label="浏览器类型"> <template slot-scope="scope"> <span>{{ scope.row.browserType}}</span> </template> </el-table-column> <el-table-column align="center" label="操作系统"> <template slot-scope="scope"> <span>{{ scope.row.os}}</span> </template> </el-table-column> <el-table-column align="center" label="登录状态"> <template slot-scope="scope"> <el-tag :type="tagType(scope.row.loginStatus)"> {{ map[scope.row.loginStatus ] }} </el-tag> </template> </el-table-column> <el-table-column align="center" label="操作系统"> <template slot-scope="scope"> <span>{{ scope.row.createTime}}</span> </template> </el-table-column> </el-table> <!-- 分页 --> <el-pagination class="pagination-container" background @size-change="handleSizeChange" @current-change="handleCurrentChange" :current-page="this.listQuery.pageNum" :page-size="this.listQuery.pageSize" :total="count" :page-sizes="[10, 20, 30]" layout="total, sizes, prev, pager, next, jumper" /> </el-card></template><script>import { fetchLoginLogList } from '@/api/operation'export default { name: 'LoginOperationlog', created() { this.getList() }, data() { return { list: null, listLoading: true, count: 0, listQuery: { pageNum: 1, pageSize: 10 }, map: { 0: '登录成功', 1: '登录失败' } } }, methods: { getList() { this.listLoading = true var body = this.listQuery; fetchLoginLogList({body}).then(response => { this.list = response.data.result this.count = response.data.totalSize this.listLoading = false }) }, handleSizeChange(pageSize) { this.listQuery.pageSize = pageSize this.getList() }, handleCurrentChange(pageNum) { this.listQuery.pageNum = pageNum this.getList() } }, computed: { tagType() { return function(type) { switch (type) { case 0: return "success"; case 1: return "warning"; } }; } }}</script><style rel="stylesheet/scss" lang="scss" scoped> .pagination-container { float: right; margin-top: 1.25rem; margin-bottom: 1.25rem; } .box-card { width: 98%; margin: 1%; } .clearfix:before, .clearfix:after { display: table; content: ""; } .clearfix:after { clear: both } .clearfix span { font-weight: 600; }</style>这里只说一下登录的状态页面展示,我们后台返回前端的数据是登录成功状态为0,失败为1,所以我在前端判断了一下这个状态的展示,使得页面更加的美观。
写到这里,我们的登录页面基本上完成了,此时日志中心也基本上完成。我们打开页面会看到这个时间有点小问题,后端返回过来的时间都带着T,这个影响我们数据的直观,所以我们在后台处理一下,只需要一个注解即可。
我们在实体类的时间上加上一下注解:
/ * 创建时间 */ @JsonFormat(timezone = "GMT+8",pattern="yyyy-MM-dd HH:mm:ss") private LocalDateTime createTime;将操作日志和登录日志的时间都加上,重启项目即可。
二、路由管理
我想了一下接下来的开发流程,我先把整个的路由补充完整,让整个项目的框架搭起来,功能都列举出来,到时候我们直接在对应的页面中添加即可。
首先打开src/router目录,然后打开index.js。
(1)用户管理路由
用户管理下面我们主要分两个子菜单,一个是用户列表,这个页面里包含了对用户的增删改查操作。另一个子菜单是个人简介,这里可以自由发挥,可以写写自己的介绍等。这里的icon图表可以去阿里的矢量图库中去下载。然后放到icons/svg目录下。
{ path: '/user', component: Layout, redirect: '/user/list', name: 'User', meta: { title: '用户管理', icon: 'user' }, children: [ { path: 'list', name: 'UserList', component: () => import('@/views/user/list'), meta: { title: '用户列表', icon: 'user' } }, { path: 'introduction', name: 'Introduction', component: () => import('@/views/user/introduction'), meta: { title: '个人介绍', icon: 'jieshao' } }, ] },然后我们在对应的目录下(/src/views)新建一个user文件夹,然后新建一个list.vue和introduction.vue文件。
先将以下代码填充进去,看下页面是否有数据即可。
<template> <div> 用户管理 </div></template><script>export default { name: 'UserList', }</script><style rel="stylesheet/scss" lang="scss" scoped> </style>(2)公告管理路由
接下来再创建公告的路由管理,和上面的用户一致,先写路由。
{ path: '/notice', component: Layout, redirect: '/notice/list', name: 'Notice', meta: { title: '公告管理', icon: 'notice' }, children: [ { path: 'list', name: 'NoticeList', component: () => import('@/views/notice/list'), meta: { title: '公告列表', icon: 'notice' } }, { path: 'add', name: 'AddNotice', component: () => import('@/views/notice/add'), meta: { title: '发布公告', icon: 'fabu' } }, ] },然后我们在对应的目录下(/src/views)新建一个notice文件夹,然后新建一个list.vue和add.vue文件。里面还是用上边用户的模板先填充即可。
(3)标签管理
{ path: '/tag', component: Layout, redirect: '/tag/list', name: 'Tag', meta: { title: '标签管理', icon: 'biaoqian' }, children: [ { path: 'list', name: 'TagList', component: () => import('@/views/tag/list'), meta: { title: '标签管理', icon: 'biaoqian' } }, ] },然后在新建一个标签管理的目录,参照上边的方式。新建一个tag文件夹,然后建一个list.vue即可。
(4)分类管理
{ path: '/categories', component: Layout, redirect: '/categories/list', name: 'Categories', meta: { title: '分类管理', icon: 'fenlei' }, children: [ { path: 'list', name: 'CategoriesList', component: () => import('@/views/categories/list'), meta: { title: '分类管理', icon: 'fenlei' } }, ] },然后再新建一个tag文件夹,然后建一个list.vue即可。
(5)文章管理
{ path: '/articles', component: Layout, redirect: '/articles/list', name: 'Articles', meta: { title: '文章管理', icon: 'wz' }, children: [ { path: 'list', name: 'ArticlesList', component: () => import('@/views/articles/list'), meta: { title: '文章列表', icon: 'wenzhang' } }, { path: 'add', name: 'Addrticles', component: () => import('@/views/articles/add'), meta: { title: '发布文章', icon: 'fabu' } }, ] },然后再新建一个articles文件夹,然后建一个list.vue和add.vue即可。
好啦,我们将左侧的导航功能基本上全部搭建好了,有点系统的样子了。

三、分类管理
首先我们上边已经创建了路由的管理,所以我们页面也已经创建好了,接下来我们来创建一下api接口对接。
1、创建api
新建一个category.js文件,主要是最基础的增删改查接口。
import request from '@/utils/request'export function categoryList(query) { return request({ url: '/category/list', method: 'post', data: query })}export function addCategory(data) { return request({ url: '/category/create', method: 'post', data })}export function updateCategory(data) { return request({ url: '/category/update', method: 'post', data })}export function deleteCategory(id) { return request({ url: '/category/delete', method: 'post', params: { id } })}2、分类列表
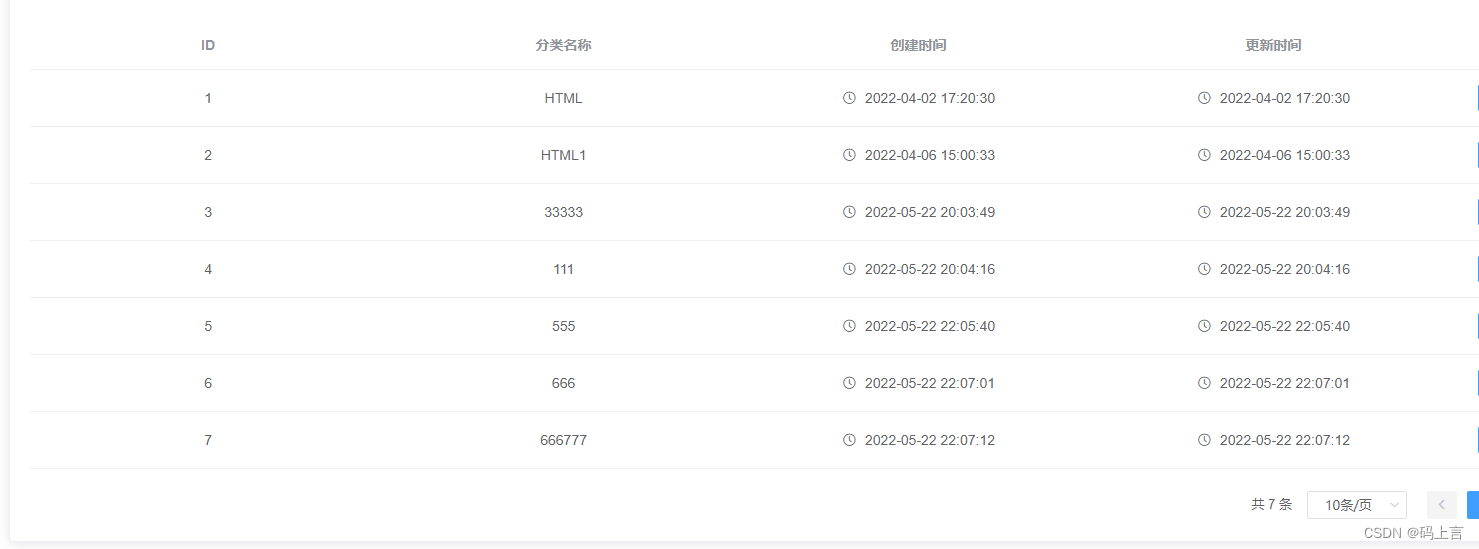
还是老规矩,先画页面,看了一下后端代码,我们还是采用的分页展示,所以这里面还要写一个分页,和用户的基本上一致。
<template> <el-card class="box-card"> <el-table v-loading="listLoading" :data="list" fit highlight-current-row style="width: 98%; margin-top:30px;"> <el-table-column align="center" label="ID" > <template slot-scope="scope"> <span>{{ scope.row.categoryId }}</span> </template> </el-table-column> <el-table-column align="center" label="分类名称"> <template slot-scope="scope"> <span>{{ scope.row.categoryName}}</span> </template> </el-table-column><el-table-column align="center" label="创建时间"> <template slot-scope="scope"> <i class="el-icon-time" style="margin-right:5px" /> <span>{{ scope.row.createTime}}</span> </template> </el-table-column><el-table-column align="center" label="更新时间"> <template slot-scope="scope"> <i class="el-icon-time" style="margin-right:5px" /> <span>{{ scope.row.updateTime}}</span> </template> </el-table-column> </el-table> <!-- 分页 --> <el-pagination class="pagination-container" background @size-change="handleSizeChange" @current-change="handleCurrentChange" :current-page="this.listQuery.pageNum" :page-size="this.listQuery.pageSize" :total="count" :page-sizes="[10, 20, 30]" layout="total, sizes, prev, pager, next, jumper" /> </el-card></template>引入接口:
import { categoryList} from '@/api/category'然后接收接口传来的数据
export default { name: 'CategoriesList', created() { this.getList() }, data() { return { list: null, listLoading: true, count: 0, listQuery: { pageNum: 1, pageSize: 10 }, } }, methods: { getList() { this.listLoading = true var body = this.listQuery; categoryList({body}).then(response => { this.list = response.data.result this.count = response.data.totalSize this.listLoading = false }) }, handleSizeChange(pageSize) { this.listQuery.pageSize = pageSize this.getList() }, handleCurrentChange(pageNum) { this.listQuery.pageNum = pageNum this.getList() } }}然后再修改一下样式:
<style rel="stylesheet/scss" lang="scss" scoped> .pagination-container { float: right; margin-top: 1.25rem; margin-bottom: 1.25rem; } .box-card { width: 98%; margin: 1%; } .clearfix:before, .clearfix:after { display: table; content: ""; } .clearfix:after { clear: both } .clearfix span { font-weight: 600; }</style>这里面我们将分页请求的参数外边又包了一层body,所以,后端如果没有修改的话,修改一下。
@ApiOperation(value = "分类列表") @PostMapping("list") public JsonResult<Object> listPage(@RequestBody @Valid PageRequestApi<PageRequest> pageRequest) { List<Category> categoryList = categoryService.getCategoryPage(pageRequest.getBody()); PageInfo pageInfo = new PageInfo(categoryList); PageResult pageResult = PageUtil.getPageResult(pageRequest.getBody(), pageInfo); return JsonResult.success(pageResult); }都写完之后,可以启动项目,查看是否有数据展示出来。
3、添加和修改
这两个放一起来说,因为我们这里面的功能比较简单,所以我就用了一个弹出框来作为用户输入的信息,根据id来判断是增加的还是修改的,大家应该知道,添加的数据此时还没有id值,所以用id作为区分。
接口已经写好,现在我们将接口的两个方法引进来。
import { categoryList, addCategory, updateCategory } from '@/api/category'然后我们新建一个添加的按钮和一个编辑的按钮,这个添加的按钮我们就放到了列表的左上角即可,一般的系统都是这样设计的,编辑的则放在列表中操作,再加一个操作列,主要放编辑和删除两个功能,跟随每一条数据操作。
<el-button type="primary" size="small" icon="el-icon-plus" @click="transformation(null)">新增分类</el-button>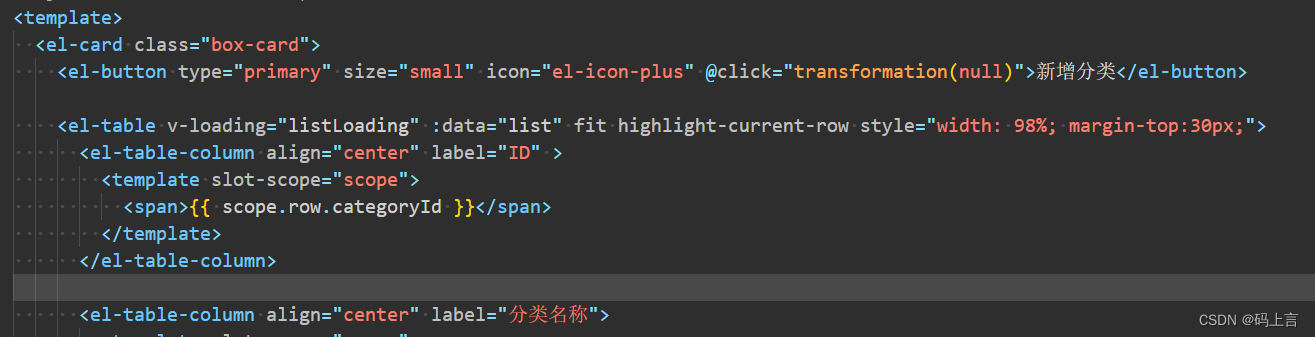
这里我们使用了一个点击事件,方法为transformation(),我们等一下再创建。
然后再加一个操作的列。这里的编辑也是用了和添加一样的点击事件。
<el-table-column align="center" label="操作" width="180"> <template slot-scope="scope"> <el-button type="primary" size="mini" icon="el-icon-edit" @click="transformation(scope.row)">编辑</el-button> </template></el-table-column>添加完之后,然后我们去写transformation()方法。
下面这个方法就是添加和修改都调用了,这个主要的功能是什么呢?,首先我们看到,方法带了一个参数,大家去上边添加和修改中看一下调用这个传的参数有什么不同。大家会发现添加的是传了一个null,修改的则是将展示的这一行的数据传了进来。讲到这里大家,大家再看一下代码,哦哦。原来是这样区分的,修改的时候我们就会把数据给带过来,添加的话则为空。这个也主要是为了弹窗准备的,共用了一个弹窗。
transformation(category) { if (category != null) { this.categoryForm = JSON.parse(JSON.stringify(category)); this.$refs.categoryTitle.innerHTML = "修改分类"; } else { this.categoryForm.categoryId = null; this.categoryForm.categoryName = ""; this.$refs.categoryTitle.innerHTML = "添加分类"; } this.addOrupdateDialogVisible = true; },最下面可能会看到还有一句话:this.addOrupdateDialogVisible = true;这个主要是控制弹窗是否显示,我们需要再return中定义一下。categoryForm也需要定义。
return { list: null, listLoading: true, count: 0, listQuery: { pageNum: 1, pageSize: 10 }, addOrupdateDialogVisible: false, categoryForm: { categoryId: null, categoryName: "" }, }接下来我们写添加或者修改的对话框。
我先列出部分功能讲解,最后我会将完整的代码附上。
<!-- 添加或修改分类对话框 --> <el-dialog :visible.sync="addOrupdateDialogVisible" width="30%"> <div class="dialog-title-container" slot="title" ref="categoryTitle" /> <el-form label-width="100px" size="medium" :model="categoryForm"> <el-form-item label="分类名称:"> <el-input v-model="categoryForm.categoryName" style="width:220px" /> </el-form-item> </el-form> <div slot="footer"> <el-button @click="addOrupdateDialogVisible = false">取 消</el-button> <el-button type="primary" @click="addCategory"> 确 定 </el-button> </div> </el-dialog>我们来分析一下,这个则是控制我们对话框弹不弹出的控制,接下来categoryTitle这个大家可以在transformation()方法中找到对它的赋值,其实就是左上角的标题。然后还有就是取消控制和确定,点击确定则会触发addCategory事件,对分类的修改或添加。
然后接下来我们就去写addCategory方法。
我从上到下来说一下流程:
首先我们要判断一下页面上的输入框分类名称是不是为空,为空的话则返回错误信息,紧接着然后获取表单的信息,如果id为null则表示添加的操作,这时走添加的接口addCategory(),否则的话会走updateCategory()方法。
最后再设置对话框为false,基本上的操作流程就这些,都是一般的逻辑。
addCategory() { if (this.categoryForm.categoryName.trim() == "") { this.$message.error("分类名不能为空"); return false; } var body = this.categoryForm; if(body.categoryId == null){ addCategory(body).then(response => { this.$message({ type: 'success', message: '添加分类成功!' }) this.getList() }).catch(() => { console.log('error') }) } else { updateCategory(body).then(response => { this.$message({ type: 'success', message: '修改分类成功!' }) this.getList() }).catch(() => { console.log('error') }) }下面再把删除功能做了,再一起测试。删除功能比较简单点,我们先添加一个删除按钮再操作列中。
4、删除
<el-button type="danger" size="small" icon="el-icon-delete" @click="deleteCategoryById(scope.row.categoryId)">删除</el-button>然后调用了删除的方法,接下来去完成删除的方法。这个也是很简单的,我们只要传入一个id给后端,然后后端根据id去删除即可,调用接口。
import { categoryList, addCategory, updateCategory, deleteCategory } from '@/api/category'deleteCategoryById (id) { this.$confirm('此操作将永久删除该分类, 是否继续?', '提示', { confirmButtonText: '确定', cancelButtonText: '取消', type: 'warning' }).then(() => { deleteCategory(id).then(response => { this.$message({ type: 'success', message: '删除成功!' }) this.getList() }).catch(() => { console.log('error') }) }).catch(() => { this.$message({ type: 'error', message: '你已经取消删除该分类!' }) }) },写完这个,因为我们传入的参数格式不一致,我们要修改后端接口代码:
@ApiOperation(value = "删除分类") @PostMapping("/delete") @OperationLogSys(desc = "删除分类", operationType = OperationType.DELETE) public JsonResult<Object> categoryDelete(@RequestParam(value = "id") int id) { categoryService.deleteCategory(id); return JsonResult.success(); }好啦,到这里在展示、添加、修改、刪除的功能基本完成,我们测试一下这几个功能。运行一下前后端项目。
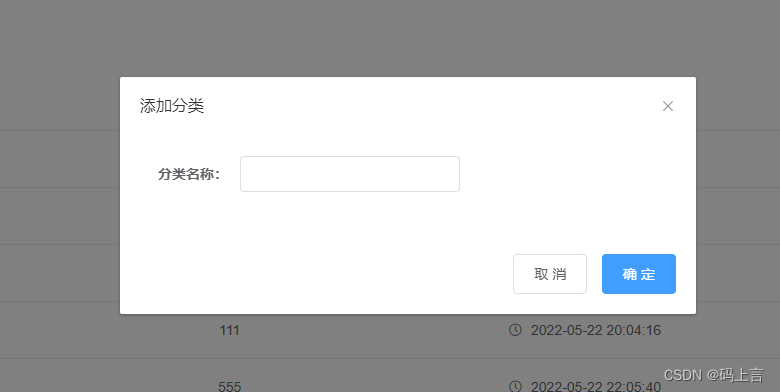
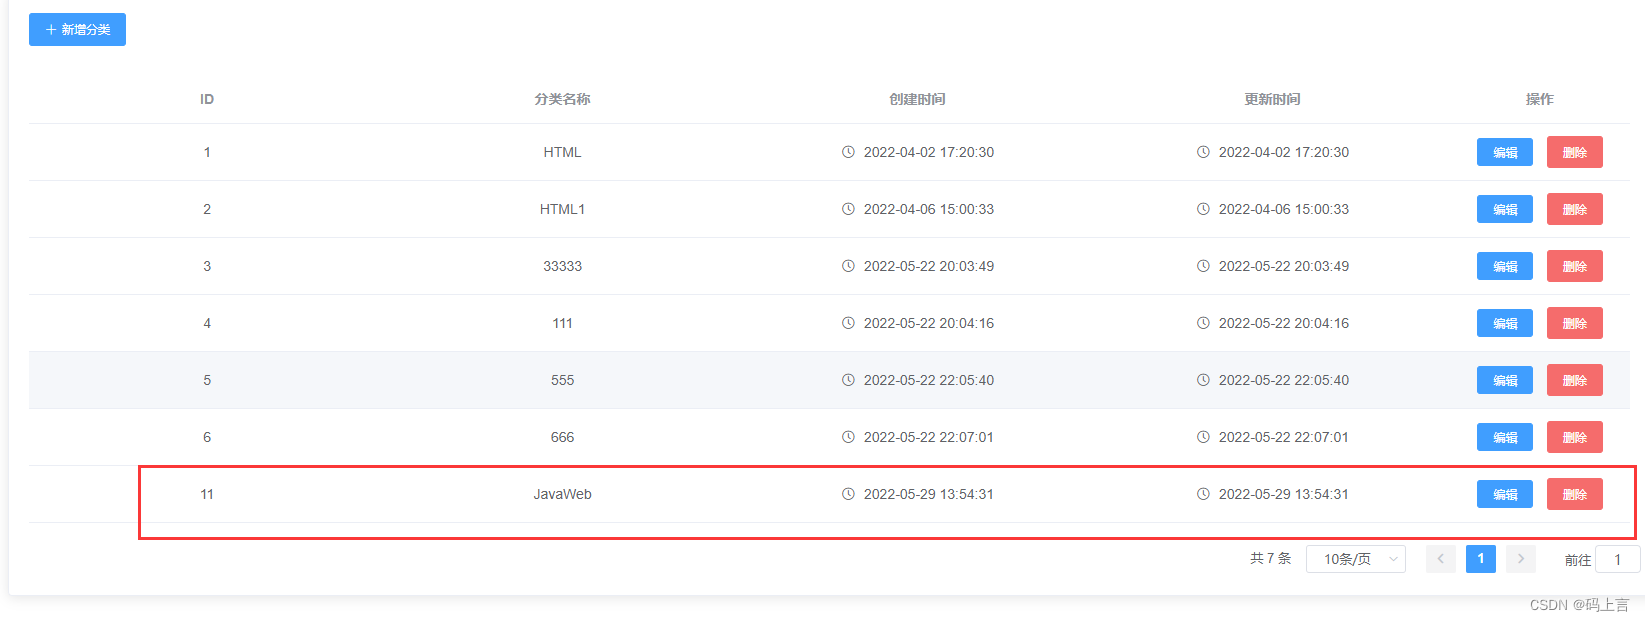
添加一条数据:
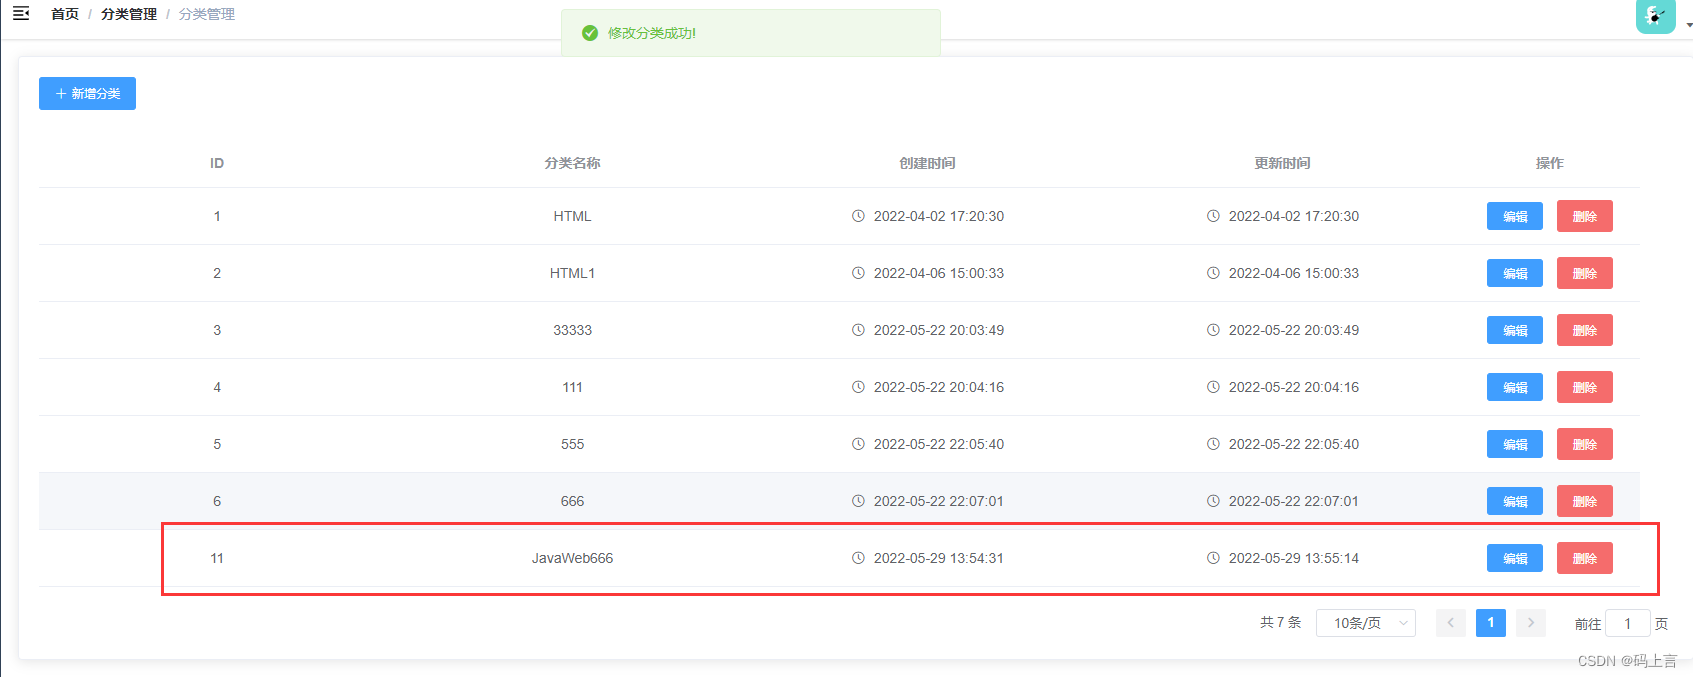
修改分类:
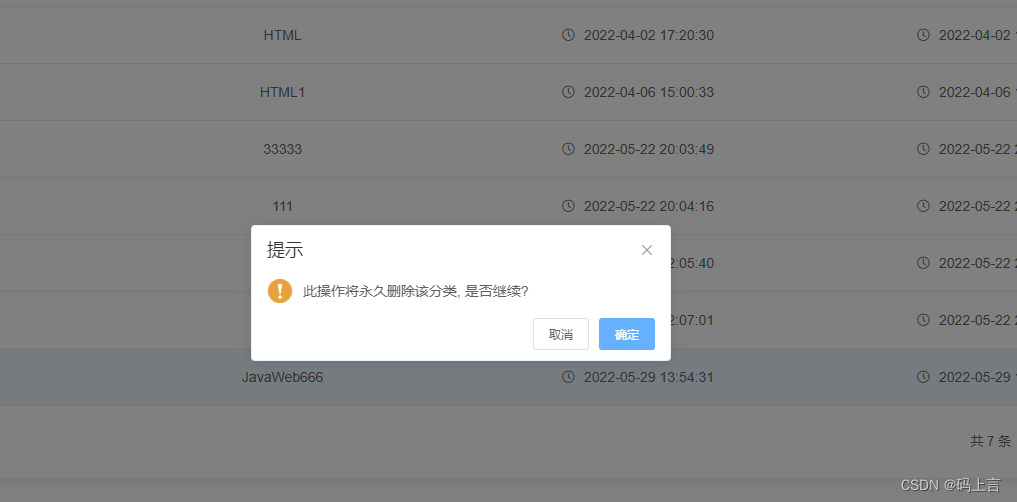
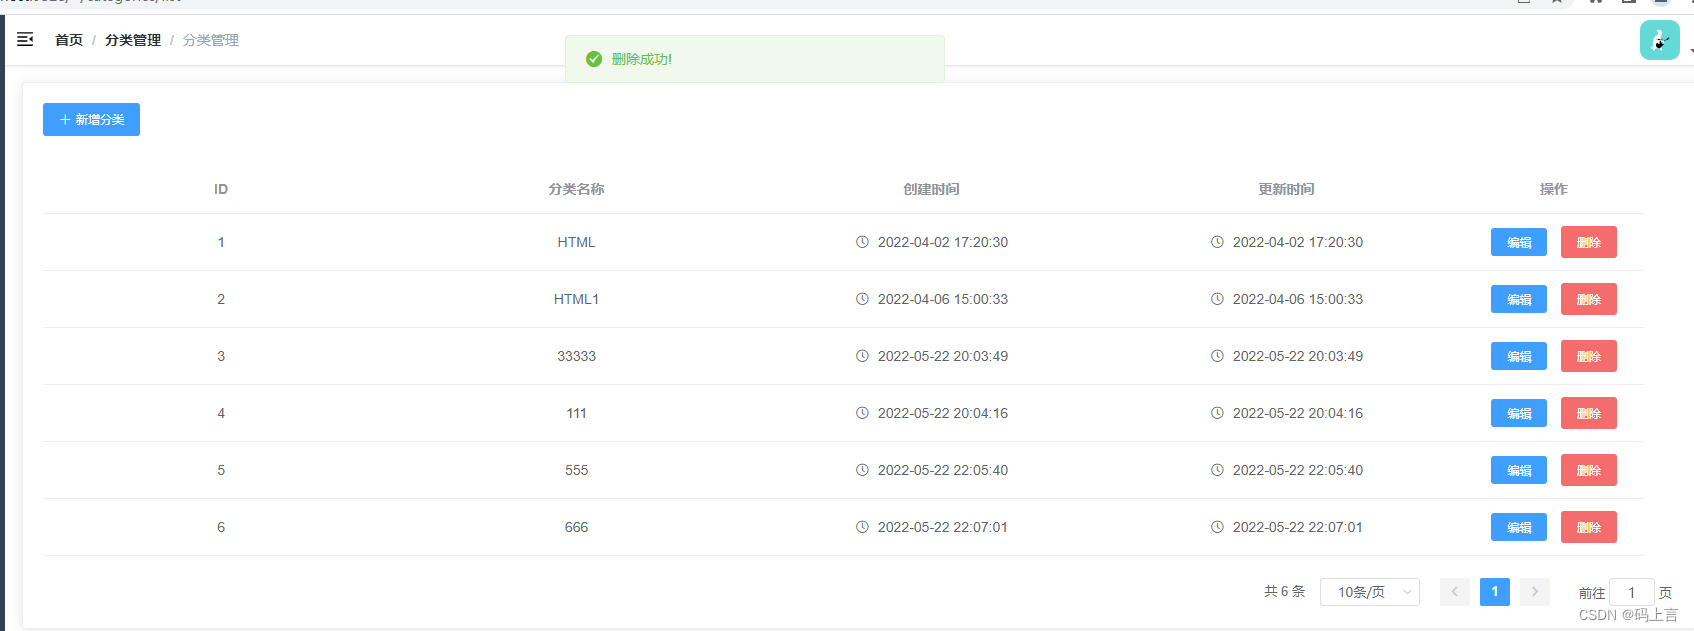
删除分类:
分类完整代码:
<template> <el-card class="box-card"> <el-button type="primary" size="small" icon="el-icon-plus" @click="transformation(null)">新增分类</el-button> <el-table v-loading="listLoading" :data="list" fit highlight-current-row style="width: 98%; margin-top:30px;"> <el-table-column align="center" label="ID" > <template slot-scope="scope"> <span>{{ scope.row.categoryId }}</span> </template> </el-table-column> <el-table-column align="center" label="分类名称"> <template slot-scope="scope"> <span>{{ scope.row.categoryName}}</span> </template> </el-table-column><el-table-column align="center" label="创建时间"> <template slot-scope="scope"> <i class="el-icon-time" style="margin-right:5px" /> <span>{{ scope.row.createTime}}</span> </template> </el-table-column><el-table-column align="center" label="更新时间"> <template slot-scope="scope"> <i class="el-icon-time" style="margin-right:5px" /> <span>{{ scope.row.updateTime}}</span> </template> </el-table-column> <el-table-column align="center" label="操作" width="180"> <template slot-scope="scope"> <el-button type="primary" size="mini" icon="el-icon-edit" @click="transformation(scope.row)">编辑</el-button> <el-button type="danger" size="small" icon="el-icon-delete" @click="deleteCategoryById(scope.row.categoryId)">删除</el-button> </template> </el-table-column> </el-table> <!-- 分页 --> <el-pagination class="pagination-container" background @size-change="handleSizeChange" @current-change="handleCurrentChange" :current-page="this.listQuery.pageNum" :page-size="this.listQuery.pageSize" :total="count" :page-sizes="[10, 20, 30]" layout="total, sizes, prev, pager, next, jumper" /> <!-- 添加或修改分类对话框 --> <el-dialog :visible.sync="addOrupdateDialogVisible" width="30%"> <div class="dialog-title-container" slot="title" ref="categoryTitle" /> <el-form label-width="100px" size="medium" :model="categoryForm"> <el-form-item label="分类名称:"> <el-input v-model="categoryForm.categoryName" style="width:220px" /> </el-form-item> </el-form> <div slot="footer"> <el-button @click="addOrupdateDialogVisible = false">取 消</el-button> <el-button type="primary" @click="addCategory"> 确 定 </el-button> </div> </el-dialog> </el-card></template><script> import { categoryList, addCategory, updateCategory, deleteCategory } from '@/api/category'export default { name: 'CategoriesList', created() { this.getList() }, data() { return { list: null, listLoading: true, count: 0, listQuery: { pageNum: 1, pageSize: 10 }, addOrupdateDialogVisible: false, categoryForm: { categoryId: null, categoryName: "" }, } }, methods: { getList() { this.listLoading = true var body = this.listQuery; categoryList({body}).then(response => { this.list = response.data.result this.count = response.data.totalSize this.listLoading = false }) }, transformation(category) { if (category != null) { this.categoryForm = JSON.parse(JSON.stringify(category)); this.$refs.categoryTitle.innerHTML = "修改分类"; } else { this.categoryForm.categoryId = null; this.categoryForm.categoryName = ""; this.$refs.categoryTitle.innerHTML = "添加分类"; } this.addOrupdateDialogVisible = true; }, addCategory() { if (this.categoryForm.categoryName.trim() == "") { this.$message.error("分类名不能为空"); return false; } var body = this.categoryForm; if(body.categoryId == null){ addCategory(body).then(response => { this.$message({ type: 'success', message: '添加分类成功!' }) this.getList() }).catch(() => { console.log('error') }) } else { updateCategory(body).then(response => { this.$message({ type: 'success', message: '修改分类成功!' }) this.getList() }).catch(() => { console.log('error') }) } this.addOrupdateDialogVisible = false; }, deleteCategoryById (id) { this.$confirm('此操作将永久删除该分类, 是否继续?', '提示', { confirmButtonText: '确定', cancelButtonText: '取消', type: 'warning' }).then(() => { deleteCategory(id).then(response => { this.$message({ type: 'success', message: '删除成功!' }) this.getList() }).catch(() => { console.log('error') }) }).catch(() => { this.$message({ type: 'error', message: '你已经取消删除该分类!' }) }) }, handleSizeChange(pageSize) { this.listQuery.pageSize = pageSize this.getList() }, handleCurrentChange(pageNum) { this.listQuery.pageNum = pageNum this.getList() } }}</script><style rel="stylesheet/scss" lang="scss" scoped> .pagination-container { float: right; margin-top: 1.25rem; margin-bottom: 1.25rem; } .box-card { width: 98%; margin: 1%; } .clearfix:before, .clearfix:after { display: table; content: ""; } .clearfix:after { clear: both } .clearfix span { font-weight: 600; }</style>四、用户功能
首先我们在src/api目录下新建一个user.js,这里面放的是和后端controller层对接的请求接口,增删改查之类的,上边写日志的时候说过,不会的小伙伴去上一篇看看。
下面一共是四个接口,大家应该从接口地址上就能看出大概是什么接口,我这里不多少了。
import request from '@/utils/request'export function userList(query) { return request({ url: '/user/list', method: 'post', data: query })}export function addUser(data) { return request({ url: '/user/create', method: 'post', data })}export function updateUser(data) { return request({ url: '/user/update', method: 'post', data })}export function deleteUser(id) { return request({ url: '/user/delete', method: 'post', params: { id } })}接口创建完之后,我们接下来可以写页面了。
打开src/views/user目录下的list.vue,还是和以前的套路一样,基本的数据展示相信大家基本上已经会了,这里为我们要比日志多了删除,添加和修改这三个功能,展示的部分基本上是一致的,我就不过多的解释了。
下面是基础的代码,展示的功能。
1、列表
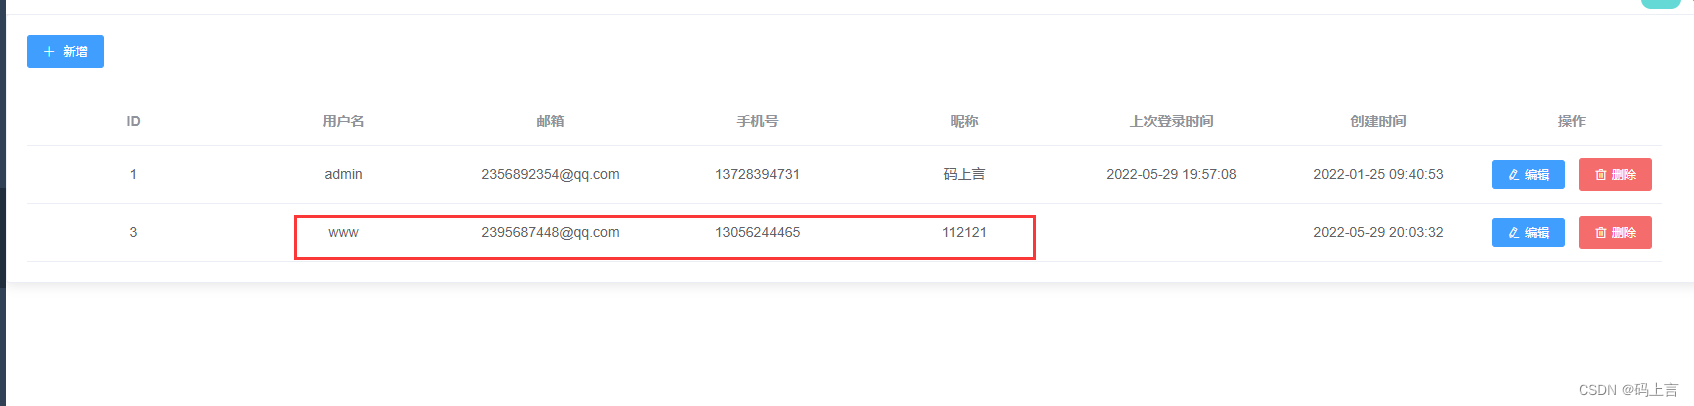
<template> <el-card class="box-card"> <el-table v-loading="listLoading" :data="list" fit highlight-current-row style="width: 98%; margin-top:30px;"> <el-table-column align="center" label="ID" > <template slot-scope="scope"> <span>{{ scope.row.id }}</span> </template> </el-table-column> <el-table-column align="center" label="用户名"> <template slot-scope="scope"> <span>{{ scope.row.userName}}</span> </template> </el-table-column> <el-table-column align="center" label="邮箱"> <template slot-scope="scope"> <span>{{ scope.row.email}}</span> </template> </el-table-column> <el-table-column align="center" label="手机号"> <template slot-scope="scope"> <span>{{ scope.row.phone}}</span> </template> </el-table-column> <el-table-column align="center" label="昵称"> <template slot-scope="scope"> <span>{{ scope.row.nickname}}</span> </template> </el-table-column> <el-table-column align="center" label="上次登录时间"> <template slot-scope="scope"> <span>{{ scope.row.lastLoginTime}}</span> </template> </el-table-column> <el-table-column align="center" label="创建时间"> <template slot-scope="scope"> <span>{{ scope.row.createTime}}</span> </template> </el-table-column> <el-table-column align="center" label="操作" width="180"> <template slot-scope="scope"> </template> </el-table-column> </el-table> </el-card></template><script> import { userList, deleteUser } from '@/api/user'export default { name: 'UserList', created() { this.getList() }, data() { return { list: null, listLoading: true, listQuery: {} } }, methods: { getList() { this.listLoading = true var body = this.listQuery; userList({body}).then(response => { this.list = response.data this.listLoading = false }) }, }}</script><style rel="stylesheet/scss" lang="scss" scoped> </style>我们完成了展示的功能,这时我们运行打开页面看一下。
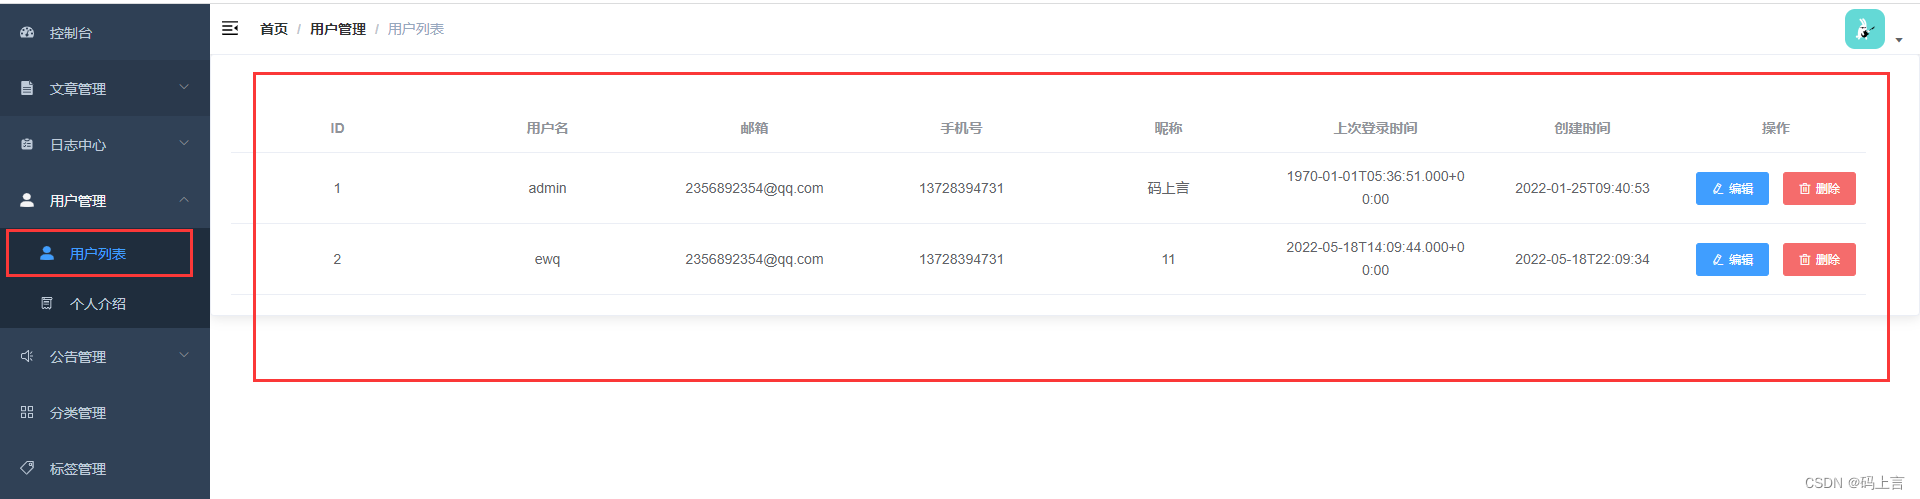
看到这里,我们的用户展示功能已经完成了,然后我们看到上次登录时间和创建时间不对,我们先去后端改一下。
打开User.java,然后在创建时间上边添加注解。然后再将上次登录时间的属性修改一下类型。
/* 创建时间*/@JsonFormat(timezone = "GMT+8",pattern="yyyy-MM-dd HH:mm:ss")private LocalDateTime createTime;/* 上次登录时间*/@JsonFormat(timezone = "GMT+8",pattern="yyyy-MM-dd HH:mm:ss")private LocalDateTime lastLoginTime;上次登录时间我们还要修改一下。
我们需要写个修改上次登录时间的方法,打开UserService.java,然后添加一个接口。
/* 更新上次登录时间* @param userId*/void updateLoginTime(Integer userId);再写一个实现方法
@Overridepublic void updateLoginTime(Integer userId) { User user = new User(); user.setId(userId); user.setLastLoginTime(LocalDateTime.now()); userMapper.updateById(user); }我们上边调用了UserMapper.java中的updateById,这个需要我们自己加一个
/* 更新上次登录时间* @param user*/void updateById(User user);紧接着去写一下xml的sql语句。
这里传的参数如果不判断为空的话,只修改某个字段的值的话,其余不修改的会变成null。
<update id="updateById" parameterType="com.blog.personalblog.entity.User"> update person_user <set> <if test="userName!=null"> username = #{userName}, </if> <if test="passWord!=null"> password = #{passWord}, </if> <if test="email!=null"> email = #{email}, </if> <if test="lastLoginTime!=null"> last_login_time = #{lastLoginTime}, </if> <if test="phone!=null"> phone = #{phone}, </if> <if test="nickname!=null"> nickname = #{nickname} </if> </set> where id = #{id}</update>完成之后,我们将在登录的时候进行修改这个时间点,打开UserController.java类,然后再login的方法中添加以下代码:
//修改上个登录的时间User user = userService.getUserByUserName(loginModel.getUsername());userService.updateLoginTime(user.getId());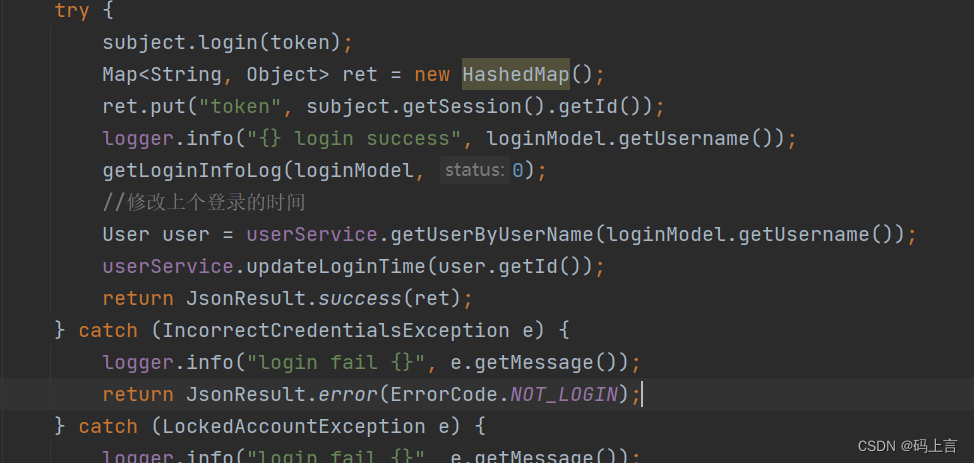
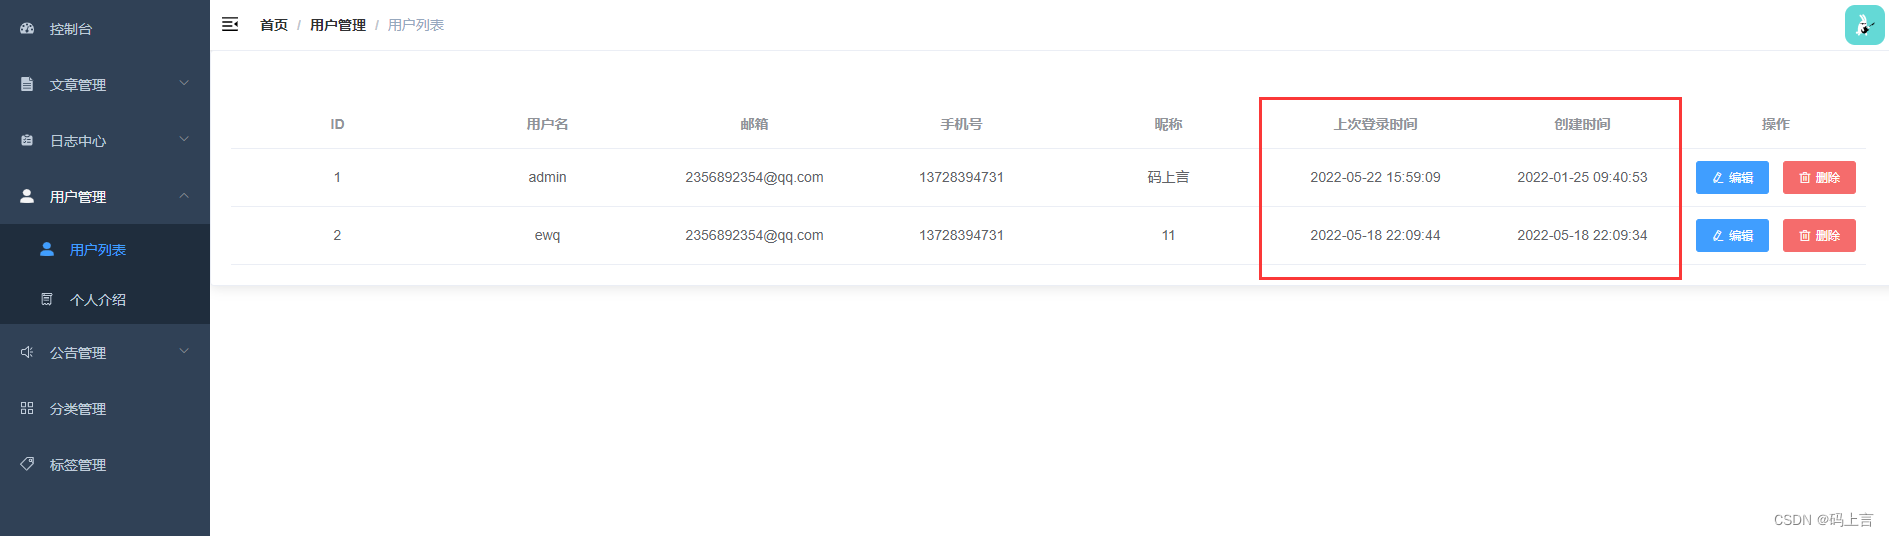
我们运行项目,再次看一下效果。现在已经都修改好了。
接下来我们完成列表最右边操作栏里面的功能,实现添加修改和删除功能。
2、删除
这里我们首先修改一下我们之前请求的接口地址:
/* 删除* @return*/@ApiOperation(value = "删除用户")@PostMapping("/delete")@OperationLogSys(desc = "删除用户", operationType = OperationType.DELETE)public JsonResult<Object> userDelete(@RequestParam(value = "id") int id) { userService.deleteUser(id); return JsonResult.success();}然后在页面的操作中添加一个删除的按钮。这里面我们定义了一个删除的deleteUser方法。
<el-button type="danger" size="small" icon="el-icon-delete" @click="deleteUser(scope.row.id)">删除</el-button>我们先引入接口的方法
import { userList, deleteUser } from '@/api/user'添加方法,在我们点击删除按钮时,要提示是否要删除该用户的提示。
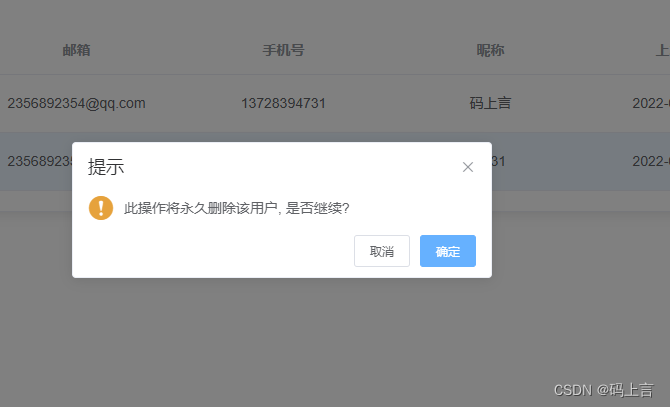
deleteUser (id) { this.$confirm('此操作将永久删除该用户, 是否继续?', '提示', { confirmButtonText: '确定', cancelButtonText: '取消', type: 'warning' }).then(() => { deleteUser(id).then(response => { this.$message({ type: 'success', message: '删除成功!' }) this.getList() }).catch(() => { console.log('error') }) }).catch(() => { this.$message({ type: 'error', message: '你已经取消删除该用户!' }) })},我们去页面上先点击删除按钮
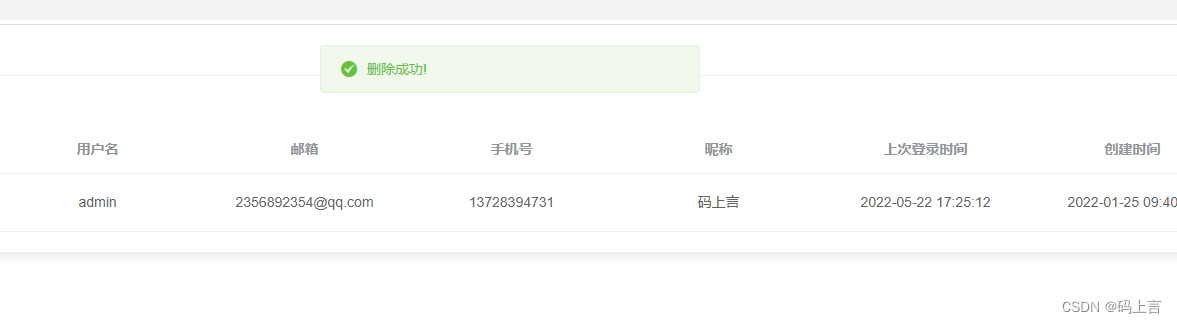
然后点击确定,删除成功会提示一下信息,这样我们就删除完成了。
3、添加和修改
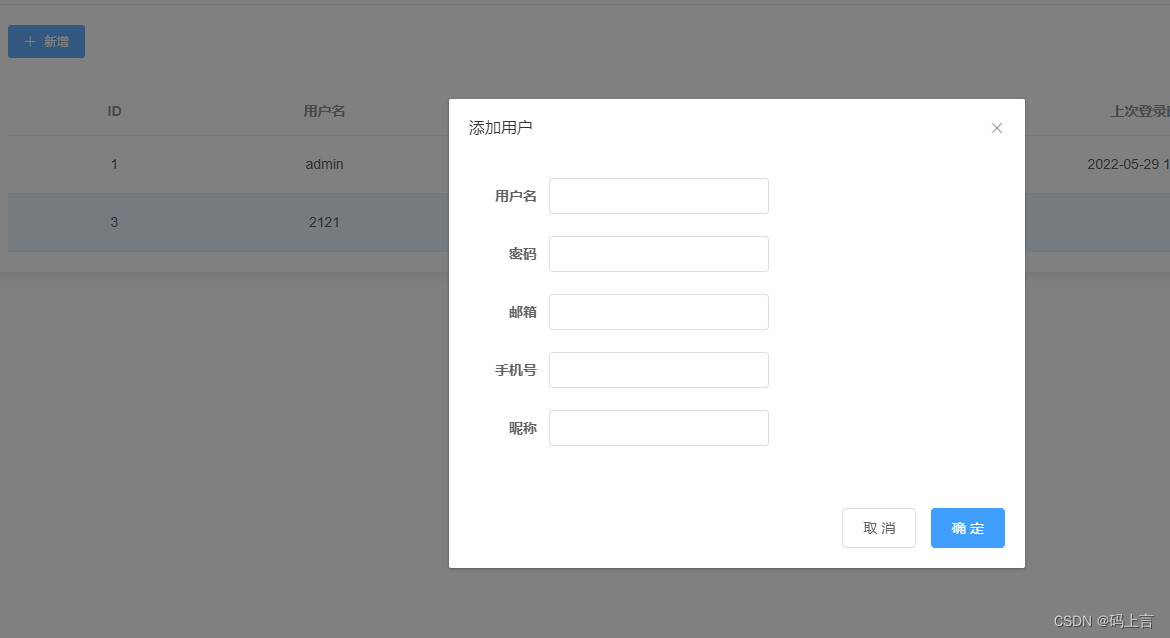
完成了删除,然后紧接着完成添加和修改,我们需要添加一个添加按钮,点击添加则跳出一个对话框进行填写数据操作。
<el-button type="primary" size="small" icon="el-icon-plus" @click="openModel(null)" > 新增 </el-button>在页面操作的那一列中添加一个编辑按钮:
<el-table-column align="center" label="操作" width="180"> <template slot-scope="scope"> <el-button type="primary" size="mini" icon="el-icon-edit" @click="openModel(scope.row)">编辑</el-button> <el-button type="danger" size="small" icon="el-icon-delete" @click="deleteUser(scope.row.id)">删除</el-button> </template> </el-table-column>此时看一下这两个按钮,同时调用了一个点击事件openModel(),但是传的参数却不同,这个主要是区分是添加还是修改,因为我将这两个功能的对话框放到了一起,所以这里多加了一层调用。我们往下看:
既然写到了这个方法,接下来我们来写这个方法:
先写返回参数:
data() { return { list: null, listLoading: true, listQuery: { }, addOrupdateDialogVisible: false, userForm: { id: null, userName: "", email: "", passWord: "", phone: "", nickname: "" }, }},下面是如果选择的是添加按钮,则走else语句,因为我们在上边可以看到我们选择的添加按钮传入的值为null,编辑的话走if语句。最后的这个addOrupdateDialogVisible是对话框的控制,我们接下来就写这个对话框。
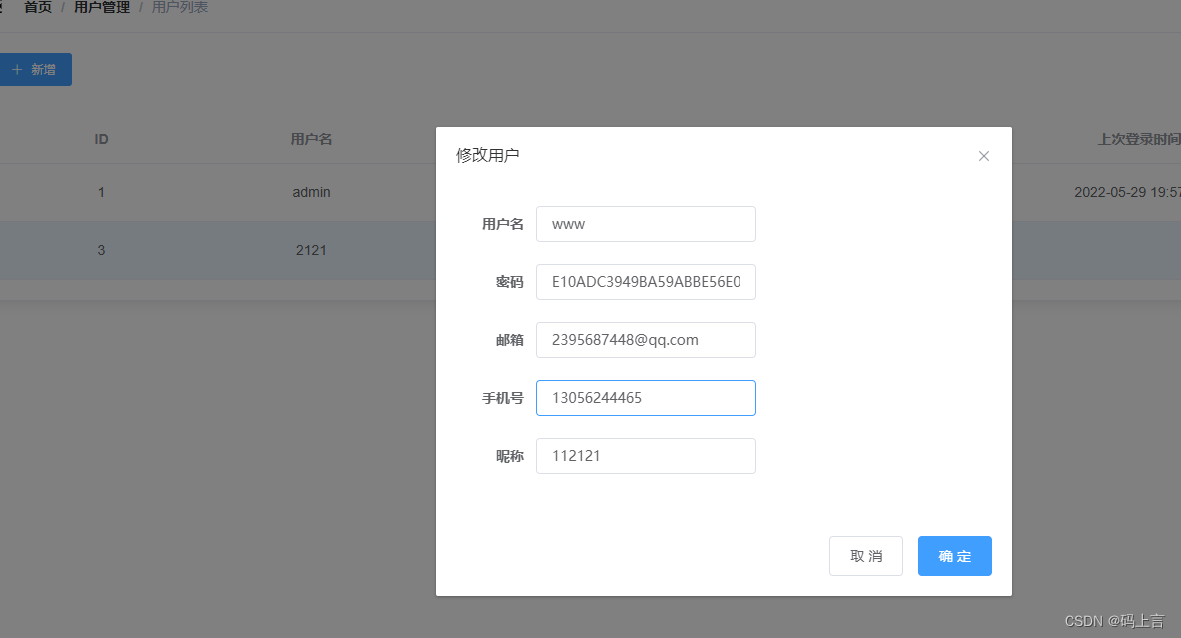
openModel(user) { if (user != null) { this.userForm = JSON.parse(JSON.stringify(user)); this.$refs.userTitle.innerHTML = "修改用户"; } else { this.userForm.id = null; this.userForm.userName = ""; this.userForm.email = ""; this.userForm.phone = ""; this.userForm.passWord = ""; this.userForm.nickname = ""; this.$refs.userTitle.innerHTML = "添加用户"; } this.addOrupdateDialogVisible = true;},我们在页面中写一下对话框,这个再Element官方文档中也可以看到具体的案例,大家可以去学习一下:https://element.eleme.cn/#/zh-CN/component/dialog
<!-- 添加编辑对话框 --> <el-dialog :visible.sync="addOrupdateDialogVisible" width="30%"> <div class="dialog-title-container" slot="title" ref="userTitle" /> <el-form label-width="80px" size="medium" :model="userForm"> <el-form-item label="用户名"> <el-input v-model="userForm.userName" style="width:220px" /> </el-form-item> <el-form-item label="密码"> <el-input v-model="userForm.passWord" style="width:220px" /> </el-form-item> <el-form-item label="邮箱"> <el-input v-model="userForm.email" style="width:220px" /> </el-form-item> <el-form-item label="手机号"> <el-input v-model="userForm.phone" style="width:220px" /> </el-form-item> <el-form-item label="昵称"> <el-input v-model="userForm.nickname" style="width:220px" /> </el-form-item> </el-form> <div slot="footer"> <el-button @click="addOrupdateDialogVisible = false">取 消</el-button> <el-button type="primary" @click="addOrEditUser"> 确 定 </el-button> </div> </el-dialog>接下来我们还有一个对接后端的方法没写,就是上边点击确定的addOrEditUser方法。还是和分类的方式基本上差不多。首先引入添加用户和更新用户的方法:
import { userList, deleteUser, addUser, updateUser } from '@/api/user'然后写下添加方法:
addOrEditUser() {var body = this.userForm;if(body.id == null){ addUser(body).then(response => { this.$message({ type: 'success', message: '添加分类成功!' }) this.getList() }).catch(() => { console.log('error') }) } else { updateUser(body).then(response => { this.$message({ type: 'success', message: '修改分类成功!' }) this.getList() }).catch(() => { console.log('error') }) } this.addOrupdateDialogVisible = false; }写完之后,我们测试一下所有的功能:
添加:
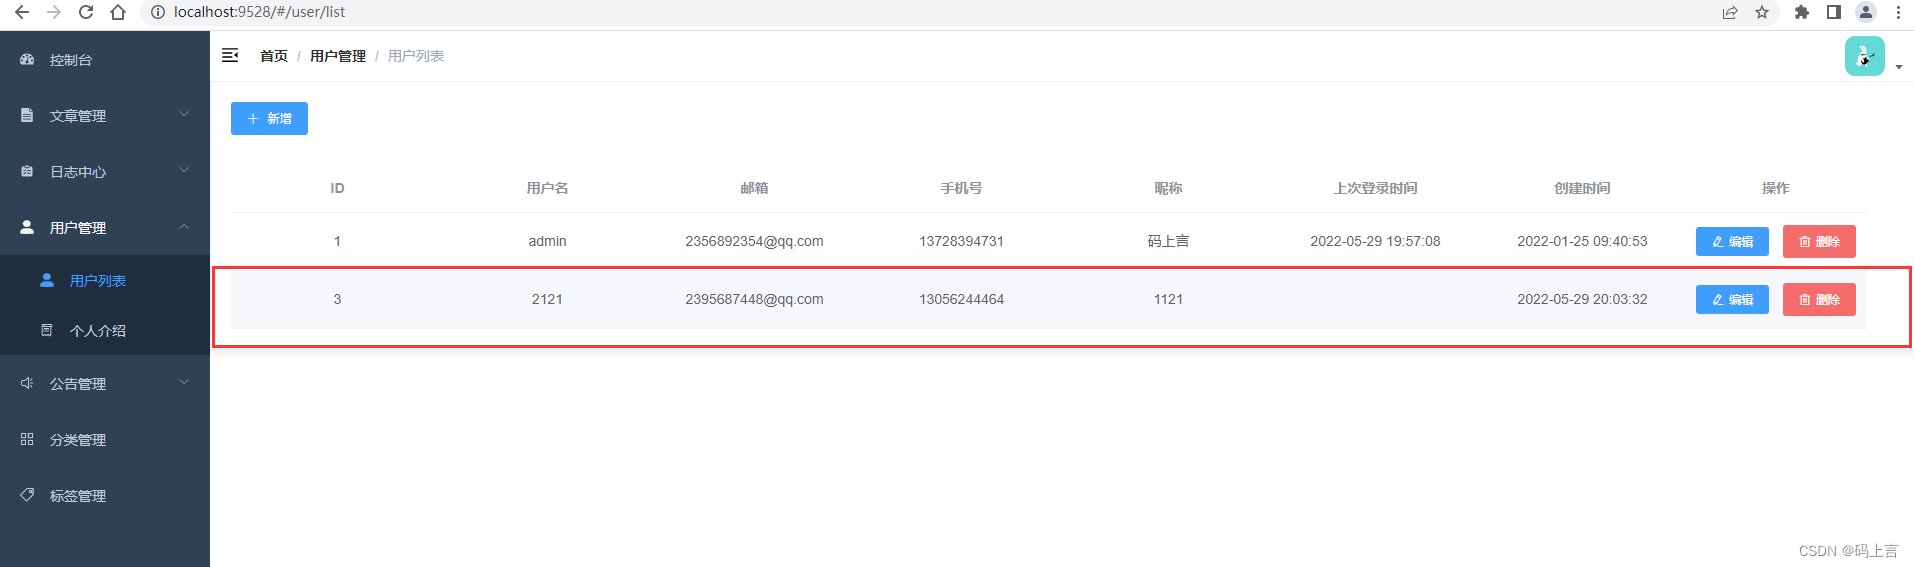
修改:
完整代码:
<template> <el-card class="box-card"> <el-button type="primary" size="small" icon="el-icon-plus" @click="openModel(null)" > 新增 </el-button> <el-table v-loading="listLoading" :data="list" fit highlight-current-row style="width: 98%; margin-top:30px;"> <el-table-column align="center" label="ID" > <template slot-scope="scope"> <span>{{ scope.row.id }}</span> </template> </el-table-column> <el-table-column align="center" label="用户名"> <template slot-scope="scope"> <span>{{ scope.row.userName}}</span> </template> </el-table-column> <el-table-column align="center" label="邮箱"> <template slot-scope="scope"> <span>{{ scope.row.email}}</span> </template> </el-table-column> <el-table-column align="center" label="手机号"> <template slot-scope="scope"> <span>{{ scope.row.phone}}</span> </template> </el-table-column> <el-table-column align="center" label="昵称"> <template slot-scope="scope"> <span>{{ scope.row.nickname}}</span> </template> </el-table-column> <el-table-column align="center" label="上次登录时间"> <template slot-scope="scope"> <span>{{ scope.row.lastLoginTime}}</span> </template> </el-table-column> <el-table-column align="center" label="创建时间"> <template slot-scope="scope"> <span>{{ scope.row.createTime}}</span> </template> </el-table-column> <el-table-column align="center" label="操作" width="180"> <template slot-scope="scope"> <el-button type="primary" size="mini" icon="el-icon-edit" @click="openModel(scope.row)">编辑</el-button> <el-button type="danger" size="small" icon="el-icon-delete" @click="deleteUser(scope.row.id)">删除</el-button> </template> </el-table-column> </el-table> <!-- 添加编辑对话框 --> <el-dialog :visible.sync="addOrupdateDialogVisible" width="30%"> <div class="dialog-title-container" slot="title" ref="userTitle" /> <el-form label-width="80px" size="medium" :model="userForm"> <el-form-item label="用户名"> <el-input v-model="userForm.userName" style="width:220px" /> </el-form-item> <el-form-item label="密码"> <el-input v-model="userForm.passWord" style="width:220px" /> </el-form-item> <el-form-item label="邮箱"> <el-input v-model="userForm.email" style="width:220px" /> </el-form-item> <el-form-item label="手机号"> <el-input v-model="userForm.phone" style="width:220px" /> </el-form-item> <el-form-item label="昵称"> <el-input v-model="userForm.nickname" style="width:220px" /> </el-form-item></el-form> <div slot="footer"> <el-button @click="addOrupdateDialogVisible = false">取 消</el-button> <el-button type="primary" @click="addOrEditUser"> 确 定 </el-button> </div> </el-dialog> </el-card></template><script> import { userList, deleteUser, addUser, updateUser } from '@/api/user'export default { name: 'UserList', created() { this.getList() }, data() { return { list: null, listLoading: true, listQuery: {}, addOrupdateDialogVisible: false, userForm: { id: null, userName: "", email: "", phone: "", passWord: "", nickname: "" }, } }, methods: { getList() { this.listLoading = true var body = this.listQuery; userList({body}).then(response => { this.list = response.data this.listLoading = false }) }, deleteUser (id) { this.$confirm('此操作将永久删除该用户, 是否继续?', '提示', { confirmButtonText: '确定', cancelButtonText: '取消', type: 'warning' }).then(() => { deleteUser(id).then(response => { this.$message({ type: 'success', message: '删除成功!' }) this.getList() }).catch(() => { console.log('error') }) }).catch(() => { this.$message({ type: 'error', message: '你已经取消删除该用户!' }) }) },openModel(user) { if (user != null) { this.userForm = JSON.parse(JSON.stringify(user)); this.$refs.userTitle.innerHTML = "修改用户"; } else { this.userForm.id = null; this.userForm.userName = ""; this.userForm.passWord = ""; this.userForm.email = ""; this.userForm.phone = ""; this.userForm.nickname = ""; this.$refs.userTitle.innerHTML = "添加用户"; } this.addOrupdateDialogVisible = true; }, addOrEditUser() {var body = this.userForm;if(body.id == null){ addUser(body).then(response => { this.$message({ type: 'success', message: '添加分类成功!' }) this.getList() }).catch(() => { console.log('error') }) } else { updateUser(body).then(response => { this.$message({ type: 'success', message: '修改分类成功!' }) this.getList() }).catch(() => { console.log('error') }) } this.addOrupdateDialogVisible = false; } }}</script><style rel="stylesheet/scss" lang="scss" scoped> .box-card { width: 98%; margin: 1%; } .clearfix:before, .clearfix:after { display: table; content: ""; } .clearfix:after { clear: both } .clearfix span { font-weight: 600; }</style>好啦,分类管理和用户的所有的功能全部写完了,这篇写的很长了,我们再用一两篇将剩下的写完基本上这个教程就结束了。
上一篇:Spring Boot + vue-element 开发个人博客项目实战教程(十九、日志中心页面接口对接)
下一篇:Spring Boot + vue-element 开发个人博客项目实战教程(二十一、待定)

