动态添加View,为什么margin会失效
目录
一.场景
二.如何动态插入View (源码:SDK30)
三.代码实现
第一种实现方法
第一种,设置root==mainRoot,attchToRoot==false
第二种,设置root==null,attchToRoot==false
源码分析(root与attachToRoot区别)
四.总结
一.场景
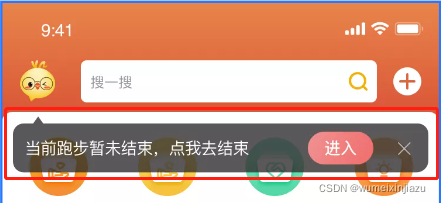
例如现在我们需要在布局中添加一个如下面的一个跑步提示,我们有多少种方法实现?
-
1.直接在想要插入的xml布局中写
-
2.直接用代码生成布局,在代码中动态的插入(addView)
-
3.单独写一个xml布局,在代码中动态的插入(addView)
最终,选择了第三种办法,
-
一是避免页面的复杂度,
-
二是降低xml的加载显示速度。
-
三是相比与第二种,第二种的效率明显会比第三种高(因为xml转换成View需要解析),但是代码生成的布局较难维护和可观性差,还是选择第三种方式。
-
二.如何动态插入View (源码:SDK30)
在讲实现前,我们先看下如何动态插入View,因为这里是通过xml文件来写的布局,所以就涉及到一个xml转换成View的问题,可以通过LayoutInflater类来转换
主要看inflate方法,他有三个参数:
第一个(resource):布局代码,例如R.layout.xx
第二个(root):需要插入的布局的父布局
第三个(attachToRoot):是否需要附加到root上
`public View inflate(@LayoutRes int resource, @Nullable ViewGroup root, boolean attachToRoot)`关于参数的具体逻辑后面再做分析,这里先看下如何使用
三.代码实现
第一种实现方法
1.需要插入的根布局(注意是ConstraintLayout根布局)
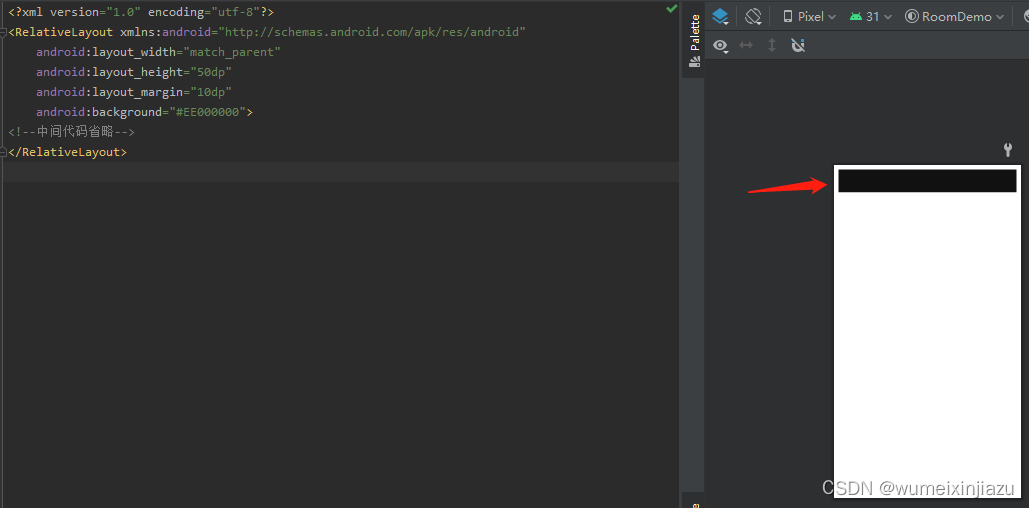
//R.layout.activity_main布局代码和UI效果图:
注意margin,上下左右各留出10dp的距离
核心插入代码:
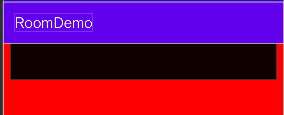
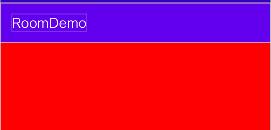
override fun onCreate(savedInstanceState: Bundle?) { super.onCreate(savedInstanceState) setContentView(R.layout.activity_main) //mainRoot就是activity_main的根布局 val mainRoot = findViewById(R.id.main_root) //把R.layout.layout_run_view布局插入到mainRoot中 LayoutInflater.from(this).inflate(R.layout.layout_run_view, mainRoot,true)}看下运行的效果:
可以很明显的看到,左右间隔是有了,但上间隔却没有(下间隔不好表示就不说了,不过原理跟上间隔一样)
到这里,我们再把根布局换成FrameLayout试试(注意代码记得修改),再看下效果图
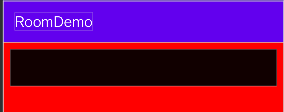
很明显,换成FrameLayout上间隔就出来,那这到底是什么导致的呢?
原因很简单,这是由于根布局自身导致的。因为ConstraintLayout与其他布局间隔设置(FrameLayout,RelativeLayout,LinearLayout)的区别就是,ConstraintLayout需要与向上留出间隔,那么你就需要指定一个他处在的位置,例如` app:layout_constraintTop_toTopOf="parent"`
解决方法也有,如下:
第一种,设置root==mainRoot,attchToRoot==false
//解析R.layout.layout_run_view,返回View对象,//attachToRoot == true,返回的就是root//attachToRoot == false,返回的就是设置LayoutParams的Viewval mRunTipView = LayoutInflater.from(this).inflate(R.layout.layout_run_view, mainRoot, false)val layoutParams = mRunTipView.layoutParams as ConstraintLayout.LayoutParamslayoutParams.apply { topToTop = ConstraintLayout.LayoutParams.PARENT_ID}//把View添加到布局中mainRoot?.addView(mRunTipView, layoutParams)第二种,设置root==null,attchToRoot==false
与第一种的区别是,此时inflate返回的是没有设置LayoutParams的View,就需要我们自己生成一个ConstraintLayout.LayoutParams传进去,如下代码:
val mRunTipView = LayoutInflater.from(this).inflate(R.layout.layout_run_view1, null,false)//创建LayoutParamsval layoutParams = ConstraintLayout.LayoutParams( ConstraintLayout.LayoutParams.MATCH_PARENT, ConstraintLayout.LayoutParams.WRAP_CONTENT).apply { topToTop = ConstraintLayout.LayoutParams.PARENT_ID}//把View添加到布局中mainRoot?.addView(mRunTipView, layoutParams)运行代码,看下效果。
是的,没有看错,什么都没有。关于原因是因为我们设置的LayoutParams的高是WRAP_CONTENT,而他布局里又没有子控件自然就没有高度。
解决方法有两个:
1.修改LayoutParams,固定高度如下:
val layoutParams = ConstraintLayout.LayoutParams( ConstraintLayout.LayoutParams.MATCH_PARENT, 100)2.在插入布局中增加子控件或者padding
修改下R.layout.layout_run_view的布局,代码如下:
仅仅是把layout_height变成wrap_content,增加paddingBottom="50dp"(你也可以在布局里放个50dp的View)
再看下效果。可以看到黑色块出来了,但是左右上下间距呢?你都没有设置当然就没有了

注意:
1.因为attachToRoot == false,所以inflate返回的是传入布局(R.layout.layout_run_view)的View,而不是mainRoot
2.如果attachToRoot == true,返回的就是mainRoot,也就是我们一开始的插入代码
源码分析(root与attachToRoot区别)
关于inflate方法的参数传值导致不同的结果,我们可以深入源码看一下(代码经过精简,主要梳理重要逻辑):
public View inflate(@LayoutRes int resource, @Nullable ViewGroup root, boolean attachToRoot) { final Resources res = getContext().getResources(); //1.尝试使用预编译生成View,但是这个版本不支持预编译布局。 View view = tryInflatePrecompiled(resource, res, root, attachToRoot); if (view != null) { return view; } //通过xml解析resource布局 XmlResourceParser parser = res.getLayout(resource); try { //这里才是真正的创建View return inflate(parser, root, attachToRoot); } finally { parser.close(); }}可以看下tryInflatePrecompiled的方法,很明显,因为mUseCompiledView的值一直都是false,所以这个方法暂时没用到的。可以看一下mUseCompiledView的赋值
private @Nullable View tryInflatePrecompiled(@LayoutRes int resource, Resources res, @Nullable ViewGroup root, boolean attachToRoot) { if (!mUseCompiledView) { return null; }}跟踪一下mUseCompiledView的设置路径,可以看到源码的提示
“Precompiled layouts are not supported in this release.”此版本不支持预编译布局
private void initPrecompiledViews() { // Precompiled layouts are not supported in this release. boolean enabled = false; initPrecompiledViews(enabled);}回到主流程继续查看inflate方法
public View inflate(XmlPullParser parser, @Nullable ViewGroup root, boolean attachToRoot) { View result = root; //判断布局是不是 merge if (TAG_MERGE.equals(name)) { if (root == null || !attachToRoot) { throw new InflateException(" can be used only with a valid " + "ViewGroup root and attachToRoot=true"); } } else { // 创建布局(R.layout.layout_run_view) final View temp = createViewFromTag(root, name, inflaterContext, attrs); ViewGroup.LayoutParams params = null; //1.root != null 并且 attachToRoot==false,返回的就只是设置了params的View if (root != null) { params = root.generateLayoutParams(attrs); if (!attachToRoot) { temp.setLayoutParams(params); } } //2.root != null 并且 attachToRoot==true,返回的是root,也就是根布局 if (root != null && attachToRoot) { root.addView(temp, params); } //3.root == null 并且 attachToRoot==false,返回的就只是设置了params的View if (root == null || !attachToRoot) { result = temp; } } return result;}看到这我们就知道的inflate方法中ViewGroup root和boolean attachToRoot两个参数的区别。
总结一下:
-
root == null,返回的是一个没有设置LayoutParams的View
if (root == null || !attachToRoot) { result = temp; } -
root != null,attachToRoot == true,返回的就是已经添加完布局的root
if (root != null && attachToRoot) { root.addView(temp, params); } -
root != null,attachToRoot == false,返回的就是设置LayoutParams的View
if (root != null) { params = root.generateLayoutParams(attrs); if (!attachToRoot) { temp.setLayoutParams(params); } }
四.总结
-
在代码中,
ConstraintLayout与其他布局的区别。在xml中很常见,但是在代码中却容易疏漏。 -
在需要在代码中插入布局时,可分为两种
2.1. 不需要返回生成的ViewLayoutInflater.from(this).inflate(R.layout.layout_run_view, mainRoot,true)//或者LayoutInflater.from(this).inflate(R.layout.layout_run_view, mainRoot)2.2. 需要返回生成的View,可能需要对View进行一些动画操作,比较方便
val mRunTipView = LayoutInflater.from(this).inflate(R.layout.layout_run_view, mainRoot,false)mainRoot?.addView(mRunTipView)//mRunTipView 旋转,平移。。。2.3. 需要返回生成的View,自己对View的位置大小进行修改
val mRunTipView = LayoutInflater.from(this).inflate(R.layout.layout_run_view, null,false)//创建LayoutParamsval layoutParams = ConstraintLayout.LayoutParams( 100, 100).apply { topMargin = 100}//把View添加到布局中mainRoot?.addView(mRunTipView,layoutParams)

