Docker部署seata-1.4.2整合SpringCloud使用(Nacos实现配置与注册中心)
目录
- 1、拉取镜像
- 2、拷贝挂载配置
-
- 直接运行镜像
- 拷贝镜像内容
- 停止并且删除镜像
- 3、配置数据源
- 4、配置Nacos
-
- 4.1 设置Nacos注册中心
- 4.2 设置Nacos配置中心
- 5、启动容器
- 6、整合使用
-
- 6.1 pom
- 6.2 undo_log建表
- 6.3 yaml
- 6.4 测试使用
- 7、数据源支持及事务级别
1、拉取镜像
docker pull seataio/seata-server:1.4.2 拉取时最好带上版本号(根据cloud版本决定),版本对应关系查询,比如:

2、拷贝挂载配置
我们先直接运行seata容器,然后将配置文件拷贝到宿主机器,用于后面的挂载操作。
直接运行镜像
docker run -d --name seata-server -p 8091:8091 seataio/seata-server:1.4.2拷贝镜像内容
docker cp seata-server:/seata-server/resources /root/docker/cloud/seata
停止并且删除镜像
完成配置文件拷贝后,停止并且删除镜像
# 停止docker stop seata-server# 删除docker rm seata-server3、配置数据源
Seata-Server端存储模式(store.mode)现有file、db、redis三种,file模式无需改动,直接启动即可。
注: file模式为单机模式,全局事务会话信息内存中读写并持久化本地文件root.data,性能较高;
如果是seata分布式集群时推荐使用Redis或者DB模式,在此配置Mysql进行储存,步骤如下:
1、建立数据库:seata
2、建表,参考语句:https://github.com/seata/seata/blob/develop/script/server/db/mysql.sql
3、修改file.conf:
修改file.conf中的mode为db,并且指定在db{}中指定mysql的配置信息,注意修改内容如下:
store { ## store mode: file、db、redis mode = "db" ..... db{ datasource = "druid" dbType = "mysql" driverClassName = "com.mysql.cj.jdbc.Driver" url = "jdbc:mysql://111.229.160.175:3316/seata?useUnicode=true&serverTimezone=Asia/Shanghai" user = "root" password = "123456" ..... ..... } .....}4、配置Nacos
4.1 设置Nacos注册中心
配置registry.conf文件:
vim /root/docker/cloud/seata/registry.conf核心内容如下:
registry {type = "nacos"nacos {application = "seata-server"serverAddr = "111.229.160.175:8848" group = "SEATA_GROUP"namespace = "13485083-0e72-47f7-af56-18b16a79ab56" //命名空间cluster = "default" // 配置cluster名称 username = "nacos" password = "nacos"}........}........config {type = "nacos"nacos { serverAddr ="111.229.160.175:8848" namespace = "13485083-0e72-47f7-af56-18b16a79ab56" group = "SEATA_GROUP" username = "nacos" password = "nacos" // dataId默认值 dataId = "seataServer.properties"}........}....4.2 设置Nacos配置中心
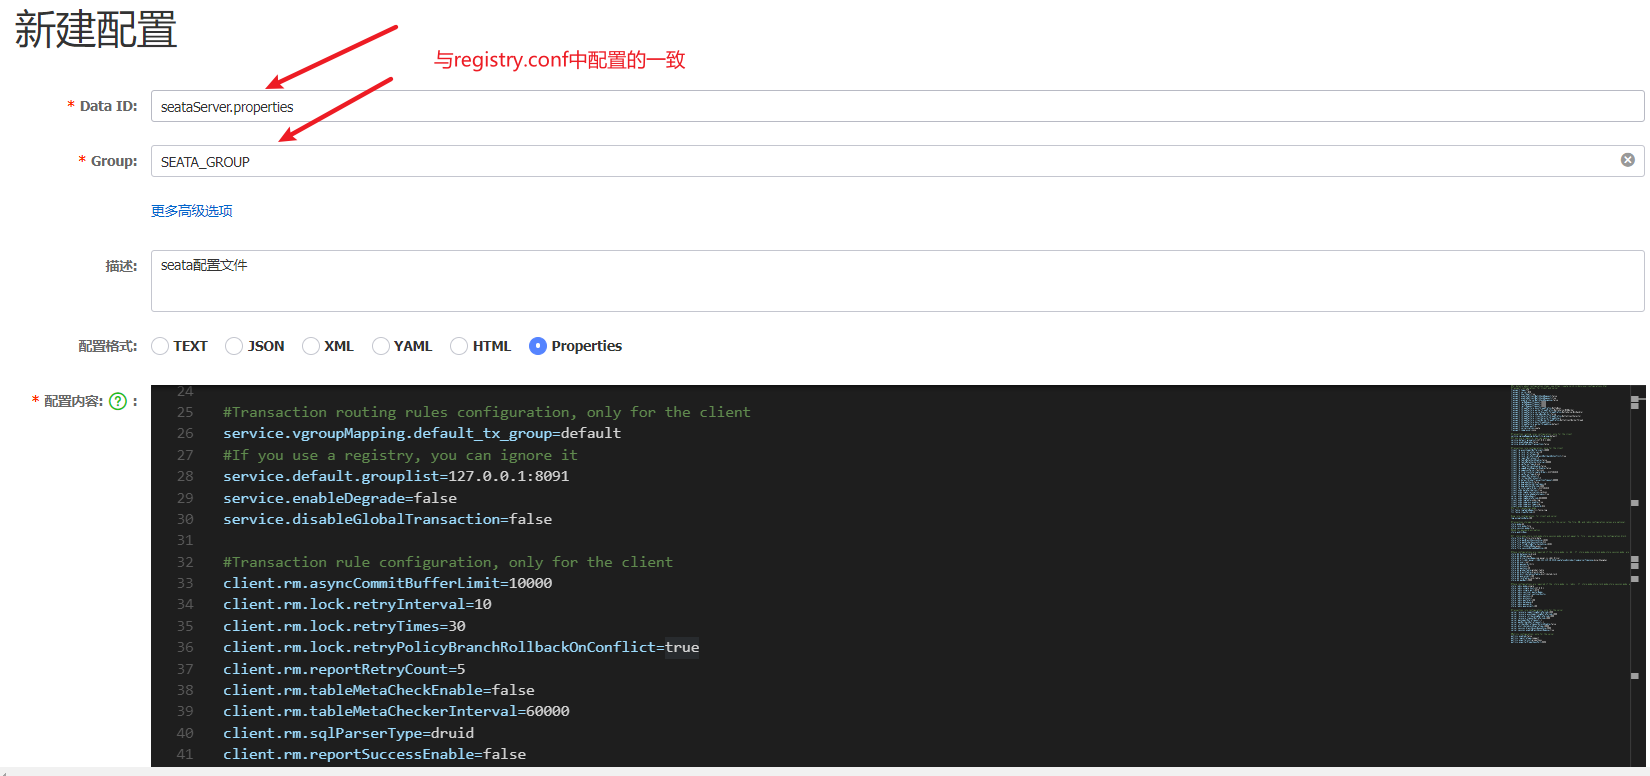
从v1.4.2版本开始,已支持从一个Nacos dataId中获取所有配置信息,你只需要额外添加一个dataId配置项。
在nacos新建配置,此处dataId为seataServer.properties。注意建立的nameSpace和group要与registry.conf文件中的一致。
配置内容,参考:https://github.com/seata/seata/blob/develop/script/config-center/config.txt中的内容,并按实际需要进行修改,主要修改内容如下(其他保持不变):
# 配置事务组# default_tx_group 事务分组名称可以自定义为项目名称,比如:seata_demo# default表示registry.conf中配置的cluster名称service.vgroupMapping.default_tx_group=default....store.mode=db........#与file.conf配置的mysql数据源一致store.db.datasource=druidstore.db.dbType=mysqlstore.db.driverClassName=com.mysql.cj.jdbc.Driverstore.db.url=jdbc:mysql://111.229.160.175:3316/seata?useUnicode=true&serverTimezone=Asia/Shanghaistore.db.user=rootstore.db.password=123456........效果:
5、启动容器
注意:云服务器安全组或者服务防火墙需要开启8091端口
docker run \--name seata-server -d \--restart=always \-p 8091:8091 \-e SEATA_IP=111.229.160.175 \-e SEATA_PORT=8091 \# 指定registry位置,为容器内部地址-e SEATA_CONFIG_NAME=file:/seata-server/resources/registry \-v /root/docker/cloud/seata:/seata-server/resources \seataio/seata-server:1.4.2seata成功启动后,nacos可以看到信息:

6、整合使用
6.1 pom
<dependency> <groupId>com.alibaba.cloud</groupId> <artifactId>spring-cloud-starter-alibaba-seata</artifactId></dependency>注意:
在引入pom需要注意SpringCloudAlibaba的版本,版本对应关系查询,比如:
如果SpringCloudAlibaba与Seata的默认版本不对应时,可以单独引入seata依赖,比如:
<dependency> <groupId>com.alibaba.cloud</groupId> <artifactId>spring-cloud-starter-alibaba-seata</artifactId> <exclusions> <exclusion> <artifactId>seata-spring-boot-starter</artifactId> <groupId>io.seata</groupId> </exclusion> </exclusions> </dependency> <dependency> <groupId>io.seata</groupId> <artifactId>seata-spring-boot-starter</artifactId> <version>1.4.2</version> </dependency>6.2 undo_log建表
在微服务客户端连接的数据库中建立undo_log表,语句如下:
CREATE TABLE IF NOT EXISTS `undo_log`( `branch_id` BIGINT(20) NOT NULL COMMENT 'branch transaction id', `xid` VARCHAR(100) NOT NULL COMMENT 'global transaction id', `context`VARCHAR(128) NOT NULL COMMENT 'undo_log context,such as serialization', `rollback_info` LONGBLOB NOT NULL COMMENT 'rollback info', `log_status` INT(11) NOT NULL COMMENT '0:normal status,1:defense status', `log_created` DATETIME(6) NOT NULL COMMENT 'create datetime', `log_modified` DATETIME(6) NOT NULL COMMENT 'modify datetime', UNIQUE KEY `ux_undo_log` (`xid`, `branch_id`)) ENGINE = InnoDB AUTO_INCREMENT = 1 DEFAULT CHARSET = utf8 COMMENT ='AT transaction mode undo table';6.3 yaml
seata: enabled: true application-id: ${spring.application.name} # 事务组的名称,对应service.vgroupMapping.default_tx_group=xxx中配置的default_tx_group tx-service-group: default_tx_group # 配置事务组与集群的对应关系 service: vgroup-mapping: # default_tx_group为事务组的名称,default为集群名称(与registry.conf中的一致) default_tx_group: default disable-global-transaction: false registry: type: nacos nacos: application: seata-server server-addr: 112.15.114.18:8848 group: SEATA_GROUP namespace: 64ed9ca7-d705-4655-b4e4-f824e420a12a username: nacos password: nacos # registry.conf中,配置cluster名称 cluster: default config: type: nacos nacos: server-addr: 112.15.114.18:8848 group: SEATA_GROUP namespace: 64ed9ca7-d705-4655-b4e4-f824e420a12a username: nacos password: nacos # nacos配置中心配置的dataId data-id: seataServer.properties6.4 测试使用
全局事务注解:
@GlobalTransactional在事务发起的微服务方法上加上注解@GlobalTransactional表示全局事务中的一个TM。
注意:异常不能被捕获需要抛出,事务才会发起回滚
比如:
@RestController@RequestMapping("test")public class TestController { @GetMapping("/insert") @GlobalTransactional public void selectUserWageByUserId() {............// 如果RootContext.getXID()不为空,则表示seata生效System.out.println("RootContext.getXID():" + RootContext.getXID()); }}效果:
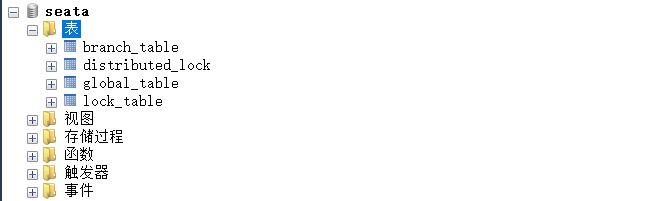
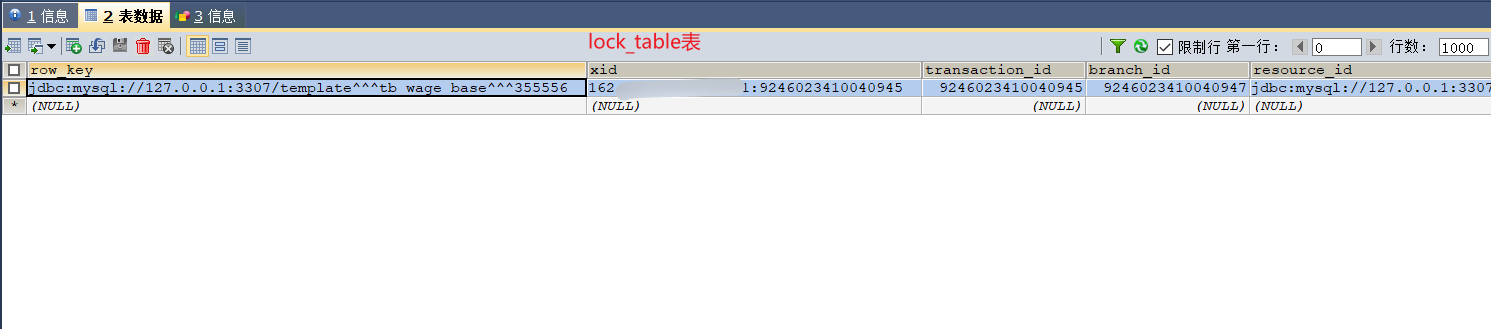
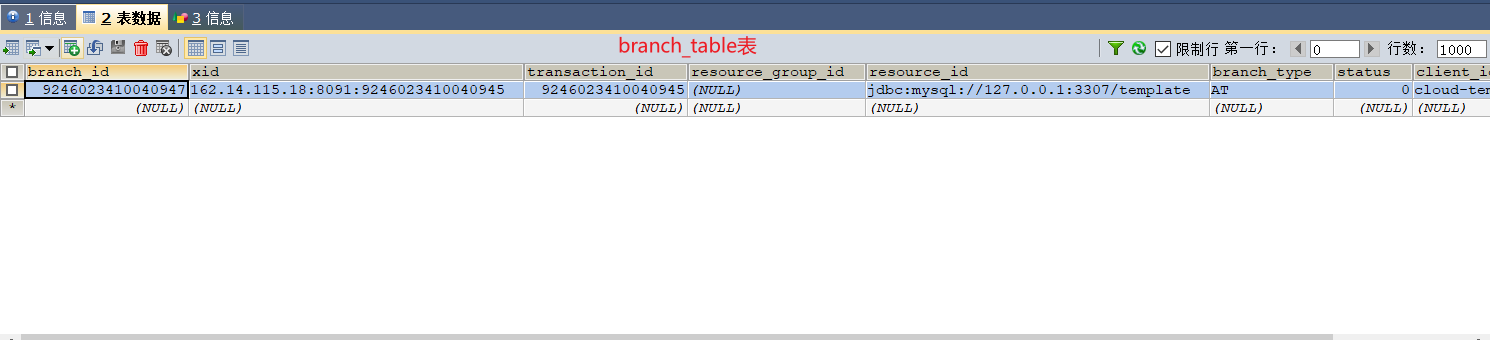
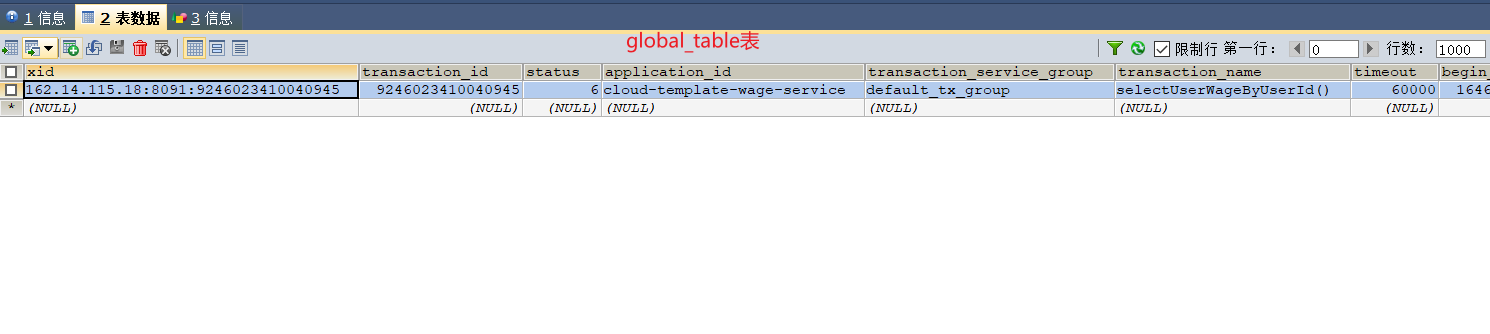
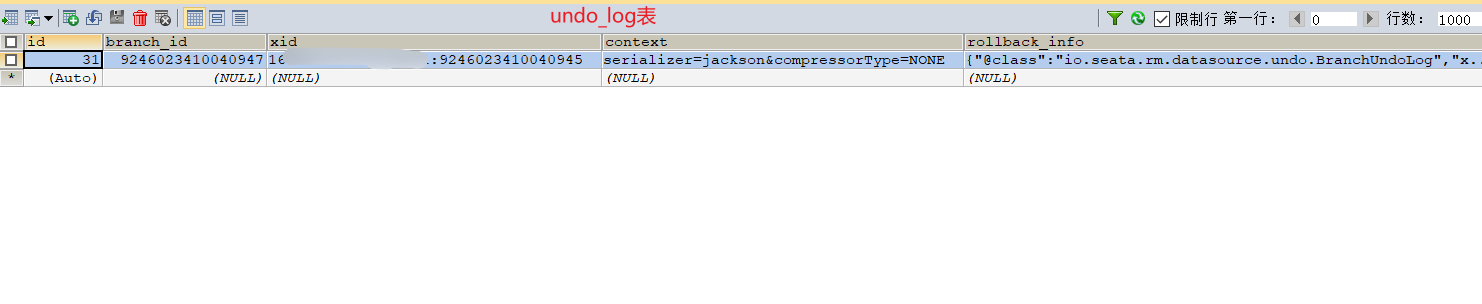
可以看到在undo_log以及seata服务的global_table、branch_table、lock_table中存在seata执行分布式事务时的数据。
7、数据源支持及事务级别
隔离级别:
Seata的隔离级别默认为读未提交。
数据源支持情况如下:
- AT模式支持的数据库有:MySQL、Oracle、PostgreSQL、 TiDB、MariaDB。
- TCC模式不依赖数据源(1.4.2版本及之前),1.4.2版本之后增加了TCC防悬挂措施,需要数据源支持。
- Saga模式不依赖数据源。
- XA模式只支持实现了XA协议的数据库。Seata支持MySQL、Oracle、PostgreSQL和MariaDB。
参考:https://seata.io/zh-cn/docs/user/datasource.html

