Redis高可用集群搭建(一)
一、架构介绍
1、redis集群架构图
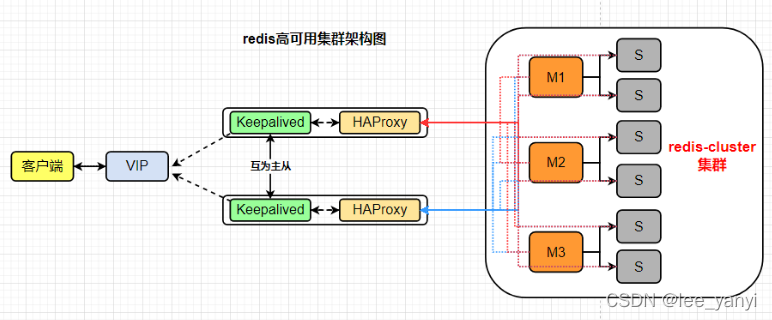
架构图中redis是一主双从(正式环境若允许,则采用),本文实验采样一主一从方式搭建。
2、采用Keepalived+HAProxy+redis-cluster方式部署。
3、服务器划分
正式环境环境搭建,建议redis的各个节点分布在不同的服务器上。
| 操作系统 | ip | 服务 |
|---|---|---|
| CentOS7 | 192.168.113.130 | Keepalived+HAProxy |
| CentOS7 | 192.168.113.131 | Keepalived+HAProxy |
| CentOS7 | 192.168.113.129 | redis-cluster |
二、redis集群安装
1.下载安装redis
方式一:
yum -y install http://rpms.remirepo.net/enterprise/remi-release-7.rpm#查看redis版本yum --enablerepo=remi list | grep ^redis | grep remi#安装yum --enablerepo=remi install redis -y方式二:(本文采用)
#创建软件包目录mkdir /opt/redisClustercd /opt/redisClustermkdir -p 7001/{data,conf,log} 7002/{data,conf,log} 7003/{data,conf,log} 7004/{data,conf,log} 7005/{data,conf,log} 7006/{data,conf,log}#下载压缩包wget https://download.redis.io/releases/redis-6.2.6.tar.gztar -zxvf redis-6.2.6.tar.gz#在编译之前我们需要确认 gcc 版本,自 redis 6.0.0 之后,编译 redis 需要支持 C11 特性,C11 特性在 4.9 中被引入。Centos 7 默认 gcc 版本为 4.8.5,所以需要升级gcc版本#安装编译环境yum -y install gcc gcc-c++ make tclyum -y install centos-release-scl yum -y install devtoolset-9-gcc devtoolset-9-gcc-c++ devtoolset-9-binutils#使gcc新版本生效echo "source /opt/rh/devtoolset-9/enable" >>/etc/profile#编译安装rediscd /opt/redisCluster/redis-6.2.6make && make install2.修改配置文件
vim /opt/redisCluster/redis-6.2.6/redis.confbind 0.0.0.0protected-mode noport 7001dir /opt/redisCluster/7001/datacluster-enabled yescluster-config-file /opt/redisCluster/7001/conf/node.confcluster-node-timeout 5000appendonly yesdaemonize yespidfile /opt/redisCluster/7001/redis.pidlogfile /opt/redisCluster/7001/log/redis.logrequirepass redis@123masterauth redis@1233.复制配置文件
for i in {1..6}; do cp /opt/redisCluster/redis-6.2.6/redis.conf /opt/redisCluster/700${i}/conf/redis.conf; done4.修改各个节点的配置文件内容
sed -i 's/7001/7002/' /opt/redisCluster/7002/conf/redis.confsed -i 's/7001/7003/' /opt/redisCluster/7003/conf/redis.confsed -i 's/7001/7004/' /opt/redisCluster/7004/conf/redis.confsed -i 's/7001/7005/' /opt/redisCluster/7005/conf/redis.confsed -i 's/7001/7006/' /opt/redisCluster/7006/conf/redis.conf5.启动redis
for i in {1..6}; do /opt/redisCluster/redis-6.2.6/src/redis-server /opt/redisCluster/700${i}/conf/redis.conf; done配置systemd服务(6个节点配置类似)
vim /usr/lib/systemd/system/redis7001.service内容如下:
[Unit]Description= redis7001 serverAfter=network.target[Service]Type=forkingExecStart=/opt/redisCluster/redis-6.2.6/src/redis-server /opt/redisCluster/7001/conf/redis.conf[Install]WantedBy=multi-user.target配置启动
systemctl daemon-reloadsystemctl start redis7001 && systemctl enable redis70016.查看进程
ps -aux | grep redisnetstat -tnlp |grep redis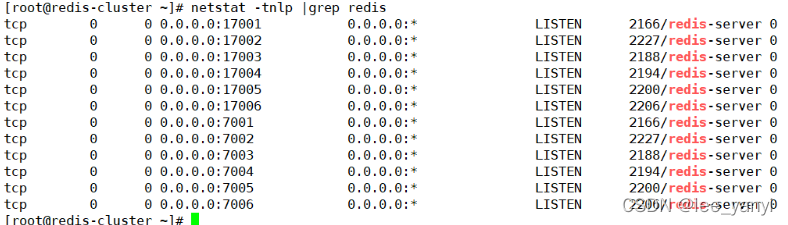
7.创建集群
cd /opt/redisCluster/redis-6.2.6/src/./redis-cli --cluster create 192.168.116.129:7001 192.168.116.129:7002 192.168.116.129:7003 192.168.116.129:7004 192.168.116.129:7005 192.168.116.129:7006 --cluster-replicas 1 -a redis@123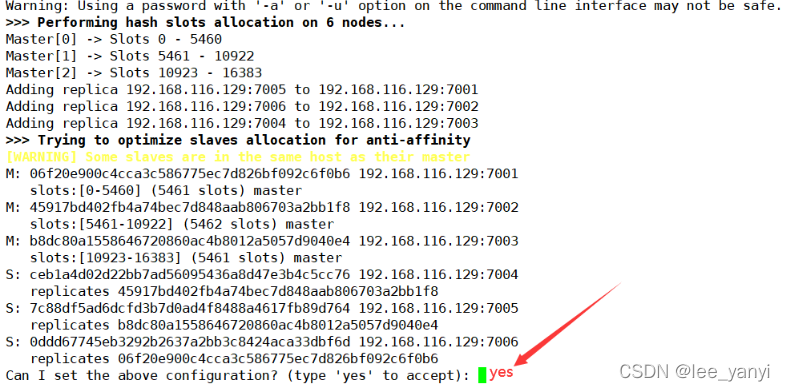 如下看到16384个槽位都被分配表示成功。

进入任意节点
#这里是进入7001节点./redis-cli -p 7001 -a redis@123#查看集群节点分布127.0.0.1:7001> cluster nodes
集群参数解释:
-
cluster-replicas 1:表示希望为集群中的每个主节点创建一个从节点(一主一从)。
-
cluster-replicas 2:表示希望为集群中的每个主节点创建两个从节点(一主二从)。
-
-a :后面写的是设置的密码
8.验证集群
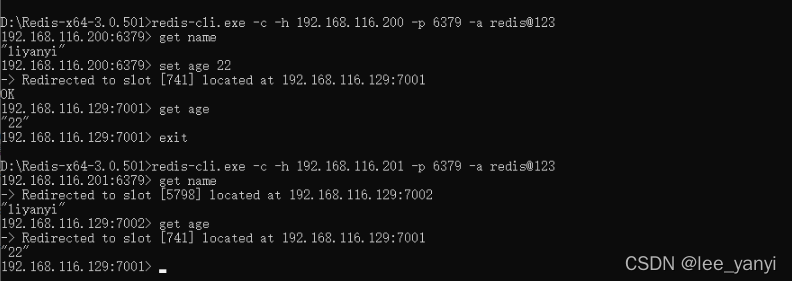
./redis-cli -c -p 7001 -a redis@123127.0.0.1:7001> set name liyanyi-> Redirected to slot [5798] located at 192.168.116.129:7002OK192.168.116.129:7002>127.0.0.1:7001> get name-> Redirected to slot [5798] located at 192.168.116.129:7002"liyanyi"”name“ Key经过CRC16算法得到一个结果,然后把这个结果对16384进行取余,值为5798,对应7002节点的卡槽(5461-10922),则数据保存在7002节点上。
HASH_SLOT=CRC16(key) mod 16384
注意:需要使用 -c 参数。

三、安装Keepalived+HAProxy集群
1.安装Keepalived(两台服务器都需要安装)
yum -y install keepalived2.编辑配置文件(K_HA1)
vim /etc/keepalived/keepalived.conf! Configuration File for keepalivedglobal_defs { router_id K_HA1 #设备在组中的标识,设置不一样即可}vrrp_script check_haproxy { script "/etc/keepalived/check_haproxy.sh" #检查脚本 interval 2#检查频率秒 weight -5 #priority减5 fall 3 #失败三次}vrrp_instance VI_1 { state MASTER interface ens33 virtual_router_id 88 priority 100 advert_int 1 authentication { auth_type PASS auth_pass 1111 } virtual_ipaddress { 192.168.116.200/24 }track_script { check_haproxy } }vrrp_instance VI_2 { state BACKUP interface ens33 virtual_router_id 99 priority 90 advert_int 1 authentication { auth_type PASS auth_pass 1111 } virtual_ipaddress { 192.168.116.201/24 }track_script { check_haproxy } }3.编辑配置文件(K_HA2)
vim /etc/keepalived/keepalived.conf! Configuration File for keepalivedglobal_defs { router_id K_HA2 #设备在组中的标识,设置不一样即可}vrrp_script check_haproxy { script "/etc/keepalived/check_haproxy.sh" #检查脚本 interval 2#检查频率秒 weight -5 #priority减5 fall 3 #失败三次}vrrp_instance VI_1 { state BACKUP interface ens33 virtual_router_id 88 priority 90 advert_int 1 authentication { auth_type PASS auth_pass 1111 } virtual_ipaddress { 192.168.116.200/24 }track_script { check_haproxy } }vrrp_instance VI_2 { state MASTER interface ens33 virtual_router_id 99 priority 100 advert_int 1 authentication { auth_type PASS auth_pass 1111 } virtual_ipaddress { 192.168.116.201/24 }track_script { check_haproxy } }4.启动Keepalived
#先启动K_HA1systemctl start keepalived && systemctl enable keepalived#再启动K_HA2systemctl start keepalived && systemctl enable keepalived5.验证
关闭其中一台的keepalived服务查看VIP是否进行漂移。
systemctl stop keepalived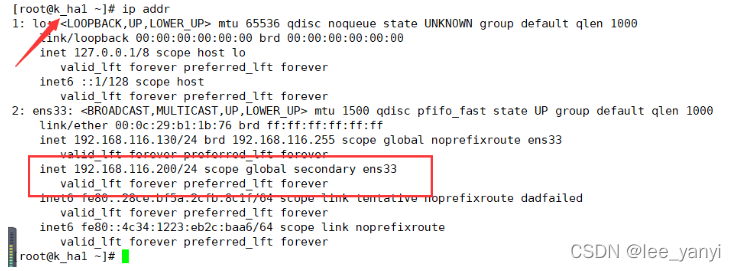
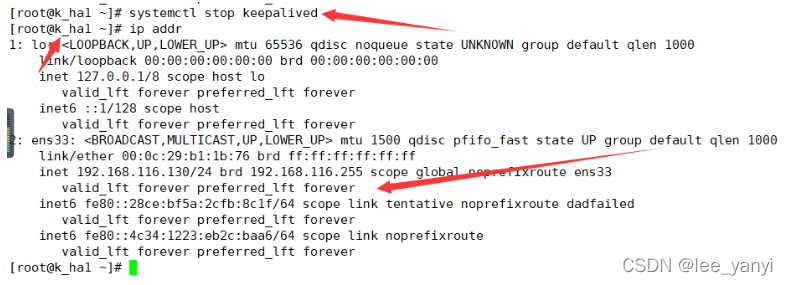
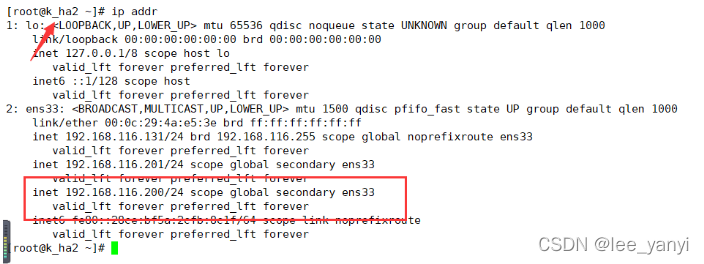 以上所示,表示在服务关闭后VIP发生了漂移。
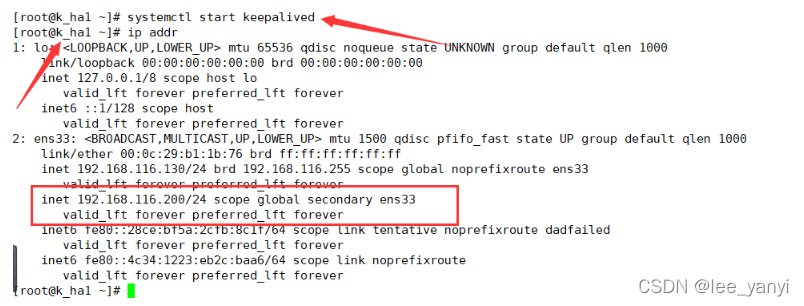
重新启动K_HA1上的keepalived服务,VIP会再次漂移回来。
6.准备HAProxy健康检查脚本
vim /etc/keepalived/check_haproxy.sh#赋执行权限chmod +x /etc/keepalived/check_haproxy.sh#!/bin/bash#检查haproxy进程是否存在counter=$(ps -C haproxy --no-heading|wc -l)if [ "${counter}" = "0" ]; then#尝试启动一次haproxy,停止5秒后再次检测 systemctl restart haproxy sleep 5 counter=$(ps -C haproxy --no-heading|wc -l) if [ "${counter}" = "0" ]; then#如果启动没成功,就杀掉keepalive触发主备切换systemctl stop keepalived fifi7.安装HAProxy
yum install epel-release -y yum install haproxy -y8.修改配置文件
vim /etc/haproxy/haproxy.cfgglobal log127.0.0.1 local0 chroot /var/lib/haproxy pidfile /var/run/haproxy.pid maxconn 4000 user haproxy group haproxy daemon nbproc 1defaults modehttp log global option dontlognull retries 3 maxconn 3000 timeout connect 5000 timeout client 50000 timeout server 50000 option abortoncloselisten stats bind *:8888 stats enable stats hide-version stats uri /haproxystats stats realm Haproxy\ stats stats authadmin:haproxy@123 stats admin if TRUElisten redis bind *:6379 mode tcp balance roundrobin server redis1 192.168.116.129:7001 check server redis2 192.168.116.129:7002 check server redis3 192.168.116.129:7003 check server redis4 192.168.116.129:7004 check server redis5 192.168.116.129:7005 check server redis6 192.168.116.129:7006 check9.验证配置文件
haproxy -f /etc/haproxy/haproxy.cfg -c#Configuration file is valid 表示文件没有问题10.启动
systemctl start haproxy && systemctl enable haproxy11.验证HAProxy服务
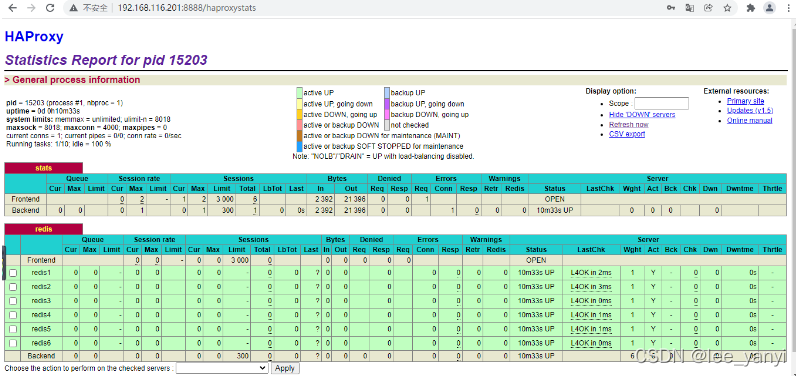
访问
http://vip+8888/haproxystats
账号:密码
admin: haproxy@123
http://192.168.116.200:8888/haproxystats
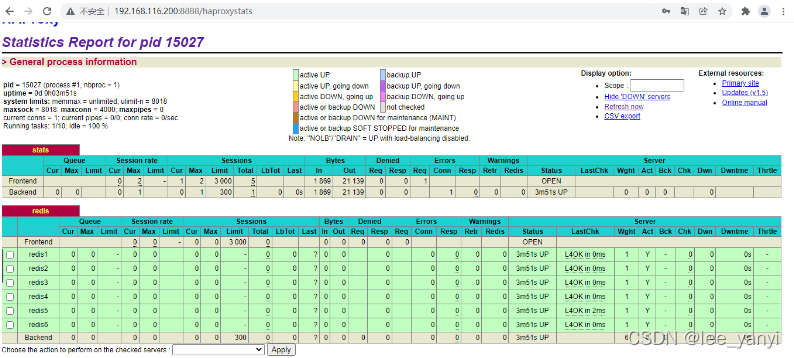
http://192.168.116.201:8888/haproxystats
本地连接redis服务,进行测试。
 验证成功!
验证成功!

