深度学习框架如何优雅地做算子对齐任务?

直播提前约!!!
今晚19:30,OneFlow工程师教你用AI算法拯救渣画质照片,欢迎参与。
撰文 | BBuf
之前回答过「如何为PyTorch做贡献的知乎问题」(https://www.zhihu.com/question/502301777/answer/2248950419)。回答提到了去年在OneFlow开发一些算子时,基于算子AutoTest框架找到了一些PyTorch算子的bug,并给PyTorch做出了反馈或修复。但这个回答没有介绍这个AutoTest框架长什么样子,以及它背后的原理。
因此,这篇文章就用来介绍OneFlow的算子AutoTest框架,看一下OneFlow深度学习框架在算子开发过程中是如何优雅地做算子对齐任务(由 @大缺弦 开发,后经我和其它同事进行扩展和丰富功能形成今天的形态)。这个AutoTest框架也可以很轻易移植到其它深度学习训练框架使用,代码实现在:
https://github.com/Oneflow-Inc/oneflow/blob/v0.6.0/python/oneflow/test_utils/automated_test_util/torch_flow_dual_object.py
1
传统的算子对齐方式
不局限于OneFlow,任何组织或者个人编写的深度学习训练框架都需要验证算子的实现正确性。那么,深度学习框架中验证算子正确性的一般做法是什么呢?
以百度的PaddlePaddle为例,在验证算子正确性时一般是根据调用其它标准库获得的结果(比如卷积算子的验证就调用cudnn的卷积,erf算子的验证就调用了scipy的erf)或者直接使用numpy模拟的计算结果来进行验证(比如full算子的验证即为numpy模拟)。在PyTorch的测试中还有硬编码一些测试样例的方式,也即将固定输入样例的标准答案和算子计算的结果进行对比,以此判断算子实现的正确性。
这些方法都没有什么问题,但在编写测试时需要不少的人力并且在算子开发初期可能有一些corner case会容易想不到。以OneFlow为例,由于算子的行为是对齐PyTorch,如果要验证转置卷积Op在各种情况下的正确性,那么什么样的测试代码才可以全面验证呢?一种做法是将每个参数都枚举出来:
import torchimport numpy as npimport oneflow as flowfor N in range(1, 5): for C_in in range(1, 10): for L_in in range(1, 10): for H_in in range(1, 10):for C_out in range(1, 10): for Ksize in range(1, 10): for Pad in range(1, 10): for Dilation in range(1, 10): for Stride in range(1, min(L_in, H_in)):for OutPad in range(1, min(Dilation, Stride)): try: torch_input = torch.randn(N, C_in, L_in, H_in) flow_input = flow.tensor(torch_input.numpy()) torch_input.requires_grad = True flow_input.requires_grad = True torch_m = torch.nn.ConvTranspose2d(in_channels=C_in, out_channels=C_out, kernel_size=Ksize, padding=Pad, stride=Stride, output_padding=(OutPad), dilation=Dilation, bias=False) flow_m = flow.nn.ConvTranspose2d(in_channels=C_in, out_channels=C_out, kernel_size=Ksize, padding=Pad, stride=Stride, output_padding=(OutPad), dilation=Dilation, bias=False) flow_m.weight.data = flow.tensor(torch_m.weight.data.detach().numpy(), requires_grad=True) torch_out = torch_m(torch_input) flow_out = flow_m(flow_input) torch_out = torch_out.sum() flow_out = flow_out.sum() assert(np.allclose(torch_out.detach().numpy(), flow_out.detach().numpy(), 1e-06, 1e-06)), "forward not equal" torch_out.backward() flow_out.backward() print(torch_input.grad.detach().numpy()) print(flow_input.grad.detach()[:N, :C_in, :L_in, :H_in].numpy()) assert(np.allclose(torch_input.grad.detach().numpy(), flow_input.grad.detach()[:N, :C_in, :L_in, :H_in].numpy(), 1e-03, 1e-03)), "backward not equal" except Exception as e: print('Input Param Error')但这种做法虽然验证得比较全面但同样有缺点。首先枚举的上界如何确定?如果给了一个大的上界,那么这个算子的验证时间会非常长,不利于在CI流程中使用。如果上界很小就可能忽略一些corner case,导致测试仍然不会全面并增加算子出bug的风险。
基于算子测试的这些问题,同事 @大缺弦 开发了一个算子AutoTest框架,用于解决OneFlow算子和PyTorch算子对齐的问题。后来我在此基础上又为这个AutoTest框架丰富了其它的一些功能,感觉目前已经比较好使,接下里做一个全面介绍。
整个AutoTest框架只有2个Python文件,并且这个AutoTest框架可以轻易移植到其它任何深度学习框架去做算子对齐任务。
1.https://github.com/Oneflow-Inc/oneflow/blob/v0.6.0/python/oneflow/test_utils/automated_test_util/torch_flow_dual_object.py
2.https://github.com/Oneflow-Inc/oneflow/blob/v0.6.0/python/oneflow/test_utils/automated_test_util/generators.py
2
算子AutoTest框架用法
在介绍原理之前,我们先看一下AutoTest框架的用法。以上面的反卷积算子为例,使用了AutoTest框架之后就可以用下面的代码来完成算子对齐测试:
@autotest()def test_deconv2d_with_random_data(test_case): channels = random(1, 6) m = torch.nn.ConvTranspose2d( in_channels=channels, out_channels=random(1, 20), kernel_size=random(1, 4), stride=random() | nothing(), padding=random(1, 3).to(int) | nothing(), dilation=random(1, 5) | nothing(), groups=random(1, 5) | nothing(), padding_mode=constant("zeros") | nothing(), ) m.train(random()) device = random_device() m.to(device) x = random_pytorch_tensor(ndim=4, dim1=channels).to(device) y = m(x) return y熟悉PyTorch的小伙伴可以发现这个算子测试代码和PyTorch的代码风格基本一样。的确,AutoTest框架相当于是一个high level的PyTorch,它的接口和PyTorch一样,但对于给定的输入会分别用OneFlow和PyTorch运行一遍,记录运行过程中得到的每个tensor以及对应梯度tensor的值,再对这些OneFlow和PyTorch分别产生的tensor检查一遍数值形状是否完全相同,以完成自动测试工作,我们后面会细讲。
我们可以再看一个测试matmul算子的例子:
@autotest() def test_flow_matmul_with_random_data(test_case): k = random(1, 6) x = random_pytorch_tensor(ndim=2, dim1=k) y = random_pytorch_tensor(ndim=2, dim0=k) z = torch.matmul(x, y) return z我们基于random_pytorch_tensor方法构造了两个随机tensor x和y,它们的维度分别是[m, k]和[k, n],这些维度的值都是随机生成的。
执行上述两个测试例子,自动测试框架会自动帮我们随机出各种合法参数组合成的Op,并基于数值和类型完全相同地输入Tensor(PyTorch和OneFlow各有一份)分别运行PyTorch和OneFlow的代码,并完成算子的自动测试。由于自动测试框架的用法对齐了PyTorch用法,我们在开发算子之后编写测试样例将非常简单。不用再引入其它的标准库或者使用Numpy去模拟一遍算子的前向反向计算过程等,解放了生产力。
并且测试的时候只要次数足够多,就可以很大概率的覆盖到一些OneFlow算子和PyTorch算子无法对齐的样例,这个时候如果能拿到对应的复现样例就可以帮助我们确定OneFlow算子实现是否存在问题。
3
算子AutoTest框架实现思路
了解了AutoTest框架的使用方法,这里来讲解一下AutoTest框架的实现思路。从上面的用法可以大概可以猜到AutoTest框架在实现时会分成两部分,一部分是如何产生随机数据,另外一部分是用AutoTest部分的程序并记录和比较中间tensor以及对应的梯度tensor的形状和数值。
3.1 如何产生随机数据?
这里说的随机数据不仅指的是随机地输入tensor,还包含Op的属性参数比如上面反卷积Op测试例子中的kernel_size=random(1, 4)就实现了指定kernel_size将会在[1, 4)这个区间进行取值。
这部分实现在:
https://github.com/Oneflow-Inc/oneflow/blob/v0.6.0/python/oneflow/test_utils/automated_test_util/generators.py
首先我们看一下这个文件导出了哪些接口:
__all__ = [ "random_tensor", "random_bool", "random_device", "random", "random_or_nothing", "oneof", "constant", "nothing"]这些接口都是继承了generator基类用来产生随机数据结构的类,这里的数据结构既可以是内置类型如int,也可以是自定义数据类型比如tensor。AutoTest框架所有的参数的随机性都是基于这些方法来做到的,我们看一下generator基类的实现:
class generator: def __init__(self, children): self.children = children self._value = None def _init(self): self._value = None for x in self.children: x._init() def eval(self): self._init() return self.value() def _calc_value(self): raise NotImplementedError() def value(self): if self._value is None: self._value = self._calc_value() return self._value def size(self): return 1 def __or__(self, other): other = pack(other) return oneof( self, other, possibility=self.size() / (self.size() + other.size()) ) def __ror__(self, other): return self | other def __add__(self, other): return add(self, other) def __radd__(self, other): return self + other def __sub__(self, other): return self + neg(other) def __rsub__(self, other): return neg(self - other) def __mul__(self, other): return mul(self, other) def __rmul__(self, other): return self * other def to(self, annotation): self._to(annotation) for x in self.children: x.to(annotation) return self def _to(self, annotation): pass这个类不仅持有了_calc_value,value,eval等和取值有关的函数,还持有size这个反应生成数据个数的函数。另外还持有了一系列的魔法函数,让不同的generator子类可以互相组合,提升了自动测试框架书写的灵活性。最后还有一个to成员函数,这个函数被继承generator基类的类重写,用来确定这个随机数据结构的数值类型。
所有的generator派生类都继承了generator基类,并重写其中的__init__,__calc_value,size,_to等成员函数。比如nothing这个generator的派生类就是直接重写_calc_value函数,并在其中返回一个什么都不做的类的实体。
class Nothing: passclass nothing(generator): def __init__(self): super().__init__([]) def _calc_value(self): return Nothing()再例如,random这个generator的派生类的定义如下:
class random(generator): def __init__(self, low=1, high=6): self.low = pack(low) self.high = pack(high) super().__init__([self.low, self.high]) self.annotation = None def _to(self, annotation): if self.annotation is not None: return if hasattr(annotation, "__origin__"): # PyTorch _size_2_t and similar types are defined by type variables, # leading to unexpected __args__ and __origin__ # # >>> _size_2_t = Union[T, Tuple[T, T]][int] # >>> _size_2_t.__origin__ # typing.Union[~T, typing.Tuple[~T, ~T]] # # So recreate a new annotation object by repr and eval # # >>> _size_2_t # typing.Union[int, typing.Tuple[int, int]] # >>> _size_2_t_new = eval(repr(annotation)) # >>> _size_2_t_new.__origin__ # typing.Union annotation = eval(repr(annotation)) self.annotation = annotation def _generate(self, annotation): if hasattr(annotation, "__origin__"): if annotation.__origin__ is Union:x = random_util.choice(annotation.__args__)return self._generate(x) if annotation.__origin__ is Tuple or annotation.__origin__ is py_tuple:return [self._generate(x) for x in annotation.__args__] else:raise NotImplementedError( f"Not implemented annotation {annotation} in random, type(annotation.__origin__) is {type(annotation.__origin__)}") low, high = self.low.value(), self.high.value() if annotation == int: val = int(rng.integers(low, high)) elif annotation == float: val = float(rng.random() * (high - low) + low) elif annotation == bool: val = random_util.choice([True, False]) else: raise NotImplementedError(f"Not implemented annotation {annotation} in random" ) return val def _calc_value(self): return self._generate(self.annotation)def random_or_nothing(low, high): return oneof(random(low, high), nothing(), possibility=2 / 3)这里需要注意的一点是,持有annotation属性的generator派生类的可以通过to来更新annotation属性(如random类),也可以忽略这个annotation直接在_calc_value构造相应类型的随机结果(如random_device类)。
3.2 AutoTest核心实现
AutoTest框架的核心实现在:
https://github.com/Oneflow-Inc/oneflow/blob/v0.6.0/python/oneflow/test_utils/automated_test_util/torch_flow_dual_object.py
这个文件最后2行代码是:
torch = GetDualObject("", torch_original, flow)__all__ = ["autotest", "random_pytorch_tensor"]这行代码torch = GetDualObject("", torch_original, flow) 里面的torch_original表示原始的PyTorch框架,而使用GetDualObject获得的torch表示是对原始的PyTorch和OneFlow进行了一个封装,变成了一个high level的PyTorch。因此,这里最关键的实现就是GetDualObject这个函数,我们先不关注这个函数具体在做什么,而是它返回了什么。查看代码可以发现这个函数返回了一个DualObject类对象,我们先研究一下这个类:
class DualObject: def __init__(self, name, pytorch, oneflow): self.name = name self.pytorch = pytorch self.oneflow = oneflow if isinstance(pytorch, torch_original.nn.Module): state_dict = pytorch.state_dict() state_dict = {k: v.detach().cpu().numpy() for (k, v) in state_dict.items()} oneflow.load_state_dict(state_dict, strict=False) if testing:dual_modules_to_test.append(self) if isinstance(pytorch, torch_original.Tensor): if testing:dual_objects_to_test.append(self) def __repr__(self): return f"PyTorch object:\n{self.pytorch}\n\nOneFlow object:\n{self.oneflow}" def __getattr__(self, key): pytorch_attr = getattr(self.pytorch, key) oneflow_attr = getattr(self.oneflow, key) new_name = f"{self.name}.{key}" global call_pytorch call_pytorch = self.pytorch return GetDualObject(new_name, pytorch_attr, oneflow_attr)在__init__中传入了类对象名和pytorch/oneflow两个对象,在导出high level的PyTorch的时候传入的是torch_original和flow,而在导出random_pytorch_tensor 接口时传入的是pytorch_tensor和oneflow_tensor。这里不妨先看一下random_pytorch_tensor这个函数的实现:
def random_pytorch_tensor( ndim=None, dim0=1, dim1=None, dim2=None, dim3=None, dim4=None, low=0, high=1, dtype=float, requires_grad=True,): if isinstance(requires_grad, generator): requires_grad = requires_grad.value() pytorch_tensor = ( random_tensor(ndim, dim0, dim1, dim2, dim3, dim4, low, high, dtype) .value() .requires_grad_(requires_grad and dtype != int) ) flow_tensor = flow.tensor( pytorch_tensor.detach().cpu().numpy(), requires_grad=(requires_grad and dtype != int), ) return GetDualObject("unused", pytorch_tensor, flow_tensor)可以看到它和导出high level PyTorch的实现一样,也是通过调用GetDualObject来获得了一个对象。再回到DualObject类的实现,可以发现这里分别使用了dual_modules_to_test和dual_objects_to_test这两个list来分别记录OneFlow和PyTorch的nn.Module和tensor对象。另外DualObject类还重写了__getattr__这个魔法方法,这里以Flatten为例来看看这个魔法方法获取了AutoTest程序中的那些属性:
def __getattr__(self, key): pytorch_attr = getattr(self.pytorch, key) oneflow_attr = getattr(self.oneflow, key) print(key) # print(pytorch_attr) # print(oneflow_attr) new_name = f"{self.name}.{key}" return GetDualObject(new_name, pytorch_attr, oneflow_attr)# flatten的AutoTest程序@autotest(auto_backward=False)def test_against_pytorch(test_case): m = torch.nn.Flatten( start_dim=random(1, 6) | nothing(), end_dim=random(1, 6) | nothing() ) m.train(random()) device = random_device() m.to(device) x = random_pytorch_tensor().to(device) y = m(x) return y然后看一下__getattr__中key的打印结果:
nnFlattentraintoto可以看到被autotest()装饰器修饰的测试程序中的PyTorch或者OneFlow的nn.Module或者其它函数都重写了这个方法,它将这些nn.Module或者其它函数的参数和属性都取出来并同样使用GetDualObject返回一个新的DualObject对象,我们可以打印一下Flatten这个nn.Module对应的DualObject对象是什么:
PyTorch object:OneFlow object:GetDualObject这个函数就是根据传入的Pytorch以及OneFlow对象和它们的名字来生成一个DualObject对象。GetDualObject这个函数会为high level的PyTorch重写传入的原始PyTorch以及OneFlow对象的__call__魔法函数,最后返回一个DualObject对象,这个过程还包含了跳过一些不需要关注的魔法函数以及检查传入对象的属性是否合法和基于nn.Module和其它API默认参数的类型对generator继承类产生的随机数据绑定特定类型的工作(get_args函数中完成)。这里还有一句对于Tensor方法的特判,因为Tensor方法的调用方式(通过getattr)和其它Module和函数不同(通过__call__)。
GetDualObject的实现思路大致就是这样,代码比较长这里就不贴了,感兴趣可以在这里查看:
https://github.com/Oneflow-Inc/oneflow/blob/v0.6.0/python/oneflow/test_utils/automated_test_util/torch_flow_dual_object.py#L195-L401
最后,我们看一下autotest()装饰器的实现:
def autotest( n=20, auto_backward=True, rtol=0.0001, atol=1e-05, check_graph=True, check_allclose=True,): verbose = os.getenv("ONEFLOW_TEST_VERBOSE") is not None def deco(f): @functools.wraps(f) def new_f(test_case): nonlocal n loop_limit = n * 20 loop = 0 while n > 0:clear_note_fake_program()if loop > loop_limit: raise ValueError("autotest stuck in an endless loop!")dual_modules_to_test.clear()dual_objects_to_test.clear()try: global testing testing = True global testing_graph if check_graph: testing_graph = True res = f(test_case) testing = False testing_graph = Falseexcept (PyTorchDoesNotSupportError, BothDoNotSupportError) as e: if verbose: print(f"{f.__name__}") print(e) loop += 1 continueif res is not None: if not isinstance(res, collections.abc.Sequence): res = [res] func_outputs = res for x in res: if auto_backward: if isinstance(x.pytorch, torch_original.Tensor): call_tensor_id.append(id(x.pytorch)) x.sum().backward() dual_objects_to_test.append(x)for x in dual_modules_to_test: for key in x.pytorch.state_dict().keys(): if key not in x.oneflow.state_dict().keys(): warnings.warn(f"oneflow module don't have `{key}`") continue vis_parameters[key] = x.pytorch.state_dict()[key] dual_objects_to_test.append( GetDualObject( "unused", getattr(x.pytorch, key), getattr(x.oneflow, key), ) ) call_tensor_id.append(id(getattr(x.pytorch, key))) dual_objects_to_test.append( GetDualObject( "unused", getattr(x.pytorch, key).grad, getattr(x.oneflow, key).grad, ) ) call_tensor_id.append(id(getattr(x.pytorch, key).grad))for x in dual_objects_to_test: if ( isinstance(x.pytorch, torch_original.Tensor) and id(x.pytorch) not in call_tensor_id ): vis_tensor.append(x.pytorch)# check eagerfor x in dual_objects_to_test: if check_allclose: test_case.assertTrue(check_equality(x, rtol=rtol, atol=atol), x) if verbose: print(f"{f.__name__} test eager passed.")n -= 1loop += 1 return new_f return deco这个装饰器的res = f(test_case)这行代码会执行这个装饰器修饰的自动测试程序,会在给定输入的情况下去分别运行PyTorch和OneFlow的程序获得所有中间的输出tensor,包括tensor的梯度,并将它们记录到dual_modules_to_test这个列表。再遍历这个列表里面的每个tensor,比较数值和shape是否完全一样。比较函数实现在:
https://github.com/Oneflow-Inc/oneflow/blob/v0.6.0/python/oneflow/test_utils/automated_test_util/torch_flow_dual_object.py#L565-L599
原理就是拿到tensor的numpy数据进行比较。autotest() 装饰器还有几个参数可以调整,可以控制测试是否执行反向,执行次数,以及最后结果对比的精度阈值。
4
自动生成出BUG的程序和数据
上面介绍完了AutoTest框架的原理和使用方法,这里再展示一下基于AutoTest框架如何拿到可复现BUG的程序以及对应的输入tensor和参数等。原理很简单,就是把GetDualObject过程中使用的api记录下来拼起来就构成一个完整的程序,这里展示一下在CI中的效果。
https://github.com/Oneflow-Inc/oneflow/runs/4760189461?check_suite_focus=true
这个例子展示了在某次CI过程中,OneFlow的conv_transpose2d算子和PyTorch的conv_transpose2d算子在某个case下没有对齐,那么CI在报告这个错误时也输出了对应的复现代码和数据,可以方便框架开发者进行定位和判断:
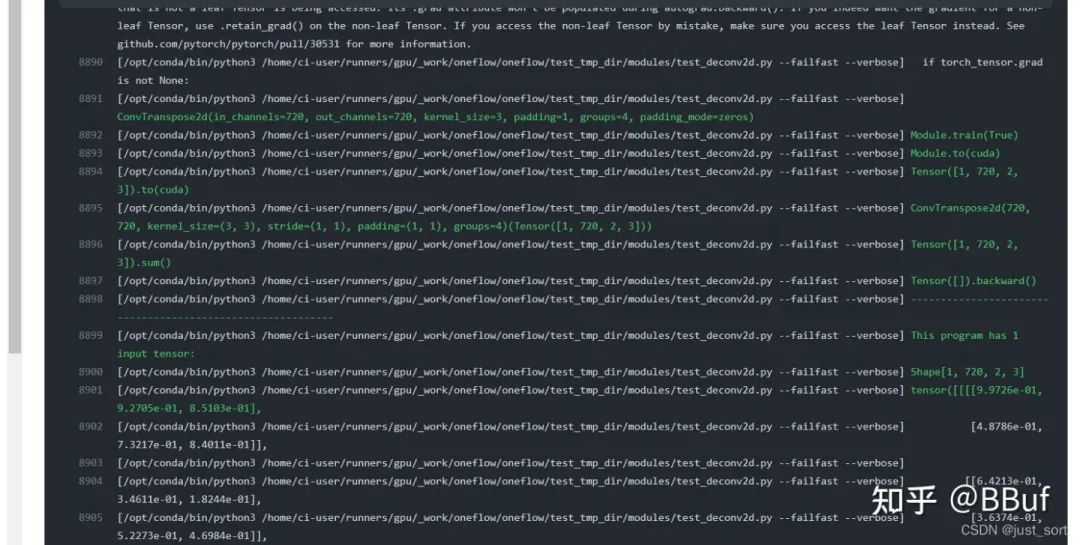
自动测试框架在算子和PyTorch没对齐时会输出复现程序和数据
除此之外,这个AutoTest框架目前不仅负责Eager算子的测试,还被我们扩展到支持nn.Graph和Eager Consistent等多种情况,极大的方便了框架开发者。
5
总结
这篇文章介绍了OneFlow的算子AutoTest框架,提供了一个深度学习优雅地做算子对齐的方法,使得开发者和用户可以像写PyTorch那样方便写测试程序。AutoTest框架的灵活性和易用性都比较强,欢迎大家学习或者使用。
(原文首发于:https://zhuanlan.zhihu.com/p/458111952)
其他人都在看
-
动态调度的“诅咒”
-
2021,我们的浮生一日
-
OneFlow v0.6.0正式发布
-
CUDA高性能计算经典问题:前缀和
-
Credit-based Flow Control的前世今生
-
计算机史最疯狂一幕:“蓝色巨人”奋身一跃
欢迎下载体验OneFlow新一代开源深度学习框架:GitHub - Oneflow-Inc/oneflow: OneFlow is a performance-centered and open-source deep learning framework.OneFlow is a performance-centered and open-source deep learning framework. - GitHub - Oneflow-Inc/oneflow: OneFlow is a performance-centered and open-source deep learning framework. https://github.com/Oneflow-Inc/oneflow/