必学框架新版SpringBoot教程(上集)
个人简介
作者是一个来自河源的大三在校生,以下笔记都是作者自学之路的一些浅薄经验,如有错误请指正,将来会不断的完善笔记,帮助更多的Java爱好者入门。
文章目录
SpringBoot
创建SpringBoot项目报错的问题

遇到这个问题我们可以在Custom输入:https://start.springboot.io,这个是阿里云的SpringBoot镜像

生成SpringBoot项目


再点击Next,勾选自己需要的模块,这样SpringBoot项目就构建好了。
SpringBoot的Hello World
1.在resources目录下的templates放页面

2.必须把Java代码放在springBoot主程序同级的目录下(也就是当前的boot目录),不然springboot检测不到

3.controller层方法。

然后去访问这个路径就OK啦。

运行时的异常。-datasource

很显然可以看出这是关于数据源的异常,因为我们在构建SpringBoot项目时勾选了Datasource模块,SpringBoot的AutoConfiguration自动去配置数据源,而我们没有对数据源进行配置,所以就会报错。
解决办法:application.properties配置如下
spring.datasource.driver-class-name=com.mysql.jdbc.Driverspring.datasource.url=jdbc:mysql://localhost:3306/ssmrl?serverTimezone=UTCspring.datasource.username=rootspring.datasource.password=18420163207 SpringBoot运行原理
POM.XML
<parent> <groupId>org.springframework.boot</groupId> <artifactId>spring-boot-starter-parent</artifactId> <version>2.4.1</version> <relativePath/> </parent>SpringBoot有父依赖。
我们点进去spring-boot-starter-parent看看。

springBoot里面自带了很多依赖,这些依赖都在spring-boot-dependencies里面。
我们截取了一段代码。

说明SpringBoot自带了很多依赖,和控制了这些依赖的version(版本)==》spring-boot-dependencies是版本控制中心
springBoot的启动器

我们点进去一个看看。


结论:可以看出来,很多我们在WEB开发需要用的,SpringBoot都给我们封装好了,变成了一个个starter(启动器),简化了开发。也就是说启动器里面就是我们要用的依赖。
SpringBoot的主程序
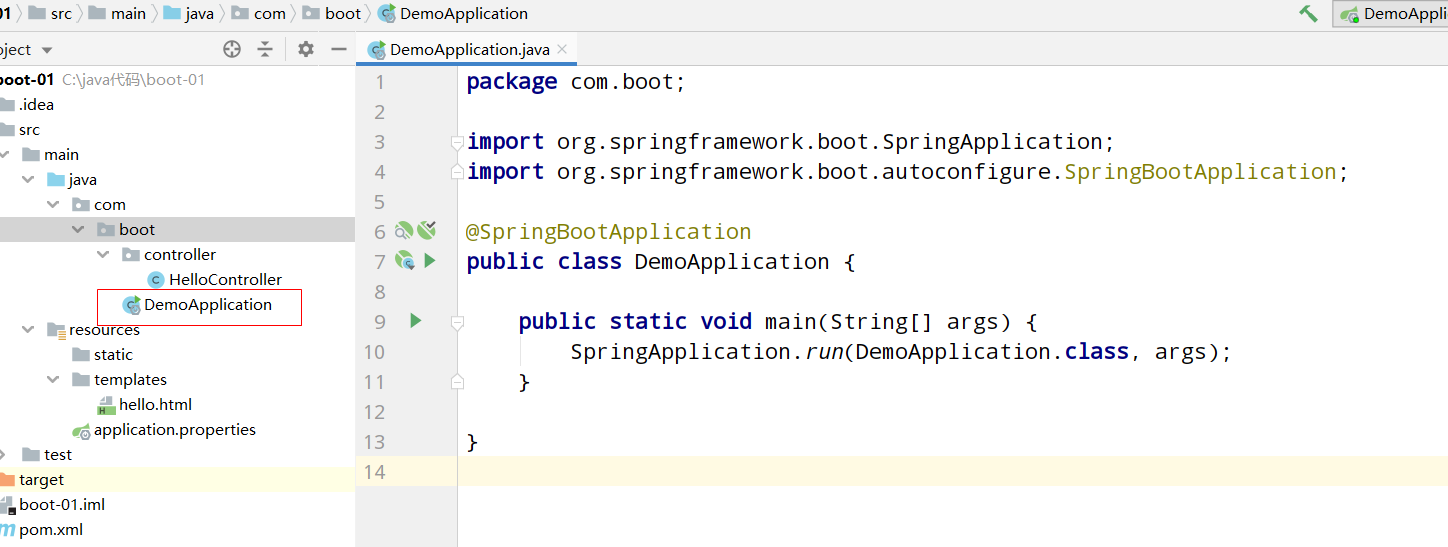

上面短短的几句代码就可以把SpringBoot项目运行起来。说明里面的原理是很复杂的。
SpringBoot主程序注解
点开@SpringBootApplication:

SpringBoot底层运用了大量的Spring底层注解。
@SpringBootConfiguration:说明这个类是SpringBoot的配置类
@EnableAutoConfiguration:开启自动配置功能。SpringBoot最核心的功能就是自动配置。大大的简化了开发,所以这个注解是非常重要的
@ComponentScan:Spring的注解,也就是去扫描这些类,并添加到SpringIOC容器中。
进去@SpringBootConfiguration注解里面:


因为@SpringBootConfiguration里面有@Configuration注解,@Configuration里面又有@Component注解。
说明@SpringBootConfiguration是以一个Spring组件添加进来的。
点进去@EnableAutoConfiguration注解:

我们可以看到两个注解:@AutoConfigurationPackage和@Import({AutoConfigurationImportSelector.class})
@AutoConfigurationPackage:自动配置包
在@AutoConfigurationPackage里面有如下代码:
@Import({Registrar.class})public @interface AutoConfigurationPackage { String[] basePackages() default {}; Class<?>[] basePackageClasses() default {};}Registrar.class:作用是将springBoot主程序类所在的包和所在包的子包,也就是目前的“boot”目录下所有类进行扫描,并加载到SpringIOC容器中,所以也就是为什么在boot外面的Java代码会没有作用,正因为springBoot在自动配置包注解中,默认只会扫描主程序类所在的包和所在包的子包的类
@Import({AutoConfigurationImportSelector.class}):导入自动配置导入选择器类
在AutoConfigurationImportSelector类中,有如下代码:
protected List<String> getCandidateConfigurations(AnnotationMetadata metadata, AnnotationAttributes attributes) { List<String> configurations = SpringFactoriesLoader.loadFactoryNames(this.getSpringFactoriesLoaderFactoryClass(), this.getBeanClassLoader()); Assert.notEmpty(configurations, "No auto configuration classes found in META-INF/spring.factories. If you are using a custom packaging, make sure that file is correct."); return configurations; }作用是得到候选配置
点进去 SpringFactoriesLoader.loadFactoryNames()方法:
public static List<String> loadFactoryNames(Class<?> factoryType, @Nullable ClassLoader classLoader) { ClassLoader classLoaderToUse = classLoader; if (classLoader == null) { classLoaderToUse = SpringFactoriesLoader.class.getClassLoader(); } String factoryTypeName = factoryType.getName(); return (List)loadSpringFactories(classLoaderToUse).getOrDefault(factoryTypeName, Collections.emptyList()); }我们在点进(List)loadSpringFactories(classLoaderToUse)的loadSpringFactories方法中
private static Map<String, List<String>> loadSpringFactories(ClassLoader classLoader) { Map<String, List<String>> result = (Map)cache.get(classLoader); if (result != null) { return result; } else { HashMap result = new HashMap(); try { Enumeration urls = classLoader.getResources("META-INF/spring.factories"); while(urls.hasMoreElements()) { URL url = (URL)urls.nextElement(); UrlResource resource = new UrlResource(url); Properties properties = PropertiesLoaderUtils.loadProperties(resource); Iterator var6 = properties.entrySet().iterator(); while(var6.hasNext()) { Entry<?, ?> entry = (Entry)var6.next(); String factoryTypeName = ((String)entry.getKey()).trim(); String[] factoryImplementationNames = StringUtils.commaDelimitedListToStringArray((String)entry.getValue()); String[] var10 = factoryImplementationNames; int var11 = factoryImplementationNames.length; for(int var12 = 0; var12 < var11; ++var12) {String factoryImplementationName = var10[var12];((List)result.computeIfAbsent(factoryTypeName, (key) -> { return new ArrayList();})).add(factoryImplementationName.trim()); } } } result.replaceAll((factoryType, implementations) -> { return (List)implementations.stream().distinct().collect(Collectors.collectingAndThen(Collectors.toList(), Collections::unmodifiableList)); }); cache.put(classLoader, result); return result; } catch (IOException var14) { throw new IllegalArgumentException("Unable to load factories from location [META-INF/spring.factories]", var14); } } }我们可以看到它频繁的出现META-INF/spring.factories。我们去搜索它


在这里我们可以看到非常多的配置信息。这就是SpringBoot自动配置的根源所在,在SpringBoot运行的时候,自动配置类会在类路径下的META-INF/spring.factories里面去找到对应的值,只有导入了这些对应的值,自动配置才能生效
SpringBoot主程序的Run方法:
我们点进去run(),找到SpringApplication的构造器。
public SpringApplication(ResourceLoader resourceLoader, Class<?>... primarySources) { ............. ............. #上面省略 this.webApplicationType = WebApplicationType.deduceFromClasspath(); this.setInitializers(this.getSpringFactoriesInstances(ApplicationContextInitializer.class)); this.setListeners(this.getSpringFactoriesInstances(ApplicationListener.class)); this.mainApplicationClass = this.deduceMainApplicationClass(); }SpringApplication
结论:SpringApplication这个类会做如下的事:
- 先去推断这个项目是不是WEB项目
- 从SpringFactories实例中查找出所有初始化器,并设置到initializers属性中
- 从SpringFactories实例中查找出所有应用监听器,并设置到listeners属性中
- 推断SpringBoot主程序类,并设置到mainApplicationClass中
yml配置注入
SpringBoot自带了application.properties,但是呢,SpringBoot更加推荐用yml或者yaml,不过本质上其实是差不多的,只是语法有些许不同罢了,yml和yaml会更加简洁
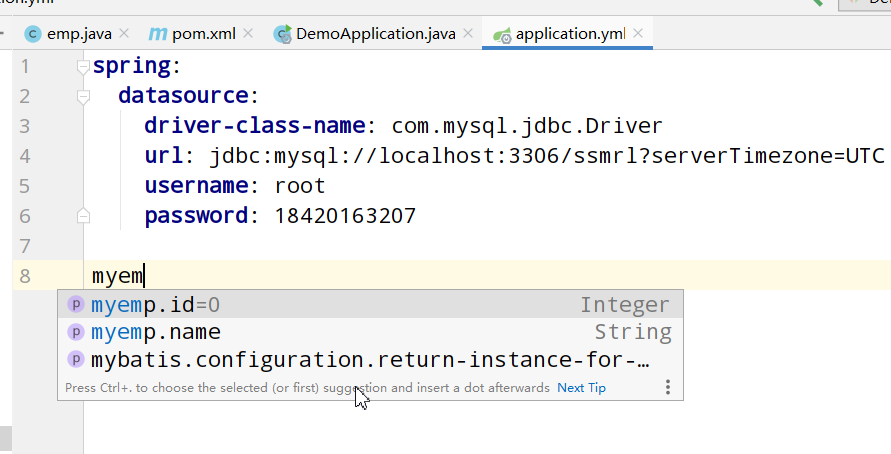
#yml语法:key:空格 值spring: datasource: driver-class-name: com.mysql.jdbc.Driver url: jdbc:mysql://localhost:3306/ssmrl?serverTimezone=UTC username: root password: 18420163207#properties语法:key=值spring.datasource.driver-class-name=com.mysql.jdbc.Driver问:我们如何用SpringBoot自带的配置文件对一个对象进行封装,以便我们用@Autowired对这个类进行注入

@ConfigurationProperties(prefix=“前缀”):把这个类的对象交给SpringBoot配置文件,我们可以在配置文件中用 前缀.属性名去赋值,这样SpringBoot就会把这些属性值封装成一个‘’对象‘’,放在IOC容器里,这样我们通过自动装配就可以获得这个对象
如图上所示,报了一个错误====Not registered via @EnableConfigurationProperties, marked as Spring component, or scanned via @ConfigurationPropertiesScan
意思是:我们少了一个@EnableConfigurationProperties注解,我们必须开启这个注解,@ConfigurationProperties才会生效
解决方法:
1.
<dependency> <groupId>org.springframework.boot</groupId> <artifactId>spring-boot-configuration-processor</artifactId> <optional>true</optional> </dependency>2.
@EnableConfigurationProperties(emp.class) //必须要加上这个注解,并指定类@SpringBootApplicationpublic class DemoApplication { public static void main(String[] args) { SpringApplication.run(DemoApplication.class, args); }}进入application.yml:
======说明我们已经通过@ConfigurationProperties绑定到这个类了
去绑定一下:
myemp: id: 999 name: springBoot@SpringBootTestclass DemoApplicationTests { @Autowired private emp emp; @Test void contextLoads() { System.out.println(emp); }}
*====然后我们就绑定成功了!!!*
多环境切换
在实际的开发中,我们可能会需要有多种环境,比如开发环境、测试环境、真实环境,我们如何做到这一点呢?
在resources目录下创建application-dev.properties
此时这个环境名就叫做:dev
springBoot默认会读取application.properties而不是application-dev.properties,所以我们要切换环境只能如下操作:
application.properties
server.port=8080 #设置该环境服务器的端口号spring.profiles.active=dev #环境切换成devapplication-dev.properties
server.port=8081当我们去启动SpringBoot项目,下面有一段日志写着:

在application.properties我们配置的端口号是8080,在application-dev.properties我们配置的端口号是8081,但是启动时我们发现初始化端口号是8081,说明我们已经顺利的切换了环境。
SpringBoot自动装配原理
@EnableAutoConfiguration //开启自动配置功能@ComponentScan( excludeFilters = {@Filter( type = FilterType.CUSTOM, classes = {TypeExcludeFilter.class}), @Filter( type = FilterType.CUSTOM, classes = {AutoConfigurationExcludeFilter.class})})public @interface SpringBootApplication { .... }我们进去@EnableAutoConfiguration:
@Import({AutoConfigurationImportSelector.class}) //将指定的类导入到容器中public @interface EnableAutoConfiguration { String ENABLED_OVERRIDE_PROPERTY = "spring.boot.enableautoconfiguration"; Class<?>[] exclude() default {}; String[] excludeName() default {};}我们再点进去AutoConfigurationImportSelector
找到如下:
protected List<String> getCandidateConfigurations(AnnotationMetadata metadata, AnnotationAttributes attributes) { List<String> configurations = SpringFactoriesLoader.loadFactoryNames(this.getSpringFactoriesLoaderFactoryClass(), this.getBeanClassLoader()); Assert.notEmpty(configurations, "No auto configuration classes found in META-INF/spring.factories. If you are using a custom packaging, make sure that file is correct."); return configurations; }进入loadFactoryNames()
public static List<String> loadFactoryNames(Class<?> factoryType, @Nullable ClassLoader classLoader) { ClassLoader classLoaderToUse = classLoader; if (classLoader == null) { classLoaderToUse = SpringFactoriesLoader.class.getClassLoader(); } String factoryTypeName = factoryType.getName(); return (List)loadSpringFactories(classLoaderToUse).getOrDefault(factoryTypeName, Collections.emptyList()); }再进入(List)loadSpringFactories(classLoaderToUse)
private static Map<String, List<String>> loadSpringFactories(ClassLoader classLoader) { Map<String, List<String>> result = (Map)cache.get(classLoader); if (result != null) { return result; } else { HashMap result = new HashMap(); try { //1.获取所有META-INF/spring.factories Enumeration urls = classLoader.getResources("META-INF/spring.factories"); while(urls.hasMoreElements()) { URL url = (URL)urls.nextElement(); UrlResource resource = new UrlResource(url); //2.把所有META-INF/spring.factories封装成properties Properties properties = PropertiesLoaderUtils.loadProperties(resource); Iterator var6 = properties.entrySet().iterator(); while(var6.hasNext()) { Entry<?, ?> entry = (Entry)var6.next(); String factoryTypeName = ((String)entry.getKey()).trim(); String[] factoryImplementationNames = StringUtils.commaDelimitedListToStringArray((String)entry.getValue()); String[] var10 = factoryImplementationNames; int var11 = factoryImplementationNames.length; for(int var12 = 0; var12 < var11; ++var12) {String factoryImplementationName = var10[var12];((List)result.computeIfAbsent(factoryTypeName, (key) -> { return new ArrayList();})).add(factoryImplementationName.trim()); } } } result.replaceAll((factoryType, implementations) -> { return (List)implementations.stream().distinct().collect(Collectors.collectingAndThen(Collectors.toList(), Collections::unmodifiableList)); }); cache.put(classLoader, result); return result; } catch (IOException var14) { throw new IllegalArgumentException("Unable to load factories from location [META-INF/spring.factories]", var14); } } }结论:
- 当springBoot启动时,会去搜索所有/META-INF/spring.factories

并把所有EnableAutoConfiguration的值导入到容器中,然后自动配置才会生效
xxxAutoConfiguration会和xxxProperties绑定在一起,xxxAutoConfiguration需要的值会在xxxProperties里面取,xxxProperties的默认值可以通过application.properties来设置
静态资源处理
SpringBoot项目自带的静态资源目录

注意:templates目录只用来存放html页面。
欢迎页
我们先打开WebMvcAutoConfiguration,会看到如下代码
@Bean public WelcomePageHandlerMapping welcomePageHandlerMapping(ApplicationContext applicationContext, FormattingConversionService mvcConversionService, ResourceUrlProvider mvcResourceUrlProvider) { WelcomePageHandlerMapping welcomePageHandlerMapping = new WelcomePageHandlerMapping(new TemplateAvailabilityProviders(applicationContext), applicationContext, this.getWelcomePage(), this.mvcProperties.getStaticPathPattern()); welcomePageHandlerMapping.setInterceptors(this.getInterceptors(mvcConversionService, mvcResourceUrlProvider)); welcomePageHandlerMapping.setCorsConfigurations(this.getCorsConfigurations()); return welcomePageHandlerMapping; }在 WelcomePageHandlerMapping welcomePageHandlerMapping = new WelcomePageHandlerMapping(new TemplateAvailabilityProviders(applicationContext), applicationContext, this.getWelcomePage(), this.mvcProperties.getStaticPathPattern());代码中有一句:this.getWelcomePage(),我们进入这个方法看看,看它是如何得到欢迎页的
进入后代码如下:
private Optional<Resource> getWelcomePage() { String[] locations = WebMvcAutoConfiguration.getResourceLocations(this.resourceProperties.getStaticLocations()); return Arrays.stream(locations).map(this::getIndexHtml).filter(this::isReadable).findFirst(); } ............private Resource getIndexHtml(String location) { return this.resourceLoader.getResource(location + "index.html"); } //欢迎页就是location下面的index.html而已再进入this.resourceProperties.getStaticLocations()方法
public String[] getStaticLocations() { return this.staticLocations; }点进this.staticLocations之后我们会发现有如下代码:
public static class Resources { private static final String[] CLASSPATH_RESOURCE_LOCATIONS = new String[]{"classpath:/META-INF/resources/", "classpath:/resources/", "classpath:/static/", "classpath:/public/"}; private String[] staticLocations; private boolean addMappings; private boolean customized; private final WebProperties.Resources.Chain chain; private final WebProperties.Resources.Cache cache; public Resources() { this.staticLocations = CLASSPATH_RESOURCE_LOCATIONS; this.addMappings = true; this.customized = false; this.chain = new WebProperties.Resources.Chain(); this.cache = new WebProperties.Resources.Cache(); }这就是SpringBoot对静态资源的处理
这段代码 private static final String[] CLASSPATH_RESOURCE_LOCATIONS = new String[]{“classpath:/META-INF/resources/”, “classpath:/resources/”, “classpath:/static/”, “classpath:/public/”};说明了SpringBoot只去认这些路径下面的静态资源,其他路径的静态资源是无效的
回到上一步,我们进入WelcomePageHandlerMapping这个类,会有如下代码:
WelcomePageHandlerMapping(TemplateAvailabilityProviders templateAvailabilityProviders, ApplicationContext applicationContext, Optional<Resource> welcomePage, String staticPathPattern) { if (welcomePage.isPresent() && "/".equals(staticPathPattern)) { logger.info("Adding welcome page: " + welcomePage.get()); this.setRootViewName("forward:index.html"); } else if (this.welcomeTemplateExists(templateAvailabilityProviders, applicationContext)) { logger.info("Adding welcome page template: index"); this.setRootViewName("index"); } }上面我们说了,所有在"classpath:/META-INF/resources/", “classpath:/resources/”, “classpath:/static/”, "classpath:/public/"路径下的静态资源都会被SpringBoot扫描,上面的代码可以看出SpringBoot会扫描这些路径下的index.html,作为欢迎页

静态资源处理的两种方式
在WebMvcAutoConfiguration里面有一段代码,里面写着怎么处理静态资源
public void addResourceHandlers(ResourceHandlerRegistry registry) { if (!this.resourceProperties.isAddMappings()) { logger.debug("Default resource handling disabled"); } else { Duration cachePeriod = this.resourceProperties.getCache().getPeriod(); CacheControl cacheControl = this.resourceProperties.getCache().getCachecontrol().toHttpCacheControl(); if (!registry.hasMappingForPattern("/webjars/")) {this.customizeResourceHandlerRegistration(registry.addResourceHandler(new String[]{"/webjars/"}).addResourceLocations(new String[]{"classpath:/META-INF/resources/webjars/"}).setCachePeriod(this.getSeconds(cachePeriod)).setCacheControl(cacheControl).setUseLastModified(this.resourceProperties.getCache().isUseLastModified())); } String staticPathPattern = this.mvcProperties.getStaticPathPattern(); if (!registry.hasMappingForPattern(staticPathPattern)) { this.customizeResourceHandlerRegistration(registry.addResourceHandler(new String[]{staticPathPattern}).addResourceLocations(WebMvcAutoConfiguration.getResourceLocations(this.resourceProperties.getStaticLocations())).setCachePeriod(this.getSeconds(cachePeriod)).setCacheControl(cacheControl).setUseLastModified(this.resourceProperties.getCache().isUseLastModified())); } } }-
方式一: this.customizeResourceHandlerRegistration(registry.addResourceHandler(new String[]{"/webjars/"}).addResourceLocations(new String[]{"classpath:/META-INF/resources/webjars/"}).setCachePeriod(this.getSeconds(cachePeriod)).setCacheControl(cacheControl).setUseLastModified(this.resourceProperties.getCache().isUseLastModified())); //用webjars方式 -
this.customizeResourceHandlerRegistration(registry.addResourceHandler(new String[]{staticPathPattern}).addResourceLocations(WebMvcAutoConfiguration.getResourceLocations(this.resourceProperties.getStaticLocations())).setCachePeriod(this.getSeconds(cachePeriod)).setCacheControl(cacheControl).setUseLastModified(this.resourceProperties.getCache().isUseLastModified())); }在(2)里面有一个this.resourceProperties.getStaticLocations(),进入我们可以看到
public static class Resources { private static final String[] CLASSPATH_RESOURCE_LOCATIONS = new String[]{"classpath:/META-INF/resources/", "classpath:/resources/", "classpath:/static/", "classpath:/public/"}; private String[] staticLocations; private boolean addMappings; private boolean customized; private final WebProperties.Resources.Chain chain; private final WebProperties.Resources.Cache cache; public Resources() { this.staticLocations = CLASSPATH_RESOURCE_LOCATIONS; this.addMappings = true; this.customized = false; this.chain = new WebProperties.Resources.Chain(); this.cache = new WebProperties.Resources.Cache(); } 方式二: private static final String[] CLASSPATH_RESOURCE_LOCATIONS = new String[]{"classpath:/META-INF/resources/", "classpath:/resources/", "classpath:/static/", "classpath:/public/"}; //只要资源文件在这里面的目录,就可以被扫描到
