Microsoft Azure和WPF实现人脸检测
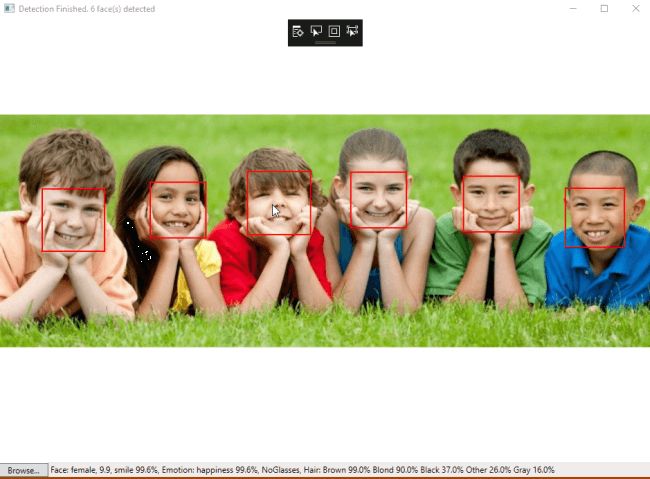
在本文中,详解如何使用Microsoft Azure和WPF技术的帮助下使用实现人脸API应用程序。该应用程序检测人脸图像,显示每张脸周围的红框,以及通过将光标移动到框来显示每张脸的描述的状态栏。
先决条件
- 在 Azure 门户中创建人脸 API。
- 在 WPF 应用程序中访问和管理人脸 API 密钥。
- 在 Visual Studio 2019 中使用人脸 API 创建 WPF 应用程序。
按照步骤在 Azure 门户上创建人脸 API。
第1步
登录 Azure网站。
Step 2
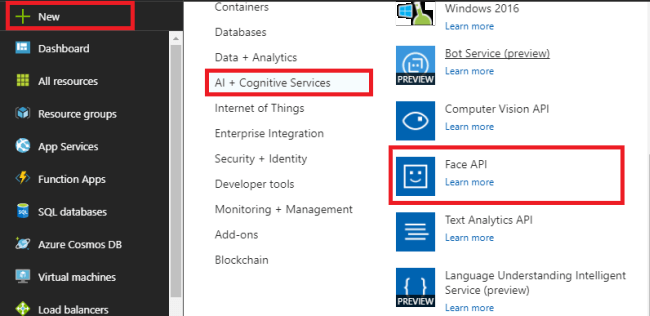
按“+新建”,选择“AI+认知服务”,选择“人脸API”。
第 3 步
在“创建人脸 API”边栏选项卡中,输入您的API名称,选择所需的订阅,然后为API选择所需的位置。选择我们使用所需的适当定价层。为API创建资源组。然后,按“创建”。
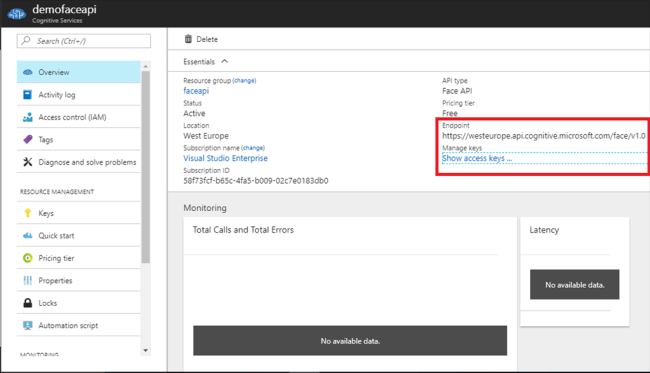
复制端点并按“显示/管理密钥”以显示我们在WPF应用程序中使用的密钥。
第4步
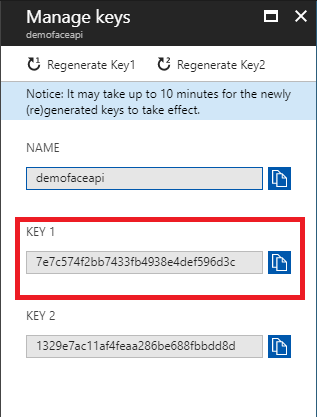
“管理密钥”刀片显示将用作我们的人脸API访问密钥的密钥。单击“复制”按钮,然后将其粘贴到记事本中。
使用 C#在Visual Studio中实现人脸API
第 5 步
按照步骤使用 Visual Studio 2019创建基于Windows 的 WPF应用程序。
打开Visual Studio 2019。
- 从菜单栏中,单击文件>>新建>>新建项目。
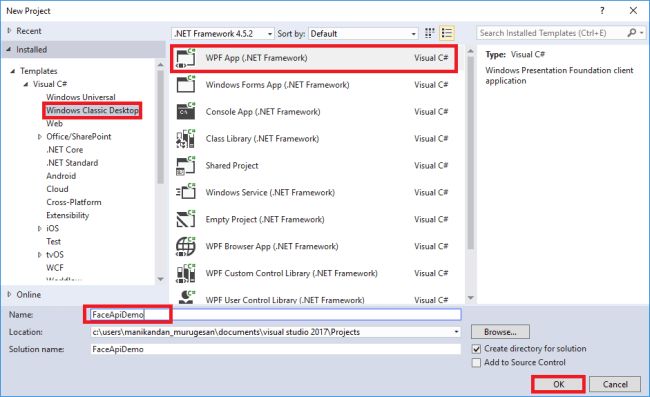
- 在Visual Studio中,选择已安装-->模板-->Visual C#-->Windows经典桌面-->WPF应用程序(.NET 应用程序)。
- 为我们的应用程序输入名称为FaceApiDemo,然后按 OK 在解决方案资源管理器中打开它。
第 6 步
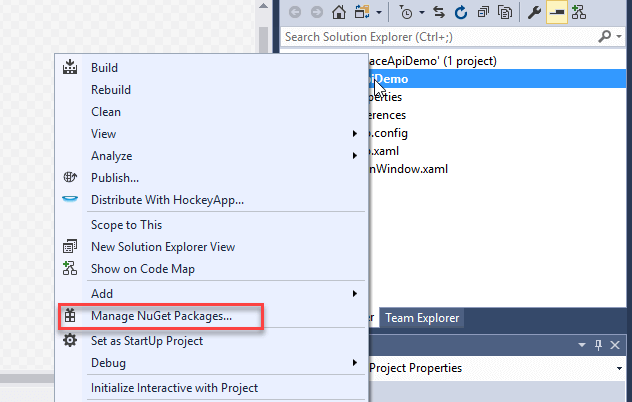
我们需要将两个包添加到我们的WPF应用程序中。右键单击解决方案资源管理器并按“NuGet 包管理器”添加两个包。
Newtonsoft.json是适用于.NET应用程序的流行JSON框架的框架。我们将使用它,因为我们的 Face API包含大量JSON文件来存储有关图像的各种详细信息。
在 NuGet 包中,浏览 Newtonsoft.json,然后按“安装”。

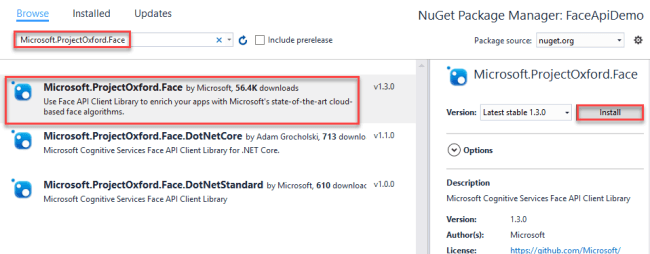
此外,浏览Microsoft.ProjectOxford.Face并按“安装” 。该包用于通过HTTPS请求配置人脸 API 和我们的应用程序。因此,它导入了一个封装 Face API REST 请求的 .NET 库。
第 7 步
将以下代码复制并粘贴到MainWindow.Xaml。这是我们的Windows应用程序的布局代码。
步骤8
打开MainWindow.xaml.cs,用下面的代码替换代码。
using System; using System.Collections.Generic; using System.IO; using System.Text; using System.Threading.Tasks; using System.Windows; using System.Windows.Input; using System.Windows.Media; using System.Windows.Media.Imaging; using Microsoft.ProjectOxford.Common.Contract; using Microsoft.ProjectOxford.Face; using Microsoft.ProjectOxford.Face.Contract; namespace FaceApiDemo { public partial class MainWindow : Window { // Replace the first parameter with your valid subscription key. // // Replace or verify the region in the second parameter. // // You must use the same region in your REST API call as you used to obtain your subscription keys. // For example, if you obtained your subscription keys from the westus region, replace // "westcentralus" in the URI below with "westus". // // NOTE: Free trial subscription keys are generated in the westcentralus region, so if you are using // a free trial subscription key, you should not need to change this region. private readonly IFaceServiceClient faceServiceClient =new FaceServiceClient("keys", "Endpoints"); Face[] faces; // The list of detected faces. String[] faceDescriptions; // The list of descriptions for the detected faces. double resizeFactor; // The resize factor for the displayed image. //private object faceDescriptionStatusBar; public MainWindow() {InitializeComponent(); } // Displays the image and calls Detect Faces. private async void BrowseButton_Click(object sender, RoutedEventArgs e) {// Get the image file to scan from the user.var openDlg = new Microsoft.Win32.OpenFileDialog(); openDlg.Filter = "JPEG Image(*.jpg)|*.jpg";bool? result = openDlg.ShowDialog(this); // Return if canceled.if (!(bool)result){ return;} // Display the image file.string filePath = openDlg.FileName; Uri fileUri = new Uri(filePath);BitmapImage bitmapSource = new BitmapImage(); bitmapSource.BeginInit();bitmapSource.CacheOption = BitmapCacheOption.None;bitmapSource.UriSource = fileUri;bitmapSource.EndInit(); FacePhoto.Source = bitmapSource; // Detect any faces in the image.Title = "Detecting...";faces = await UploadAndDetectFaces(filePath);Title = String.Format("Detection Finished. {0} face(s) detected", faces.Length); if (faces.Length > 0){ // Prepare to draw rectangles around the faces. DrawingVisual visual = new DrawingVisual(); DrawingContext drawingContext = visual.RenderOpen(); drawingContext.DrawImage(bitmapSource, new Rect(0, 0, bitmapSource.Width, bitmapSource.Height)); double dpi = bitmapSource.DpiX; resizeFactor = 96 / dpi; faceDescriptions = new String[faces.Length]; for (int i = 0; i < faces.Length; ++i) { Face face = faces[i]; // Draw a rectangle on the face. drawingContext.DrawRectangle( Brushes.Transparent, new Pen(Brushes.Red, 2), new Rect( face.FaceRectangle.Left * resizeFactor, face.FaceRectangle.Top * resizeFactor, face.FaceRectangle.Width * resizeFactor, face.FaceRectangle.Height * resizeFactor ) ); // Store the face description. faceDescriptions[i] = FaceDescription(face); } drawingContext.Close(); // Display the image with the rectangle around the face. RenderTargetBitmap faceWithRectBitmap = new RenderTargetBitmap( (int)(bitmapSource.PixelWidth * resizeFactor), (int)(bitmapSource.PixelHeight * resizeFactor), 96, 96, PixelFormats.Pbgra32); faceWithRectBitmap.Render(visual); FacePhoto.Source = faceWithRectBitmap; // Set the status bar text. faceDescriptionStatusBar.Text = "Place the mouse pointer over a face to see the face description.";} } // Displays the face description when the mouse is over a face rectangle. private void FacePhoto_MouseMove(object sender, MouseEventArgs e) {// If the REST call has not completed, return from this method.if (faces == null) return; // Find the mouse position relative to the image.Point mouseXY = e.GetPosition(FacePhoto); ImageSource imageSource = FacePhoto.Source;BitmapSource bitmapSource = (BitmapSource)imageSource; // Scale adjustment between the actual size and displayed size.var scale = FacePhoto.ActualWidth / (bitmapSource.PixelWidth / resizeFactor); // Check if this mouse position is over a face rectangle.bool mouseOverFace = false; for (int i = 0; i = left && mouseXY.X = top && mouseXY.Y <= top + height) { faceDescriptionStatusBar.Text = faceDescriptions[i]; mouseOverFace = true; break; }} // If the mouse is not over a face rectangle.if (!mouseOverFace) faceDescriptionStatusBar.Text = "Place the mouse pointer over a face to see the face description."; } // Uploads the image file and calls Detect Faces. private async Task UploadAndDetectFaces(string imageFilePath) {// The list of Face attributes to return.IEnumerable faceAttributes = new FaceAttributeType[] { FaceAttributeType.Gender, FaceAttributeType.Age, FaceAttributeType.Smile, FaceAttributeType.Emotion, FaceAttributeType.Glasses, FaceAttributeType.Hair }; // Call the Face API.try{ using (Stream imageFileStream = File.OpenRead(imageFilePath)) { Face[] faces = await faceServiceClient.DetectAsync(imageFileStream, returnFaceId: true, returnFaceLandmarks: false, returnFaceAttributes: faceAttributes); return faces; }}// Catch and display Face API errors.catch (FaceAPIException f){ MessageBox.Show(f.ErrorMessage, f.ErrorCode); return new Face[0];}// Catch and display all other errors.catch (Exception e){ MessageBox.Show(e.Message, "Error"); return new Face[0];} } // Returns a string that describes the given face. private string FaceDescription(Face face) {StringBuilder sb = new StringBuilder(); sb.Append("Face: "); // Add the gender, age, and smile.sb.Append(face.FaceAttributes.Gender);sb.Append(", ");sb.Append(face.FaceAttributes.Age);sb.Append(", ");sb.Append(String.Format("smile {0:F1}%, ", face.FaceAttributes.Smile * 100)); // Add the emotions. Display all emotions over 10%.sb.Append("Emotion: ");EmotionScores emotionScores = face.FaceAttributes.Emotion;if (emotionScores.Anger >= 0.1f) sb.Append(String.Format("anger {0:F1}%, ", emotionScores.Anger * 100));if (emotionScores.Contempt >= 0.1f) sb.Append(String.Format("contempt {0:F1}%, ", emotionScores.Contempt * 100));if (emotionScores.Disgust >= 0.1f) sb.Append(String.Format("disgust {0:F1}%, ", emotionScores.Disgust * 100));if (emotionScores.Fear >= 0.1f) sb.Append(String.Format("fear {0:F1}%, ", emotionScores.Fear * 100));if (emotionScores.Happiness >= 0.1f) sb.Append(String.Format("happiness {0:F1}%, ", emotionScores.Happiness * 100));if (emotionScores.Neutral >= 0.1f) sb.Append(String.Format("neutral {0:F1}%, ", emotionScores.Neutral * 100));if (emotionScores.Sadness >= 0.1f) sb.Append(String.Format("sadness {0:F1}%, ", emotionScores.Sadness * 100));if (emotionScores.Surprise >= 0.1f) sb.Append(String.Format("surprise {0:F1}%, ", emotionScores.Surprise * 100)); // Add glasses.sb.Append(face.FaceAttributes.Glasses);sb.Append(", "); // Add hair.sb.Append("Hair: "); // Display baldness confidence if over 1%.if (face.FaceAttributes.Hair.Bald >= 0.01f) sb.Append(String.Format("bald {0:F1}% ", face.FaceAttributes.Hair.Bald * 100)); // Display all hair color attributes over 10%.HairColor[] hairColors = face.FaceAttributes.Hair.HairColor;foreach (HairColor hairColor in hairColors){ if (hairColor.Confidence >= 0.1f) { sb.Append(hairColor.Color.ToString()); sb.Append(String.Format(" {0:F1}% ", hairColor.Confidence * 100)); }} // Return the built string.return sb.ToString(); } } } 在代码的第30行,输入我们从Azure Face API获取的密钥和端点 URL。
private readonly IFaceServiceClient faceServiceClient = new FaceServiceClient("_key_", "End-point URL"); 在 Azure 门户上使用人脸API替换密钥和端点。
步骤 9
保存并启动程序。然后,单击“浏览”按钮导入图像以检测人脸。
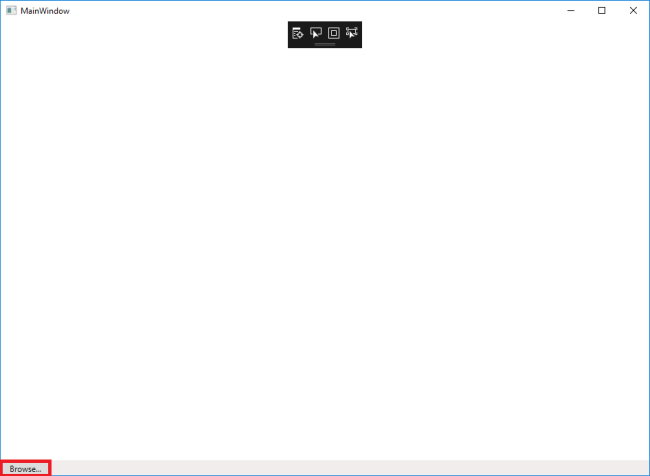
第 10 步
等待几秒钟。云API想要响应我们的图像,以使用图像中人脸周围的红色框来检测人脸。将光标移到面部矩形上,该图像的描述会显示在状态栏中。