文心一言 4.5 开源深度剖析:性能中文双项碾压,开源引擎驱动行业变革,解锁大模型新范式_开源文心一言的优势
引言
不知道大家关注到没?文心大模型 ERNIE 4.5 已开源并首发于 GitCode 平台!不同于以往的开源模型,百度这次一口气开源了 10 款模型,覆盖基础、对话、多模态、思考等多个方向,甚至将核心训练框架、分布式策略完全开放。在基准测试中,文心开源即刷榜,性能大幅超越 Qwen3、DeepSeek-V3 等模型;下面跟随博主一起从模型架构特性、技术分析、部署难度等来对文心模型全面解析一下!

文章目录
- 引言
- 一、文心大模型 ERNIE 4.5 开源简介
-
- 1.1 开源模型版本介绍
- 1.2 基准测试表现
- 1.3 全面的工具生态链
- 二、文心大模型 ERNIE 4.5技术分析
-
- 2.1 多模态异构 MOE
- 2.2 高效训练与并行架构
- 2.3 后训练策略
- 2.4 推理和部署
- 三、基于 GitCode 仓库的文心开源模型个人部署
-
- 3.1 个人部署详细步骤
-
-
- 3.1.1 环境选择
- 3.1.2 环境准备
- 3.1.2 模型下载与配置
- 3.1.3 部署与测试
-
- 3.2 个人部署效率分析
-
-
- 3.2.1 部署时间成本
-
- 3.3 个人部署难度评估
-
-
- 3.3.1 技术门槛要求
- 3.3.2 常见问题及解决办法(选看)
-
- 四、文心一言 4.5 全方位对比评测
-
- 3.1 基础通识测试
- 3.2 高级推理测试
- 3.3 视觉能力测试
- 3.4 代码编程部分
- 3.5 数学能力测试
- 3.6 指令能力测试
- 3.7 知识能力测试
- 3.8 通用能力测试
- 3.9 对比评测总结
- 五、总结与社区生态展望
-
- 5.1 社区生态展望
- 5.2 全文总结
- 六、附录
一、文心大模型 ERNIE 4.5 开源简介
1.1 开源模型版本介绍
话不多说,先来看看大家最关心的问题?文心大模型这次开源的 10 款模型,它们都有哪些版本、聚焦什么方向、参数规模多大 ,下面咱们逐个来看!

文心大模型 ERNIE 4.5 开源本次主要分为3类、文本大语言模型、视觉语言模型、和小型密集模型。所的模型都支持128K的上下的上下文窗口,覆盖了基础、对话、多模态、思考等多个方向。
对于每个版本的文心模型官方都给出了两种版本,Base 基础版(预训练基础模型)和PT
(Fine-tuned 微调版)模型版本。我这边建议大家部署的话通常去选择PT(
Fine-tuned 微调版)模型,不仅因为PT模型他性能最佳,而且它对人类偏好进行了定向优化,能更好地适配各类下游任务场景。视觉语言模型方面 Qwen2-VL 有 3B、7B 和 72B ,最达参数为720亿,而文心视觉语言模型的的参数达到了4240亿,活跃参数达470亿。均大于通义千问视觉语言模型的参数规模。
1.2 基准测试表现
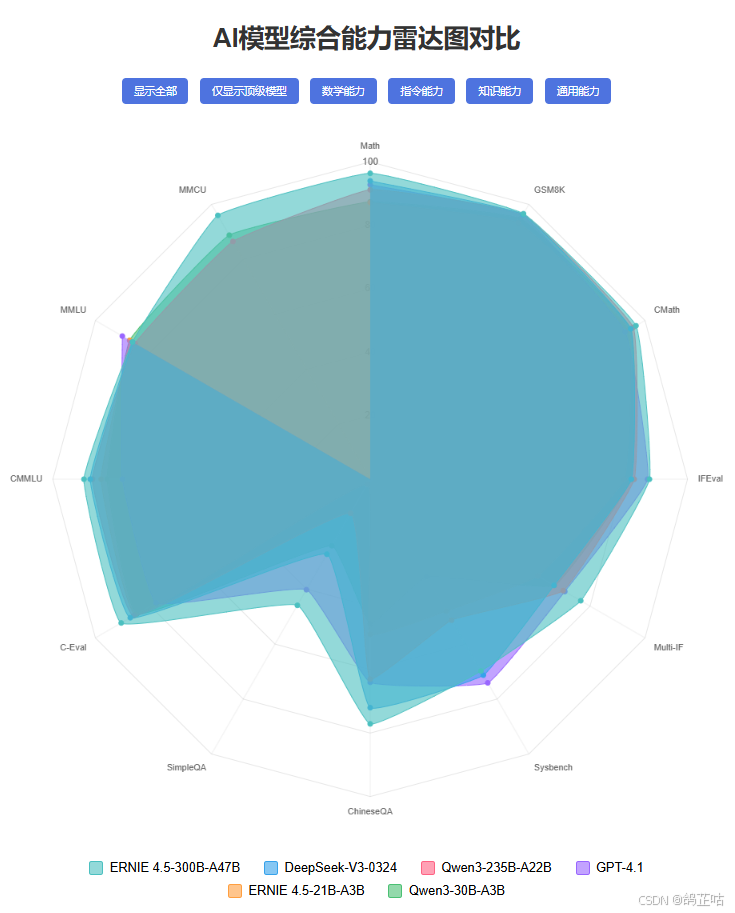
文心大模型开源除带来了各种各样的版本,在基准测试方面也是表现极佳,在多个文本和多模态数据集上取得了 SOTA 的性能,大幅超越 Qwen3、DeepSeek-V3 等模型。

从上图我们可以看到文心 300B 的参数模型大幅超越了 Qwen3、DeepSeek-V3,但规模只有 DeepSeek-V3 6710 亿参数的一半,可谓是相当强悍了。

其中在ERNIE-4.5-21B-A3B 后训练模型,ERNIE-4.5-21B-A3B-Base 的参数量仅为210亿比Qwen3-30B 300亿参数更小,却在BBH 和 CMATH 在内的多个数学和推理基准上效果优于 Qwen3-30B-A3B-Base。实现了效果和效率的双向平衡。
1.3 全面的工具生态链
除此之外文心大模型本次开源全部按照Apache 2.0协议开源,这意味着我们不管是使用它进行学术研究,还是用在商用领域开发产业相关的应用项目,都完全没问题。

而且百度这次不仅仅只是开源10款大模型而已,为了让所有开发者都能体验上
文心大模型 ERNIE 4.5的强悍性能。还开源了大模型高效部署套件FastDeploy,提供了一行代码开箱即用的多硬件部署体验,使用接口兼容vLLM和OpenAI协议。
在模型量化、对齐、LoRA精调等方面也无需担心。百度早已准备好了,开源了文心大模型开发套件ERNIEKit,提供预训练、全参精调(SFT)、直接偏好优化(DPO)、参数高效精调与对齐(SFT-LoRA/DPO-LoRA)、训练感知量化(QAT)和训练后量化(PTQ)等大模型全流程开发支持。
- 帮助我们轻松部署及高性能推理文心大模型4.5开源系列模型。

二、文心大模型 ERNIE 4.5技术分析
或许不少兄弟心里都犯嘀咕,为啥这次文心大模型 ERNIE 4.5 实力这么强劲?它不光在性能上超越 Qwen3、DeepSeek - V3,还在多个文本与多模态基准测试里达到 SOTA 水平。
- 接下来,咱就借着文心大模型 ERNIE 4.5 的技术文档,来看看其中百度给我们带来了什么技术亮点!
2.1 多模态异构 MOE
文心一言这一次性能达到SOTA水平,靠的可不是简单粗暴的参数堆砌。而是对整个架构都更新换代了,设计了一个很巧妙的多模异构结构。于传统的
Mixture of Experts(MoE)模型不同,ERNIE 4.5使用了一种新的异构结构模态结构,它支持跨模态的参数共享,包括自注意力参数共享和专家参数共享,同时还允许为每个单独的模态提供专用参数。

注意这可不是简单的“拉通共享”的粗暴拼接就能实现的,而是文本和视觉各有专属专家。为其各自的特征量身定制的不同专家组,从而减少跨模态干扰。让文字与视觉精准分工、各行其道,实现互不干扰的协同运作。
同时MoE(混合专家模型)的文本和视觉标记都会经过共享专家处理,其输出与文本专家、视觉专家的输出相加,共同构成 MoE 层的最终输出,从而促进模态间知识融合,让模型在多模态任务中表现更优。
彻底保证了既不互相干扰,又能互相增强,催生出 1+1 远大于 2 的协同效能。
2.2 高效训练与并行架构
在大规模多模态 MoE 架构中,文本、图像等不同模态的信息数据结构与处理逻辑差异显著。分布式训练时,会导致专家负载不均衡、模态间数据交互不畅、资源分配失衡、利用率低甚至模型收敛困难等问题。
为此,文心 ERNIE 4.5 引入了一种异构并行策略,以实现高效的联合训练。此外,还提出了一种分层负载均衡方法,用于提高可变分辨率训练的扩展效率。

在异构并行策略引入了 FP8 混合精度训练框架和容错系统,对内存、通信、计算开销进行优化。文心最大 的ERNIE 4.5 语言模型采用了 8 路专家并行 (EP)、12 路管道并行 (PP)和 ZeRO-1 数据并行 (DP)配置。
通过以上全面优化,实现了 47% 的模型 FLOPs 利用率 (MFU),比DeepSeek的 FLOPs 利用率还高。

在层负载均衡策略这边采用了,粗粒度负载均衡和细粒度动态均衡分区, 对 ViT 编码器数据并行组令牌计数,借循环分区算法分发打包序列,实现粗粒度负载平衡;再在 attention 算子内外执行动态分区,进一步均衡负载 。
通过这次的分层负载均衡策略,计算、内存和通信的资源利用效率得到了显著提高。与没有负载均衡的基线方法相比,ERNIE-4.5-VL424B-A47B-Base 在端到端多模态训练中实现了高达 32% 的整体性能升。

2.3 后训练策略
文心4.5还引入了一种模态感知专家分配策略,其中视觉专家仅包含文本专家的三分之一参数,从而提高了视觉信息处理的效率。
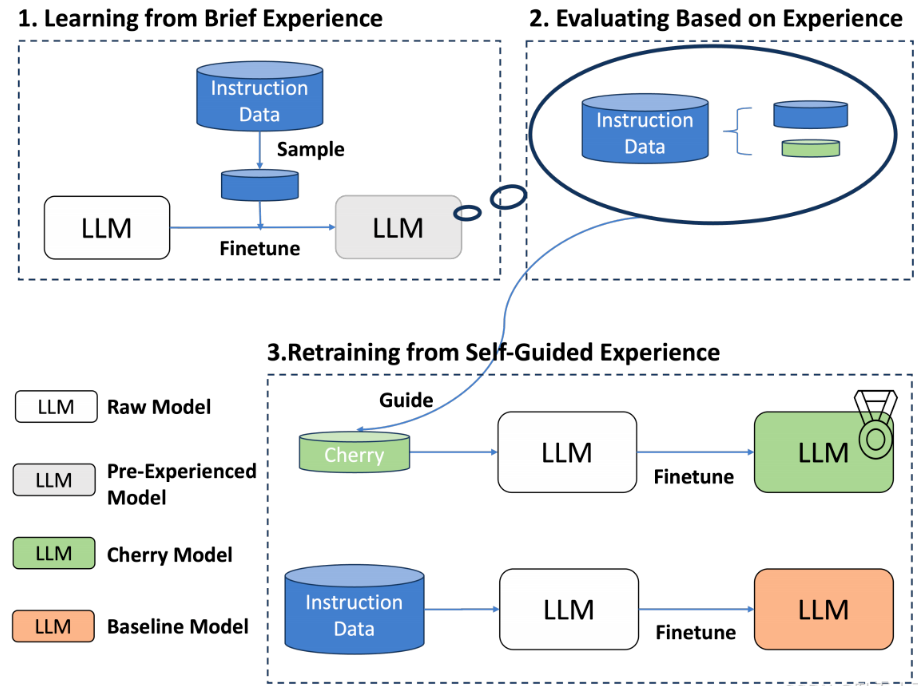
并且对特定的模态的训练策略进行微调,对每个模型采用SFT(监督微调)
手把手”教模型怎么做”, DPO(直接偏好优化)通过用户偏好直接优化模型输出,让用户更喜欢模型的回答, UPO(统一偏好优化)使模型在多任务场景,能同时兼顾用户的多种偏好,来满足实际应用的不同要求。
2.4 推理和部署
推理和部署方面,文心4.5的技术依旧很猛,为了进一步提高推理效率并支持更广泛的硬件,不仅提供 BF16 和 FP8 推理功能,还提供各种低精度推理选项。支持4bit 和2bit的“极限压缩”,但压缩不损效果,还能做动态切换和并行加速。

也是说只要有一个 141GB的显存环境,就可以部署 2 位 ERNIE-4.5-300BA47B 的超大模型了,也就是俩张A100就满足要求了(80GB)大大降低了 ERNIE 4.5 的准入门槛。而同级别的 Qwen3、DeepSeek-V3 等模型所需要的显存远远不止这个数。
三、基于 GitCode 仓库的文心开源模型个人部署
经过前面的细致介绍与深度解读,相信各位铁铁对文心 4.5 已构建起全面清晰的认知。面对这款性能强悍的大模型,想必大家早已按捺不住实战部署的热切期待 —— 话不多说,接下来就让我们直接踏入部署实战的环节。
3.1 个人部署详细步骤
3.1.1 环境选择
再部署之前我们先看下简单ERNIE不同系列模型对于配置的要求
以上就是部分文心模型对显存的要求
(完整版的ERNIE配置要求链接在文末附录,需要的小伙伴们可以自取),从配置要求可以看出,文心大模型的 0.3B 轻量版本仅需一张 40 系显卡即可流畅运行。
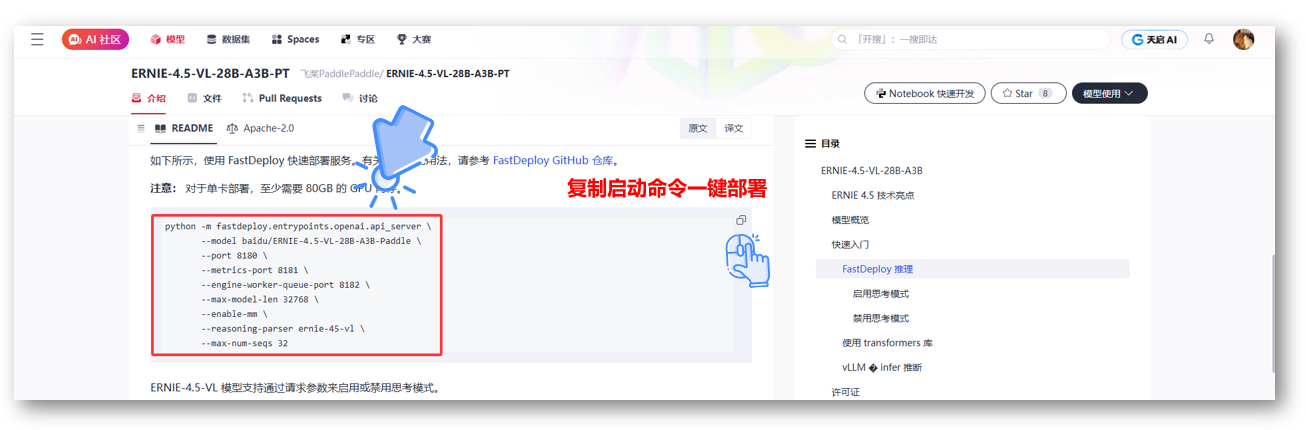
本次实战部署,我们特意选择了ERNIE-4.5-VL-28B-A3B-PT这一型号作为轻量级模型中的代表性选择,在模型性能、多模态理解与生成、应用场景等方面有出色表现,并且对中文的语义理解和文化背景知识的把握更精准,具备广泛的应用适配性,当前主流算力平台也能够轻松适配,非常适合实战体验。
- 对于本地部署百度提供了FastDeploy一键部署工具,FastDeploy 是基于 PaddlePaddle 的大型语言模型和可视化语言模型的推理部署工具包。它提供具有核心加速技术的生产就绪型开箱即用部署的解决方案。
以下是对基于NVIDIA CUDA GPU 安装FastDeploy,需要满足以下环境
3.1.2 环境准备
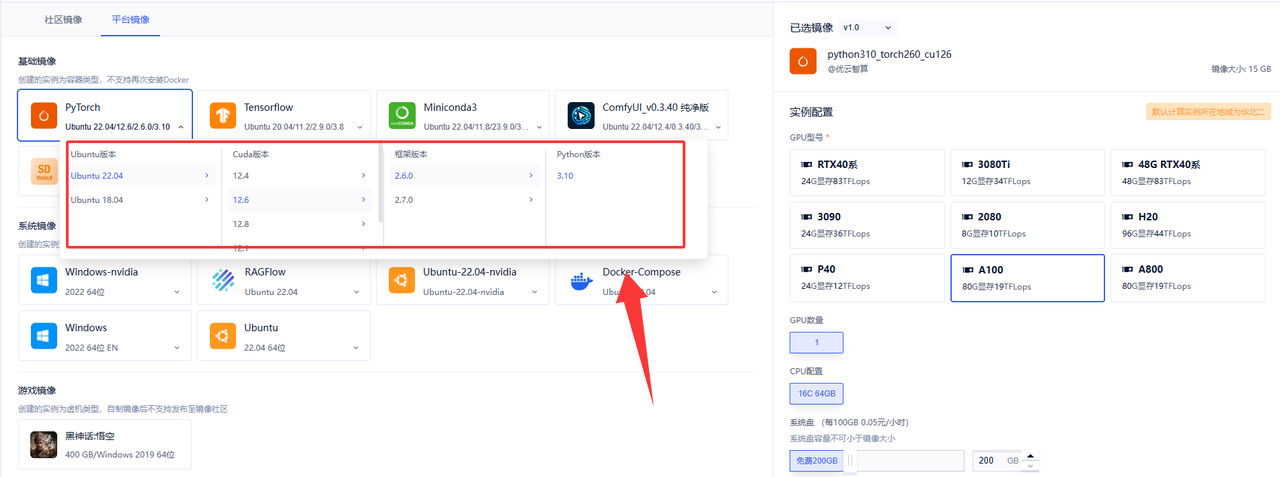
ERNIE-4.5-VL-28B-A3B-PT对于本地部署还是需要较强的硬件资源的,一般本机的配置不足以进行搭建与测试。博主这边也是给大家租了一台A100显卡的配置来给大家实测一下。(ps现在市面上已经有很多算力平台提供算力服务,适用于各种AI深度学习、高性能计算、渲染测绘、云游戏等算力租用各种场景,大家随便选择就好)
- 这里我们直接选择PyToch镜像,可以看到预装了很多环境基本不需要自己配置,我们选择满足部署FastDeploy启动的环境就够了。
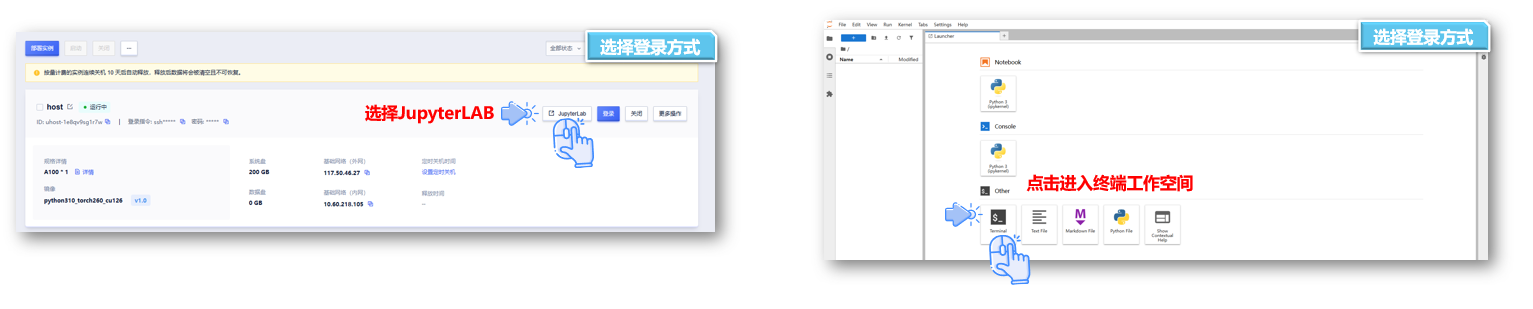
- ① 创建云实例成功后,有两种方式可连接实例:一是通过 SSH 密钥连接,二是借助 JupyterLab 可视化工具连接(推荐使用这种更便捷的方式 )。
- ② 点击进入JupyterLab可视化的工具的终端进入工作空间控制台
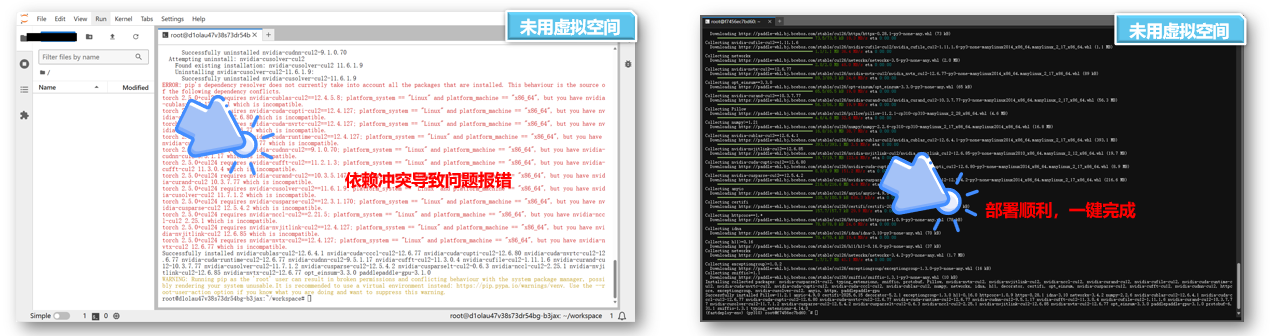
然后我们选择用python创建虚拟空间,主要是来保持保持系统环境清洁和隔离项目依赖
- ① 避免我们后续操作出现环境上的报错问题,确保依赖互不干扰
- ② 如果不用虚拟环境我们就肯会出现下面的报错
- 1. 安装虚拟环境工具
把下面命令复制粘贴输入到控制终端即可
#更新软件包apt update#安装虚拟环境工具apt install -y python3-venv
- 2. 创建虚拟环境,创建名为 fastdeploy-env 的虚拟环境
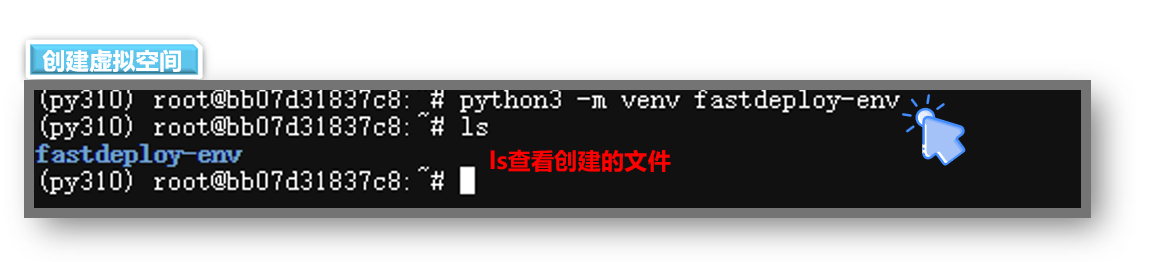
python3 -m venv fastdeploy-env/- 3. 激活虚拟环境

source fastdeploy-env/bin/activate- 4.下载GNU依赖库
libgomp1 是 GNU OpenMP 库的一部分,用于支持程序中的 并行计算(多线程并行处理),在后面我们启动服务是需要依赖 libgomp1 来实现并行计算加速。
apt update && apt install -y libgomp1 libssl-dev zlib1g-dev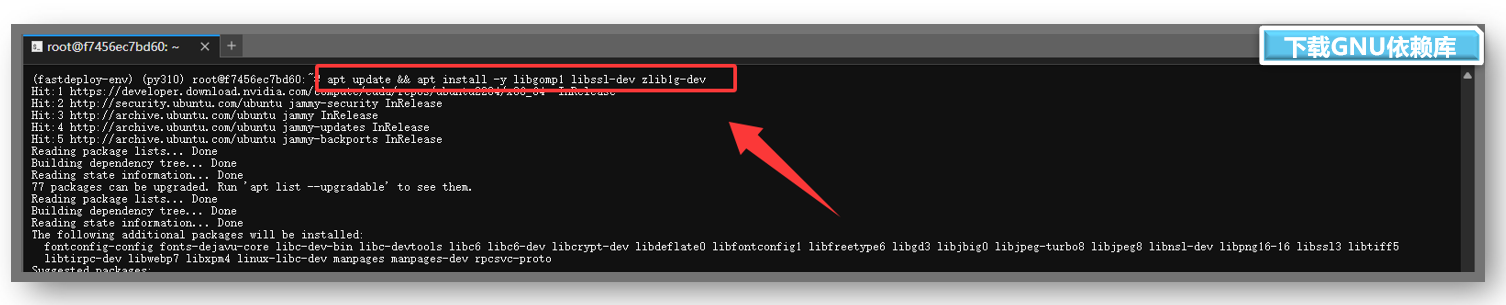
- 6.安装 paddlepaddle-gpu:3.1.0版本
因为FastDeploy 的部分核心功能(如模型解析、推理引擎适配)直接依赖 PaddlePaddle 的底层库,未安装 Paddle的话,FastDeploy 将无法正确加载和运行 Paddle 模型来以提供 CUDA/CUDNN 等 GPU 加速所需的依赖。所以我们先安装一下
paddlepaddle-gpu。
- ① 在这里我们一定要根据自己显卡厂商和CUDA的版本来选择安装命令,否则导致依赖冲突
- ②
paddlepaddle-gpu安装的详细说明:【一键直达:查看安装信息】
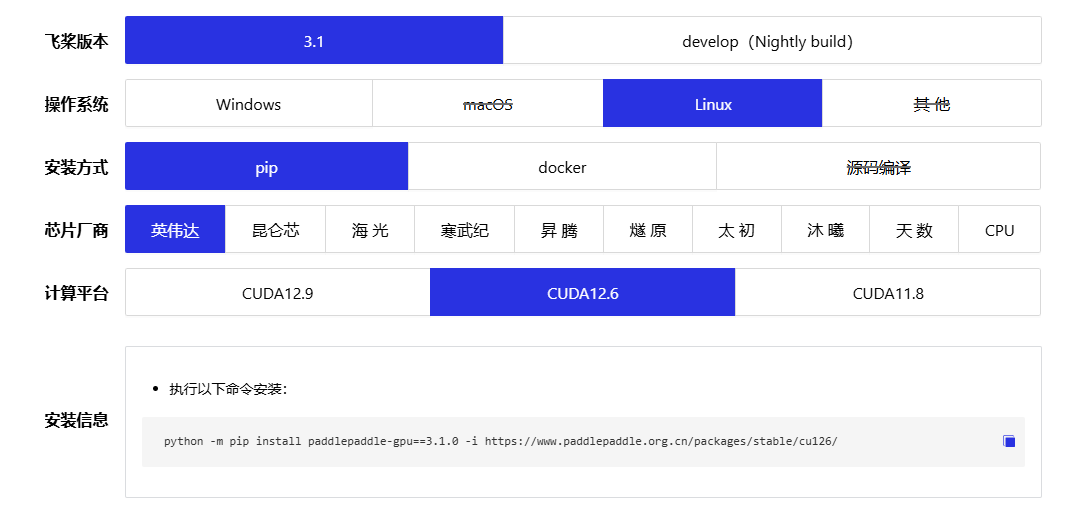
python -m pip install paddlepaddle-gpu==3.1.0 -i https://www.paddlepaddle.org.cn/packages/stable/cu126/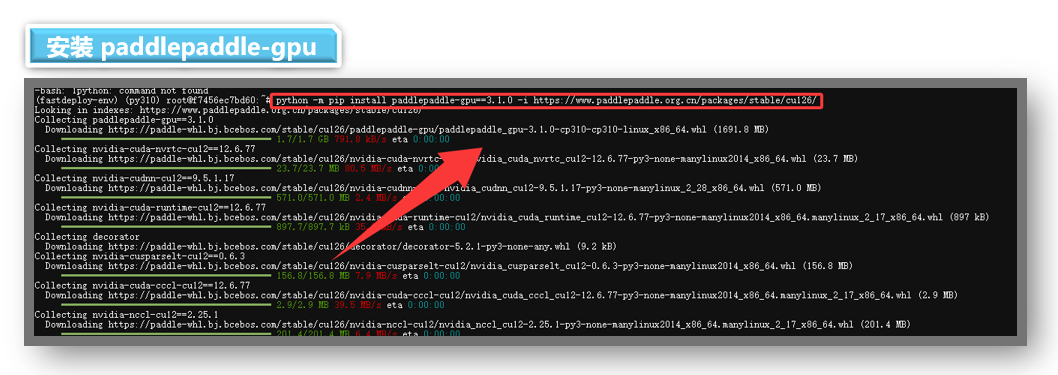
- 检测是否安装成功
paddlepaddle-gpu安装好了我们可以使用一下代码检测一下,如果没问题那么就证明可以下一步了
- ① vi check.py 用vim编辑器创建一个python文件,把代码复制进去
- ② python check.py 运行代码查看信息
import paddlepaddle.utils.run_check()这边可以看命令运行完之后,显示paddlepaddle-gpu 安装成功,现在就开始使用 PaddlePaddle 进行深度学习吧。

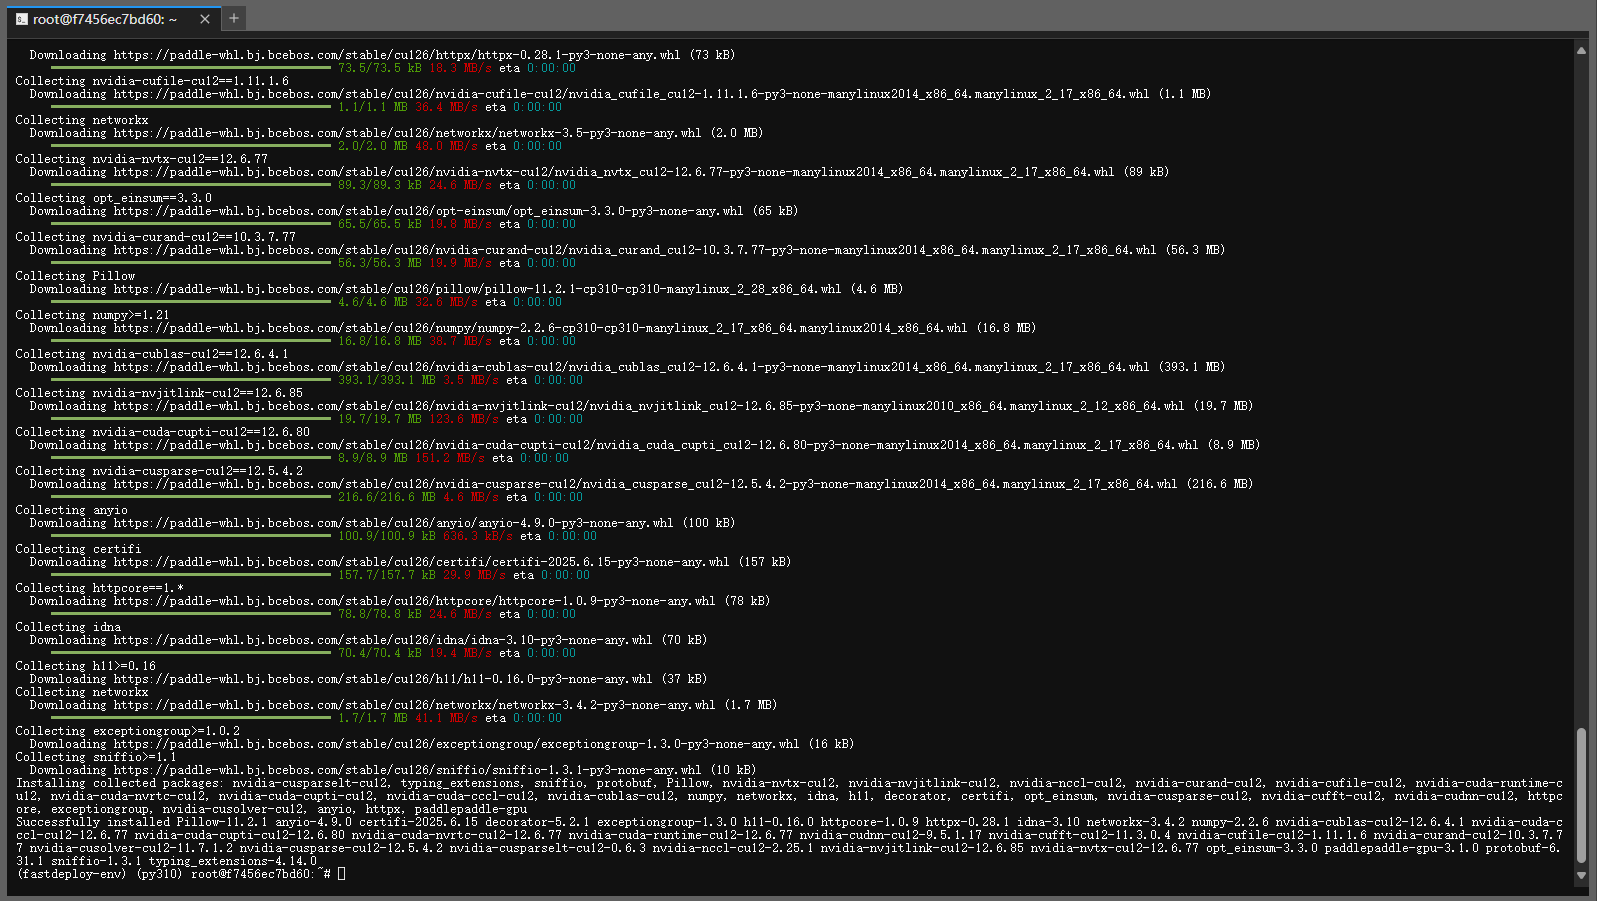
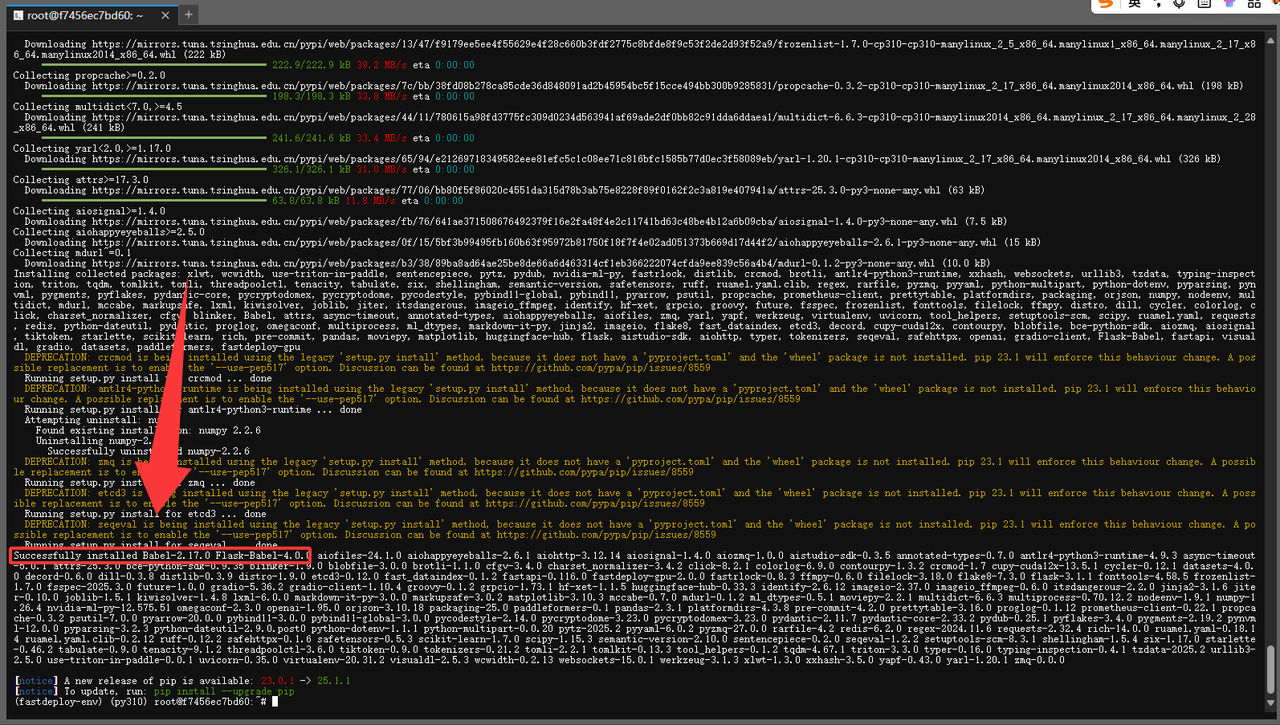
- 7.安装 fastdeploy
下载完
fastdeploy工具我们就可以一键启动我们的ERNIE-4.5-VL-28B-A3B-Paddle了。
- ① 在下载时我们要注意使用自己CPU架构对应的版本来安装下载,不然就会启动失败
- ② fastdeploy的安装手册: 【一键直达】
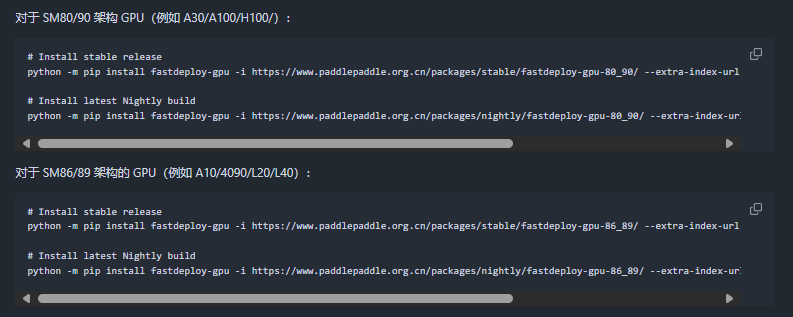
我们本次显卡是A100所以直接选择对应版本的命令下载就好了
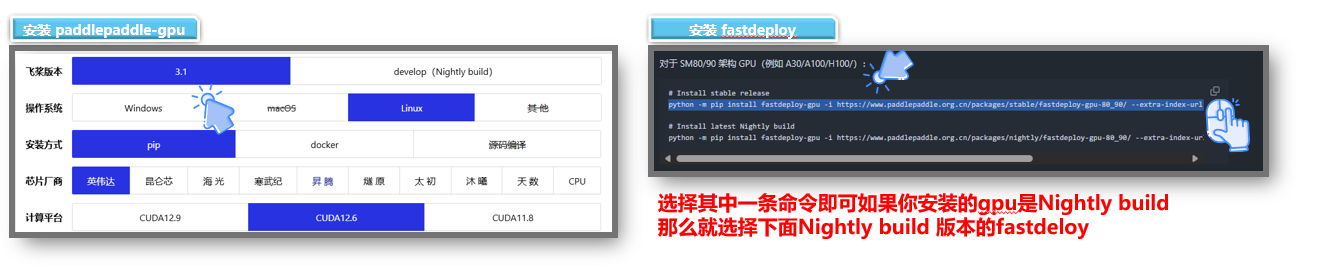
# Install stable releasepython -m pip install fastdeploy-gpu -i https://www.paddlepaddle.org.cn/packages/stable/fastdeploy-gpu-80_90/ --extra-index-url https://mirrors.tuna.tsinghua.edu.cn/pypi/web/simple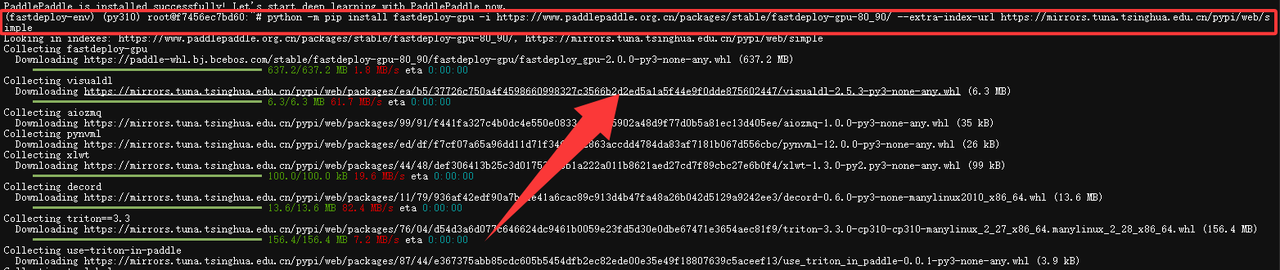
看到下面这种就是成功安装了 fastdeploy
- 验证PaddlePaddle GPU 是否支持
安装完成后,再次运行以下命令,确认输出为 True 和 gpu,如果输出结果为False cpu 表示这意味着 PaddlePaddle 没有使用 CUDA 编译,只能在 CPU 上运行。
- 需要重新安装 paddlepaddle-gpu:3.1.0
python -c \"import paddle; print(paddle.is_compiled_with_cuda()); print(paddle.device.get_device())\"
3.1.2 模型下载与配置
以上运行模型需要的环境就全部搭建好,其实整个过程还是非常简单了只需要输入几行命令5分钟就可以快速部署起来了,下面我们去
gitcode拉取ERNIE-4.5-VL-28B-A3B-PT开源项目来一键部署
- 文心大模型4.5系列开源模型: https://ai.gitcode.com/theme/1939325484087291906
- 1.下载git 工具(如果系统有就不用下载了,直接拉取就好)
apt install git
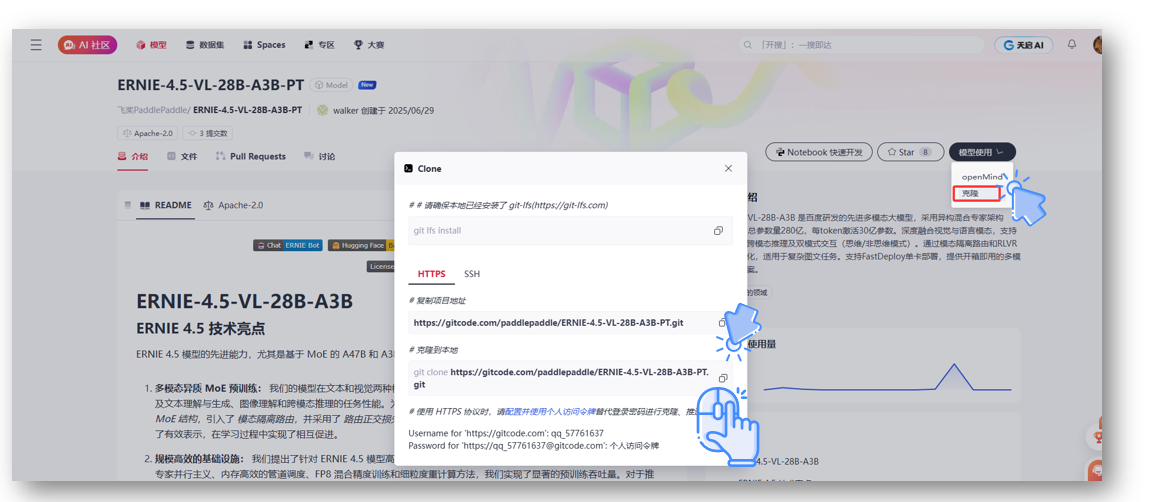
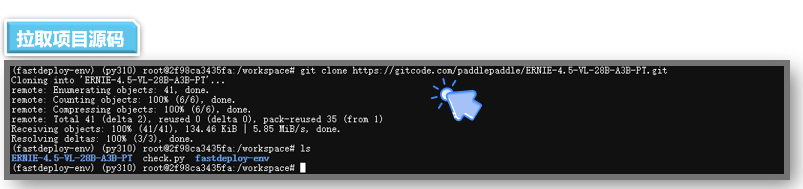
- 点击进入gitcode仓库,进行拉取项目
ERNIE-4.5-VL-28B-A3B-PT开源地址:https://gitcode.com/paddlepaddle/ERNIE-4.5-VL-28B-A3B-PT
- 修改主机映射(避免DNS 解析失败)
为了避免大模型后续启动解析主机名(或获取本机 IP)时,DNS 解析失败。使用我们这里修改一下主机的配置来让主机名与本机 IP 的映射。
#1. 查看当前主机名hostname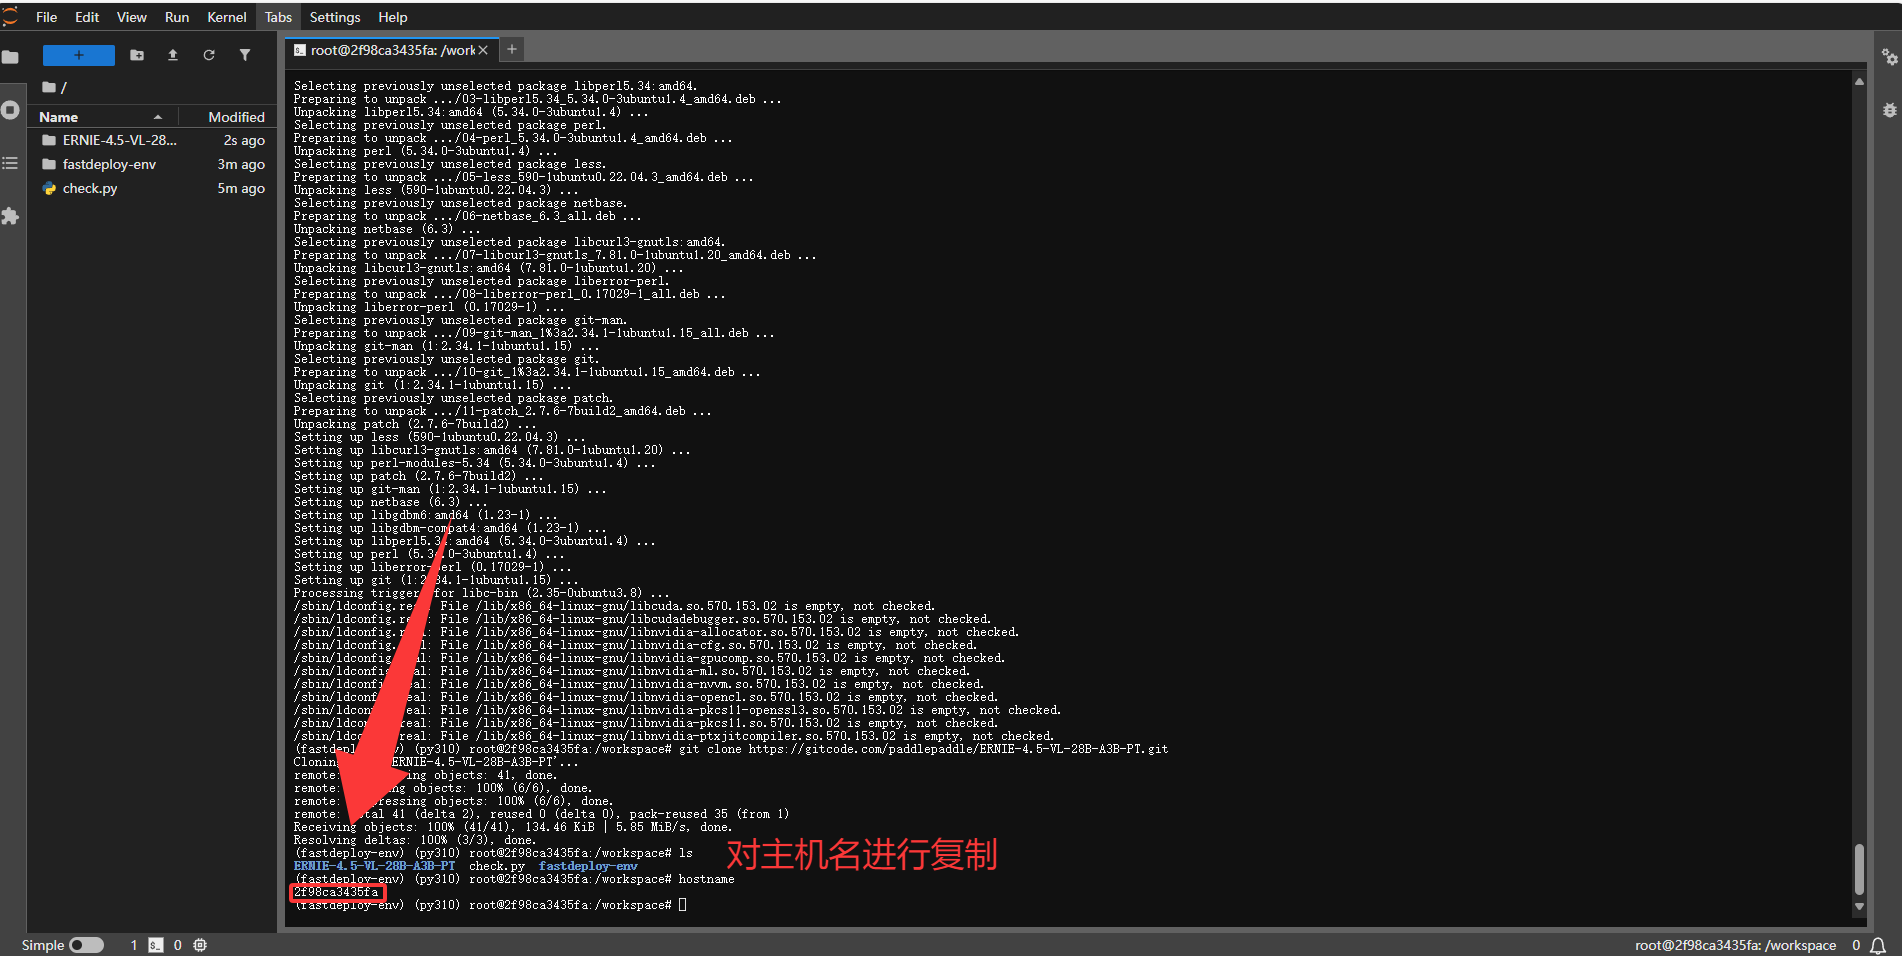
#2. 编辑 hosts 文件vim /etc/hosts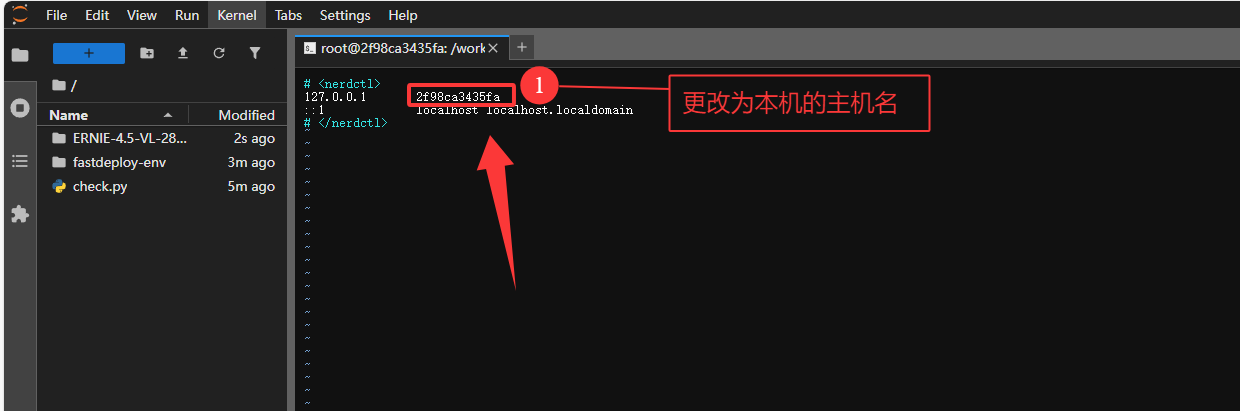
3.1.3 部署与测试
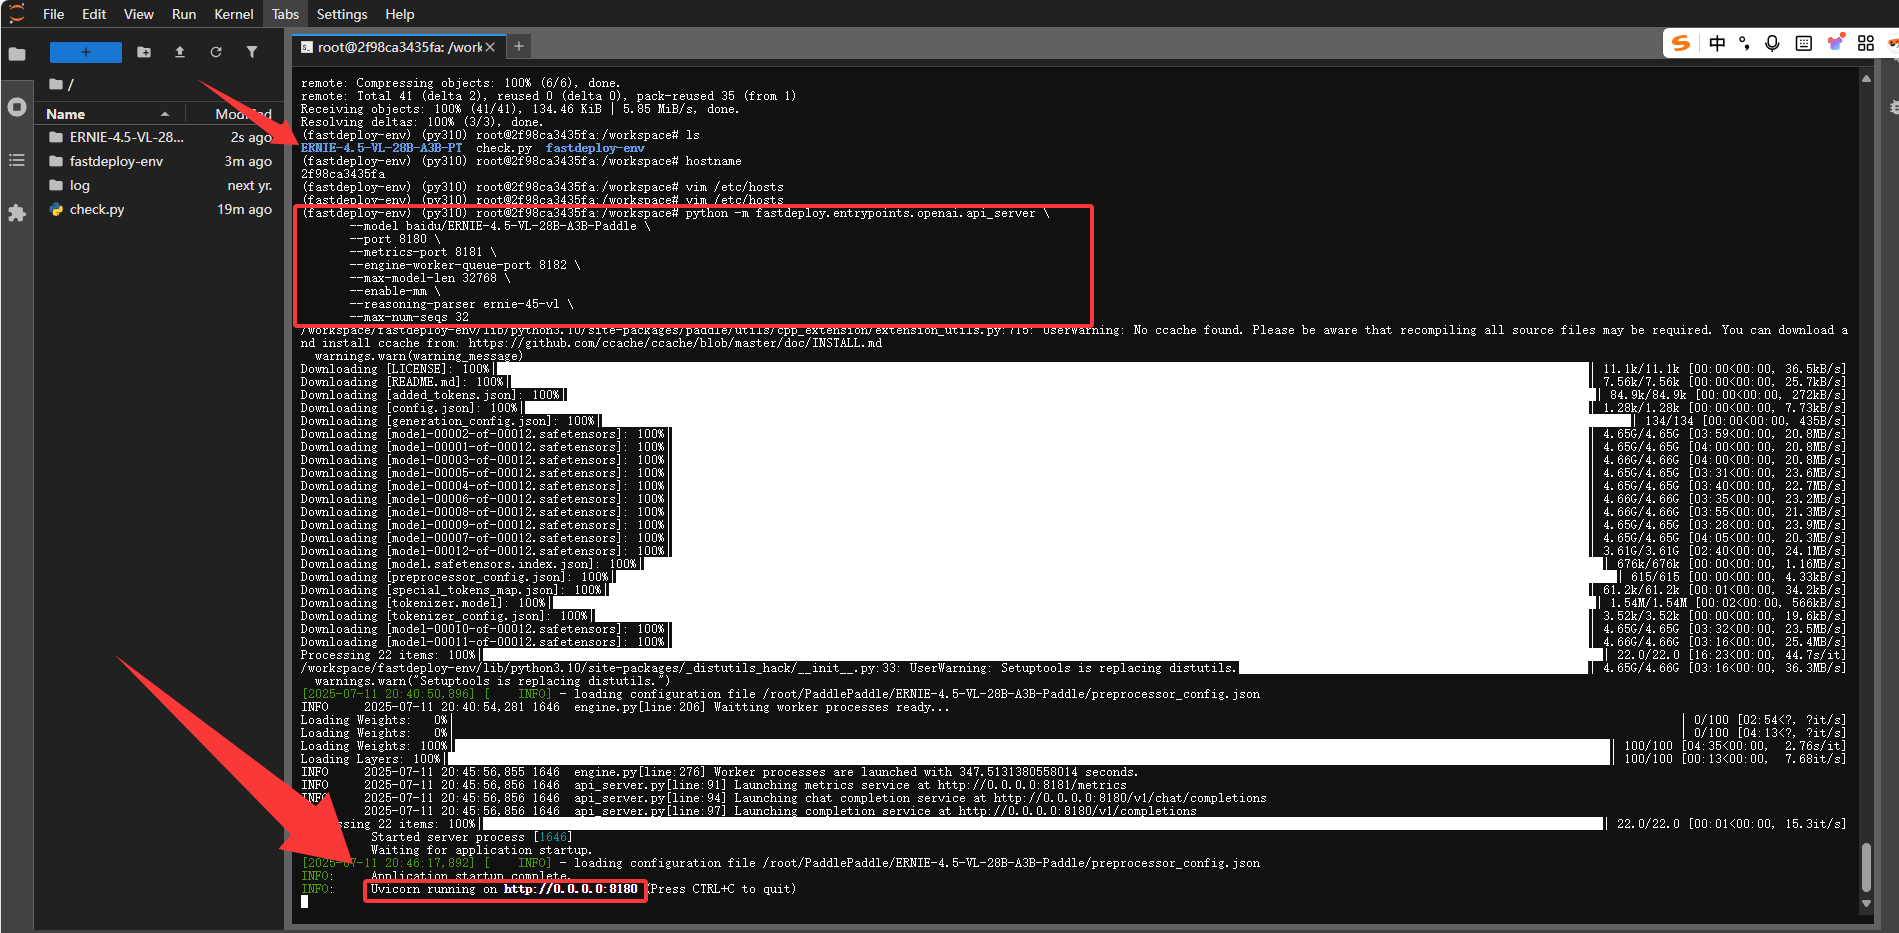
- 一键启动ERNIE-4.5-VL-28B-A3B-PT

由于这是 280 亿参数的大模型,部署需要一定时间,我们稍微等待 5 分钟左右即可。当下方显示 8180 端口启动时,咱们的大模型就部署完成了。
- 服务启动了一定要注意,不要Ctrl+C退出连接,否则服务会停止,API也无法访问了。
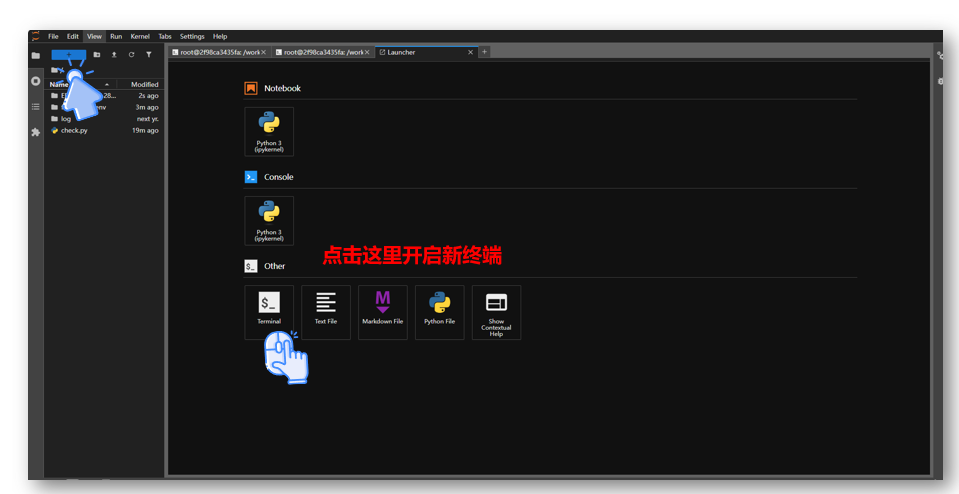
- 开启第二个终端开始测试
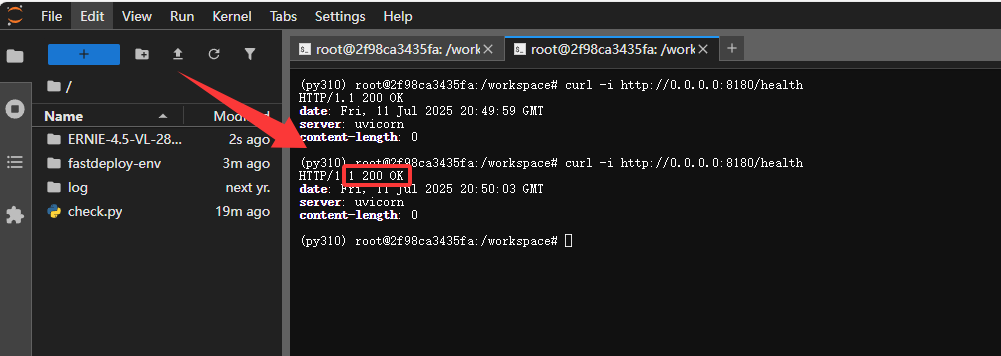
- 查看端口是否连接成功,验证服务状态(HTTP 200 表示成功)
curl -i http://0.0.0.0:8180/health这里可以看到咱们端口连接没问题,服务完美启动了
- 下载requests 库发送 HTTP 请求
首先我们需要下载一个requests 库发送 HTTP 请求
pip install requests 
- 创建测试文件开始测试
vi test.py这里我给大家准备了一个python的大模型交互程序来方便我们进行和大模型交互,把下面代码复制进test文件
import requestsimport json# 模型服务的API端点,需确保模型服务已启动并可通过该地址访问url = \"http://127.0.0.1:8180/v1/chat/completions\" # 请求头,指定发送数据的格式为JSONheaders = {\"Content-Type\": \"application/json\"} # 初始化对话上下文列表,用于保存用户输入和模型回复的历史messages = [] # 启动对话循环,持续获取用户输入并与模型交互while True: # 获取用户输入,提示用户输入内容 user_input = input(\"你: \") # 如果用户输入exit或quit(不区分大小写),则退出对话循环 if user_input.lower() in [\'exit\', \'quit\']: break # 将用户输入以指定格式添加到对话上下文,role为user表示是用户输入 messages.append({\"role\": \"user\", \"content\": user_input}) # 构建请求体数据 data = { # 指定要使用的模型,需与服务端部署的模型匹配 \"model\": \"baidu/ERNIE-4.5-VL-28B-A3B-PT\", # 传入对话上下文,包含历史交互信息 \"messages\": messages, # 温度参数,控制模型输出的随机性,值越大越随机 \"temperature\": 0.7 } try: # 发送POST请求到模型服务,将data转为JSON字符串传入 response = requests.post(url, headers=headers, data=json.dumps(data)) # 解析响应为JSON格式 response_json = response.json() # 提取模型回复内容,从响应的特定结构中获取 result = response_json[\"choices\"][0][\"message\"][\"content\"] # 输出模型回复,标识为ERNIE的回复 print(\"ERNIE: \", result) # 将模型回复添加到对话上下文,role为assistant表示是模型回复 messages.append({\"role\": \"assistant\", \"content\": result}) except requests.RequestException as e: # 如果请求过程中发生异常(如网络问题、服务未响应等),捕获并提示 print(\"请求发生异常: \", e) except KeyError as e: # 如果响应JSON结构不符合预期,捕获并提示 print(\"解析响应失败,缺少必要字段: \", e) except json.JSONDecodeError as e: # 如果响应内容无法正确解析为JSON,捕获并提示 print(\"响应内容解析为JSON失败: \", e)启动python 文件

- 通识基础测试
问题:9.11和9.9哪个更大?
- 这个问题详细大家都不陌生吧,连chatGPT遇到了都互犯傻的简单问题!国内很多模型都回答不出来我们来看看ERNIE-4.5-VL-28B-A3B-PT 的推理能力如何
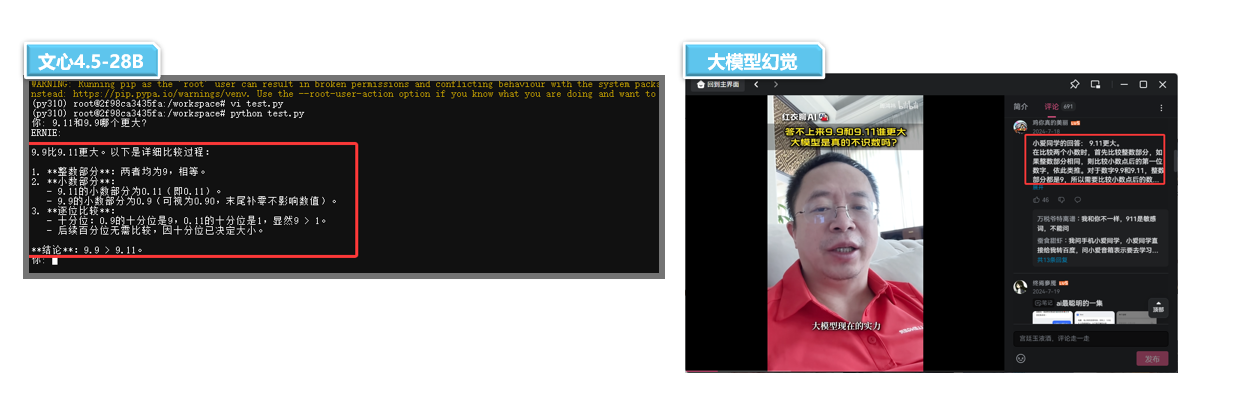
从实际测试来看,文心 ERNIE-4.5-28B 版本的推理能力表现稳健,对比多数同级别模型优势明显。不过受限于终端交互体验的局限性,这里暂不展开更多测试内容。本次环节主要是带大家初步感知模型的基础能力,更全面、深入的对比评测将在下文详细呈现。
3.2 个人部署效率分析
3.2.1 部署时间成本
文心ERNIE-4.5不同版本的模型博主也去实际测试部署了一下,整个部署流程通过fastdeploy部署工具其实很简单几分钟就搞定,其中部署的大部分时间都是在等待模型启动毕竟参数也是 280亿的大模型,部署时间肯定是要比稠密型模型要时间长。
整体来说文心文心ERNIE-4.5部署时间成本很低,通过fastdeploy部署工具10几分钟就能完成一个轻量级大模型的部署使用。
3.3 个人部署难度评估
3.3.1 技术门槛要求
从上面的部署测试全过程不难看出,百度文心 4.5 的部署技术门槛已降至中等偏下水平。通过百度FastDeploy 部署工具的深度优化 —— 整个部署流程被高度简化,开发者无需复杂配置,只需输入预设命令即可实现模型的一键启动,极大降低了操作难度。这种 “轻量化” 的部署体验,让更多开发者能轻松跨越技术壁垒,快速上手文心开源模型的落地应用。
不同层次开发者的部署难度
- 有深度学习基础的开发者:熟悉虚拟环境配置、依赖管理及模型部署流程的用户,可直接参照 GitCode 仓库的官方文档和命令示例,按照步骤执行部署命令,通常能在半小时内完成服务启动,过程顺畅度较高。
- 对于新手开发者而言: 尽管可能面临环境配置(如 CUDA 版本不兼容、依赖安装失败)或命令行操作不熟练等问题,但通过查阅部署文档、百度飞桨开发者社区, CSDN 等技术论坛的资料,小白也可轻松部署。整体而言,工具的 “一键部署” 特性已大幅降低技术壁垒,新手通过 1-2 小时的学习和调试即可完成部署,技术门槛处于中等水平
3.3.2 常见问题及解决办法(选看)
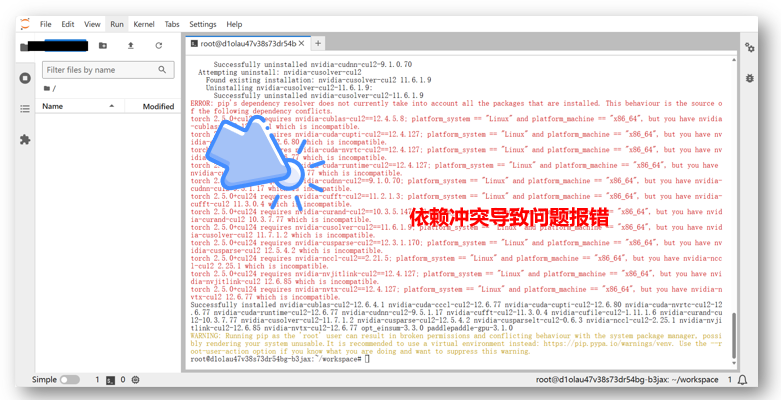
- 依赖冲突问题
在部署过程中最容易出现的就是依赖冲突问题,容易导致各种报错。对于这种报错只需要配置启动虚拟空间就可以完美解决依赖冲突问题
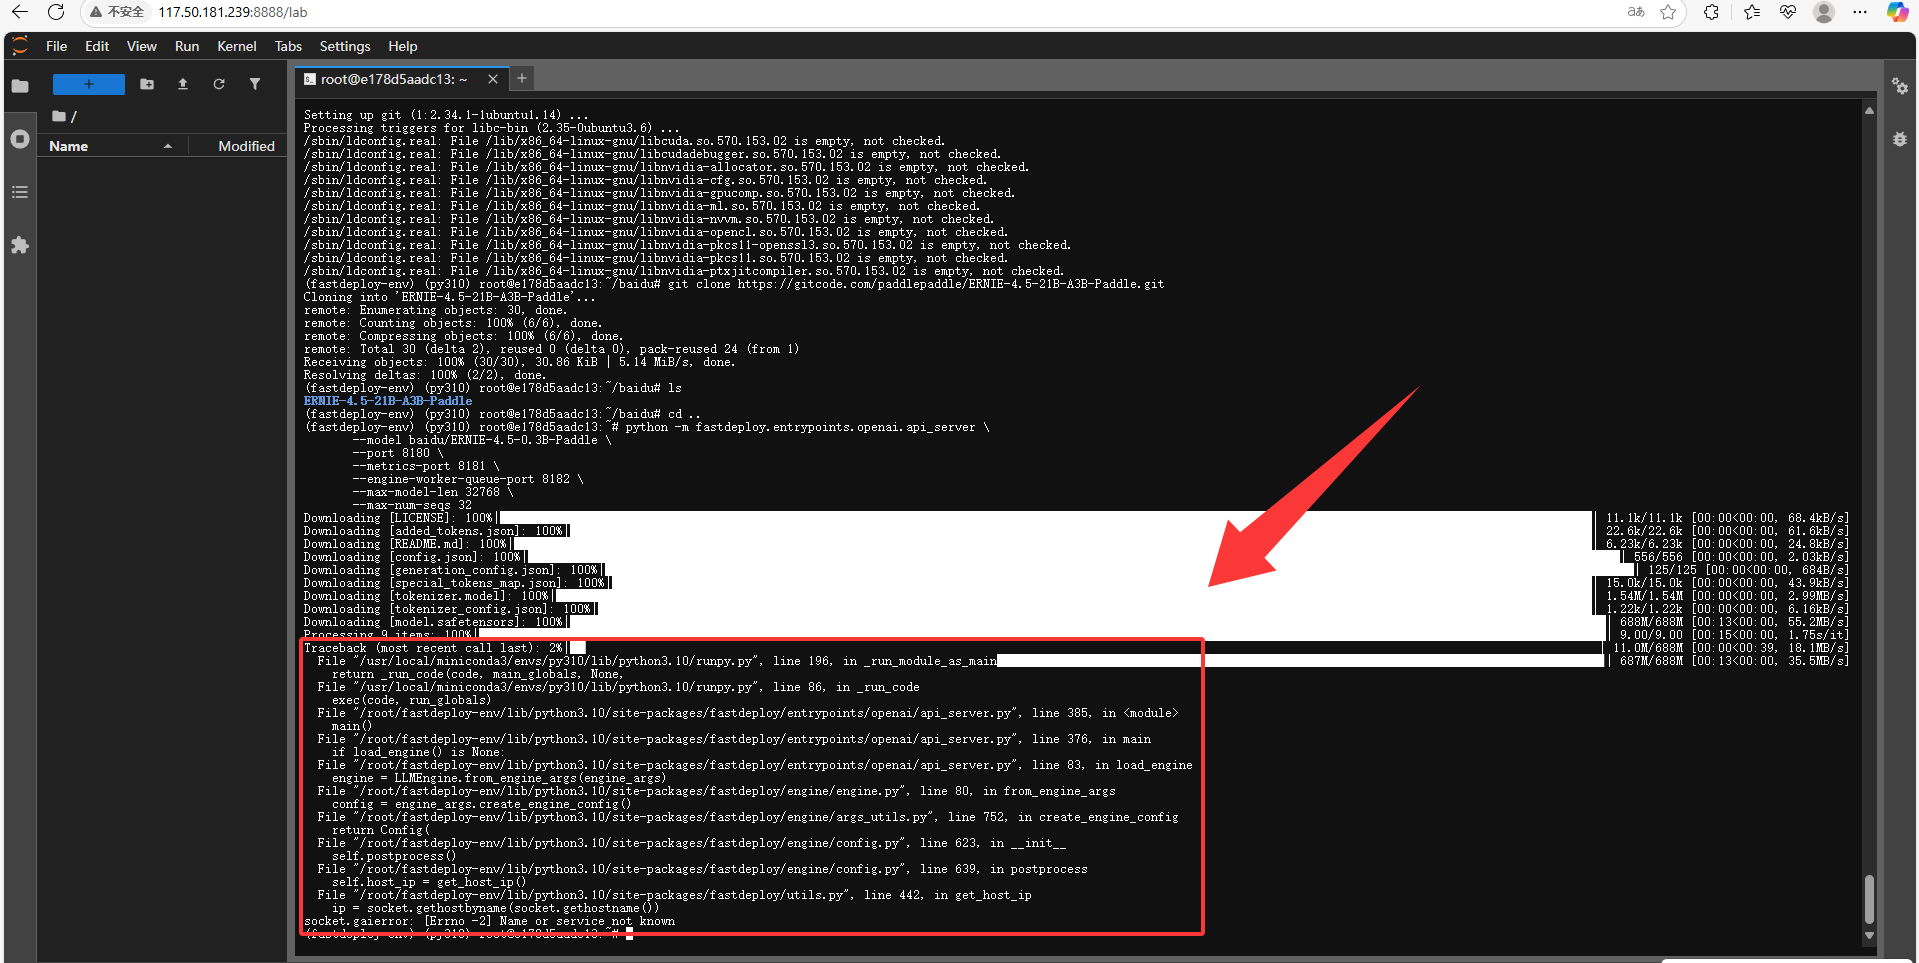
- 启动时报错:socket.gaierror: [Errno -2] Name or service not known
此报错核心是 主机名无法解析为 IP,优先检查 /etc/hosts 配置和主机名解析命令
- 然后对主机名和ip进行映射即可解决
- hostname 查询出主机名 然后 vim /etc/host 进行修改映射关系
-
启动时报错:ImportError: libgomp.so.1: cannot open shared object file: No such file or directory
这个报错主要的原因是,系统缺少 PaddlePaddle 运行所需的共享库文件libgomp.so.1
- 只需要pip 安装即可: apt update && apt install -y libgomp1 libssl-dev zlib1g-dev
Traceback (most recent call last): File \"/root/baidu/ERNIE-4.5-0.3B-Paddle/check.py\", line 1, in <module> import paddle File \"/usr/local/miniconda3/envs/py310/lib/python3.10/site-packages/paddle/__init__.py\", line 38, in <module> from .base import core # noqa: F401 File \"/usr/local/miniconda3/envs/py310/lib/python3.10/site-packages/paddle/base/__init__.py\", line 38, in <module> from . import ( # noqa: F401 File \"/usr/local/miniconda3/envs/py310/lib/python3.10/site-packages/paddle/base/backward.py\", line 28, in <module> from . import core, framework, log_helper, unique_name File \"/usr/local/miniconda3/envs/py310/lib/python3.10/site-packages/paddle/base/core.py\", line 388, in <module> raise e File \"/usr/local/miniconda3/envs/py310/lib/python3.10/site-packages/paddle/base/core.py\", line 267, in <module> from . import libpaddleImportError: libgomp.so.1: cannot open shared object file: No such file or directory四、文心一言 4.5 全方位对比评测
上面部署大模型的时候也给大家做了一些简单的评测,不过由于终端的交互性不怎么好,如果对比大模型的话展现也麻烦。所以这里使用文心千帆平台来调用api ,用UI交互的方式,对比文心ERNIE-4.5与同级别的大模型究竟谁强谁弱?
- 本次的参赛选手分别是:ERNIE-4.5-28B-VL-A3B & Qwen2.5-VL-32b & DeepSeek-VL2-Small 3个多模态视觉大模型。
每次评分的机制为,
首token最快3分,最快耗时 3分,答案是否正确 4分这三个核心方面分别体现了大模型响应效率,处理时长,和推理能力。
3.1 基础通识测试
为了测试大模型的基础通识能力,我给各位大模型准备了 3 道题,这些题可是业内公认的大模型处理难题,看看各位模型面对它们时,到底能交出怎样的答卷,比比谁更厉害
问题1:9.11和9.9哪个更大?
通过测试大家可以看到ERNIE-4.5-28B-VL-A3B在本轮表现不错,不仅耗时最快,而且答案也正确,其次是 DeepSeek-VL2响应也很快,但是推理方面有点问题,答案是错误的。
问题2:单词Strawberry里有几个r?
这里Qwen2.5的响应时间更短,但耗时方面ERNIE-4.5更优俩个模型不分上下,DeepSeek-VL2依旧是推理有些问题。
问题3:请给出10句以樱桃俩字为结尾的句子。
这道题只有ERNIE-4.5全部都答对了,Qwen对了一个这里给他算的一分,DeepSeek对了2个算2分。
- 结果汇总对比
在本次基础通识测试,可以明显看到
ERNIE-4.5-28B的模型是比Qwen2.5-VL-32b和DeepSeek-VL2要强出不少的,所以基础通识测试冠军给到ERNIE-4.5-28B这边,下面我们看看其他测试。
3.2 高级推理测试
这里同样是使用3个推理问题来考验一下3个大模型的推理能力怎么样
问题1:一个弹珠被放到红酒杯里,然后将这个红酒杯在桌子上倒过来,然后将红酒杯拿起来放到冰箱里。请问弹珠现在在哪?
在这个问题里ERNIE-4.5并没有给出准确答案,而是向我们索要更多信息后再推理所以酌情给分1分。DeepSeek-VL2就有些逻辑混乱了回答弹珠在杯子顶部。
问题2: 如果晾干5件衬衫需要4小时,那么晾干20件衬衫需要多久?

这一题我们主要是测试大模型的是否能推理出晾干是一个并行事件,来考验一下推理能力。
- 在本次测试中每个大模型都给出了正确答案非常不错
- DeepSeek-VL2在本次也是支棱起来耗时最短拿下第一
问题3:一个房间里有三个杀人犯,有一个人进来后锁死房门,然后杀了其中一个杀人犯,那现在房间里还剩下多少个杀人犯?
- 正确答案: 还剩3个杀人犯
在本次测试中ERNIE-4.5并没有给出正确答案,而是继续索要信息。而Qwen2.5给我们爆来惊喜是唯一 一个回答正确的。
- 结果汇总对比
在本次推理测试中,Qwen2.5 是我们得分最高的模型。总分为 20 分的模型只有两个,分别是 Qwen2.5 和 ERNIE-4.5(文心 4.5)。文心 4.5 在参数少了 110 亿的情况下还能达到这样的效果,也是挺不错的。
3.3 视觉能力测试
既然本次测评聚焦于多模态模型,自然不能仅局限于文本能力的考验。接下来,我们将重点转向视觉能力的测试,看看这些大模型在图像识别等视觉任务中的表现究竟如何?
问题1:识别其中动物是什么动物?
- 答案:狐狸


这里每个大模型都给出了正确答案,DeepSeek总耗时最快。但答案也很简洁,而 ERNIE-4.5和Qwen2.5都对图像做了更精准的描述图像分析能力更强一些。
下面我们来一个复杂一点的场景和问题,来看看每个模型会不会在图像识别上出现幻觉?

问题:图中一共有多少辆车?按从上到下,从左到右排号依次说出每辆车的颜色。
在本次测试中可以看到文心 4.5 完美的完成了我们的任务并且给出的信息更加详细。而Qwen和DeepSeek 俩个人推理没问题但好像都出现了幻觉给我脑补了一台车太奇怪了。
- 结果汇总对比
综合两项任务表现,ERNIE-4.5-28B-VL-A3B 以 “双任务全正确、细节分析到位、响应效率均衡” 的优异成绩,在本次视觉能力测试中脱颖而出,成功斩获视觉能力冠军;而 Qwen2.5-VL-32b 和 DeepSeek-VL2 则在复杂场景的准确性上暴露出不足,需在多模态推理的严谨性上进一步优化。
3.4 代码编程部分
在代码这部分我们也来进行测试一下看看3个大模型的代码能力怎么样?本次也选取了一个比较有难度的代码任务,为了更好的展示效果我们选择生成单个html文件,方便网页直接打开查看。
问题:通过html,创建一个动态时钟页面,要求如下:
必须以单个html文件形式创建,有时针分针秒针的表盘式时钟。
时间会每秒自动更新,始终显示当前时间。
样式要求:时钟在页面中央,背景为淡蓝色
- 得分点:需要时针分针秒针
聚集在表盘中心,且时间显示正确,
时钟位置在页面中央,背景颜色为淡蓝色,
只能使用单个html文件创建。

通过GIF相信各种都看到各个大模型的代码能力了。我们先从生成代码能力来分析一下, ERNIE-4.5-28B是本次给出的代码最全最完善大模型,其次是Qwen2.5-VL-32b的代码能力也还不错但是响应速度明显不如ERNIE-4.5-28B。
- DeepSeek-VL2 在本次任务中完成很快,但是生成的内容很少一看就不足以完成本次代码任务。
下面我们依次下载了3个大模型生成的html文档打开看一下效果,可以看到ERNIE-4.5-28B虽然中心点有些小瑕疵但是整体效果都符合要求,背景时间中心点指针都满足要求了。
- 而 Qwen2.5-VL-32b的中心点就没满足要求了,指针都糊在一起了,背景符合我们的要求
- DeepSeek-VL2 的代码生成的太简短了,所以结果也如我们所料一塌糊涂。
- 代码效果展示

上面的代码要求确实是有些难度,下面我为3个模型又准备一个简单点的题目来区分这3个模型在代码编程下的能力。
问题2:一个HTML网页,上面有个按钮,每次摁下就会随机生成一个随机数,同时这个按钮需要更换一个随机颜色。请使用单个html文件。

在这道题目的的实测中我们可以看到 ERNIE-4.5-28B 在本次生成代码速度中依旧是遥遥领先Qwen 和 DeepSeek 最先完成本次任务。
下面我们还是依次下载了每个模型生成的代码,可以看到 ERNIE-4.5-28B 的效果可以说实现的非常完美了,完全按照我们的要求来完成的,没有其他任何多于的。
Qwen 和 DeepSeek在这里也是完成了基础功能的实现,总体来说Qwen 的效果是比DeepSeek的展示更好一些的

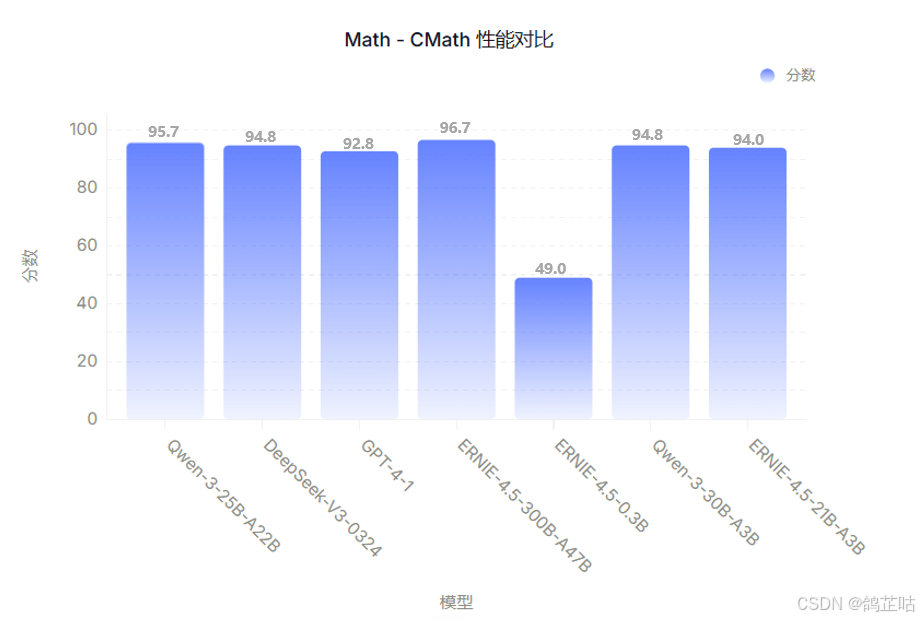
3.5 数学能力测试
数学解题与逻辑推理能力作为衡量大模型核心智能水平的关键指标,自然是本次评估的重点方向。在这一维度中,
ERNIE-4.5-300B-A47B表现尤为突出 —— 其在MATH-500、GSM8K、CMath等权威数学基准测试中展现出极强的综合竞争力,多项核心指标均斩获高分。这一优异表现不仅印证了模型在复杂问题拆解、多步骤逻辑推导上的精准性,更直观体现了其在逻辑思维能力上的显著突破与进步。
-
MATH - 500 高中数学问题数据集
-
GSM8K 小学数学题数据集
-
CMath 中文语境数学推理数据集
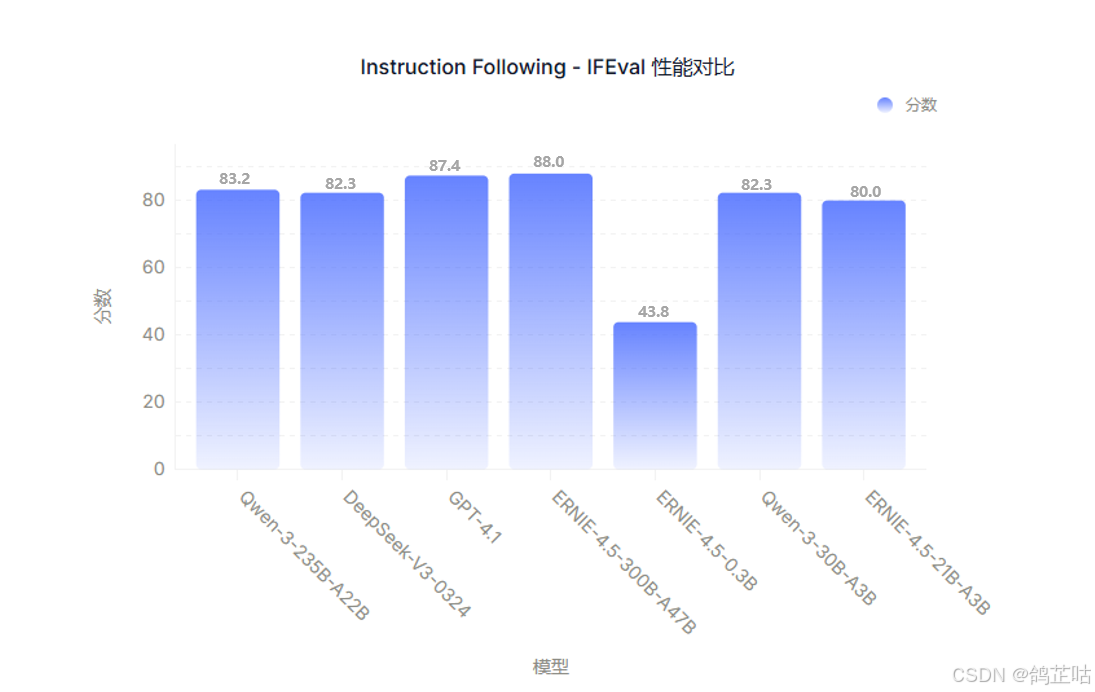
3.6 指令能力测试
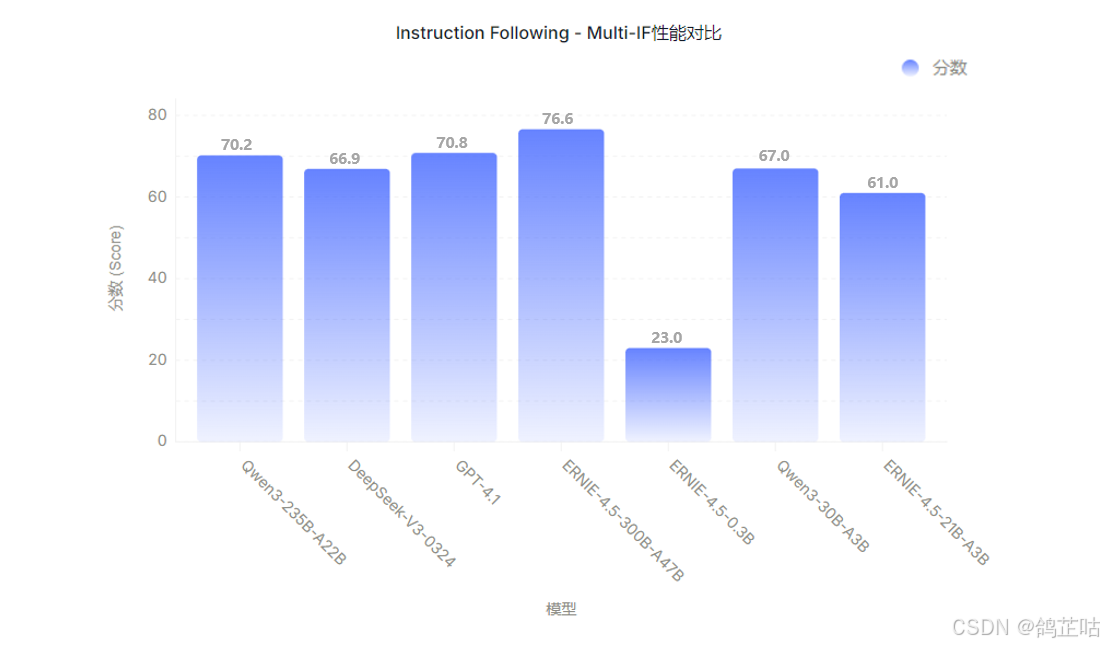
模型对复杂指令的理解与执行能力,是衡量其实际应用价值的核心维度之一。在 IFEval 和 Multi-IF 两大权威指令评估基准中
ERNIE-4.5-300B-A47B分别取得 88.0 分和 76.6 分的优异成绩,直观印证了该模型对复杂指令的精准理解与高效执行能力.
- IFEval指令遵循评估数据集聚焦于 “可验证指令”
- Multi-IF 多语言指令基础测试
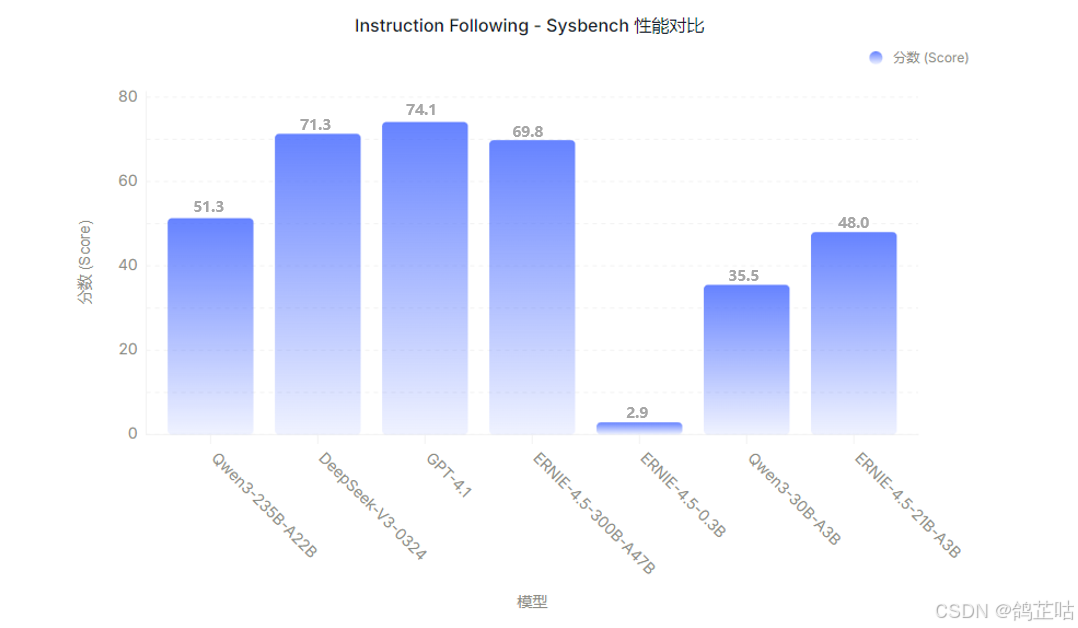
尽管在 Sysbench 基准测试中 GPT-4.1 暂居榜首但
ERNIE-4.5-300B-A47B仍以稳健发挥保持着极强的竞争力,充分展现了其在多样化指令场景下的可靠适配性。
- Sysbench基于 LuaJIT 的模块化、跨平台、多线程基准测试工具
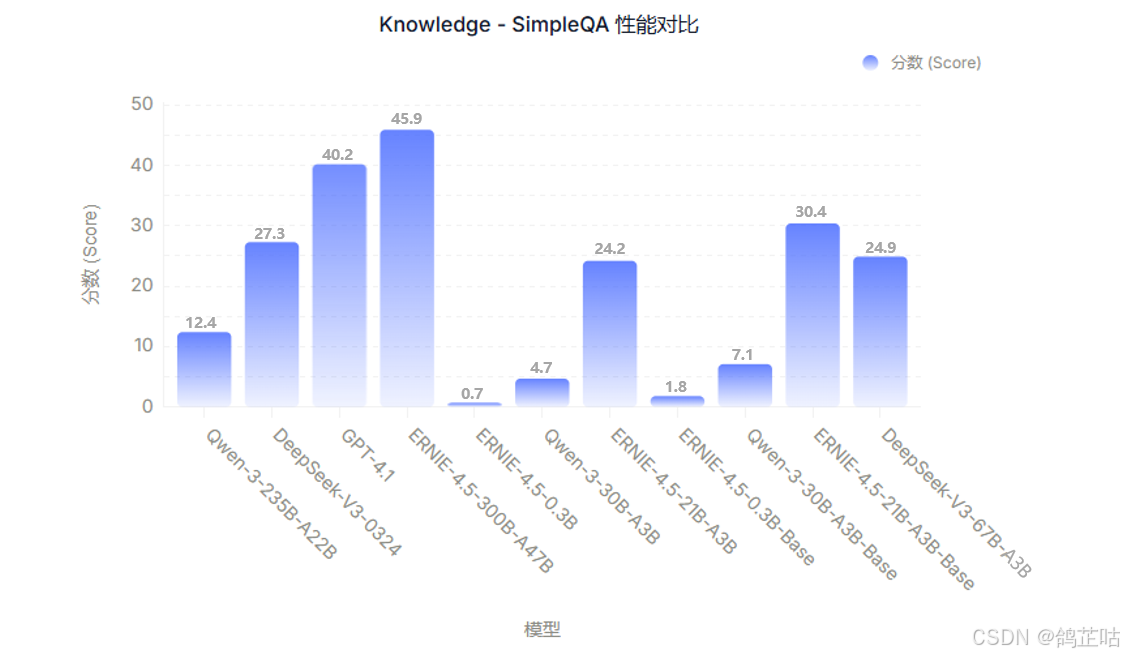
3.7 知识能力测试
在衡量模型知识储备与问答准确性的核心任务中,ERNIE-4.5 系列同样交出了亮眼答卷。作为系列中的旗舰模型,ERNIE-4.5-300B-A47B 在 ChineseSimpleQA、SimpleQA 等权威知识问答测评中展现出显著领先优势 —— 尤其在 ChineseSimpleQA 任务上,以 77.1 的高分凸显了其深厚的中文知识积淀与精准的问答能力。
- ChineseSimpleQA语言模型回答简短问题真实性能力的中文基准
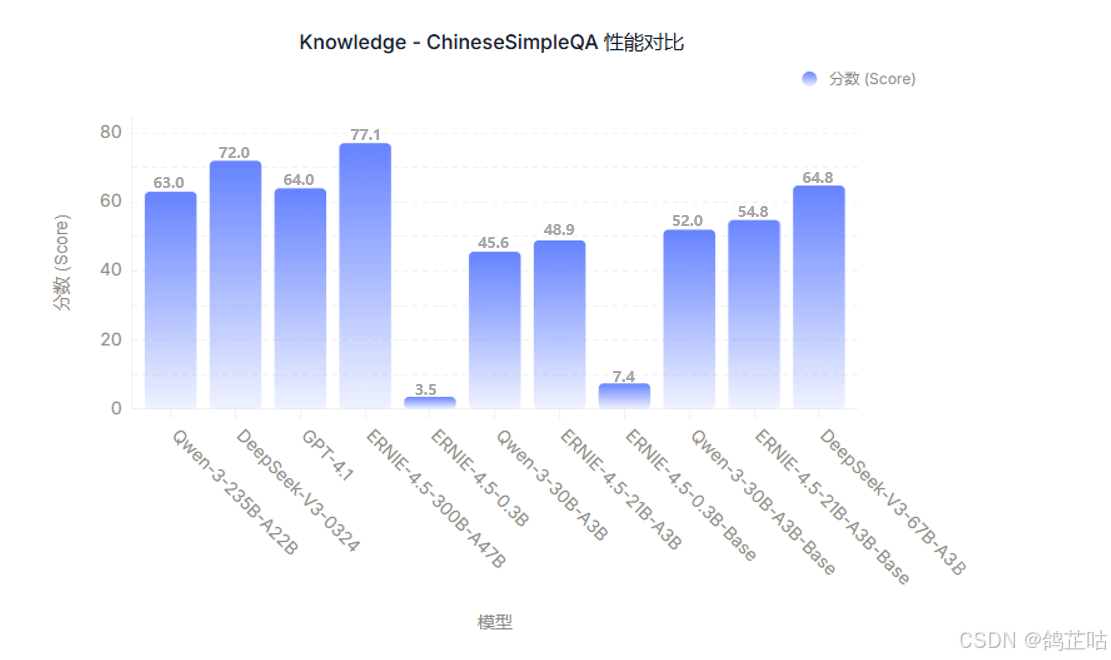
即便在中等参数量级的较量中,ERNIE-4.5 系列的表现依然可圈可点。例如 ERNIE-4.5-21B-A3B-Base 在 SimpleQA 任务中,性能不仅优于同量级的 Qwen3-30B-A3B-Base,更彰显了其在知识理解与问答逻辑上的优化优势。
- SimpleQA评估语言模型回答简短事实性问题能力基准数据集
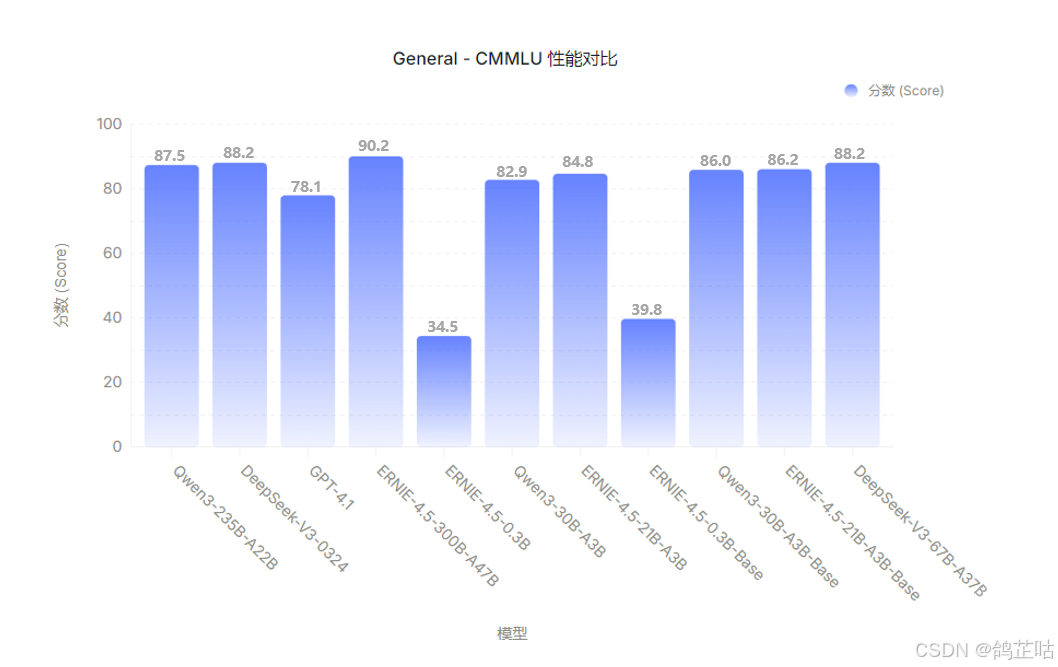
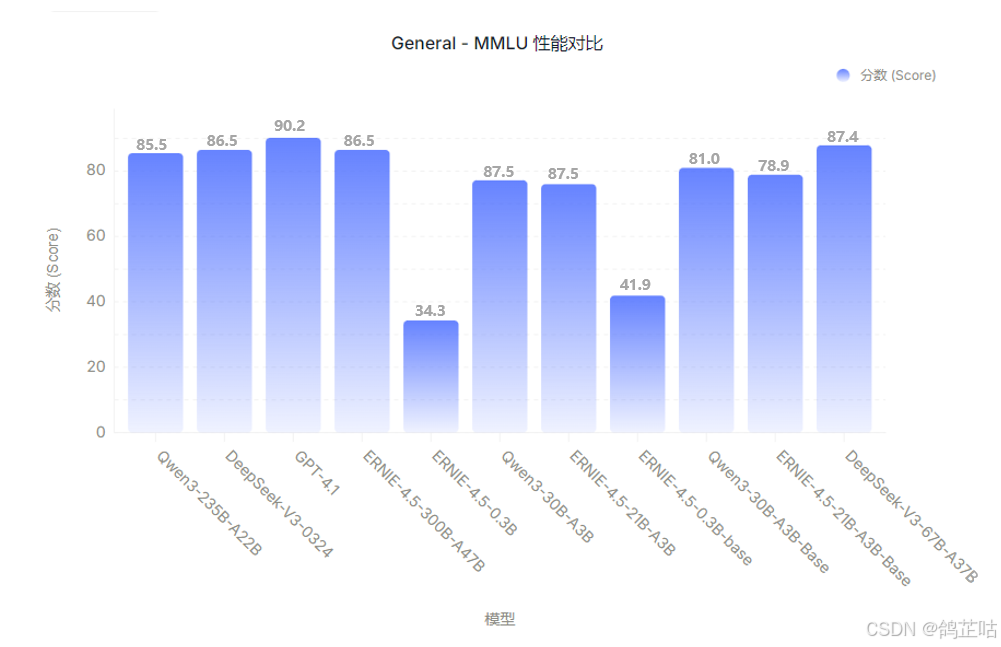
3.8 通用能力测试
中文语境理解这方面一直都是ERNIE系列模型的核心优势,而 ERNIE-4.5 系列更是在此基础上实现了中文及多语言通用能力的跨越式升级。在 C-Eval、CMMLU、MMCU、General-MMLU 等中文及多语言权威基准测试中,ERNIE-4.5 系列的表现尤为亮眼。
其中, ERNIE-4.5-300B-A47B在多数场景下稳居榜首,多数场景下得分领先同基本的大模型显示出其在通用语言理解和生成方面的强大实力。
- C-Eval中文基础模型评估套件

值得一提的是,即便参数规模相对精简的ERNIE-4.5-0.3B-Base模型,在其适配的任务边界内也展现出扎实的通用能力基底 。
- CMMLU中国语言环境及文化知识评测集
-
MMLU大规模多任务语言理解评测基准
-
MMCU甲骨易 AI 研究院推出的国内首个高质量中文评测数据集

3.9 对比评测总结
通过本次覆盖基础通识、高级推理、视觉能力、代码编程等八大核心维度的全面测试可以清晰看到,ERNIE-4.5 系列模型在多模态技术的多个关键方向基准测试中始终保持领先。这种领先并非局限于单一领域的突出表现,而是呈现出跨维度的全面优势 —— 尤其在中文语境深度理解、复杂指令精准执行和数学逻辑严谨推理等核心应用领域,其性能优势更为显著。
并且在11项细分任务的综合评测中,ERNIE-4.5-28B视觉语言大模型对比同级别大模型Qwen2.5-VL-32b、DeepSeek-VL2,展现出全面且稳定的性能表现。ERNIE-4.5-28B以280亿参数规模,在核心能力上不仅与320亿参数的Qwen2.5-VL-32b不相伯仲,部分维度更实现超越。
整体来说,ERNIE-4.5 此次呈现的大模型在技术性能上表现突出,其凭借均衡的跨模态能力与高效的参数利用率,达成了业界 SOTA(state-of-the-art)级别的技术水准。从实际测试数据来看,该模型在多维度任务中展现出全面且稳定的性能输出,在本次多模态模型评测中,以综合表现优势成为具备高可靠性的选择。
五、总结与社区生态展望
5.1 社区生态展望
文心 ERNIE-4.5 的开源不仅给我们带来了高性能模型,更构建了从训练到部署的完整生态体系。通过 GitCode 开源平台的开放协作模式,开发者可直接获取模型代码。利用百度提供的 ERNIEKit 开发套件和 FastDeploy 部署工具即可轻松完成模型部署,大幅降低技术门槛,为模型精调、量化优化、多硬件适配提供全流程支持。
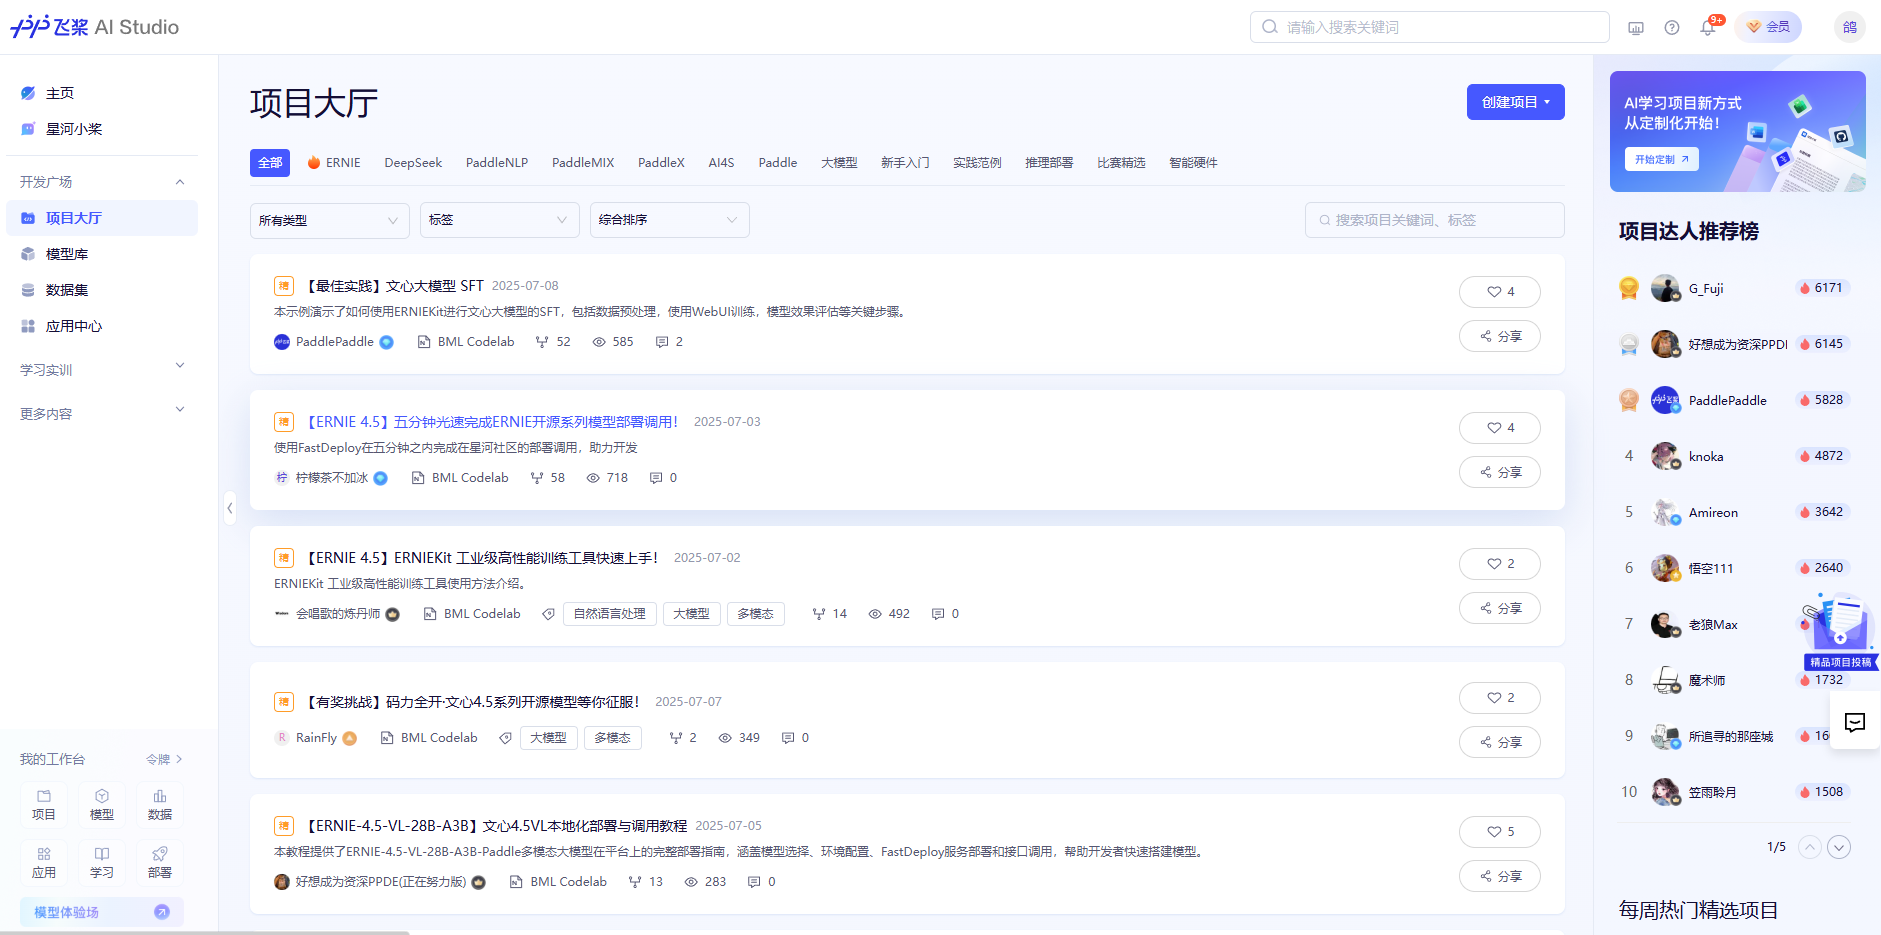
在社区生态层面,飞桨星河社区上线短短几天便吸引了大批开发者入驻。在这里,开发者既能发现众多优质有趣的开源项目,还能通过社区提供的服务 “一键运行” 项目直接体验项目效果;同时,也可以自主开源个人项目,吸引广大开发者参与协作开发,一起完善开源项目。
未来,我相信文心 ERNIE-4.5 凭借卓越的模型性能、完善的开发套件与部署工具链、活跃的社区生态氛围以及全面的技术文档支持,必将吸引大批开发者与企业用户投身其中,共同推动文心开源大模型的社区生态走向繁荣。
5.2 全文总结
本次对文心 ERNIE-4.5 开源模型的深度剖析到这里就告一段落了。我们从模型特性解读、技术架构分析、部署实践指南、到全方位对比评测,已系统呈现了其核心能力与优势。相信大家对文心 ERNIE-4.5 的实力已有清晰认知,无需过多赘述。对这款模型感兴趣的开发者,不妨一键点击文末 GitCode 链接,开启属于你的部署体验之旅吧!
- 😀一起来轻松玩转文心大模型吧!🎉🎉🎉
- 📌文心大模型免费下载地址: https://ai.gitcode.com/theme/1939325484087291906
六、附录
以下是博主在本次评测梳理的 ERNIE-4.5 开源生态核心资源合集,涵盖代码仓库、部署配置规范、技术白皮书及开发工具包等关键内容,希望能为各位对
文心ERNIE4.5感兴趣的开发者提供帮助。

