UI自动化|如何结合TestNG做Selenium UI自动化
所 寫 即 所 思
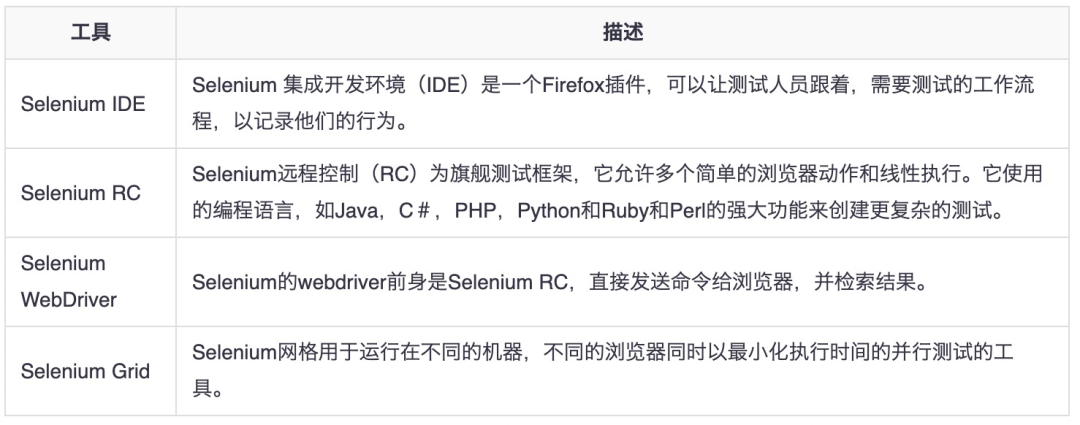
对于大多数刚接触自动化测试同学来说,Selenium是大家接触最早的Web UI自动化测试框架,Selenium是一个开源的和便携式的自动化软件测试工具,用于测试Web应用程序有能力在不同的浏览器和操作系统运行。Selenium其实是一套工具,帮助测试者更有效地基于Web的应用程序的自动化。
当然,UI自动化用例的断言也是不可或缺的,更好更快的断言也是selenium的劣势,而TestNG恰恰又是非常有名的测试框架,正好可以结合selenium, 提供断言模块以弥补selenium的劣势, 使你的自动化用例开发效率成倍增加。
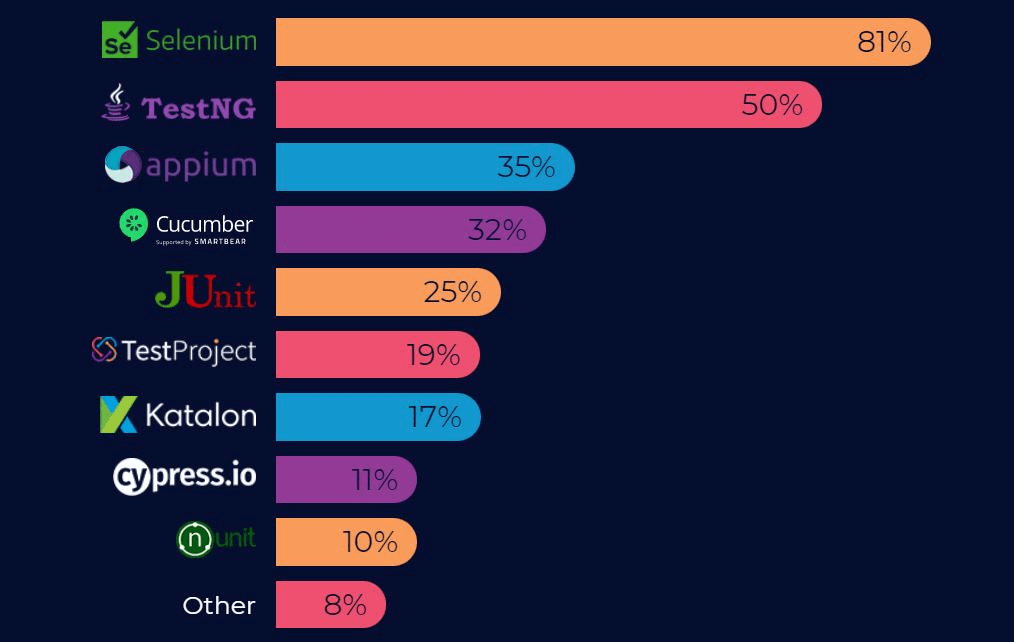
TestNG 不仅易于实现和学习,还支持并行执行测试和生成日志报告,我想用过的同学大多数人都会对TestNG给出肯定的回答。下面的开源测试框架使用现状调查可以看出,TestNG 是开发人员首选的最佳Java 测试框架之一,Selenium是唯一领先于 TestNG 的测试自动化框架,接近 50%的组织或个人喜欢TestNG 框架。
TestNG,其中NG代表Next Generation,是由 Cedric Beust 开发的测试框架,TestNG类似于JUnit(特别是JUnit 4),虽然灵感来源于JUnit,但它不是JUnit框架的扩展。它的目的是优于JUnit,尤其是在用于测试集成多类时。在这个Selenium TestNG 教程中,我将深入探讨如何安装 TestNG,并介绍使用 TestNG 编写第一个自动化脚本以进行Selenium自动化测试的要点。
什么是TestNG?
TestNG 是一个基于JUnit 和 NUnit 功能的开源高级测试框架。该框架不仅健壮,而且还提供了诸如TestNG 注解、分组、参数化等非常niceeeee的功能,有助于保持测试结构良好且易于用例的维护。
在撰写本文时,TestNG 的最新版本已经更新到7.5。
TestNG 框架旨在简化从单元测试到集成测试(测试由几个类、几个包甚至几个外部框架组成的整个系统,例如应用程序)复杂的测试需求。
TestNG的优点如下:
-
以高效易读的格式提供HTML 报告,从而满足 WebDriver 生成此类报告的限制
-
支持在调用特定组时将多个测试用例分组在一起执行
-
能够在测试用例 中设置优先级,这有助于决定哪个用例先执行
-
在testng-failed.xml的辅助下提供仅执行失败案例的能力
-
支持跨浏览器测试、数据参数化和并行测试
-
易于理解的注解,有助于控制自动化脚本中的执行顺序
-
固有地处理未捕获的异常,从而防止突然的测试终止
-
“靠谱”的参数化能力
如何在 IntelliJ 中安装 TestNG
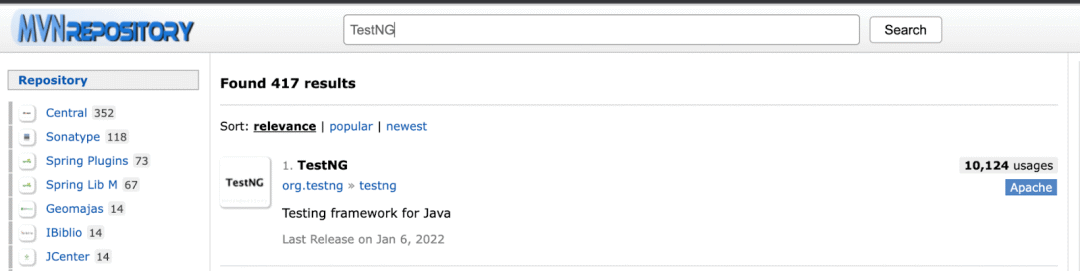
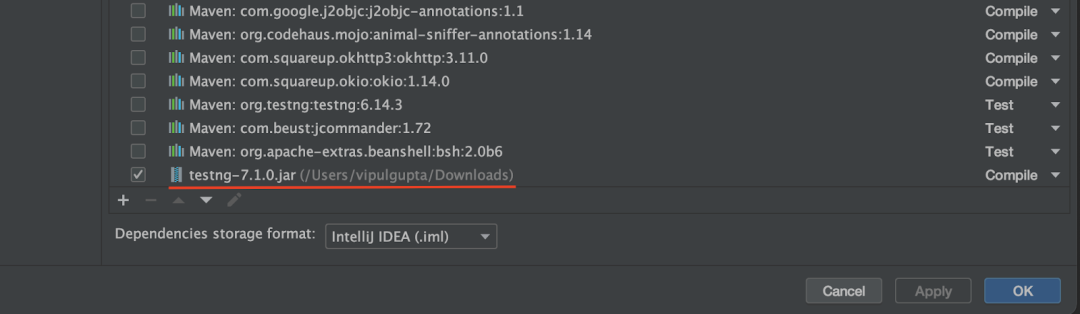
从 Maven Repositories网站下载 JAR 并添加到依赖。
第 1 步:访问Maven Repositories,搜索TestNG并选择常用的版本(即 7.1.0)。
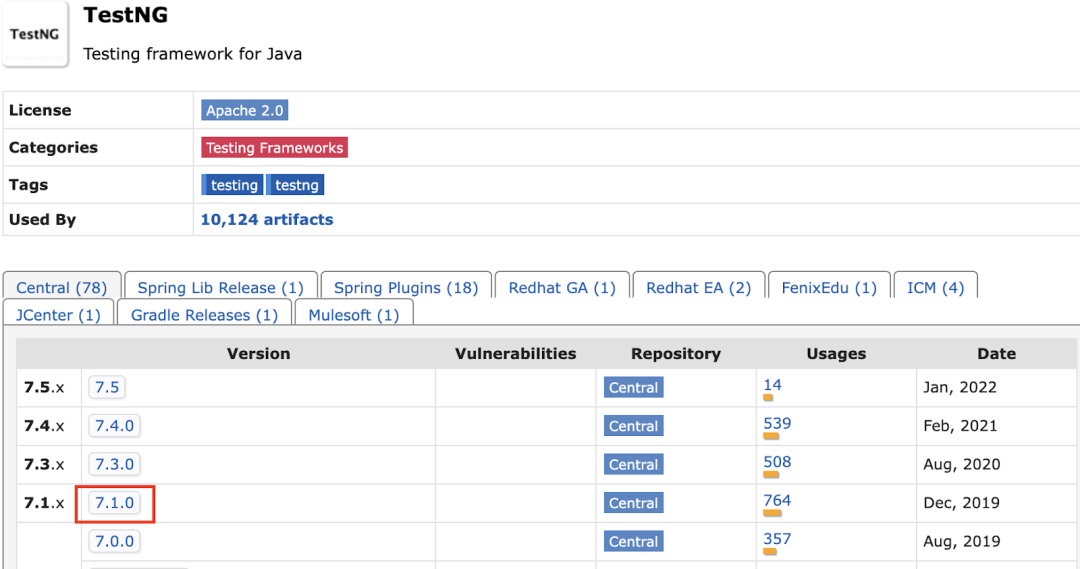
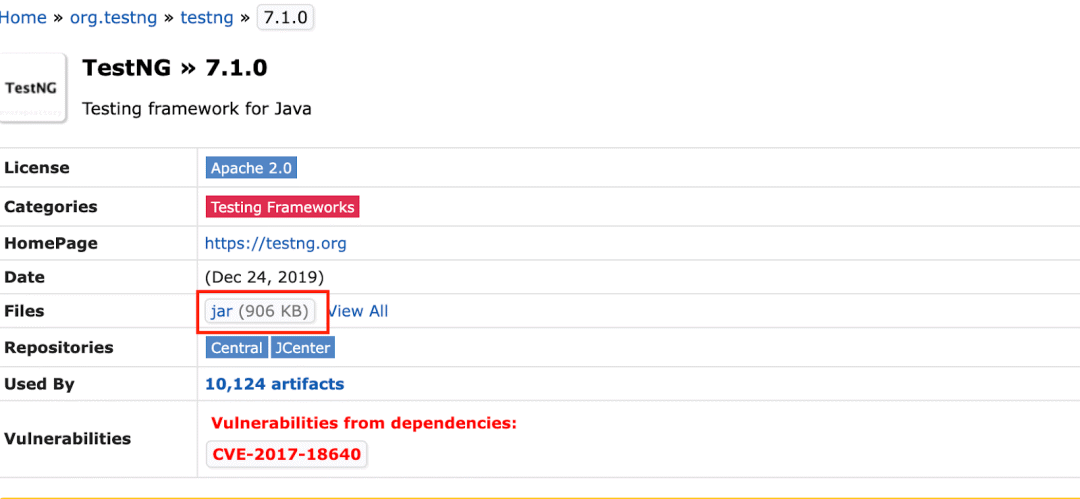
第2步:选择并下载jar文件。我们将把这个 jar 添加到 IntelliJ。
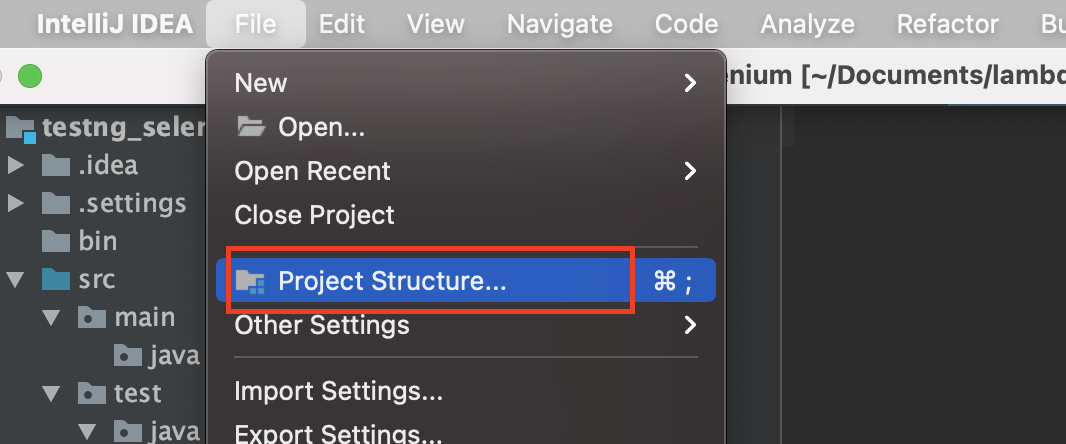
第 3 步:启动 IntelliJ,打开File菜单,然后选择Project Structure。
第 4 步:打开Modules面板,转到Dependencies选项卡,单击 + 号,然后选择JAR 或目录。
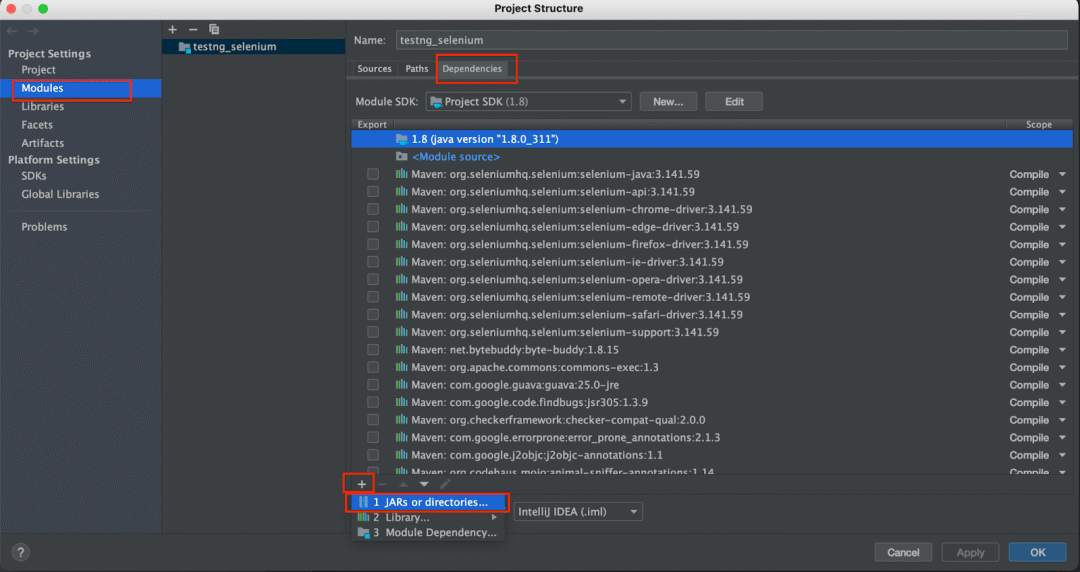
第 5 步:导航到我们从前面的步骤下载的 jar 的路径并选择它。
第 6 步:它将出现在依赖项列表中。只需检查它并单击“应用”按钮,然后单击“确定”按钮。
无论使用何种 IDE,上述步骤都是相同的。因此,让我们创建项目并添加一个测试类来验证它是否可以使用TestNG Run 执行。
-
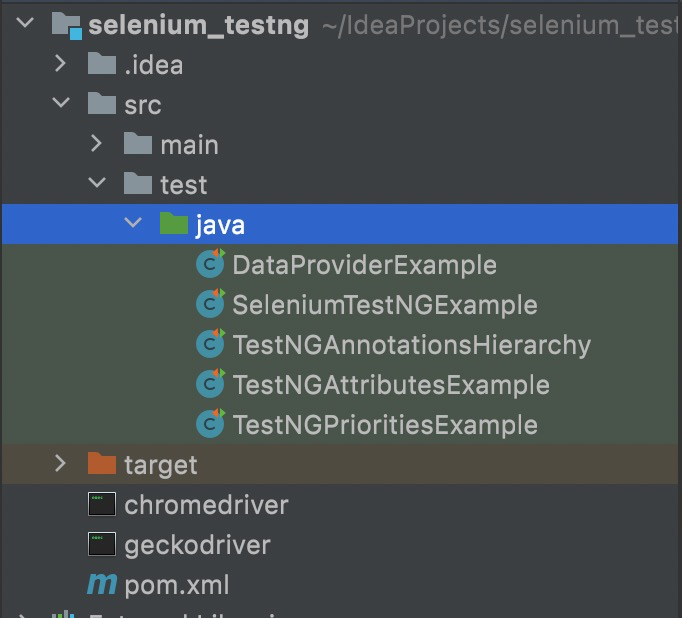
在 IDEA 中创建一个 Maven 项目并将其命名为selenium_testng。
-
在pom.xml中添加Selenium和TestNG依赖项。
POM是 Project Object model 的缩写,是一个 XML 文件,它构成了 Maven 的基本基本单元。它存储有关项目的信息,例如版本、描述等,还包含配置详细信息,例如依赖项,Maven 使用这些信息来构建项目并使我们的代码正常工作。
4.0.0 selenium_testng selenium_testng 0.0.1-SNAPSHOT src maven-compiler-plugin 3.8.1 16 org.seleniumhq.selenium selenium-java 3.141.59 org.testng testng 7.1.0 test
第 1 步:创建一个包并将其命名为test。这个包将包含我们所有的测试类文件。
第 2 步:在这个包中,添加一个新类VerifySetup,添加以下代码并保存。
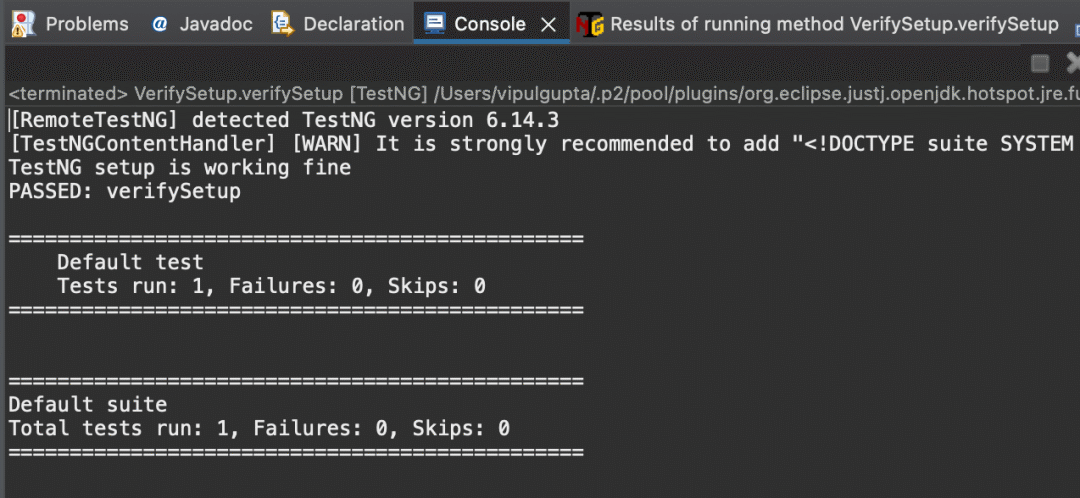
package test;import org.testng.annotations.Test;public class VerifySetup {@Testpublic void verifySetup(){System.out.println("TestNG setup is working fine");}}第 3 步:现在将其作为 TestNG 测试执行以验证设置是否OK。为此选择方法名,右键单击它,选择Run As然后单击TestNG Test。
成功执行后,输出应如下所示。这验证了我们的 TestNG 设置是OK的,并且可以执行相同的步骤来执行我们在本教程中添加的更多测试。
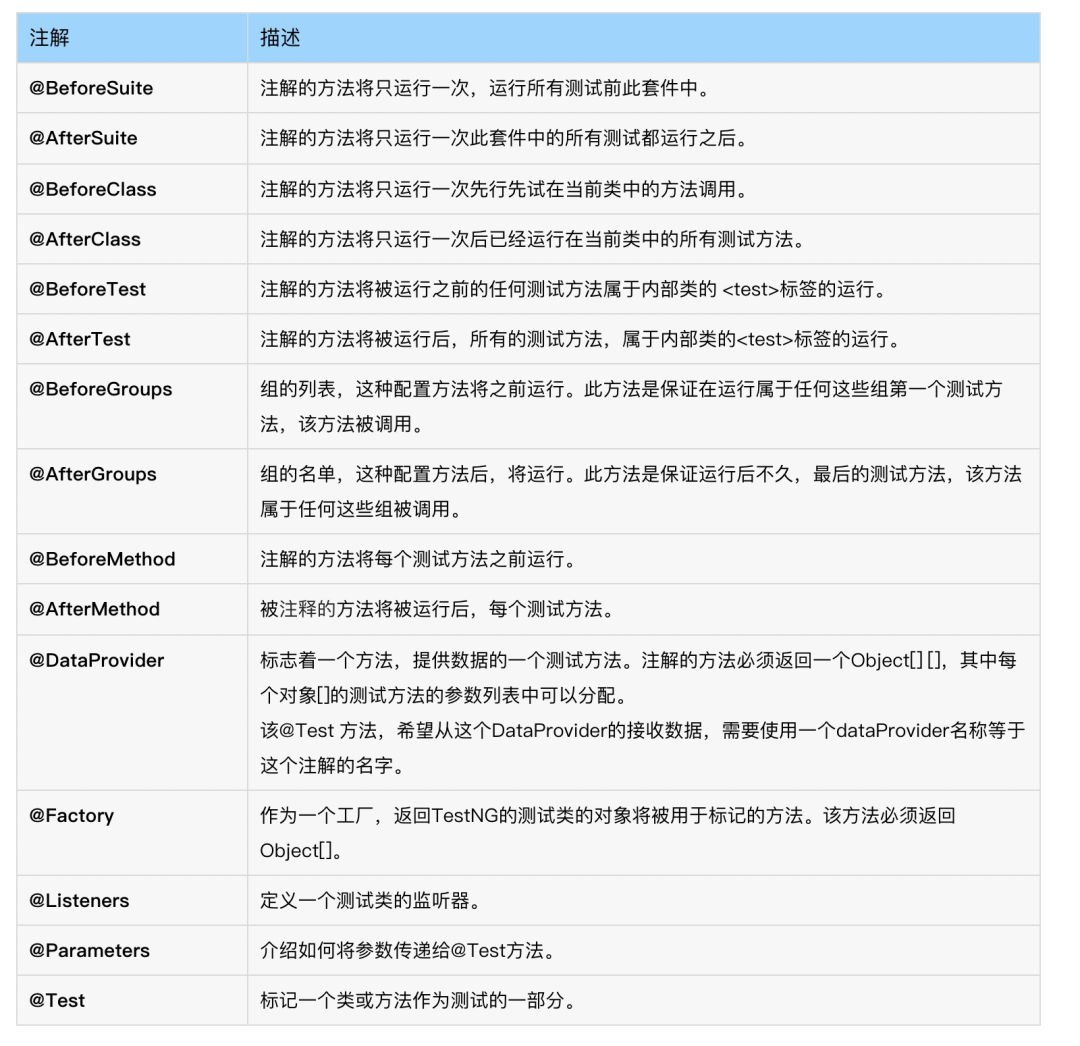
TestNG 注解和属性
TestNG 中的注解是一些预定义的关键字,它们有助于控制自动化脚本在适当的流程中的执行。
package test;import org.testng.annotations.Test;public class UnAnnotatedTestExample {@Testpublic void testWithAnnotation() {System.out.println("This test is annotated");}public void testWithoutAnnotation() {System.out.println("This test is not annotated");}}在上面的示例中,我们添加了两个测试用例,一个用例带有@Test 注解,一个没有。所以执行测试期望结果是只执行一个带有注解的,另一个则不会被执行。让我们执行该类并验证这一点。
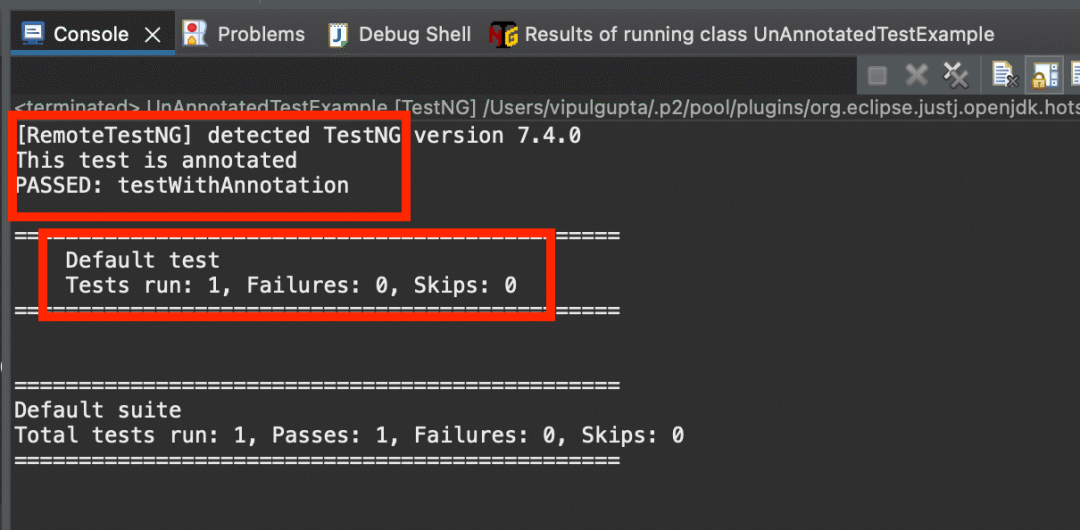
从输出中可以清楚地看出,只有带有注解的情况才被执行。这里要注意的另一件事是,输出的测试运行结果也将测试用例的总数显示为 1,这是因为 TestNG 从 @Test 注解中读取测试用例的数量,而我们在文件中只有一个这样的用例。
TestNG 注解还提供与它们关联的方法、类或测试套件的相关信息。这些通过添加@前缀来表示。让我们一一学习下这些注解,后面的代码样例中会使用它们。
注解类型
注解的层次结构
TestNG 注解具有预定义的执行层次结构,有助于执行测试代码。它们的执行优先级如下:

让我们看一下下面的代码示例,以更好地演示其层次结构。
package test;import org.testng.annotations.AfterClass;import org.testng.annotations.AfterMethod;import org.testng.annotations.AfterSuite;import org.testng.annotations.AfterTest;import org.testng.annotations.BeforeClass;import org.testng.annotations.BeforeMethod;import org.testng.annotations.BeforeSuite;import org.testng.annotations.BeforeTest;import org.testng.annotations.Test; public class TestNGAnnotationsHierarchy { @Test public void testCase1() { System.out.println("This is Test Case 1"); } @Test public void testCase2() { System.out.println("This is Test Case 2"); } @BeforeMethod public void beforeMethod() { System.out.println("This will execute before every Test Method"); } @AfterMethod public void afterMethod() { System.out.println("This will execute after every Test Method"); } @BeforeClass public void beforeClass() { System.out.println("This will execute before the Class"); } @AfterClass public void afterClass() { System.out.println("This will execute after the Class"); } @BeforeTest public void beforeTest() { System.out.println("This will execute before the First Test"); } @AfterTest public void afterTest() { System.out.println("This will execute after the Last Test"); } @BeforeSuite public void beforeSuite() { System.out.println("This will execute before the Test Suite"); } @AfterSuite public void afterSuite() { System.out.println("This will execute after the Test Suite"); }}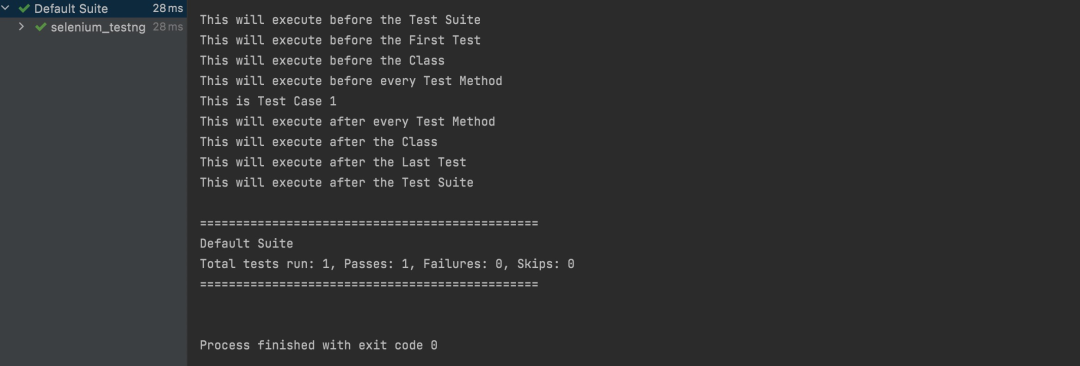
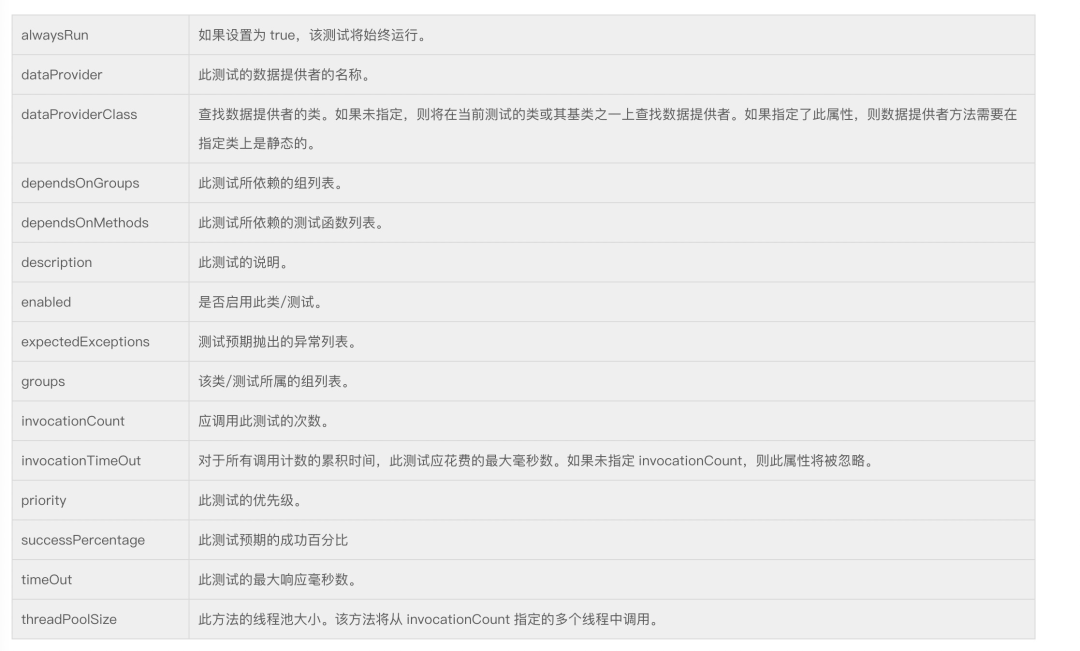
TestNG 属性
就像 Java 中的方法一样,TestNG 注解有助于使我们的测试更加明确的属性,并在使用 TestNG 执行 Selenium 自动化测试时提供有关测试脚本的更多信息。
在这种情况下,首先执行优先级为 1 的测试,然后执行优先级为 2 的测试。
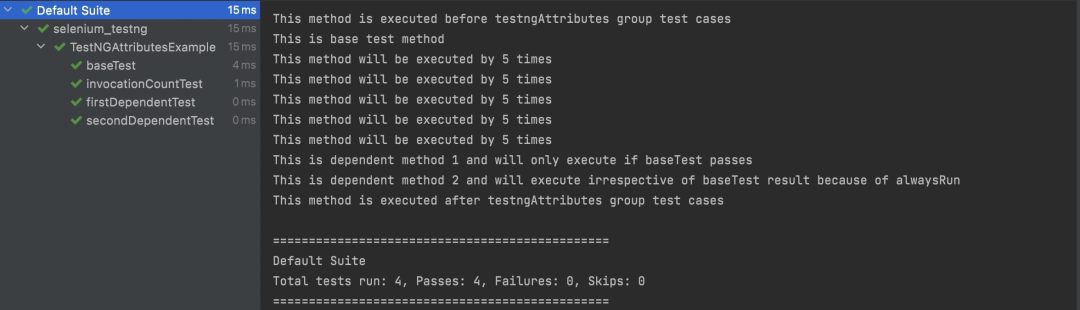
package test;import org.testng.annotations.AfterGroups;import org.testng.annotations.BeforeGroups;import org.testng.annotations.Test;public class TestNGAttributesExample {@Test(enabled = false, description = "This test will be skipped as enabled is set to false")public void disabledTest() {System.out.println("This method will be skipped from the test run using the attribute enabled=false");}@Test(invocationCount = 5, invocationTimeOut = 20, groups = "testngAttributes")public void invocationCountTest() {System.out.println("This method will be executed by 5 times");}@Test(timeOut = 500, groups = "testngAttributes")public void baseTest() {System.out.println("This is base test method");}@Test(dependsOnMethods = "baseTest", groups = "testngAttributes")public void firstDependentTest() {System.out.println("This is dependent method 1 and will only execute if baseTest passes");}@Test(alwaysRun = true, dependsOnMethods = "baseTest", groups = "testngAttributes")public void secondDependentTest() {System.out.println("This is dependent method 2 and will execute irrespective of baseTest result because of alwaysRun");}@BeforeGroups("testngAttributes")public void beforeGroupMethod() {System.out.println("This method is executed before testngAttributes group test cases");}@AfterGroups("testngAttributes")public void afterGroupMethod() {System.out.println("This method is executed after testngAttributes group test cases");}}运行上面的代码将给出以下输出:
TestNG 优先级
TestNG 中的测试用例执行由测试用例的优先级控制。但是,如果没有为测试用例分配优先级怎么办。那么是什么决定了测试执行的顺序。
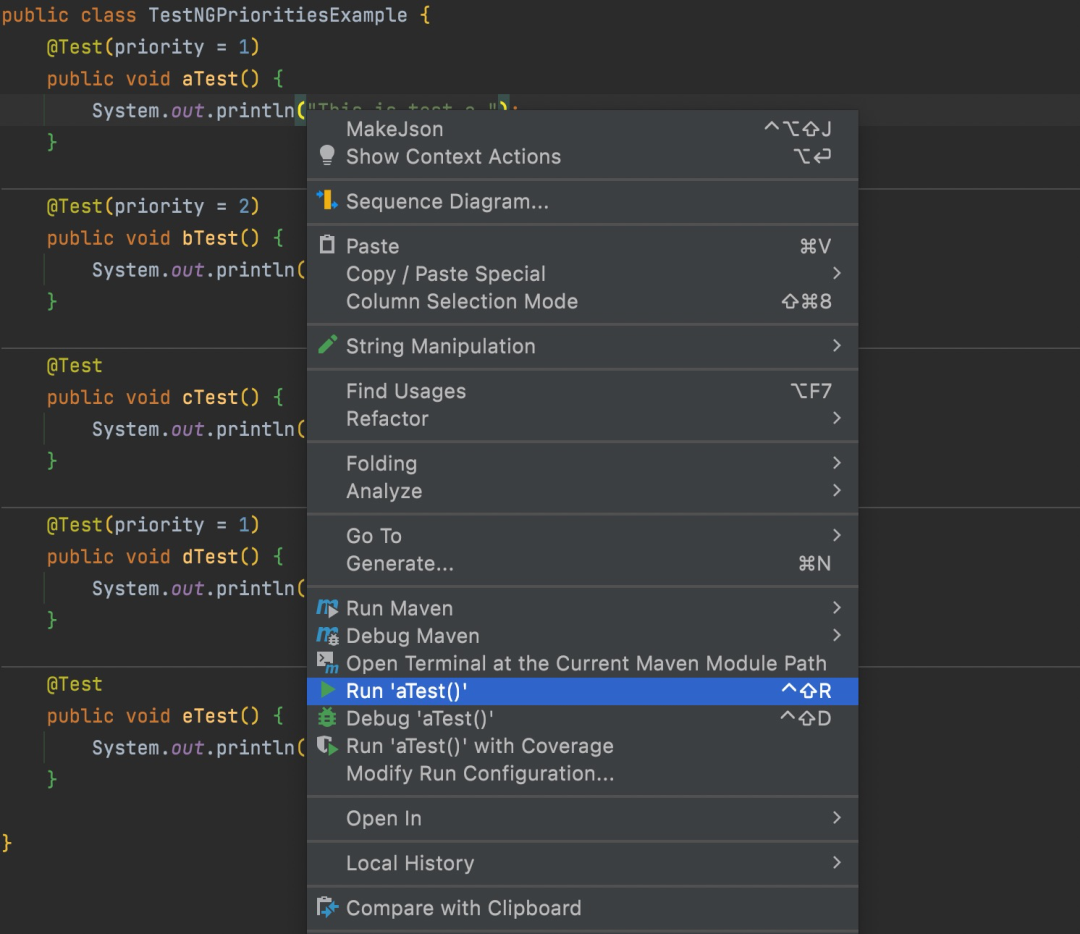
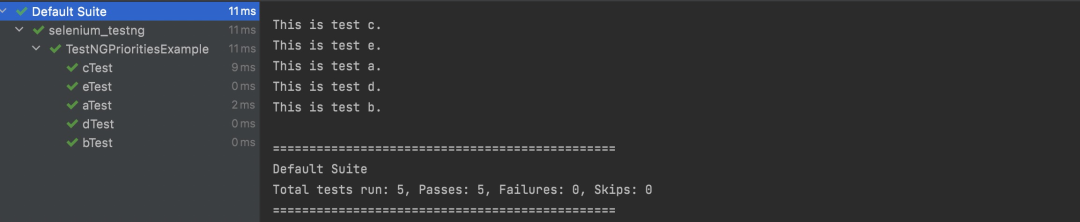
如果有多个测试用例,则 TestNG 默认按字母顺序执行它们。
package test;import org.testng.annotations.Test;public class TestNGPrioritiesExample {@Test(priority = 1)public void aTest() {System.out.println("This is test a.");}@Test(priority = 2)public void bTest() {System.out.println("This is test b.");}@Testpublic void cTest() {System.out.println("This is test c.");}@Test(priority = 1)public void dTest() {System.out.println("This is test d.");}@Testpublic void eTest() {System.out.println("This is test e.");}}在这种情况下,默认情况下,TestNG 将优先级 = 0 分配给没有该属性的测试。这些测试按字母顺序执行,然后按照优先级逻辑执行其他测试。所以上面代码的输出是
TestNG 中的DataProviders
TestNG 中的DataProviders是内置 TestNG 数据驱动测试方法的一部分,用于通过@DataProvider注解将不同的值传递给同一个 TestNG 测试类。
TestNG DataProvider 示例:
@DataProvider(name = "dataProvider_name")public Object[][] dataProviderMethod() {return new Object[][] {};}此注解仅包含一个属性名称,并且为String类型。如果未提供名称,则方法的名称默认为数据提供者名称,在这种情况下为dataProviderMethod 。
DataProvider 始终返回对象的二维列表,测试方法在每个传递的参数上使用数据驱动的方法在其上执行执行。
让我们举一个简单的跨浏览器代码示例,我们希望在 Chrome 和 Firefox 浏览器上打开一个网站。
package test;import org.openqa.selenium.WebDriver;import org.openqa.selenium.chrome.ChromeDriver;import org.openqa.selenium.firefox.FirefoxDriver;import org.testng.annotations.DataProvider;import org.testng.annotations.Test;public class DataProviderExample {@DataProvider(name = "browserName")public Object[][] browserName() {return new Object[][] { { "chrome" }, { "firefox" } };}@Test(dataProvider = "browserName")public void crossBrowserTest(String browser) {WebDriver driver = null;System.out.println("Launching browser : " + browser);switch(browser){case "chrome":System.setProperty("webdriver.chrome.driver", "");driver = new ChromeDriver();break;case "firefox":System.setProperty("webdriver.firefox.driver", "");driver = new FirefoxDriver();break;default:System.out.println("Invalid browser name passed");}driver.navigate().to("http://www.taobao.com/");System.out.println("Navigated Successfully to the website");}}在上面的代码中,我们实现了名为browserName的 DataProvider ,它传递了chrome和firefox两个值。这些值使用参数值传递给测试方法crossBrowserTest,测试用例在两个浏览器上一一执行。
这是跨浏览器测试代码实现的经典示例,我们希望在多个浏览器上执行相同的脚本。执行上面的代码会给出如下输出:
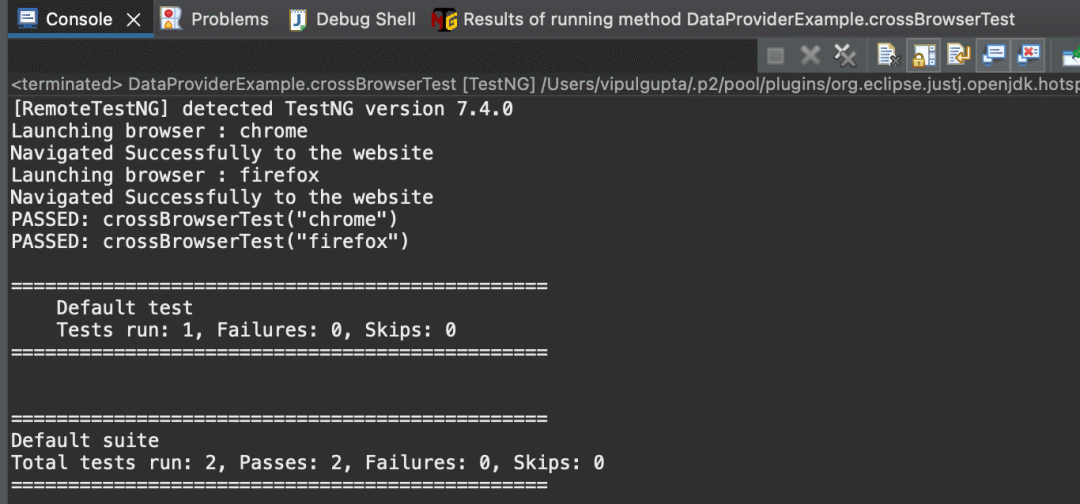
这里要注意的是,不是只有 1 个带有 @Test 注解的测试用例,而是执行显示两个测试用例被执行。这是因为我们向测试用例传递了 2 个不同的值,因为测试数据不同,所以 TestNG 将其视为 2 个单独的测试用例。
TestNG 断言
断言提供了验证测试用例执行的实际结果和预期结果是否匹配的方法,从而决定测试用例的结果是通过还是失败。这些广泛用于验证 Selenium 中任何 TestNG 脚本中的结果。TestNG 断言的一个示例是在用户登录网站后验证仪表板上的用户名。
TestNG 断言的语法:
Assert.Method(actual, expected, message)
-
actual:作为执行的一部分从测试用例中获取的实际值。
-
预期:要与实际值进行比较的预期值。
-
message : 断言失败时显示的结果。
关于assert常见断言方法及描述如下:
-
assertTrue:判断是否为True。True就通过
-
assertFalse:判断是否为false。false就通过
-
assertSame:判断引用地址是否相同。
-
assertNotSame:判断引用地址是否不相同。
-
assertNull:判断是否为null。
-
assertNotNull:判断是否不为null。
-
assertEquals:判断是否相等,Object类型的对象需要实现haseCode及equals方法。
-
assertNotEquals:判断是否不相等。
-
assertEqualsNoOrder:判断忽略顺序是否相等
TestNG Selenium 实践
到目前为止,TestNG 教程已经涵盖了 TestNG 框架的几乎所有主要功能,下面编写你的第一个 Java 自动化脚本。在下面的代码示例中,我们将结合到目前为止我们学到的所有注解、属性、优先级、DataProvider和断言。
此代码将执行以下测试场景(打印并验证 2 个数字的总和)
-
创建一个将值作为firstValue、secondValue、expectedSum传递的 dataProvider 。
-
打开https://www.lambdatest.com/selenium-playground/simple-form-demo。
-
使用第一组值 {1, 4, 5} 运行测试 1。该测试应该通过,因为预期的总和是正确的。
-
从表单中清除旧值。
-
使用第二组 {2, 4, 7} 运行测试 2。由于预期的总和不正确,因此该测试预期应该失败。我们故意传递不正确的预期值,以查看通过和失败案例的输出和测试报告的差异。当然正常情况下,期望值应该始终是正确的值。
除了这个测试用例之外,我们还将添加两个优先级的测试用例来展示用法,其中一个具有 invocationCount 属性来显示用例按优先级多次执行。
package test;import java.net.MalformedURLException;import java.net.URL;import org.openqa.selenium.By;import org.openqa.selenium.remote.*;import org.testng.Assert;import org.testng.annotations.*;public class SeleniumTestNGExample {public RemoteWebDriver driver = null;String username = "";String accessKey = "";@BeforeSuitepublic void setUp() {DesiredCapabilities capabilities = new DesiredCapabilities();capabilities.setCapability("browserName", "Chrome");capabilities.setCapability("version", "92.0");capabilities.setCapability("platform", "Windows 10");capabilities.setCapability("resolution", "1024x768");capabilities.setCapability("build", "TestNG Selenium Tutorial");capabilities.setCapability("name", "TestNG Selenium JAVA");try {driver = new RemoteWebDriver(new URL("https://" + username + ":" + accessKey + "@hub.lambdatest.com/wd/hub"), capabilities);} catch (MalformedURLException e) {System.out.println("Invalid grid URL");}System.out.println("The driver setup process is completed using BeforeSuite");}@BeforeTestpublic void browserProfile() {driver.manage().window().maximize();System.out.println("The browser profile is updated using BeforeTest");}@BeforeClasspublic void navigateToUrl() {driver.get("https://www.lambdatest.com/selenium-playground/simple-form-demo");System.out.println("Navigated to URL using BeforeClass");}@Test(description = "Test case with priority", priority = 1)public void testPriotity(){System.out.println("This case has priority 1");}@Test(description = "Test case with priority and invocation count", priority = 2, invocationCount = 2)public void testInvocationCount(){System.out.println("This case has priority 2 and invocation count");}@DataProvider(name = "SanityTestData")public Object[][] sanityTestDataProvider() {String[][] testData = { { "1", "4", "5" }, { "2", "4", "7" } };return testData;}@Test(dataProvider = "SanityTestData", description = "Test case with group and data provider but without priority", alwaysRun = true, groups = { "sanity" })public void testSumOfTwoValues(String firstValue, String secondValue, String expectedSum) {// to enter data and submitdriver.findElement(By.id("sum1")).sendKeys(firstValue);driver.findElement(By.id("sum2")).sendKeys(secondValue);driver.findElement(By.xpath("//button[text()='Get values']")).click();// to fetch actual resultString actualSum = driver.findElement(By.id("addmessage")).getText();// to assert actual and expected resultAssert.assertEquals(actualSum, expectedSum,"Expected and actual results do not match. Expected : " + expectedSum + " and Actual : " + actualSum);}@AfterMethod()public void clearOldData() {driver.findElement(By.id("sum1")).clear();driver.findElement(By.id("sum2")).clear();}@AfterClasspublic void closeDriver() {driver.quit();System.out.println("Quit the driver using AfterClass");}@AfterTestpublic void testReporting() {System.out.println("Test Report generated using AfterTest");}}加质量君微信 ISTE1204,邀请进群免费领软件测试进阶测试开发资料

