Far planner代码系列(4)
teleop_rviz_plugin(2)
我们今天接着来看剩下的控件drive_widget
#ifndef DRIVE_WIDGET_H#define DRIVE_WIDGET_H#include #include #include #include #include namespace teleop_rviz_plugin{class DriveWidget: public QWidget{Q_OBJECTpublic: DriveWidget( QWidget* parent = 0 ); virtual void paintEvent( QPaintEvent* event ); virtual void mouseMoveEvent( QMouseEvent* event ); virtual void mousePressEvent( QMouseEvent* event ); virtual void mouseReleaseEvent( QMouseEvent* event ); virtual void leaveEvent( QEvent* event ); virtual QSize sizeHint() const { return QSize( 150, 150 ); }Q_SIGNALS: void outputVelocity( float linear, float angular, bool pressed );protected: void sendVelocitiesFromMouse( int x, int y, int width, int height ); void stop(); float linear_velocity_; float angular_velocity_; float linear_scale_; float angular_scale_; float x_mouse_, y_mouse_; bool mouse_pressed_;};}#endif // DRIVE_WIDGET_H看到namespace teleop_rviz_plugin 这就说明它也是teleop_rviz_plugin的一员,在这个class DriveWidget: public QWidget 的类里面注册了多个事件,比如鼠标移动事件、鼠标按压事件、鼠标松开事件等等。他们都是继承自Qt的,然后写的虚函数,这里可以看看c++的多态特性。
比较关心的是outputVelocity和sendVelocitiesFromMouse这两个函数。
我们依次来看看这些函数在drive_widget.cpp中的实现:
http://t.csdn.cn/sa1i5![]() http://t.csdn.cn/sa1i5
http://t.csdn.cn/sa1i5
void DriveWidget::paintEvent( QPaintEvent* event ){ QColor background; QColor crosshair; if( isEnabled() ) { background = Qt::white; crosshair = Qt::black; } else { background = Qt::lightGray; crosshair = Qt::darkGray; }//这一部分是画控制的矩形 int w = width(); int h = height(); int size = (( w > h ) ? h : w) - 1; int hpad = ( w - size ) / 2; int vpad = ( h - size ) / 2; QPainter painter( this ); painter.setBrush( background ); painter.setPen( crosshair ); //QRect使用的是 左 顶 宽 高的格式,左、顶相当于矩形的左上角的坐标。 painter.drawRect( QRect( hpad, vpad, size, size )); painter.drawLine( hpad, height() / 2, hpad + size, height() / 2 ); painter.drawLine( width() / 2, vpad, width() / 2, vpad + size ); if( isEnabled() && (angular_velocity_ != 0 || linear_velocity_ != 0 )) { QPen pen; pen.setWidth( size/150 ); pen.setColor( Qt::darkRed ); pen.setCapStyle( Qt::RoundCap ); pen.setJoinStyle( Qt::RoundJoin ); painter.setPen( pen ); QPointF joystick[ 2 ]; joystick[ 0 ].setX( w/2 ); joystick[ 0 ].setY( h/2 ); joystick[ 1 ].setX( x_mouse_ ); joystick[ 1 ].setY( y_mouse_ ); painter.drawPolyline( joystick, 2 ); painter.drawEllipse( x_mouse_ - 10, y_mouse_ - 10, 20, 20 ); }}这一段代码绘制矩形和十字框
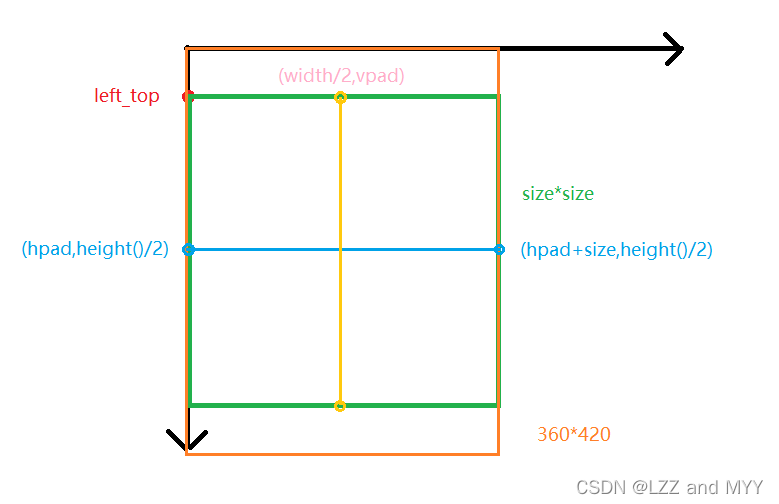
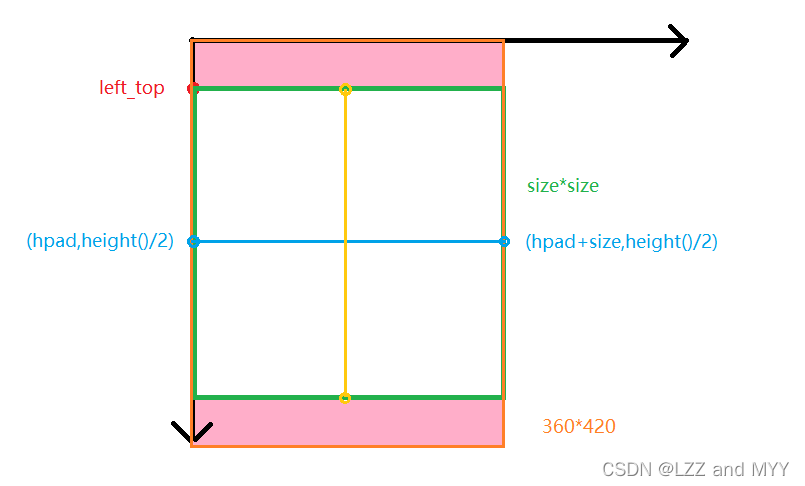
int w = width(); int h = height(); int size = (( w > h ) ? h : w) - 1; int hpad = ( w - size ) / 2; int vpad = ( h - size ) / 2; QPainter painter( this ); painter.setBrush( background ); painter.setPen( crosshair ); //QRect使用的是 左 顶 宽 高的格式,左、顶相当于矩形的左上角的坐标。 painter.drawRect( QRect( hpad, vpad, size, size )); painter.drawLine( hpad, height() / 2, hpad + size, height() / 2 ); painter.drawLine( width() / 2, vpad, width() / 2, vpad + size );假定我们的w和h分别是360和420。那么size=359,hpad=0,vpad=30;那么矩形的左上顶点就是(0,30),矩形大小是size*size也就是359*359。那么这个(hpad,height()/2),这个点就是(0,210)。同理另一个。我们可以看图:
我们接着看:
if( isEnabled() && (angular_velocity_ != 0 || linear_velocity_ != 0 )) { QPen pen; pen.setWidth( size/150 ); pen.setColor( Qt::darkRed ); pen.setCapStyle( Qt::RoundCap ); pen.setJoinStyle( Qt::RoundJoin ); painter.setPen( pen ); QPointF joystick[ 2 ]; joystick[ 0 ].setX( w/2 ); joystick[ 0 ].setY( h/2 ); joystick[ 1 ].setX( x_mouse_ ); joystick[ 1 ].setY( y_mouse_ ); painter.drawPolyline( joystick, 2 ); painter.drawEllipse( x_mouse_ - 10, y_mouse_ - 10, 20, 20 ); }}如果这个drive_widget启用了,且角速度或线速度有一个不为0的话,开始设置一个画笔,其中包括画笔的粗细、画笔的颜色、画笔端点风格等等。
PointF是一个平面点,它定义了一个joystick[2]的数组,里面存放两个点。这两个点就是我们操作时候它中心点和鼠标移动的点,并且通过drawPolyline把他们两个连在一起。
void DriveWidget::mouseMoveEvent( QMouseEvent* event ){ sendVelocitiesFromMouse( event->x(), event->y(), width(), height() );}这个写的就是鼠标事件了,就是捕获鼠标的坐标,传送速度。里面还使用了sendVelocitiesFromMouse函数。
void DriveWidget::sendVelocitiesFromMouse( int x, int y, int width, int height ){ int size = (( width > height ) ? height : width ); int hpad = ( width - size ) / 2; int vpad = ( height - size ) / 2; x_mouse_ = x; if ( x_mouse_ width / 2 + size / 2 ) x_mouse_ = width / 2 + size / 2; y_mouse_ = y; if ( y_mouse_ height / 2 + size / 2 ) y_mouse_ = height / 2 + size / 2; linear_velocity_ = (1.0 - float( y - vpad ) / float( size / 2 )) * linear_scale_; if ( linear_velocity_ 1.0 ) linear_velocity_ = 1.0; if ( fabs( linear_velocity_ ) < 0.1 ) linear_velocity_ = 0; angular_velocity_ = ( 1.0 - float( x - hpad ) / float( size / 2 )) * angular_scale_; if ( angular_velocity_ 1.0 ) angular_velocity_ = 1.0; mouse_pressed_ = true; Q_EMIT outputVelocity( linear_velocity_, angular_velocity_, mouse_pressed_ ); update();}看它传入的参数,int x ,int y 这个就是鼠标的坐标,可以从Qt的event里面获取到,int width,int height就是框住这个函数取到的鼠标有效移动位置范围。(或者确切的说应该是这个widget的范围。)
x_mouse_ = x; if ( x_mouse_ width / 2 + size / 2 ) x_mouse_ = width / 2 + size / 2; y_mouse_ = y; if ( y_mouse_ height / 2 + size / 2 ) y_mouse_ = height / 2 + size / 2;这一部分代码是限制x和y活动的范围。相当于把粉色区域的y值都屏蔽了。当然如果宽度大于高度,就相当于把一部分的x值屏蔽了。
再来看看和速度相关的内容:
linear_velocity_ = (1.0 - float( y - vpad ) / float( size / 2 )) * linear_scale_; if ( linear_velocity_ 1.0 ) linear_velocity_ = 1.0; if ( fabs( linear_velocity_ ) < 0.1 ) linear_velocity_ = 0; angular_velocity_ = ( 1.0 - float( x - hpad ) / float( size / 2 )) * angular_scale_; if ( angular_velocity_ 1.0 ) angular_velocity_ = 1.0;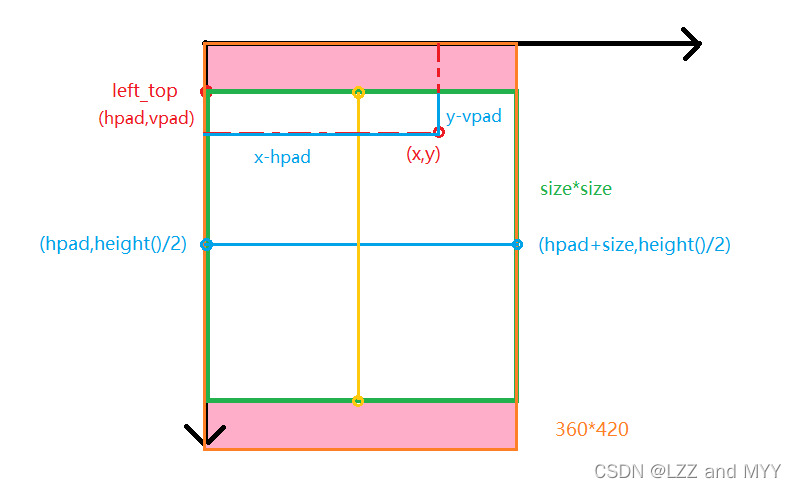
以这张图为例子,假定(x,y)为(200,100);那么linear_velocity_ = 0.609*linear_scale
(其实,我们可以反推,当速度为0的时候,y的值应该是1*179+30=209.5 和height()/2基本上一样的)速度被控制在-1到1之间。但是209.5显然不等于210对吧。这就意味着它会动。那怎么办呢?
他加了一句这个:
if ( fabs( linear_velocity_ ) < 0.1 ) linear_velocity_ = 0;只要速度小于0.1,那么速度就为0。这样既避免了误操作,也可以使得一定阈值内的动态承受度提高。比如初始y在210位置,linear_velocity_ =-0.002*linear_scale。当linear_scale=1时,它的fabs就小于0.1 默认它不动。
linear_velocity_ = (1.0 - float( 210 - 30 ) / float( 359 / 2 )) * linear_scale_接着看角速度的内容:
angular_velocity_ = ( 1.0 - float( x - hpad ) / float( size / 2 )) * angular_scale_; if ( angular_velocity_ 1.0 ) angular_velocity_ = 1.0;和上面基本上一样的,就不详细说了。补充一下一些Qt的知识:
http://t.csdn.cn/CVNn3![]() http://t.csdn.cn/CVNn3
http://t.csdn.cn/CVNn3
mousePressEvent函数和上面的mouseMoveEvent 内容是一样的。
void DriveWidget::leaveEvent( QEvent* event ){ stop();}我们来看一下鼠标离开的时候它是怎么操作的。调用了一个stop()
void DriveWidget::stop(){ linear_velocity_ = 0; angular_velocity_ = 0; mouse_pressed_ = false; Q_EMIT outputVelocity( linear_velocity_, angular_velocity_, mouse_pressed_ ); update();}把线速度和角速度都设为0,鼠标按压设置false。outputVelocity一次,然后更新。完事了。

