快速集成AppLinking服务-HarmonyOS平台
App Linking是一种支持Android、iOS、HarmonyOS、Web等多种平台的跳转链接,无论用户是否已经安装您的应用,App Linking都能够按照您指定的方式进行跳转。用户在Android、iOS或HarmonyOS设备上点击App Linking后,即可跳转到链接指定的内容。用户在PC端浏览器中打开相同的链接地址,也可以跳转到网站上的同等内容。
集成内容
通过HarmonyOS sdk插件集成AppLinking服务,在AGC控制台开启服务,添加一个链接前缀,同时端侧集成SDK调用生成长链接和短链接,分享链接至浏览器,展示分享的内容。
集成准备
1、安装DevEco Studio开发工具,并熟悉HarmonyOS应用的开发流程。
2、AGC创建工程并开通服务
a)在AGC创建HarmonyOS应用并开通验证服务。
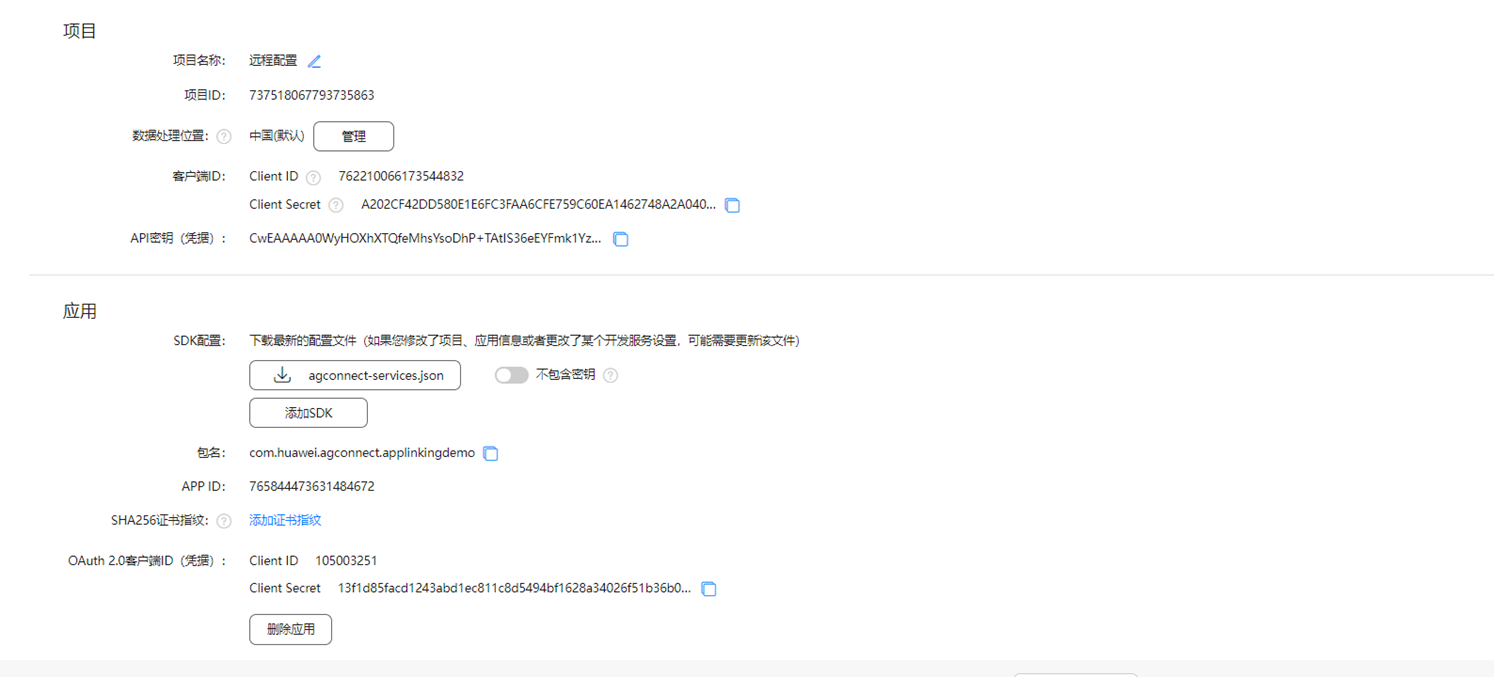

b)添加链接前缀

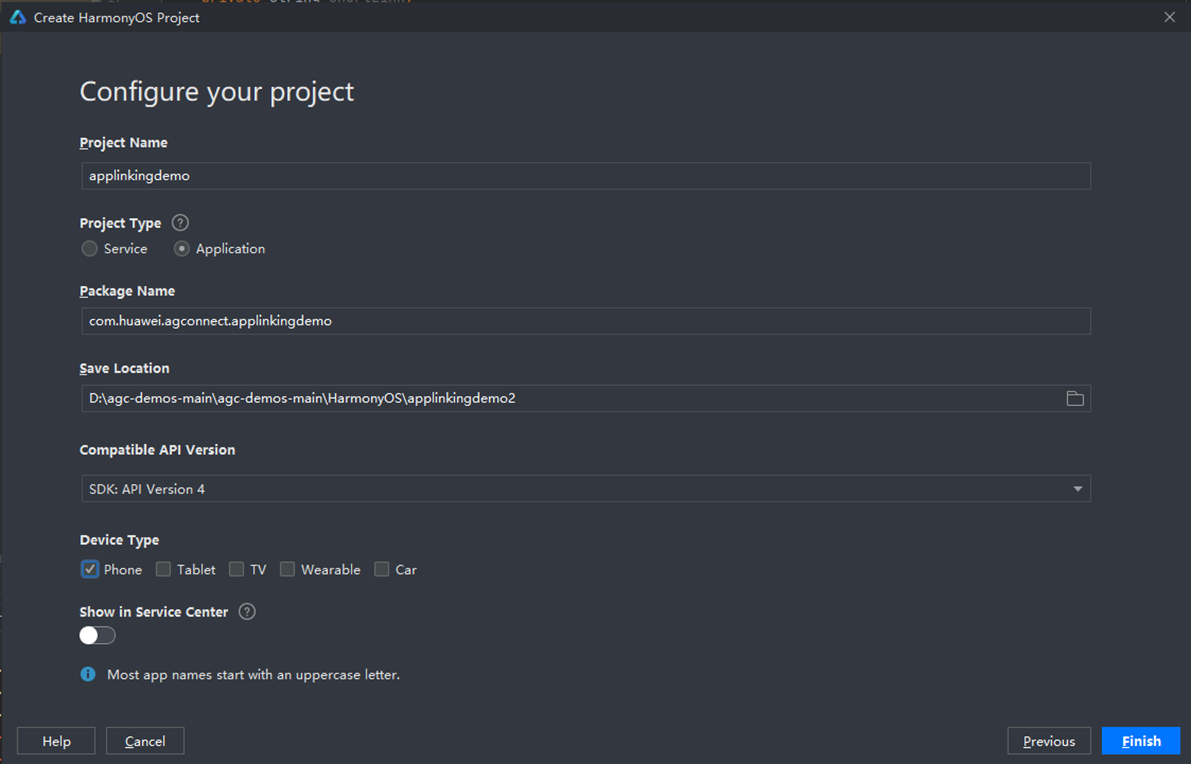
3、DevEco Studio中创建HarmonyOS工程
a)打开IDE工具,选择File-New-New project,选择Java语言编译模板后,点击Next进入创建工程配置界面。
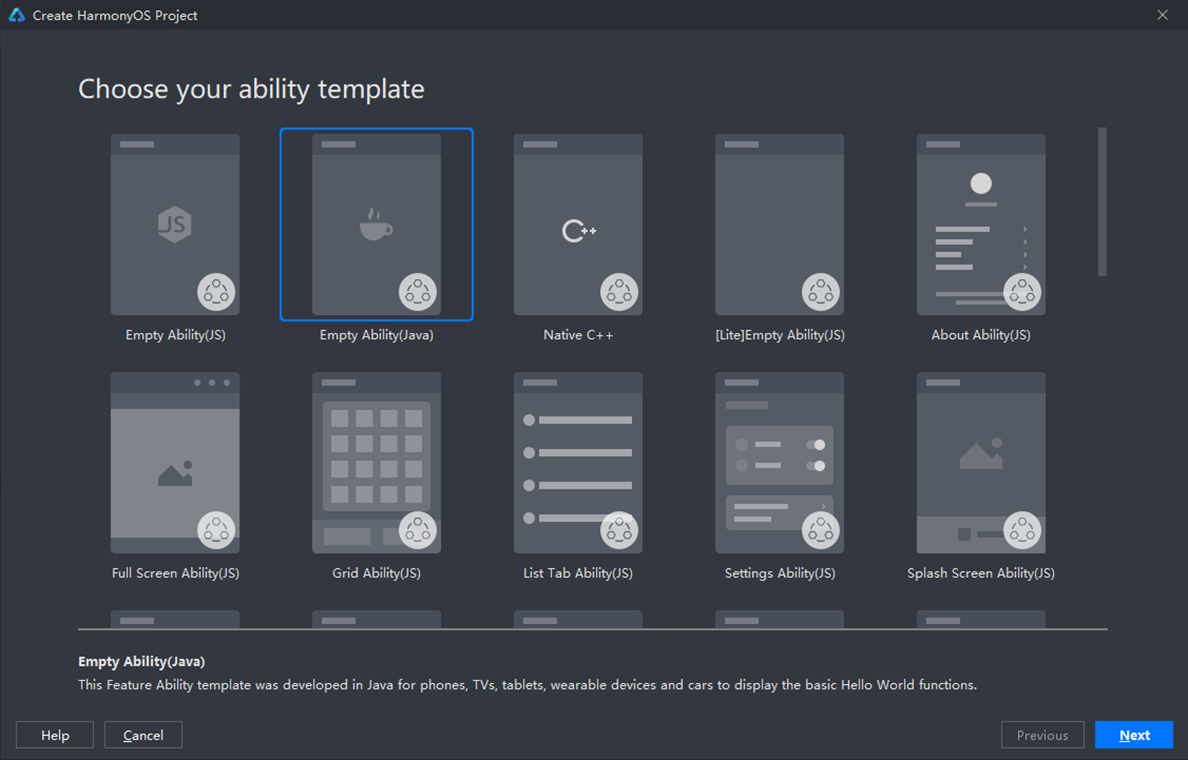
注意选择应用(Application),包名和AGC创建的应用包名相同。
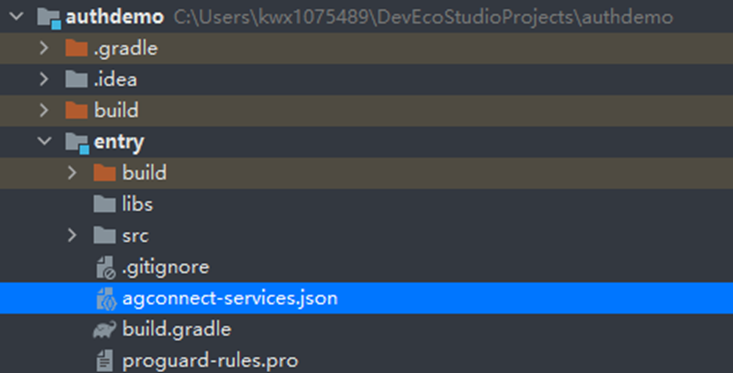
b)将agconnect-services.json文件拷贝到项目的entry模块的目录下
c)配置Maven仓地址和AGC插件地址。
打开DevEco Studio项目级build.gradle文件。
在allprojects ->repositories里面配置maven仓地址。
在buildscript->repositories中配置maven仓地址。
在buildscript->dependencies中配置AppGallery Connect插件地址。
测试环境需要配置内部私仓地址,正式环境需要配置外部正式仓。
buildscript { repositories { maven { url 'https://repo.huaweicloud.com/repository/maven/' } maven { url 'https://developer.huawei.com/repo/' } maven { url 'http://language.cloudartifact.dgg.dragon.tools.huawei.com/artifactory/product_maven' } maven { url 'http://szg1.artifactory.inhuawei.com/artifactory/sz-maven-public/' } jcenter() } dependencies { classpath 'com.huawei.ohos:hap:2.4.4.2' classpath 'com.huawei.ohos:decctest:1.2.4.0' classpath 'com.huawei.agconnect:agcp-harmony:1.2.0.200' }}allprojects { repositories { maven { url 'https://repo.huaweicloud.com/repository/maven/' } maven { url 'https://developer.huawei.com/repo/' } maven { url 'http://language.cloudartifact.dgg.dragon.tools.huawei.com/artifactory/product_maven' } maven { url 'http://szg1.artifactory.inhuawei.com/artifactory/sz-maven-public/' } jcenter() }}d)添加编译依赖和集成SDK。
打开HarmonyOS项目应用级(entry)的build.gradle文件,添加插件地址。
apply plugin: 'com.huawei.ohos.hap'apply plugin: 'com.huawei.ohos.decctest'apply plugin: 'com.huawei.agconnect'在“dependencies”中添加添加agconnect-core的编译依赖和AppLinking SDK。
dependencies { implementation fileTree(dir: 'libs', include: ['*.jar', '*.har']) implementation "com.huawei.agconnect:agconnect-applinking-harmony: 1.2.1.300" testImplementation 'junit:junit:4.13' ohosTestImplementation 'com.huawei.ohos.testkit:runner:1.0.0.100'}e)entry (hap)模块添加配置信息
enrty模块的config.json文件的module/abilities中,加入如下配置,注意包名的替换。
{ "permissions": [ "com.huawei.agconnect.core.DataAbilityShellProvider.PROVIDER" ], "name": "com.huawei.agconnect.core.provider.AGConnectInitializeAbility", "type": "data", "uri": "dataability://com.huawei.agconnect.applinkingdemo.AGConnectInitializeAbility"}f)同步工程配置。

4、配置签名信息。
Harmony应用安装到真机进行测试,需要配置签名信息,有手动签名和自动签名两种方式,具体可以参见:配置签名信息。建议优先使用自动签名方式,如自动签名失败,可以选择手动签名方式。这里使用自动签名方式:
a)连接真机设备,确保DevEco Studio与真机设备已连接,真机连接成功后如下图所示

b)进入File > Project Structure > Project > Signing Configs界面,点击“Sign In”按钮进行登录,选择Debug,勾选Automatically generate signing,点击try again即可自动进行签名。自动生成签名所需的密钥(.p12)、数字证书(.cer)和Profile文件(.p7b)会存放到用户user目录下的.ohos\config目录下。
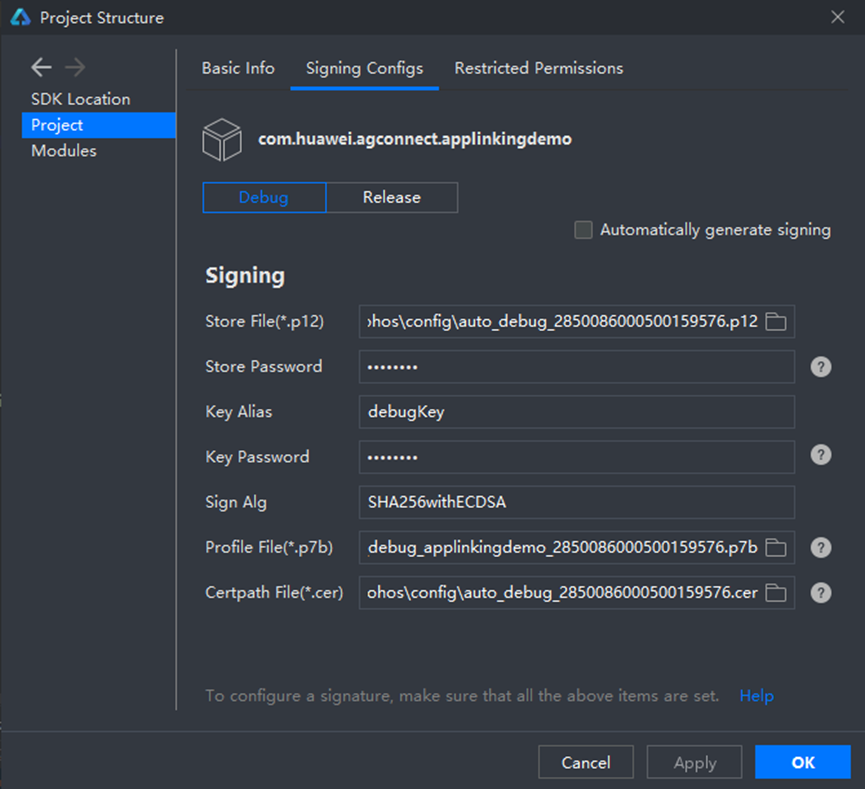
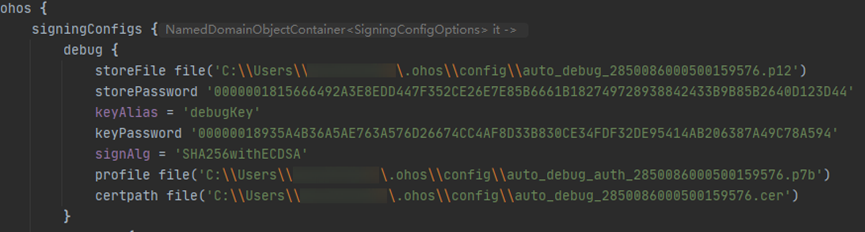
设置完签名信息后,点击OK进行保存,然后可以在工程下的build.gradle中查看签名的配置信息。
登录AGC,进入“用户与访问”-“证书管理”,点击新增证书,上传前面生成的.csr文件,类型选择调试证书。
完成签名配置后即可点击安装应用到调试设备。
功能实现
布局设计
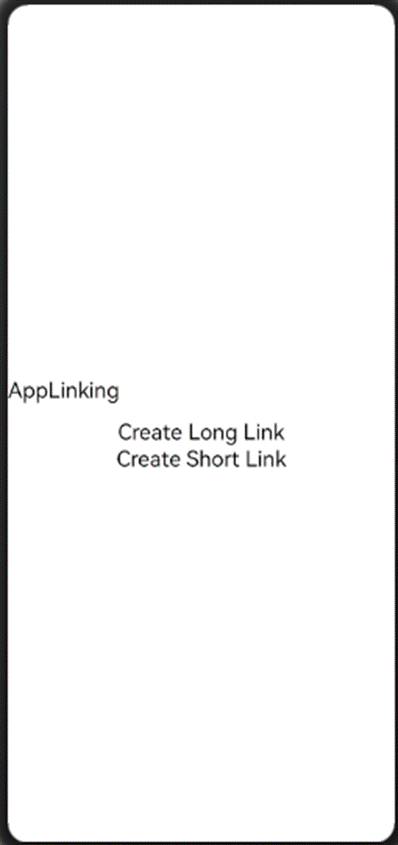
参考如上设置布局,一个Text,两个Button,按钮“Creat Long Link”用来创建长链接,按钮“Creat Short Link”用来创建短链接,布局代码如下:
创建链接
1、在onStart方法定义相关界面元素:
text = (Text) findComponentById(ResourceTable.Id_text_linking);Button createShort = (Button) findComponentById(ResourceTable.Id_button_createshort);createShort.setClickedListener(component -> { createShortLink();});Button createLong = (Button) findComponentById(ResourceTable.Id_button_createlong);createLong.setClickedListener(component -> { createLongLink();});2、初始化App Linking对象实例:
AGConnectAppLinking.getInstance().getAppLinking(getAbility()).addOnSuccessListener(resolvedLinkData -> { HiLog.info(LABEL, resolvedLinkData.getDeepLink());}).addOnFailureListener(e -> { HiLog.error(LABEL, e.toString());});3、创建App Linking:
AppLinking.Builder builder = AppLinking.newBuilder() .setUriPrefix(DOMAIN_URI_PREFIX) .setDeepLink("https://www.example.com") .setHarmonyLinkInfo(AppLinking.HarmonyLinkInfo.newBuilder() .setHarmonyDeepLink("agckit://example.com?appId=C5373&channelId=123412") .build()) .setCampaignInfo(AppLinking.CampaignInfo.newBuilder() .setName("xinnian") .setSource("huawei") .setMedium("pic").build()) .setIsShowPreview(true) .setPreviewType(AppLinking.LinkingPreviewType.AppInfo); builder.buildShortAppLinking().addOnSuccessListener(shortAppLinking -> { text.setText(shortAppLinking.getShortUrl()); }).addOnFailureListener(e -> { HiLog.error(LABEL, e.toString()); });接收链接
接收AppLinking:
1、在Ability里面的skills添加对应的内容
"skills": [ { "entities": [ "entity.system.home" ], "actions": [ "action.system.home" ] }, { "actions": [ "android.intent.action.VIEW" ], "entities": [ "entity.system.default", "entity.system.browsable" ], "uris": [ { "scheme": "agckit", "host": "example.com" } ] }]2、配置接收的代码:
AGConnectAppLinking.getInstance().getAppLinking(this).addOnSuccessListener(resolvedLinkData -> { Uri deepLink = null; if (resolvedLinkData!= null) { deepLink = resolvedLinkData.getDeepLink(); String LinkInfo = deepLink.toString(); HiLog.info(hiLogLabel,"getAppLinking success: " + LinkInfo); }}功能测试
完成上述配置以后,即可点击运行进行测试。复制链接至浏览器可以正确拉起HarmonyOS应用。

欲了解更多更全技术文章,欢迎访问https://developer.huawei.com/consumer/cn/forum/?ha_source=zzh

