SpringBoot中的异常处理
SpringBoot异常处理
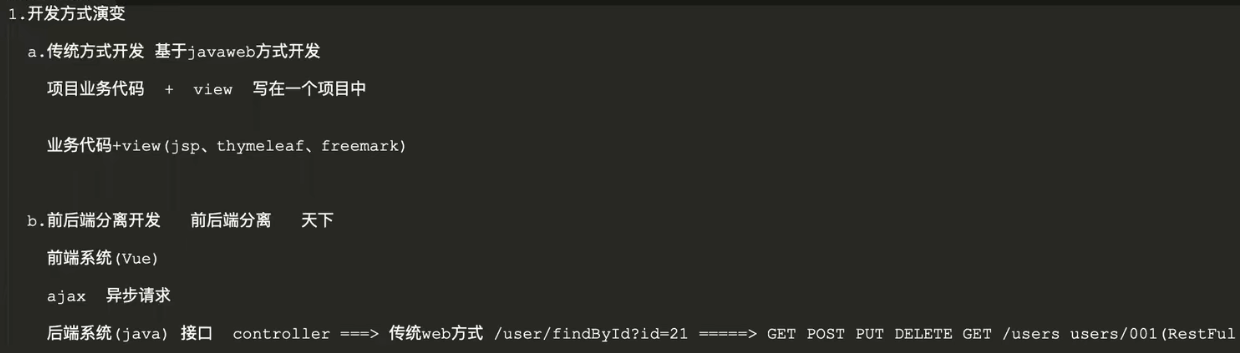
开发方式有两种
- 一种是传统方式的开发,是基于javaweb方法的开发,将业务代码和view写在一个项目中
- 还有一种是前后端分离开发,前端和后端是分开的,后端只需要写接口就可以
毫无疑问,前后端分离开发实现了前端和后端的解耦,相较于传统的开发方式前后端分离开发还有许许多多大的好处,可以想象的是以后一定是前后端分离开发的天下。
本篇的SpringBoot中的异常处理机制也会基于传统方式开发和前后端分离开发两种类型进行说明。
1.1 传统javaweb开发时的异常处理
-
为什么会出现异常处理机制
- 在处理用户请求出现运行时异常时直接响应给用户的是一个错误界面,对于用户的使用体验不友好
-
什么是全局异常处理机制
- 用来解决整个系统中任意一个控制器抛出异常时的统一处理入口
-
如何使用全局异常处理
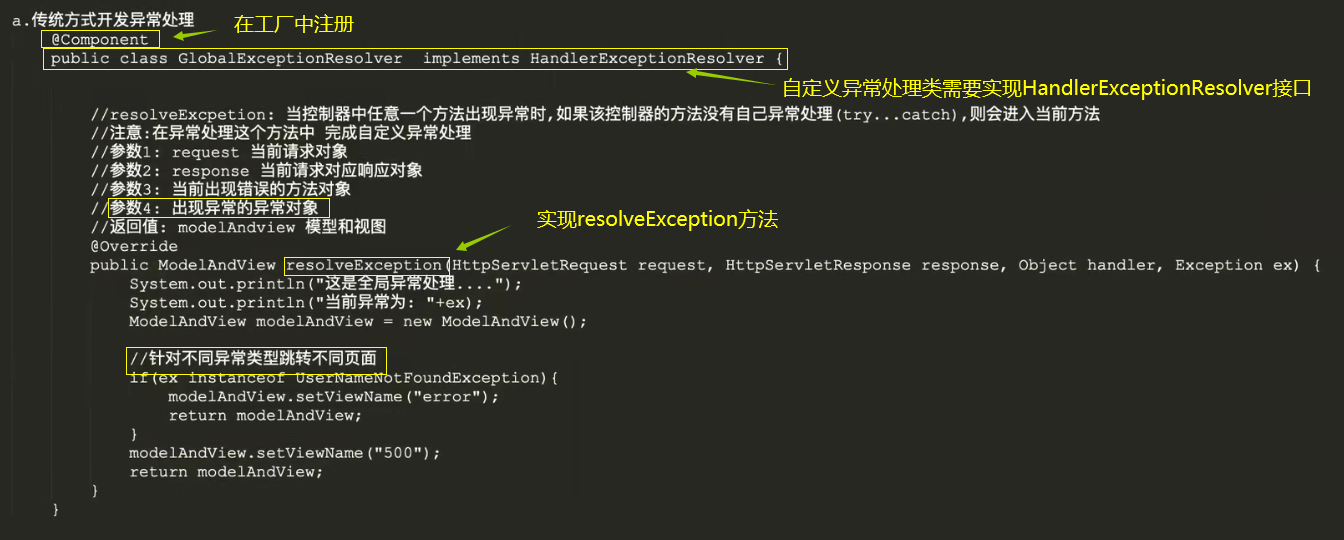
- 类 implements HandlerExceptionResolver,之后重写接口中的resolveException方法
-
使用全局异常处理机制的好处
- 可以带给用户相对较好的用户体验
- 如果在每一个controller方法中进行try…catch进行异常处理,会造成代码的冗余,而使用异常处理机制为所有controller方法出现异常时提供一个统一的处理入口,解决了代码的冗余问题,而且在一定程度上还实现了解耦,将异常处理与实际业务方法进行了解耦
- 可以根据不同的异常类型跳转到不同的页面
SpringBoot集合了SpringMVC和Spring的优势,其实SpringBoot的异常处理机制只是沿用了SpringMVC的异常处理机制,以前写过一篇关于SpringMVC的异常处理机制,阅读之后相信你会对异常处理机制有一个大致的了解。
SpringMVC中的拦截器和全局异常处理
接下来我们来使用一个SpringBoot在传统方式(javaweb)中的异常处理
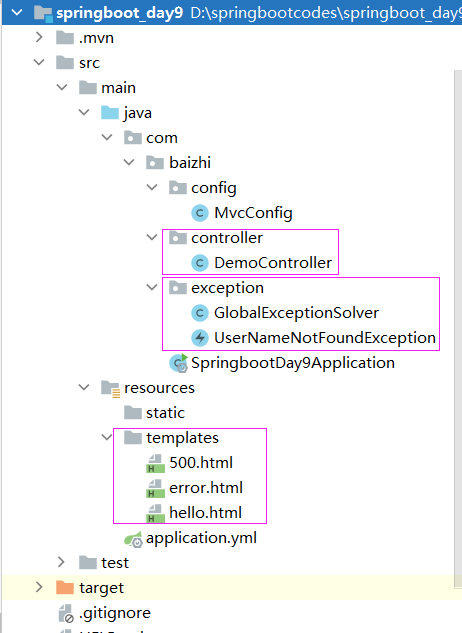
用到的包结构
- 引入依赖
我们使用themeleaf,所以要导入themeleaf依赖,并且在配置文件中配置一下themeleaf的模板目录和模板后缀
<dependency> <groupId>org.springframework.boot</groupId> <artifactId>spring-boot-starter-thymeleaf</artifactId></dependency>application.yml
spring: thymeleaf: prefix: classpath:/templates/ # 指定thymeleaf模板前缀目录 suffix: .html # 指定模板的后缀 cache: false # 是否开启thymeleaf缓存,默认为true是开启的,在开发过程中建议 # 关了
- application.yml配置文件
server: port: 8081# 设置项目端口号spring: thymeleaf: prefix: classpath:/templates/ # 指定thymeleaf模板前缀目录 suffix: .html # 指定模板的后缀 cache: false # 是否开启thymeleaf缓存,默认为true是开启的,在开发过程中建议 # 关了
- 用到的themeleaf模板
注意:在使用themeleaf时需要将html文件的
<html lang="en">修改为
<html lang="en" xmlns:th="http://www.thymeleaf.org">hello.html
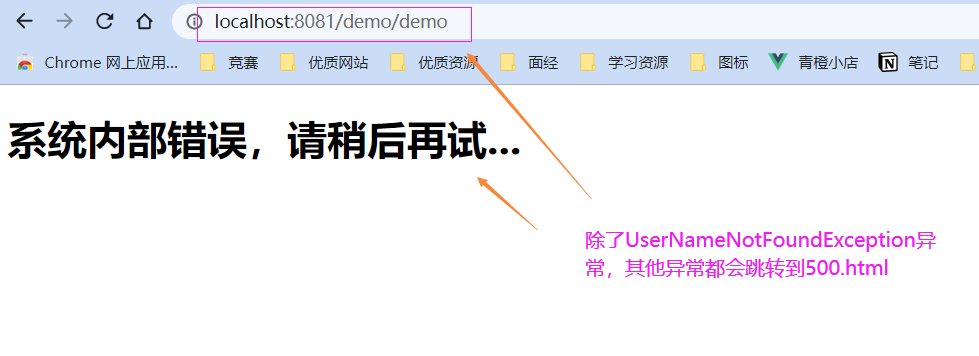
<!DOCTYPE html><html lang="en" xmlns:th="http://www.thymeleaf.org"><head> <meta charset="UTF-8"> <title>hello html</title></head><body> <h1>hello springboot</h1></body></html>500.html
<!DOCTYPE html><html lang="en" xmlns:th="http://www.thymeleaf.org"><head> <meta charset="UTF-8"> <title>hello html</title></head><body> <h1>系统内部错误,请稍后再试...</h1></body></html>error.html
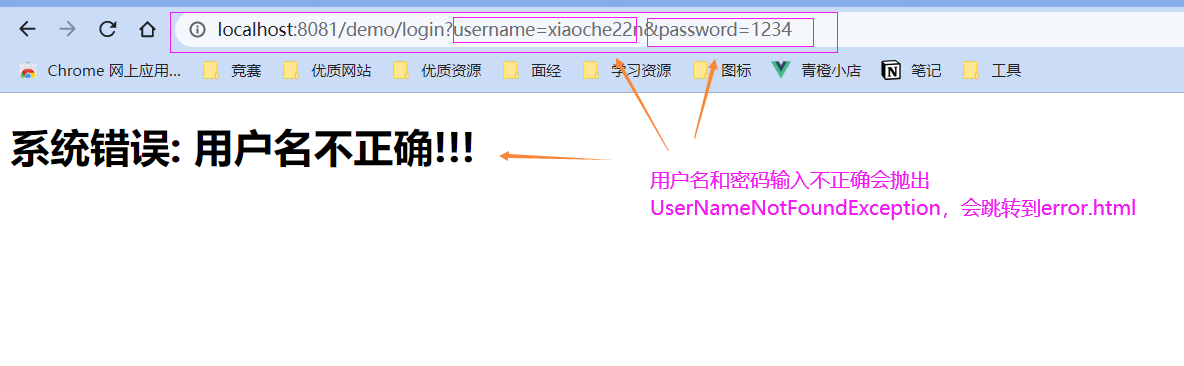
<!DOCTYPE html><html lang="en" xmlns:th="http://www.thymeleaf.org"><head> <meta charset="UTF-8"> <title>hello html</title></head><body> <h1>系统错误: 用户名不正确!!!</h1></body></html>
- 开发一个自定义异常类
// 自定义 用户名不存在异常public class UserNameNotFoundException extends RuntimeException{ public UserNameNotFoundException(String message) { super(message); }}
- 开发controller
@Controller@RequestMapping("demo")public class DemoController { @RequestMapping("demo") public String demo(){ System.out.println("demo ok ..."); int n = 1 / 0;// 除0异常 return "hello"; } @RequestMapping("login") public String login(String username, String password){ System.out.println("login ..."); System.out.println("username: " + username); System.out.println("password: " + password); if("xiaochen".equals(username) && "123".equals(password)){ return "hello"; }else { throw new UserNameNotFoundException("用户名不正确!!"); //如果输入信息错误会抛出UserNameNotFoundException } }}
- 开发异常处理类
@Component // 在工厂中创建这个类的对象public class GlobalExceptionSolver implements HandlerExceptionResolver { // resolveException: 当控制器中任意一个方法出现异常时 如果该控制器的方法没有自己异常处理(try...catch),则会进入当前方法 // 在异常处理这个方法中,可以完成自定义的异常处理 // 参数1: 当前请求对象 // 参数2: 当前请求对应的响应对象 // 参数3: 当前方法对象 // 参数4: 出现异常时的异常对象 // 返回值: ModelAndView 模型和视图 @Override public ModelAndView resolveException(HttpServletRequest httpServletRequest, HttpServletResponse httpServletResponse, Object o, Exception e) { System.out.println("这是全局异常处理...."); System.out.println("当前异常为: " + e); ModelAndView modelAndView = new ModelAndView(); // 根据不同的异常类型跳转到不同的页面 if(e instanceof UserNameNotFoundException){ modelAndView.setViewName("error"); return modelAndView; } modelAndView.setViewName("500"); // 跳转到 500.html 这个页面 return modelAndView; }}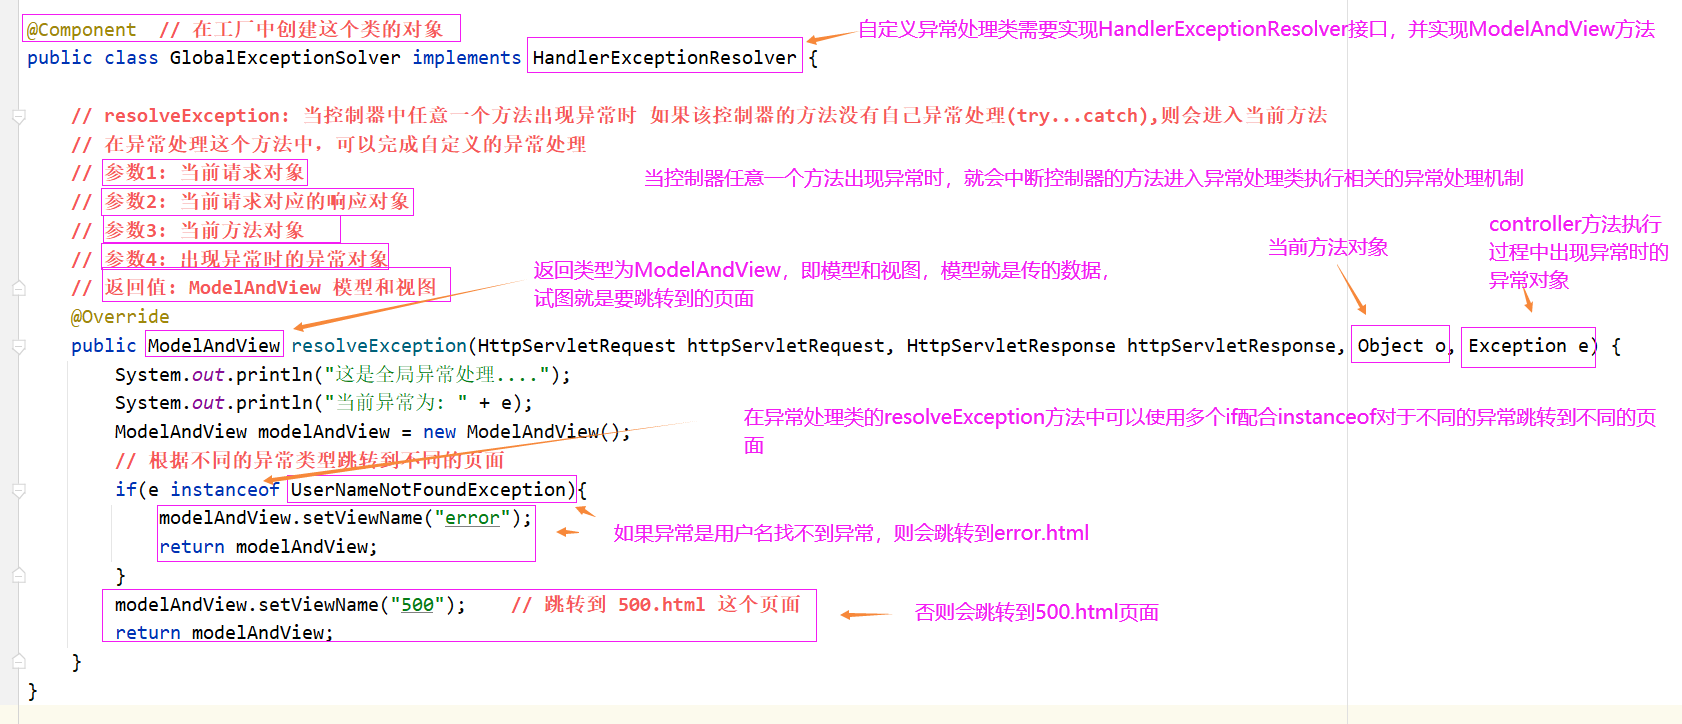
- 测试
1.2 前后端分离开发时的异常处理
因为前面已经提到过了异常处理机制的概念,所以我们直接进行开发前后端分离时的异常处理的操作
用到的包结构
- 先自定义一个异常类
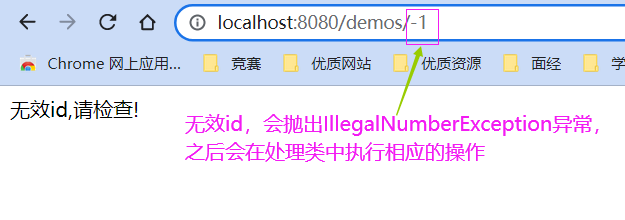
// 自定义异常类非法数字异常public class IllegalNumberException extends RuntimeException{ public IllegalNumberException(String message) { super(message); }}
- 开发controller
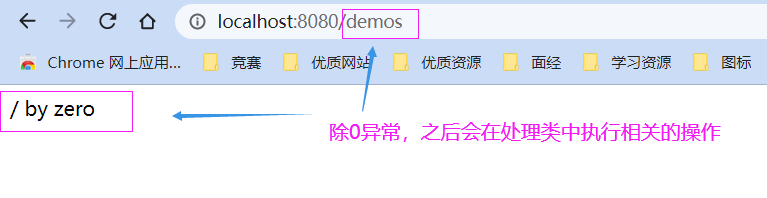
@RestController@RequestMapping("demos")public class DemoController { @GetMapping public ResponseEntity<String> demo(){ System.out.println("demo ok"); int n = 1/0; return new ResponseEntity<>("demook", HttpStatus.OK); } @GetMapping("/{id}") public ResponseEntity<String> demo1(@PathVariable("id") Integer id){ System.out.println("demo ok " + id); if(id < 0) throw new IllegalNumberException("无效id,请检查!"); return new ResponseEntity<>("demo ok", HttpStatus.OK); }}
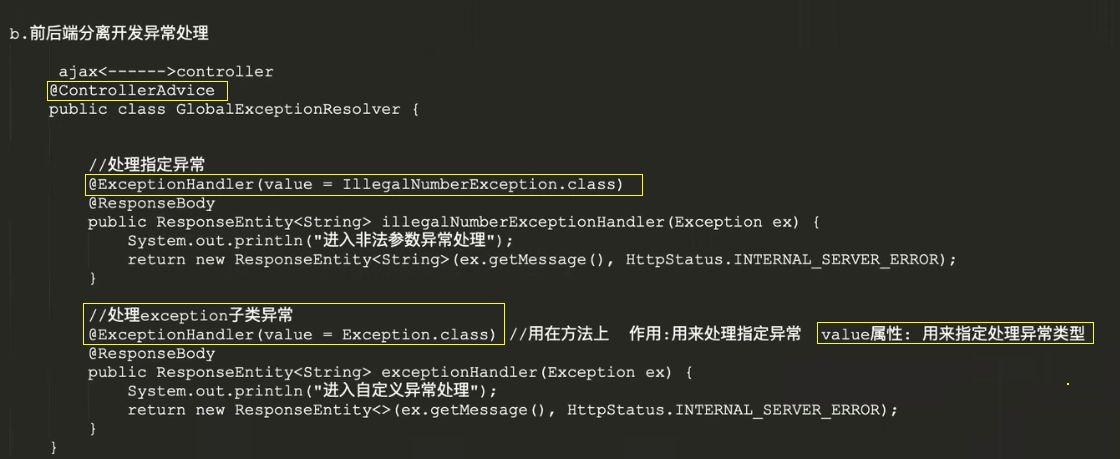
- 开发异常处理类
@ControllerAdvice// 这个注解应用于类上,表示这个类中的方法应用于全局所有controller,这个注解有一个value属性,默认// 作用于所有controller// 如果不想作用于所有controller,可以在value属性上指定哪些包可以用public class GlobalExceptionResolver { // 处理自定义异常 @ExceptionHandler(IllegalNumberException.class) @ResponseBody public ResponseEntity<String> illegalNumberExceptionHandler(Exception e){ // 方法名随便,不过为了望文生意,一般就取为exceptionHandler System.out.println("进入非法参数异常处理"); return new ResponseEntity<>(e.getMessage(), HttpStatus.INTERNAL_SERVER_ERROR); } // 处理Exception及其子类异常(几乎就是所有异常了) @ExceptionHandler(Exception.class) // 用在方法上 作用:用来处理指定异常 value属性: 用来处理指定异常类型 // 写Exception.class就是把Exception及其所有子类异常都处理了 @ResponseBody // 将方法的返回值以json的格式返回 public ResponseEntity<String> exceptionHandler(Exception e){ // 方法名随便,不过为了望文生意,一般就取为exceptionHandler System.out.println("进入自定义异常处理"); return new ResponseEntity<>(e.getMessage(), HttpStatus.INTERNAL_SERVER_ERROR); //服务器内部错误 }}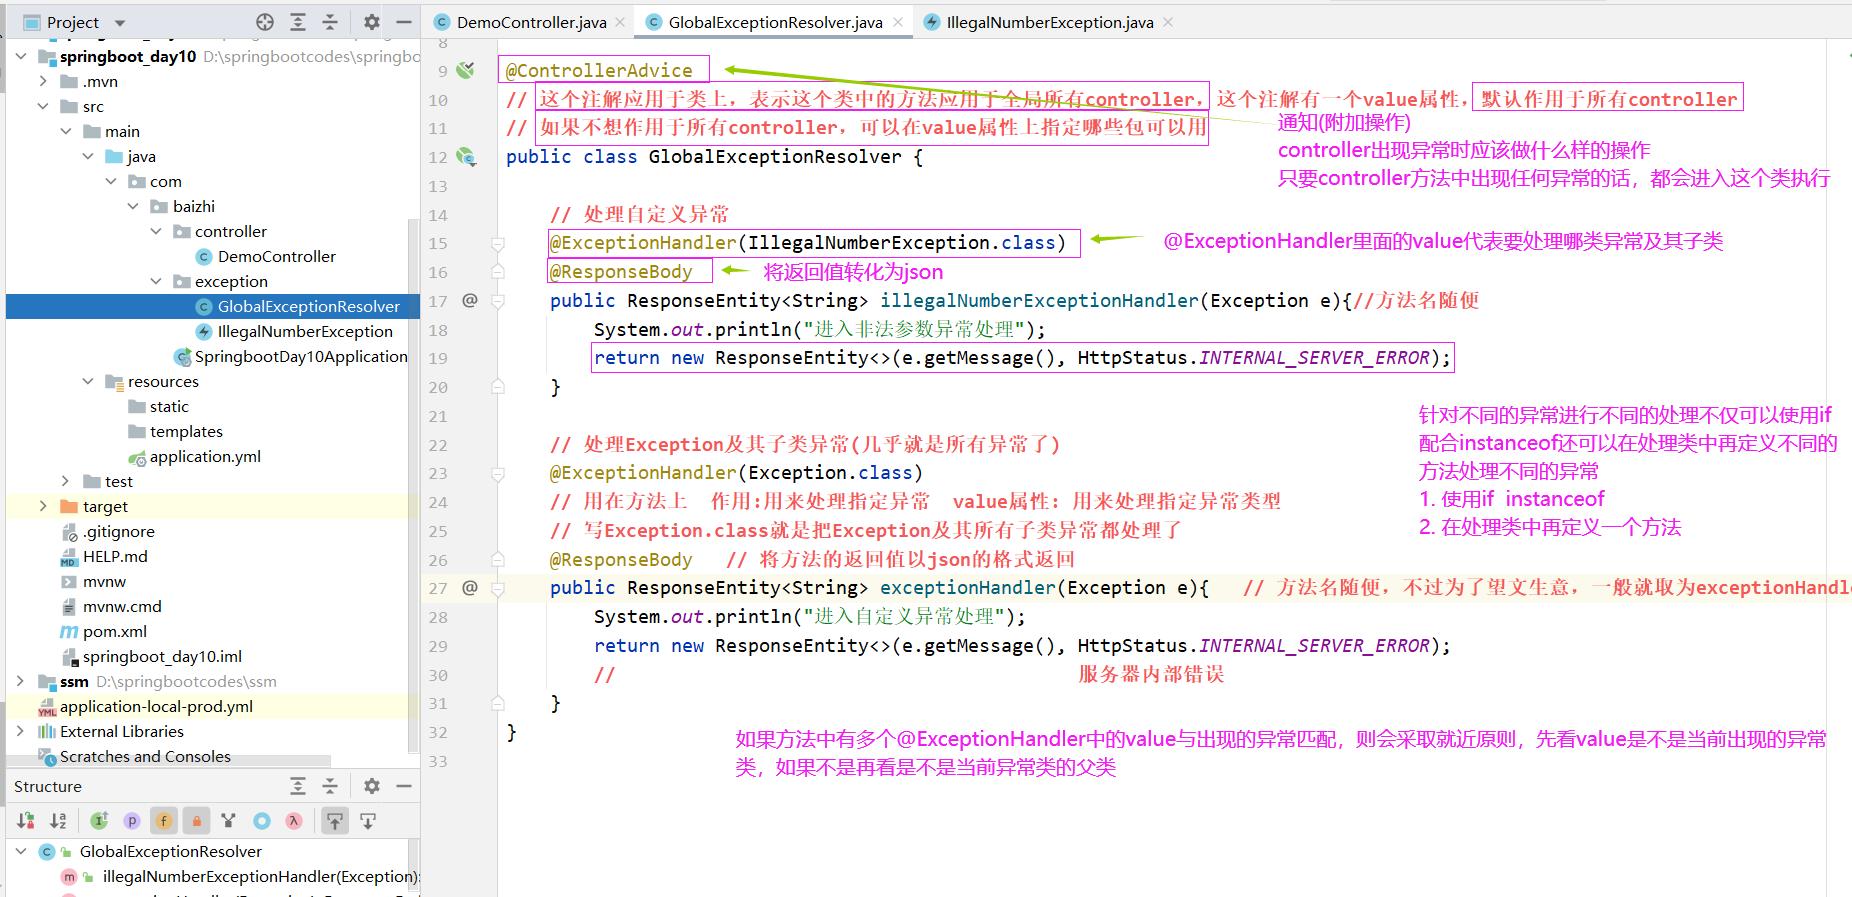
- 测试