浅谈Netty
在学习Netty之前,建议大家先学习一下NIO的相关知识哈😀
传送门🚪 NIO的理解和使用
文章目录
-
-
- 一、介绍
- 二、服务端案例
- 三、常见类
- 四、源码分析
-
- 🏝️服务端的初始化过程
- 🏝️下面我们来看看Netty的NIO线程是怎么监听事件的
- 五、小总结
-
一、介绍
Netty是一个异步事件驱动的网络应用框架,用于快速开发可维护的高性能协议服务器和客户端,简单来说,就是用于网络编程的底层框架,向TCP、UDP的通信,或者项目中使用到的RPC框架,如:dubbo等都是使用的Netty作为底层框架
在学习Netty之前,我们要想一下为什么要学习Netty呢?我的回答是
- 可以更好的理解NIO
- 了解到多路复用的思想
- 学习到优秀的设计模式
- 为网络编程打下良好的基础
二、服务端案例
我们来看一下Netty的服务端简单实现吧😇
public class TestServer { public static void main(String[] args) { // 1. 启动器,负责组装 netty 组件,启动服务器 new ServerBootstrap() // 2. BossEventLoop, WorkerEventLoop(selector,thread), group 组 .group(new NioEventLoopGroup()) // 3. 选择 服务器的 ServerSocketChannel 实现 .channel(NioServerSocketChannel.class) // OIO BIO // 4. boss 负责处理连接 worker(child) 负责处理读写,决定了 worker(child) 能执行哪些操作(handler) .childHandler( // 5. channel 代表和客户端进行数据读写的通道 Initializer 初始化,负责添加别的 handler new ChannelInitializer<NioSocketChannel>() {@Overrideprotected void initChannel(NioSocketChannel ch) throws Exception { // 6. 添加具体 handler ch.pipeline().addLast(new LoggingHandler()); ch.pipeline ().addLast(new StringDecoder()); // 将 ByteBuf 转换为字符串 ch.pipeline().addLast(new ChannelInboundHandlerAdapter() { // 自定义 handler @Override // 读事件 public void channelRead(ChannelHandlerContext ctx, Object msg) throws Exception { System.out.println(msg); // 打印上一步转换好的字符串 } });} }) // 7. 绑定监听端口 .bind(8080); }}就这十几行代码,就能够实现服务端且异步的多路复用,简单高效。我们先来解读一下这些代码
- 创建的入口是ServerBootstrap类,它是Netty的启动类其实就是包装了Netty的属性配置、子处理器、子组别等等。
- gourp组别表示创建的线程池类型,Netty中的线程池顶层接口是EventExecutorGroup,它继承了ScheduledExecutorService。
- channel表示创建的通道类型。
- childHandler是Netty的子处理器,这里有子,必然有父,那父子都是干嘛的呢?父负责的是Accept接收任务,读写任务由子处理。
- 在initChannel中有多个pipeline,这些pipeline就是具体的执行逻辑,之间的通信靠ChannelHandlerContext全局对象来传递。
三、常见类
在源码分析Netty之间,我们先来看看Netty中的比较重要的类
🌍Future
public interface Future<V> extends java.util.concurrent.Future<V> {...Future<V> addListener(GenericFutureListener<? extends Future<? super V>> listener);Future<V> sync() throws InterruptedException;...}可以看到,Netty中的Future继承了Java的Future,并多了一些同步和异步的方法,其实就是对java的Future的封装,以满足Netty的业务需求。
🌍Promise
public interface Promise<V> extends Future<V> Promise继承了Future ,也可以当成一个异步接收对象。
🌍ChannelFuture
public interface ChannelFuture extends Future<Void> {}继承了Future重写了方法以满足Channel通道上的异步结果的接收。
🌍 EventLoopGroup
public interface EventLoopGroup extends EventExecutorGroup {...@Override EventLoop next(); ChannelFuture register(Channel channel); ...}是Netty中线程池的抽象类
🌍EventLoop
public interface EventLoop extends OrderedEventExecutor, EventLoopGroup { @Override EventLoopGroup parent();}EventLoop可以处理所有的I/O操作。一个EventLoop 实例将处理多个channel。其实就是Netty中多路复用器的接口,具体的多路复用器实现这个接口,比如NioEventLoop。
🌍ChannelPipeline
public interface ChannelPipeline extends ChannelInboundInvoker, ChannelOutboundInvoker, Iterable<Entry<String, ChannelHandler>>它是各种入栈出栈处理器的集合。
ChannelInboundInvoker就是对应的入栈,可以理解为是读操作的handle。
ChannelOutboundInvoker对应的出栈,理解为是写操作的handle。
四、源码分析
下面我们来跟着源码来分析Netty
🏝️服务端的初始化过程
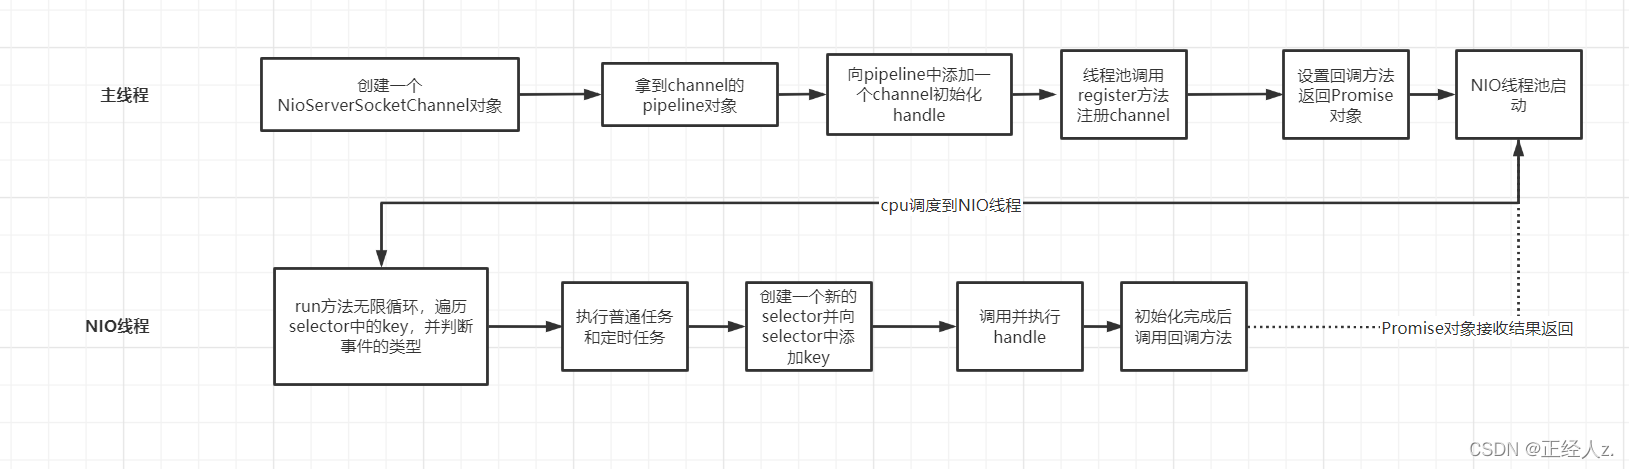
⛰️体现了Netty的异步策略的代码如下
在init方法中
ch.eventLoop().execute(new Runnable() { @Override public void run() { pipeline.addLast(new ServerBootstrapAcceptor( ch, currentChildGroup, currentChildHandler, currentChildOptions, currentChildAttrs)); } });init方法在主线程中执行,使用了线程池的executre方法,也就是使用NIO线程来执行这个任务,当然,在此时NIO线程还未开启,所以,这个任务被放入到了Queue任务队列中。
private void doStartThread() { assert thread == null; executor.execute(new Runnable() { @Override public void run() { thread = Thread.currentThread(); if (interrupted) { thread.interrupt(); } boolean success = false; updateLastExecutionTime(); try { SingleThreadEventExecutor.this.run(); success = true; ...}这里开启了NIO的线程池,开始去处理任务和监听io事件。
🏝️下面我们来看看Netty的NIO线程是怎么监听事件的
看看关键代码吧😊
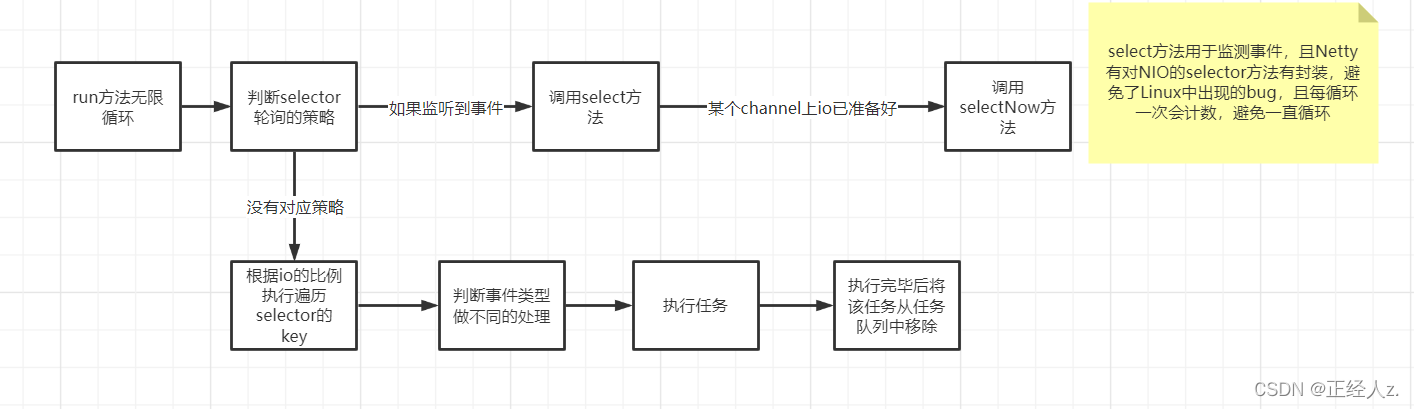
protected void run() { for (;;) { try { try { switch (selectStrategy.calculateStrategy(selectNowSupplier, hasTasks())) { case SelectStrategy.CONTINUE: continue; case SelectStrategy.BUSY_WAIT: case SelectStrategy.SELECT: select(wakenUp.getAndSet(false)); if (wakenUp.get()) {selector.wakeup(); } default: } } catch (IOException e) { rebuildSelector0(); handleLoopException(e); continue; } cancelledKeys = 0; needsToSelectAgain = false; final int ioRatio = this.ioRatio; if (ioRatio == 100) { try { processSelectedKeys(); } finally { runAllTasks(); } } else { final long ioStartTime = System.nanoTime(); try { processSelectedKeys(); } finally { final long ioTime = System.nanoTime() - ioStartTime; runAllTasks(ioTime * (100 - ioRatio) / ioRatio);....⚠️需要注意的点
- 这里是由NIO的线程执行的且无限循环
- ioRatio 是io的比例,也就是执行select监测方法和执行任务的比例。默认是1:1
下面来看看select方法
private void select(boolean oldWakenUp) throws IOException { ..... Selector selector = this.selector; if (......) { selector.selectNow(); } selectCnt ++; selector = selectRebuildSelector(selectCnt); .....}⚠️注意几点
- 这个方法重构了selector,避免了在Linux环境下出现的轮询bug
- 引入了计数器和阈值,避免一直循环
- 当某些条件成立判断channel中有可读数据时,调用selectNow方法
下面来看看服务端监听读事件并处理的过程
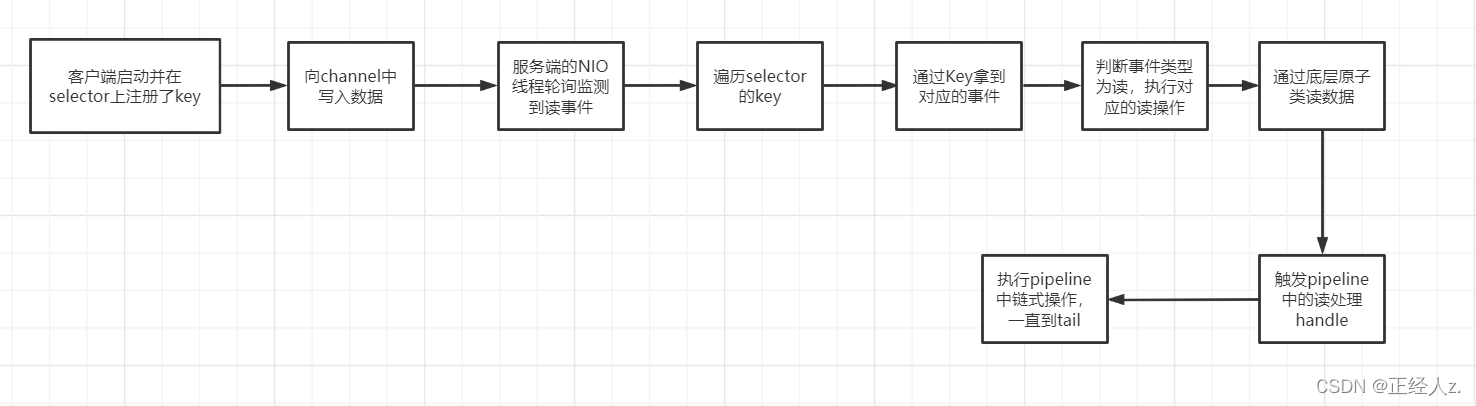
⛰️关键的代码有
if ((readyOps & (SelectionKey.OP_READ | SelectionKey.OP_ACCEPT)) != 0 || readyOps == 0) { unsafe.read(); }public void read() { assert eventLoop().inEventLoop(); final ChannelConfig config = config(); final ChannelPipeline pipeline = pipeline(); final RecvByteBufAllocator.Handle allocHandle = unsafe().recvBufAllocHandle(); allocHandle.reset(config); boolean closed = false; Throwable exception = null; try { try { do { int localRead = doReadMessages(readBuf); if (localRead == 0) {break; } if (localRead < 0) {closed = true;break; } allocHandle.incMessagesRead(localRead); } while (allocHandle.continueReading()); } catch (Throwable t) { exception = t; } int size = readBuf.size(); for (int i = 0; i < size; i ++) { readPending = false; pipeline.fireChannelRead(readBuf.get(i)); } readBuf.clear(); allocHandle.readComplete(); pipeline.fireChannelReadComplete(); ....🚩需要知道的是
- 读操作也是通过底层原子类unsafe来设置缓冲区buf的大小
- 将读取的数据放入buf中,然后再遍历buf,pipeline中读处理器一个字节一个字节的读取处理,当buf全部读取完毕,则调用回调方法通知。
五、小总结
- Netty中使用了很多的异步处理方法,形如addListener等字样的代码都是异步,异步的意思是当前线程创建任务,由其他的线程去执行这个任务,当某个时间完成了这个任务,则回调方法返回异步结果对象。
- Netty中封装了线程池和Future等,在继承的基础上添加了很多异步和同步的处理方法。
- Netty使用了ioRatio属性很好的权衡了io处理和任务处理的执行比例。
- Netty使用重构的方式将NIO原生的selector重构,避免了在Linux中select轮询的bug。

