JavaScript(五)-- PC 端网页特效
1. 元素偏移量 offset 系列
1.1 offset 概述
offset 翻译过来就是偏移量,我们使用 offset 系列相关属性可以动态的得到该元素的位置( 偏移 )、大小等。
● 获得元素距离带有定位父元素的位置
● 获得元素自身的大小( 宽度高度 )
● 注意:返回的数值都不带单位
offset 系列常用属性:

// offset 系列 var father = document.querySelector('.father'); var son =document.querySelector('.son'); var w =document.querySelector('.w'); // 1. 可以得到元素的偏移 位置 返回的不带单位的数值 console.log(father.offsetTop); // 100 console.log(father.offsetLeft); // 100 // 它以带有定位的父亲为准﹑如果么有父亲或者父亲没有定位则以 body为准 console.log(son.offsetLeft); // 145 45 // 2. 可以得到元素的 大小 宽度 和 高度 是包含 padding + border + width console.log(w.offsetWidth); // 200 console.log(w.offsetHeight); // 200 // 3. 返回带有定位的父亲 否则返回的是body console.log(son.offsetParent); // 返回带有定位的父亲 否则返回的是body console.log(son.parentNode); // 返回父亲是最近一级的父亲 亲爸爸 不管父亲有没有定位 1.2 offset 与 style 区别

Document .box { width: 200px; height: 200px; background-color: pink; padding: 20px; } // offset 与 style 区别 var box = document.querySelector('.box'); console.log(box.offsetWidth); console.log(box.style.width); // box.offsetWidth = '300px'; box.style.width = '300px'; 案例:获取鼠标在盒子内的坐标
案例分析
① 我们在盒子内点击,想要得到鼠标距离盒子左右的距离。
② 首先得到鼠标在页面中的坐标( e.pageX, e.pageY )
③ 其次得到盒子在页面中的距离( box.offsetLeft, box.offsetTop)
④ 用鼠标距离页面的坐标减去盒子在页面中的距离,得到鼠标在盒子内的坐标
⑤ 如果想要移动一下鼠标,就要获取最新的坐标,使用鼠标移动事件 mousemove
Document .box { width: 300px; height: 300px; background-color: pink; margin: 200px; } // 我们在盒子内点击,想要得到鼠标距离盒子左右的距离。 // 首先得到鼠标在页面中的坐标( e.pagex,e.pageY) // 其次得到盒子在页面中的距离(box.offsetLeft, box.offsetTop) // 用鼠标距离页面的坐标减去盒子在页面中的距离,得到鼠标在盒子内的坐标 var box =document.querySelector('.box'); box.addEventListener('mousemove', function(e) { // console.log(e.pageX); // console.log(e.pageY); // console.log(box.offsetLeft); // console.log(box.offsetTop); var x = e.pageX - box.offsetLeft; // console.log(x); var y = e.pageY - box.offsetTop; // console.log(y); this.innerHTML = 'x坐标是:' + x + ' y坐标是:' + y; }) 案例:模态框拖拽
弹出框,我们也称为模态框。
1.点击弹出层,会弹出模态框,并且显示灰色半透明的遮挡层。
2.点击关闭按钮,可以关闭模态框,并且同时关闭灰色半透明遮挡层。
3.鼠标放到模态框最上面一行,可以按住鼠标拖拽模态框在页面中移动。
4.鼠标松开,可以停止拖动模态框移动。
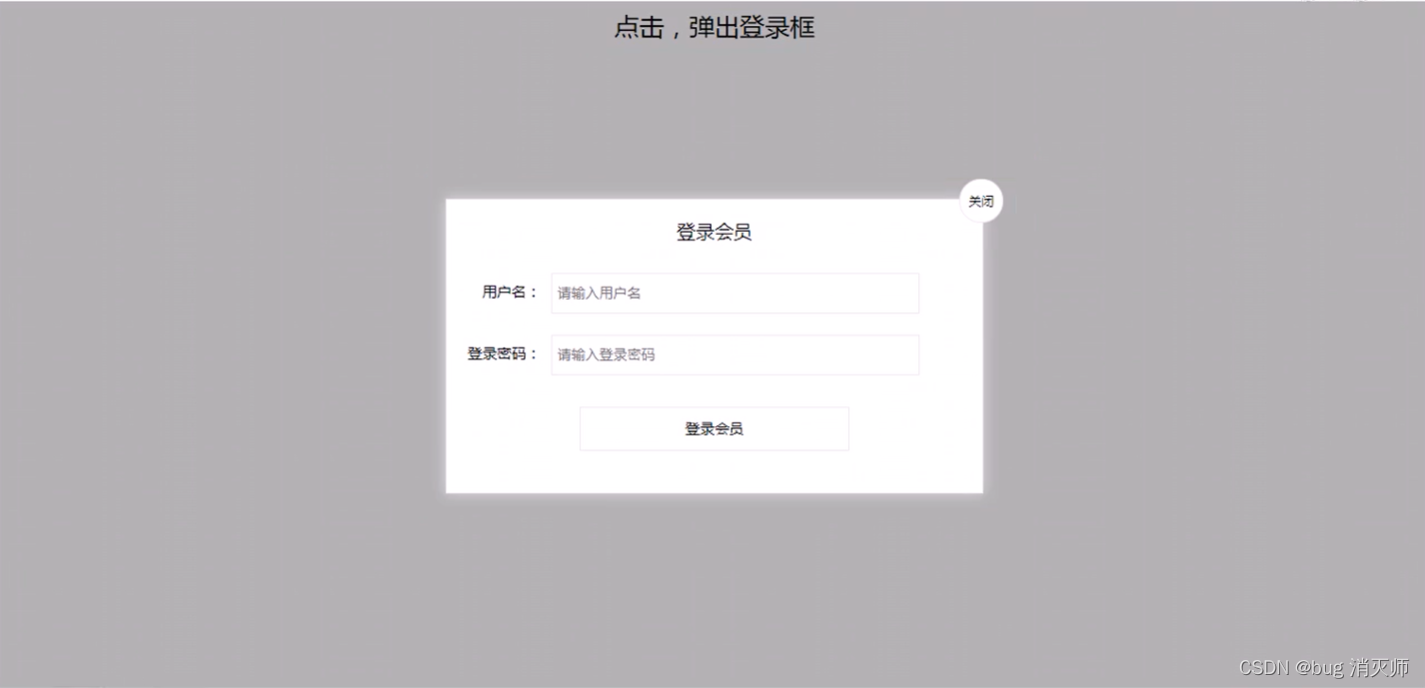
案例分析
① 点击弹出层,模态框和遮挡层就会显示出来 display:block;
② 点击关闭按钮,模态框和遮挡层就会隐藏起来 display:none;
③ 在页面中拖拽的原理:鼠标按下并且移动,之后松开鼠标
④ 触发事件是鼠标按下 mousedown,鼠标移动 mousemove,鼠标松开 mouseup
⑤ 拖拽过程:鼠标移动过程中,获得最新的值赋值给模态框的 left 和 top 值,这样模态框可以跟着鼠标走了
⑥ 鼠标按下触发的事件源是最上面一行,就是 id 为 title
⑦ 鼠标的坐标减去鼠标在盒子内的坐标,才是模态框真正的位置。
⑧ 鼠标按下,我们要得到鼠标在盒子的坐标。
⑨ 鼠标移动,就让模态框的坐标设置为:鼠标坐标减去盒子坐标即可,注意移动事件写到按下事件里面。
⑩ 鼠标松开,就停止拖拽,就是可以让鼠标移动事件解除
Document .login-header { width: 100%; text-align: center; height: 30px; font-size: 24px; line-height: 30px; } ul, li, ol, dl, dt, dd, div, p, span, h1, h2, h3, h4, h5, h6, a { padding: 0px; margin: 0px; } .login { display: none; width: 512px; height: 280px; position: fixed; border: #ebebeb solid 1px; left: 50%; top: 50%; background: #ffffff; box-shadow: 0px 0px 20px #ddd; z-index: 9999; transform: translate(-50%, -50%); } .login-title { width: 100%; margin: 10px 0px 0px 0px; text-align: center; line-height: 40px; height: 40px; font-size: 18px; position: relative; cursor: move; } .login-input-content { margin-top: 20px; } .login-button { width: 50%; margin: 30px auto 0px auto; line-height: 40px; font-size: 14px; border: #ebebeb 1px solid; text-align: center; } .login-bg { display: none; width: 100%; height: 100%; position: fixed; top: 0px; left: 0px; background: rgba(0, 0, 0, .3); } a { text-decoration: none; color: #000000; } .login-button a { display: block; } .login-input input.list-input { float: left; line-height: 35px; height: 35px; width: 350px; border: #ebebeb 1px solid; text-indent: 5px; } .login-input { overflow: hidden; margin: 0px 0px 20px 0px; } .login-input label { float: left; width: 90px; padding-right: 10px; text-align: right; line-height: 35px; height: 35px; font-size: 14px; } .login-title span { position: absolute; font-size: 12px; right: -20px; top: -30px; background: #ffffff; border: #ebebeb solid 1px; width: 40px; height: 40px; border-radius: 20px; } // 1. 获取元素 var login = document.querySelector('.login'); var mask = document.querySelector('.login-bg'); var link = document.querySelector('#link'); var closeBtn = document.querySelector('#closeBtn'); var title = document.querySelector('#title'); // 2.点击弹出层这个链接link 让mask和login显示出来 link.addEventListener('click', function() { login.style.display = 'block'; mask.style.display = 'block'; }); // 3.点击 closeBtn 就隐藏 mask 和 login closeBtn.addEventListener('click', function() { login.style.display = 'none'; mask.style.display = 'none'; }); // 4. 开始拖拽 // (1) 当我们鼠标按下,就获得鼠标在盒子内的坐标 title.addEventListener('mousedown', function(e) { var x = e.pageX - login.offsetLeft; var y = e.pageY - login.offsetTop; // (2) 鼠标移动的时候,把鼠标在页面中的坐标,减去鼠标在盒子内的坐标就是模态框的left和top值 document.addEventListener('mousemove', move); function move(e) { login.style.left = e.pageX - x + 'px'; login.style.top = e.pageY - y + 'px'; } // (3) 鼠标弹起,就让鼠标移动事件移除 document.addEventListener('mouseup', function() { document.removeEventListener('mousemove', move); }); }); 案例:仿京东放大镜

案例分析
① 整个案例可以分为三个功能模块
② 鼠标经过小图片盒子,黄色的遮挡层和大图片盒子显示,离开隐藏 2 个盒子功能
③ 黄色的遮挡层跟随鼠标功能。
④ 移动黄色遮挡层,大图片跟随移动功能。
① 鼠标经过小图片盒子,黄色的遮挡层和大图片盒子显示,离开隐藏2个盒子功能
② 就是显示与隐藏
① 黄色的遮挡层跟随鼠标功能。
② 把鼠标坐标给遮挡层不合适。因为遮挡层坐标以父盒子为准。
③ 首先是获得鼠标在盒子的坐标
④ 之后把数值给遮挡层做为 left 和 top 值。
⑤ 此时用到鼠标移动事件,但是还是在小图片盒子内移动。
⑥ 发现,遮挡层位置不对,需要再减去盒子自身高度和宽度的一半。
⑦ 遮挡层不能超出小图片盒子范围。
⑧ 如果小于零,就把坐标设置为 0
⑨ 如果大于遮挡层最大的移动距离,就把坐标设置为最大的移动距离
⑩ 遮挡层的最大移动距离:小图片盒子宽度减去遮挡层盒子宽度
① 移动黄色遮挡层,大图片跟随移动功能。
② 求大图片的移动距离公式


手机详情页! - 相关分类
- 推荐品牌
- 商品介绍
- 规格与包装
- 售后保障
- 商品评价(50000)
- 手机社区
- 分辨率:1920*1080(FHD)
- 后置摄像头:1200万像素
- 前置摄像头:500万像素
- 核 数:其他
- 频 率:以官网信息为准
- 品牌: Apple ♥关注
- 商品名称:APPLEiPhone 6s Plus
- 商品编号:1861098
- 商品毛重:0.51kg
- 商品产地:中国大陆
- 热点:指纹识别,Apple Pay,金属机身,拍照神器
- 系统:苹果(IOS)
- 像素:1000-1600万
- 机身内存:64GB


 <!-- 规格与包装售后保障 -->
 -
正品保障
正品保障,提供发票
-
正品保障
正品保障,提供发票
-
正品保障
正品保障,提供发票
-
正品保障
正品保障,提供发票
-
正品保障
正品保障,提供发票
- 帮助中心
-

品优购客户端
关于我们 | 联系我们 | 联系客服 | 商家入驻 | 营销中心 | 手机品优购 | 友情链接 | 销售联盟 | 品优购社区 | 品优购公益 | English Site | Contact U
地址:北京市昌平区建材城西路金燕龙办公楼一层 邮编:100096 电话:400-618-4000 传真:010-82935100 邮箱: zhanghj+itcast.cn
京ICP备08001421号京公网安备110108007702


window.addEventListener('load', function() { var preview_img = document.querySelector('.preview_img'); var mask = document.querySelector('.mask'); var big = document.querySelector('.big'); // 1. 当我们鼠标经过 preview_img 就显示和隐藏 mask 遮挡层 和 big 大盒子 preview_img.addEventListener('mouseover', function() { mask.style.display = 'block'; big.style.display = 'block'; }) preview_img.addEventListener('mouseout', function() { mask.style.display = 'none'; big.style.display = 'none'; }) // 2. 鼠标移动的时候,让黄色的盒子跟着鼠标来走 preview_img.addEventListener('mousemove', function(e) { // (1). 先计算出鼠标在盒子内的坐标 var x = e.pageX - this.offsetLeft; var y = e.pageY - this.offsetTop; // console.log(x, y); // (2) 减去盒子高度 300的一半 是 150 就是我们mask 的最终 left 和top值了 // (3) 我们mask 移动的距离 var maskX = x - mask.offsetWidth / 2; var maskY = y - mask.offsetHeight / 2; // (4) 如果x 坐标小于了0 就让他停在0 的位置 // 遮挡层的最大移动距离 var maskMax = preview_img.offsetWidth - mask.offsetWidth; if (maskX = maskMax) { maskX = maskMax; } if (maskY = maskMax) { maskY = maskMax; } mask.style.left = maskX + 'px'; mask.style.top = maskY + 'px'; // 3. 大图片的移动距离 = 遮挡层移动距离 * 大图片最大移动距离 / 遮挡层的最大移动距离 // 大图 var bigIMg = document.querySelector('.bigImg'); // 大图片最大移动距离 var bigMax = bigIMg.offsetWidth - big.offsetWidth; // 大图片的移动距离 X Y var bigX = maskX * bigMax / maskMax; var bigY = maskY * bigMax / maskMax; bigIMg.style.left = -bigX + 'px'; bigIMg.style.top = -bigY + 'px'; })})2. 元素可视区 client 系列
client 翻译过来就是客户端,我们使用 client 系列的相关属性来获取元素可视区的相关信息。通过 client 系列的相关属性可以动态的得到该元素的边框大小、元素大小等。
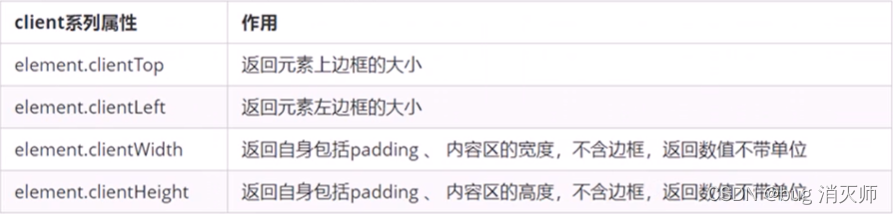

Document div { width: 200px; height: 200px; background-color: pink; border: 10px solid red; padding: 10px; } // client 宽度 和我们 offsetwidth 最大的区别就是不包含边框 var div = document.querySelector('div'); console.log(div.clientWidth); 
