任意无人机手柄链接Unity-100元的凤凰SM600手柄接入Unity Input System_sm600遥控器驱动
网上教程真少!奋发图强自力更生!2025.5.1
分步详解:凤凰6000模拟器接入Unity Input System
前提条件:
-
安装 Unity Input System: 确保你的 Unity 项目已经通过 Package Manager 安装了 Input System 包。如果没有,请前往 Window -> Package Manager,选择 Unity Registry,搜索 Input System 并安装。
-
启用 Input System: 在 Edit -> Project Settings -> Player -> Other Settings 中,找到 Active Input Handling 选项,将其设置为 Input System Package (New) 或者 Both。Unity 会提示重启编辑器。
步骤一:找到凤凰SM600手柄的 VID 和 PID
这是识别你设备的“身份证号”。
-
连接手柄: 将凤凰SM600手柄通过 USB 连接到你的 Windows 电脑。
-
打开设备管理器:
-
在 Windows 搜索栏搜索“设备管理器”并打开。
-
或者右键点击“此电脑” -> “管理” -> “设备管理器”。
-
-
找到你的手柄: 在设备列表中查找,它可能在“人体学输入设备 (HID)”、\"通用串行总线控制器\" 下,或者显示为设备名称(如 \"Phoenix SM600\" 或类似名称)。仔细查找,可能显示为 \"USB 输入设备\" 或 \"HID-compliant game controller\"。
-
提示: 如果不确定是哪个设备,可以尝试拔掉手柄再插上,观察设备列表的变化。
-
-
查看属性: 找到设备后,右键点击它,选择“属性”。
-
查找 VID 和 PID:
-
切换到“详细信息”选项卡。
-
在“属性”下拉菜单中,选择“硬件 ID”。
-
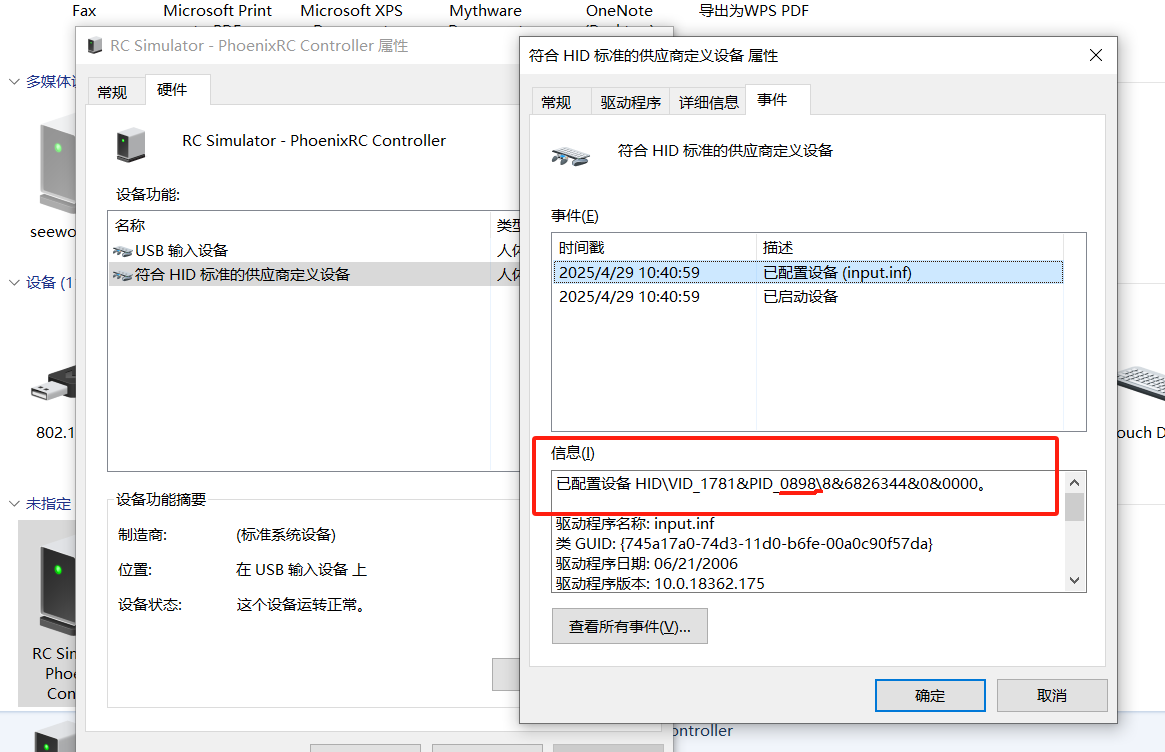
你会看到类似 HID\\VID_xxxx&PID_xxxx 或 USB\\VID_xxxx&PID_xxxx 的值。这里的 xxxx 就是你需要记下的 Vendor ID (VID) 和 Product ID (PID)。它们通常是 4 位的十六进制数(例如 054C 或 09CC)。 请记下你找到的实际 VID 和 PID 值。
-
步骤1:获取设备VID/PID.
操作流程
- 连接凤凰6000模拟器到电脑
- 打开
设备管理器→ 右键设备 → 属性 → 详细信息 → 硬件ID - 记录
VID_XXXX和PID_XXXX(例如:VID_1234&PID_5678)
步骤2: 撰写脚本让Unity支持设备哦
下面的脚本是自己创建一个Unity 可识别的摇杆!实现检测硬件,并且被Unity的新输入系统支持!
using UnityEngine; // 使用Unity引擎的基本功能(比如画图、控制游戏)using UnityEngine.InputSystem; // 使用Unity的输入系统(控制键盘、鼠标、手柄)using UnityEngine.InputSystem.Layouts; // 定义输入设备的布局(比如手柄的按钮和摇杆位置)using UnityEngine.InputSystem.HID; // 处理USB设备(如飞行器遥控器)using UnityEngine.InputSystem.Utilities; // 工具类帮助处理输入using UnityEngine.InputSystem.LowLevel; // 低级输入处理(直接读取设备数据)using System.Runtime.InteropServices; // 处理不同系统的兼容性(比如Windows和Mac)using System.Diagnostics; // 调试工具(查看程序运行信息)#if UNITY_EDITOR // 如果在Unity编辑器中运行using UnityEditor; // Unity编辑器的工具(如创建菜单)#endif// 1. 定义设备布局结构体 (简化版,只映射原始字节)[StructLayout(LayoutKind.Explicit, Size = 9)] // 报告大小为 9 字节public struct PhoenixSM600HIDInputReport : IInputStateTypeInfo{ // Report ID (偏移 0) [FieldOffset(0)] public byte reportId; // 将所有 8 个数据字节映射为原始 Byte 控件 // 这样可以在 Input Debugger 中看到每个字节的原始值 [InputControl(name = \"byte1Raw\", layout = \"Byte\", offset = 1, displayName = \"数据字节 1 (右摇杆左右?)\")] [FieldOffset(1)] public byte byte1_raw; [InputControl(name = \"byte2Raw\", layout = \"Byte\", offset = 2, displayName = \"数据字节 2 (未知?)\")] [FieldOffset(2)] public byte byte2_raw; [InputControl(name = \"byte3Raw\", layout = \"Byte\", offset = 3, displayName = \"数据字节 3 (右摇杆上下?)\")] [FieldOffset(3)] public byte byte3_raw; [InputControl(name = \"byte4Raw\", layout = \"Byte\", offset = 4, displayName = \"数据字节 4 (左摇杆上下?)\")] [FieldOffset(4)] public byte byte4_raw; [InputControl(name = \"byte5Raw\", layout = \"Byte\", offset = 5, displayName = \"数据字节 5 (左摇杆左右?)\")] [FieldOffset(5)] public byte byte5_raw; [InputControl(name = \"byte6Raw\", layout = \"Byte\", offset = 6, displayName = \"数据字节 6 (右上角开关?)\")] [FieldOffset(6)] public byte byte6_raw; [InputControl(name = \"byte7Raw\", layout = \"Byte\", offset = 7, displayName = \"数据字节 7 (左上角旋钮?)\")] [FieldOffset(7)] public byte byte7_raw; [InputControl(name = \"byte8Raw\", layout = \"Byte\", offset = 8, displayName = \"数据字节 8 (按钮?)\")] [FieldOffset(8)] public byte byte8_raw; // 实现 IInputStateTypeInfo 接口 public FourCC format => new FourCC(\'H\', \'I\', \'D\');}// 2. 注册设备布局 (保持不变,确保 VID/PID 正确)#if UNITY_EDITOR[InitializeOnLoad]#endif// 注意这里可以继续继承 Gamepad,即使当前没有映射所有 Gamepad 控件[InputControlLayout(stateType = typeof(PhoenixSM600HIDInputReport), displayName = \"Phoenix SM600 Drone Controller (Raw)\")] // 修改显示名称以便区分public class PhoenixSM600ControllerSupport : Gamepad{ static PhoenixSM600ControllerSupport() { // 使用 VID 和 PID 注册设备 // 确保这里的 VID/PID (0x1781, 0x0898) 是正确的 InputSystem.RegisterLayout( matches: new InputDeviceMatcher() .WithInterface(\"HID\") .WithCapability(\"vendorId\", 0x1781) .WithCapability(\"productId\", 0x0898) ); Debug.Log(\"Phoenix SM600 Controller (Raw) layout registered.\"); } [RuntimeInitializeOnLoadMethod(RuntimeInitializeLoadType.BeforeSceneLoad)] static void InitializeInPlayer() { // Triggers the static constructor } // 不需要在这里定义属性或 FinishSetup(),因为只映射了原始字节}这个脚本就像一个设备驱动程序!不需要挂载游戏物体上被运行!
这个脚本的作用: 想象一下,你买了一个新的、很特别的玩具遥控器(Phoenix SM600),但你的电脑(Unity)还不认识它。这个脚本就像是给电脑安装一个“驱动程序”或者“说明书”。它告诉 Unity:“嘿,如果你看到一个 USB 设备,它的身份证号(VID)是 0x1781,型号(PID)是 0x0898,那它就是这个凤凰遥控器,它发过来的信号(数据)是这样排列的(就是我们定义的那个 struct 结构)。”
它是如何工作的:
代码里的 [InitializeOnLoad] (编辑器里用) 和 [RuntimeInitializeOnLoadMethod] (游戏运行时用) 这两个“魔法标记”,会确保 Unity 在启动时或者游戏开始运行时,自动去执行这个脚本里的注册代码(InputSystem.RegisterLayout 那部分)。
这个注册过程是全局性的,它直接修改了 Unity 输入系统本身对设备的认知,而不是只针对某一个游戏物体。
它不是什么: 这个脚本不是用来 读取 遥控器输入的(比如检查哪个按钮被按下了)。它只是负责 让 Unity 能够理解 这个遥控器。
谁来读取输入: 你需要另外写一个脚本(或者使用 Unity 的 Input Action Assets),那个脚本才需要挂载到游戏物体上。那个脚本会去问 Unity 的输入系统:“嘿,凤凰遥控器的左摇杆现在在哪里?”或者“按钮 A 按下了吗?” 因为有了我们这个“说明书”脚本的注册,输入系统才能正确地回答那个挂载在物体上的脚本的问题。
总结:
这个脚本是定义和注册设备布局的,它在后台自动工作,让 Unity 认识新设备。
它不需要挂载到游戏物体上。你需要另外的脚本(挂载到物体上)来实际使用这个遥控器的输入。
所以,你只需要把这个 C# 文件放到你的 Unity 项目的 Assets 文件夹(或者任何子文件夹)下,确保没有编译错误,它就会自动生效了。
不用担心,没有被挂载到场景就不被打包出去生效的问题!它不需要挂载也会在打包后生效:
这个脚本是用来“教”Unity认识你的手柄的,而不是直接读取输入的,所以它不需要挂载。
现在,关于打包成 APK 安装到 VR 眼镜(如 Meta Quest、Pico 等独立 VR 设备)后,如何确保手柄能工作,你的思路是正确的,关键在于确保那个“教学”过程在 VR 眼镜上也能顺利进行。
以下是确保它工作的关键点和步骤:
-
[RuntimeInitializeOnLoadMethod] 是关键:
-
你的代码里使用了 [RuntimeInitializeOnLoadMethod(RuntimeInitializeLoadType.BeforeSceneLoad)] 这个标记。这非常重要!
-
它的作用就是告诉 Unity:“当这个游戏(打包后的 APK)在任何设备上启动时,在加载第一个场景之前,请自动运行 InitializeInPlayer() 这个函数。”
-
而 InitializeInPlayer() 函数虽然是空的,但它的存在会触发 PhoenixSM600ControllerSupport 类的静态构造函数(static PhoenixSM600ControllerSupport())运行。
-
静态构造函数里的 InputSystem.RegisterLayout(...) 就是注册手柄布局的核心代码。
-
结论: 只要你的脚本包含在最终的 APK 包里,并且有 [RuntimeInitializeOnLoadMethod],那么每次游戏在 VR 眼镜上启动时,注册过程理论上会自动执行。
-
-
VR 眼镜的操作系统 (Android) 需要识别手柄:
-
大多数现代独立 VR 眼镜(如 Quest 2/3, Pico 4)运行的是定制版的 Android 系统。
-
它们通常支持 USB OTG (On-The-Go),这意味着它们的 USB-C 接口可以作为“主机”来识别和使用外部 USB 设备,比如键盘、鼠标、还有游戏手柄。
-
当你的 USB 手柄通过合适的转接头(如果需要的话,比如 USB-A 转 USB-C)插入 VR 眼镜的 USB 口时,VR 眼镜的 Android 系统首先需要能够识别它是一个标准的 HID (Human Interface Device) 游戏手柄。
-
对于绝大多数标准 USB 游戏手柄,这是自动的,Android 系统有内置的驱动来处理它们。你的 Phoenix SM600 很可能也属于这一类。
-
-
Unity 输入系统在 Android 上的工作:
-
Unity 的 Input System 包在 Android 平台上会与 Android 底层的输入管理系统交互。
-
当 Android 系统识别出你的手柄后,它会把这个设备信息告诉正在运行的 Unity 应用。
-
此时,因为你的脚本已经在游戏启动时通过 RegisterLayout 注册了你的手柄的特定 VID (Vendor ID - 厂家 ID) 和 PID (Product ID - 产品 ID),Unity 的 Input System 就会检查新连接的设备列表。
-
如果它发现一个 HID 设备的 VID 和 PID 完全匹配你在代码中设置的 0x1781 和 0x0898,它就会应用你定义的 PhoenixSM600ControllerSupport 布局来处理这个手柄的输入信号。
-
-
需要检查和确认的事项:
-
VR 眼镜的 USB OTG 支持: 确认你的目标 VR 眼镜型号确实支持通过 USB 连接外部游戏手柄。对于主流设备(Quest, Pico)通常是支持的,但最好查一下官方文档或社区确认。
-
正确的 VID/PID: 再次确认你在代码中使用的 0x1781 和 0x0898 绝对准确。差一个数字或字母,匹配就会失败。你可以在 PC 的设备管理器里查找手柄的硬件 ID 来确认。
-
Input System 包已安装: 确保你的 Unity 项目中,Input System 包已经通过 Package Manager 正确安装,并且包含在最终的 Build 设置里。
-
脚本包含在 Build 中: 确保你的 PhoenixSM600ControllerSupport.cs 文件位于 Assets 文件夹下,并且没有被设置排除在 Build 之外(通常默认是包含的)。
-
物理连接: 确保 USB 线缆和任何需要的转接头工作正常。
-
供电: 极少数情况下,如果手柄耗电量很大,VR 眼镜的 USB 口可能供电不足,但这对于普通手柄不太常见。
-
-
如何测试和调试 (如果遇到问题):
-
先在 PC 上测试 Build: 打包一个 Windows/Mac 的可执行文件,确认手柄在这个独立 Build 中能正常工作。这可以排除脚本本身逻辑或 VID/PID 错误的问题。
-
基础 Android 测试: 尝试将手柄连接到 VR 眼镜后,看看 VR 眼镜本身的系统菜单或者其他支持手柄的应用是否能识别到手柄(即使按键映射可能不对)。这能确认基础的 OTG 和 HID 识别是否正常。
-
Android Logcat: 在 VR 眼镜上启用开发者模式和 USB 调试,连接到电脑,使用 adb logcat 命令。启动你的游戏,并插拔手柄,观察日志中是否有与 Input System、HID 或你的设备 VID/PID 相关的错误或信息。这是查找底层问题的强大工具。
-
Unity Profiler/Input Debugger (远程连接): 如果可能,尝试将 Unity 编辑器通过网络连接到运行在 VR 眼镜上的游戏 (Build and Run with Profiler Connection)。然后可以在编辑器中使用 Input Debugger 查看设备是否被识别,以及应用了哪个布局。
-
总结:
你的 C# 脚本设计是正确的,利用 [RuntimeInitializeOnLoadMethod] 可以在 APK 运行时自动注册布局。只要 VR 眼镜的 Android 系统能识别你的 USB 手柄作为标准 HID 设备,并且你的 VID/PID 完全正确,那么 Unity 的 Input System 就应该能够匹配并使用你定义的布局,让手柄在 VR 游戏中正常工作。关键在于确保硬件连接无误、操作系统支持,以及代码中的设备标识符准确无误。
详细注释版本:
// -----------------------------------------------------------------------------// 想象一下,我们在用积木搭一个可以和电脑沟通的玩具遥控器 (Phoenix SM600)// 这些 \'using\' 语句就像是告诉电脑:“我们要用这些工具箱里的工具哦!”// 每个工具箱里都有别人已经写好的代码,可以帮我们做一些事情。// -----------------------------------------------------------------------------// 这个工具箱(UnityEngine)是 Unity 游戏引擎自带的,有很多基础功能。using UnityEngine;// 这个工具箱(UnityEngine.InputSystem)是专门用来处理玩家输入(比如按按钮、动摇杆)的。using UnityEngine.InputSystem;// 这个工具箱(UnityEngine.InputSystem.Layouts)帮助我们定义输入设备(比如遥控器)的样子和功能。using UnityEngine.InputSystem.Layouts;// 这个工具箱(UnityEngine.InputSystem.HID)是专门处理一种叫做 HID 的设备,很多键盘、鼠标、游戏手柄都用这种方式和电脑沟通。我们的遥控器也是。using UnityEngine.InputSystem.HID;// 这个工具箱(UnityEngine.InputSystem.Utilities)提供了一些方便的小工具。using UnityEngine.InputSystem.Utilities;// 这个工具箱(UnityEngine.InputSystem.LowLevel)处理更底层、更接近硬件的输入信息。using UnityEngine.InputSystem.LowLevel;// 这个工具箱(System.Runtime.InteropServices)能帮助我们的 C# 代码和电脑底层或者其他语言写的代码更好地“合作”。这里用它来精确控制数据在内存里的排列方式。using System.Runtime.InteropServices;// 这个工具箱(System.Diagnostics)里面有一些工具,比如可以用来在控制台打印信息,帮助我们检查代码有没有问题。using System.Diagnostics;// -----------------------------------------------------------------------------// 下面这几行是特殊指令,只在 Unity 编辑器(我们制作游戏的地方)里才有用。// 就好像说:“这段说明书只给正在搭积木的人看,玩积木的人不用看。”// -----------------------------------------------------------------------------#if UNITY_EDITOR // 如果我们正在使用 Unity 编辑器...// 这个工具箱(UnityEditor)包含了很多只在 Unity 编辑器里才能使用的工具。using UnityEditor;#endif // ...那么就包含上面那个工具箱,否则就跳过。// -----------------------------------------------------------------------------// 1. 定义设备布局结构体 (简化版,只映射原始字节)// 我们要告诉电脑,遥控器每次发过来的信息(数据包)长什么样。// 就像画一张图纸,标明这个数据包里每个位置放的是什么信息。// 我们这里用一个叫做 \"struct\" 的东西来画这张图纸,它就像一个小盒子,专门存放遥控器发来的数据。// -----------------------------------------------------------------------------// 这个 [StructLayout(...)] 就像是给小盒子(struct)定规矩。// LayoutKind.Explicit 的意思是:“我们要非常明确地告诉电脑,盒子里每个东西放在哪个精确的位置(偏移量)。”// Size = 9 的意思是:“这个小盒子总共能装 9 个字节(byte)那么大的信息。” (一个字节就像一个小小的数字格子,可以放 0 到 255 之间的数字)[StructLayout(LayoutKind.Explicit, Size = 9)]// public struct PhoenixSM600HIDInputReport : IInputStateTypeInfo// public: 表示这个图纸(结构体)大家都可以看和用。// struct: 告诉电脑,这是一个“结构体”,一个小数据容器的蓝图。// PhoenixSM600HIDInputReport: 这是我们给这个小盒子图纸起的名字,意思是“凤凰SM600遥控器通过HID方式发送的输入报告(数据)”。// : IInputStateTypeInfo: 这表示我们的小盒子图纸还遵守了一个“协议”(接口),保证它能告诉别人自己里面装的数据是什么类型的。public struct PhoenixSM600HIDInputReport : IInputStateTypeInfo{ // ------------------------------------------------------------------------- // 在小盒子里(结构体内部)定义每个数据存放的位置和名字 // ------------------------------------------------------------------------- // Report ID (偏移 0) // [FieldOffset(0)] 告诉电脑:“这个数据要放在小盒子的第 0 个位置(也就是最开始的位置)。” [FieldOffset(0)] // public byte reportId; 定义了一个叫做 reportId 的小格子(byte类型),它是公开的(public)。 // 这个 reportId 通常用来表示这份数据报告是关于什么的,但在这个简单版本里我们可能不会直接用它。 public byte reportId; // ------------------------------------------------------------------------- // 将所有 8 个数据字节映射为原始 Byte 控件 // 遥控器除了第一个字节的 reportId,后面还有 8 个字节是真正包含按钮、摇杆信息的数据。 // 我们现在先把这 8 个字节都当作“原始数字”来看,不做任何转换。 // 这样可以在 Unity 的调试工具(Input Debugger)里直接看到遥控器发来的最原始的数字是什么。 // ------------------------------------------------------------------------- // [InputControl(...)] 这个标记很重要!它告诉 Unity 的输入系统: // “嘿,这个小格子里的数据是一个‘输入控件’!玩家可以通过它来控制游戏。” // name = \"byte1Raw\": 给这个控件起一个内部名字叫 \"byte1Raw\"。 // layout = \"Byte\": 告诉 Unity 这个控件的数据类型就是一个原始的字节(数字 0-255)。 // offset = 1: 告诉 Unity 这个数据在小盒子里的第 1 个位置(紧跟在 reportId 后面)。 // displayName = \"数据字节 1 (右摇杆左右?)\": 这是在 Unity 调试工具里显示给开发者看的名字,方便我们猜这个字节可能是干嘛的(比如控制右边摇杆的左右移动?)。 [InputControl(name = \"byte1Raw\", layout = \"Byte\", offset = 1, displayName = \"数据字节 1 (右摇杆左右?)\")] // [FieldOffset(1)] 再次确认这个数据放在小盒子的第 1 个位置。 [FieldOffset(1)] // public byte byte1_raw; 定义一个公开的(public)小格子(byte类型),名字叫 byte1_raw,用来存放第 1 个数据字节的原始值。 public byte byte1_raw; // 下面的定义和 byte1_raw 非常类似,只是位置(offset)和名字不一样,对应遥控器发来的第 2 到第 8 个数据字节。 // 告诉 Unity 这是第 2 个数据字节,也是一个原始字节控件。放在小盒子的第 2 个位置。 [InputControl(name = \"byte2Raw\", layout = \"Byte\", offset = 2, displayName = \"数据字节 2 (未知?)\")] // 确认放在小盒子的第 2 个位置。 [FieldOffset(2)] // 定义存放第 2 个数据字节原始值的小格子。 public byte byte2_raw; // 告诉 Unity 这是第 3 个数据字节,也是一个原始字节控件。放在小盒子的第 3 个位置。(可能跟右摇杆上下有关?) [InputControl(name = \"byte3Raw\", layout = \"Byte\", offset = 3, displayName = \"数据字节 3 (右摇杆上下?)\")] // 确认放在小盒子的第 3 个位置。 [FieldOffset(3)] // 定义存放第 3 个数据字节原始值的小格子。 public byte byte3_raw; // 告诉 Unity 这是第 4 个数据字节,也是一个原始字节控件。放在小盒子的第 4 个位置。(可能跟左摇杆上下有关?) [InputControl(name = \"byte4Raw\", layout = \"Byte\", offset = 4, displayName = \"数据字节 4 (左摇杆上下?)\")] // 确认放在小盒子的第 4 个位置。 [FieldOffset(4)] // 定义存放第 4 个数据字节原始值的小格子。 public byte byte4_raw; // 告诉 Unity 这是第 5 个数据字节,也是一个原始字节控件。放在小盒子的第 5 个位置。(可能跟左摇杆左右有关?) [InputControl(name = \"byte5Raw\", layout = \"Byte\", offset = 5, displayName = \"数据字节 5 (左摇杆左右?)\")] // 确认放在小盒子的第 5 个位置。 [FieldOffset(5)] // 定义存放第 5 个数据字节原始值的小格子。 public byte byte5_raw; // 告诉 Unity 这是第 6 个数据字节,也是一个原始字节控件。放在小盒子的第 6 个位置。(可能跟右上角的某个开关有关?) [InputControl(name = \"byte6Raw\", layout = \"Byte\", offset = 6, displayName = \"数据字节 6 (右上角开关?)\")] // 确认放在小盒子的第 6 个位置。 [FieldOffset(6)] // 定义存放第 6 个数据字节原始值的小格子。 public byte byte6_raw; // 告诉 Unity 这是第 7 个数据字节,也是一个原始字节控件。放在小盒子的第 7 个位置。(可能跟左上角的某个旋钮有关?) [InputControl(name = \"byte7Raw\", layout = \"Byte\", offset = 7, displayName = \"数据字节 7 (左上角旋钮?)\")] // 确认放在小盒子的第 7 个位置。 [FieldOffset(7)] // 定义存放第 7 个数据字节原始值的小格子。 public byte byte7_raw; // 告诉 Unity 这是第 8 个数据字节,也是一个原始字节控件。放在小盒子的第 8 个位置。(可能跟某些按钮有关?) [InputControl(name = \"byte8Raw\", layout = \"Byte\", offset = 8, displayName = \"数据字节 8 (按钮?)\")] // 确认放在小盒子的第 8 个位置。 [FieldOffset(8)] // 定义存放第 8 个数据字节原始值的小格子。 public byte byte8_raw; // ------------------------------------------------------------------------- // 实现 IInputStateTypeInfo 接口 // 我们之前承诺了要遵守 IInputStateTypeInfo 这个协议,现在要兑现承诺。 // 这个协议要求我们提供一个“格式代码”,告诉别人我们这个小盒子里装的是什么类型的数据。 // ------------------------------------------------------------------------- // public FourCC format => new FourCC(\'H\', \'I\', \'D\'); // public: 表示这个信息是公开的。 // FourCC format: 定义了一个叫做 format 的属性,它的类型是 FourCC(一种特殊的四个字母代码)。 // =>: 是一个简写方式,表示“这个属性的值是...” // new FourCC(\'H\', \'I\', \'D\'): 创建一个新的 FourCC 代码,由字母 H, I, D 组成。这三个字母合起来就是 \"HID\",告诉 Unity 输入系统:“我这个小盒子里装的是 HID 类型的数据哦!” public FourCC format => new FourCC(\'H\', \'I\', \'D\');} // 小盒子(结构体)的定义到这里结束。// -----------------------------------------------------------------------------// 2. 注册设备布局 (保持不变,确保 VID/PID 正确)// 光有数据图纸(结构体)还不够,我们还需要告诉 Unity:// “当你看到一个长得像‘凤凰SM600’遥控器的设备插到电脑上时,就用我们刚才画的那个图纸来理解它发来的数据。”// 这个过程叫做“注册布局”。// -----------------------------------------------------------------------------#if UNITY_EDITOR // 这段代码同样只在 Unity 编辑器里运行// [InitializeOnLoad] 这个标记告诉 Unity 编辑器:“当你启动或者重新加载代码的时候,请自动运行下面这个类(Class)里面一个特殊的静态构造函数(后面会看到)。”// 这样可以确保我们的遥控器布局在编辑器一打开时就被注册好。[InitializeOnLoad]#endif // 结束只在编辑器运行的部分// [InputControlLayout(...)] 这个标记是给下面定义的“类”(Class)贴标签的。// stateType = typeof(PhoenixSM600HIDInputReport): 告诉 Unity:“当处理这个设备时,请使用我们上面定义的 PhoenixSM600HIDInputReport 这个小盒子图纸(结构体)来存放和理解它的状态数据。”// displayName = \"Phoenix SM600 Drone Controller (Raw)\": 这是在 Unity 编辑器的输入设备列表里显示的名字,方便我们找到它。(Raw 表示我们看的是原始数据)[InputControlLayout(stateType = typeof(PhoenixSM600HIDInputReport), displayName = \"Phoenix SM600 Drone Controller (Raw)\")]// public class PhoenixSM600ControllerSupport : Gamepad// public: 表示这个“类”大家都可以用。// class: 告诉电脑,这是一个“类”,是用来创建对象的蓝图。这个蓝图比“结构体”更复杂,可以包含数据和操作数据的方法。这里它代表了我们的遥控器在 Unity 里的“身份”。// PhoenixSM600ControllerSupport: 我们给这个遥控器身份蓝图起的名字,意思是“对凤凰SM600遥控器的支持”。// : Gamepad: 这表示我们的遥控器“继承”自 Unity 已知的 Gamepad(游戏手柄)类型。// 意思是:“虽然我们的遥控器可能有点特殊,但你可以把它当作一种游戏手柄来对待。”// 这样做的好处是,即使我们现在只看了原始字节,以后想让它表现得更像标准手柄(比如有左右摇杆、按钮)会更容易些。public class PhoenixSM600ControllerSupport : Gamepad{ // ------------------------------------------------------------------------- // 静态构造函数 (Static Constructor) // 这个函数很特别,它前面有 static 关键字,并且名字和类名完全一样。 // 它会在这个类第一次被“需要”的时候自动运行一次,而且只会运行一次。 // 因为我们前面用了 [InitializeOnLoad] 标记,所以在编辑器启动时,这个函数就会被自动运行。 // 它的作用就是执行注册布局的核心代码。 // ------------------------------------------------------------------------- static PhoenixSM600ControllerSupport() // 注意这里没有返回值,名字和类名一样 { // 使用 VID 和 PID 注册设备 // VID (Vendor ID) 就像是厂家的身份证号。 // PID (Product ID) 就像是这个厂家生产的这款产品的型号。 // 这两个号码组合起来,通常能唯一确定一个 USB 设备。 // 确保这里的 VID/PID (0x1781, 0x0898) 是你的凤凰SM600遥控器实际的号码!如果号码不对,Unity 就认不出你的遥控器了。 // 0x 开头表示这是一个十六进制数,是电脑喜欢用的一种数字表示方法。 // InputSystem.RegisterLayout(...) // InputSystem: 我们之前引入的输入系统工具箱里的主要负责人。 // RegisterLayout: 调用它的“注册布局”功能。 // : 告诉它我们要注册的是我们自己定义的这个 PhoenixSM600ControllerSupport 蓝图。 InputSystem.RegisterLayout( // matches: new InputDeviceMatcher() ... // matches: 参数告诉注册功能:“只有满足以下条件的设备,才使用我们这个蓝图。” // new InputDeviceMatcher(): 创建一个“设备匹配器”,用来设定匹配条件。 matches: new InputDeviceMatcher() // .WithInterface(\"HID\"): 第一个条件是,设备的接口类型必须是 \"HID\"。我们的遥控器是 HID 设备。 .WithInterface(\"HID\") // .WithCapability(\"vendorId\", 0x1781): 第二个条件是,设备的“能力”(Capability)中,厂家ID(vendorId)必须是 0x1781。 .WithCapability(\"vendorId\", 0x1781) // .WithCapability(\"productId\", 0x0898): 第三个条件是,设备的产品ID(productId)必须是 0x0898。 .WithCapability(\"productId\", 0x0898) // 只有同时满足这三个条件的设备,才会被 Unity 识别为 PhoenixSM600ControllerSupport,并使用我们定义的布局来处理数据。 ); // RegisterLayout 函数调用结束 // Debug.Log(...) 是向 Unity 的控制台窗口打印一条消息。 // 这就像是代码在说:“报告!我已经成功注册了凤凰SM600遥控器(原始数据版)的布局!” // 这可以帮助我们确认注册过程确实运行了。 Debug.Log(\"Phoenix SM600 Controller (Raw) layout registered.\"); } // 静态构造函数结束 // ------------------------------------------------------------------------- // 在游戏运行时初始化 // 有时候,在编辑器里注册好了还不够,我们还需要确保在真正玩游戏的时候,这个注册也能生效。 // 下面这个方法就是用来做这个的。 // ------------------------------------------------------------------------- // [RuntimeInitializeOnLoadMethod(RuntimeInitializeLoadType.BeforeSceneLoad)] // 这个标记告诉 Unity:“当游戏开始运行后,在加载第一个游戏场景(画面)之前,请自动运行下面这个叫做 InitializeInPlayer 的函数。” [RuntimeInitializeOnLoadMethod(RuntimeInitializeLoadType.BeforeSceneLoad)] // static void InitializeInPlayer() // static: 表示这个函数也属于类本身,而不是某个具体的遥控器对象。 // void: 表示这个函数运行完不返回任何结果。 // InitializeInPlayer: 函数的名字,意思是“在玩家玩的时候进行初始化”。 static void InitializeInPlayer() { // 这个函数里面是空的!但它有一个重要的作用。 // // Triggers the static constructor (触发静态构造函数) // 仅仅是因为这个带有 [RuntimeInitializeOnLoadMethod] 标记的函数存在, // Unity 在游戏开始运行时就会“注意到” PhoenixSM600ControllerSupport 这个类, // 如果这个时候静态构造函数(就是上面那个注册布局的函数)还没运行过, // 它就会被自动触发运行。 // 这样就保证了即使是在发布的游戏里,我们的遥控器布局也能被正确注册。 // 这是一个小技巧,确保静态构造函数在需要时一定会被执行。 } // ------------------------------------------------------------------------- // 不需要在这里定义属性或 FinishSetup(),因为只映射了原始字节 // 一般来说,如果我们想让遥控器表现得像一个标准游戏手柄, // 我们会在这里定义一些属性,比如 leftStick (左摇杆), rightStick (右摇杆), buttonSouth (南方向按钮,通常是 A 键) 等等。 // 并且还会有一个叫做 FinishSetup() 的函数,在里面把从原始字节里解析出来的数据,赋值给这些标准属性。 // 但是,因为我们这个版本非常简单,我们只关心看到原始的 8 个字节数据是什么, // 所以我们不需要定义这些额外的属性,也不需要 FinishSetup() 函数来做转换。 // 我们在上面的结构体里用 [InputControl] 定义的 byte1Raw 到 byte8Raw 就是我们目前关心的所有输入控件了。 // -------------------------------------------------------------------------} // 遥控器身份蓝图(类)的定义到这里结束。
步骤3:转换输入数据(从摇杆到轴数据)
这是最关键也是最困难的一步,因为你需要知道手柄发送数据的确切格式。 上面代码中的 PhoenixSM600HIDInputReport 结构体只是一个 完全假设 的例子,你必须用实际的数据结构替换它!
现在我们已经教会了 Unity 如何识别和理解我们的自定义 HID 设备(如 Phoenix SM600 手柄)发送的原始数据,接下来需要设置 Input Actions 并编写一个脚本来实际读取这些数据,并将其用于游戏逻辑。
-
创建 Input Actions Asset:
-
在 Unity 项目的 Assets 窗口中,右键点击 Create > Input Actions。
-
给这个新资源文件命名,例如 CustomControllerActions。
-
双击打开该资源文件,进入 Input Actions 编辑器。
-
-
定义 Action Map 和 Actions:
-
Action Maps: 在左侧面板点击 \"+\" 号添加一个新的 Action Map,命名为例如 Gameplay。Action Map 用于组织一组相关的操作(比如所有玩家控制的动作)。
-
Actions: 在中间面板为 Gameplay Action Map 添加 Actions。根据你的需求定义动作。基于你提供的脚本,我们可能需要读取至少两个轴的输入。**重要:**由于我们在第 2 步中只映射了原始字节,我们需要创建 Actions 来读取这些原始字节值。
-
点击 \"+\" 添加一个 Action,命名为例如 LeftStickVerticalRaw。
-
设置 Action Type 为 Value。
-
设置 Control Type 为 Axis (或者 Integer 如果你只想读取原始 0-255 值,但 Axis 通常更灵活用于后续处理)。
-
-
添加另一个 Action,命名为例如 LeftStickHorizontalRaw。
-
同样设置 Action Type 为 Value 和 Control Type 为 Axis。
-
-
(根据需要添加更多 Actions,例如对应右摇杆的原始字节 RightStickVerticalRaw, RightStickHorizontalRaw 等)
-
-
-
绑定 Actions 到自定义设备控件: 这是将抽象动作连接到具体设备输入的关键步骤。
-
选中 LeftStickVerticalRaw Action。
-
在右侧的 Properties 面板中,点击 Path 属性旁边的 \"+\" 号,选择 Add Binding。
-
在弹出的绑定窗口 (Listen / Path) 中,展开 HID 或你设备继承的类型(如 Gamepad)。
-
找到你的自定义设备布局名称(在第 3 步中 InputControlLayout 的 displayName 定义的,例如 \"Custom USB HID Device (Raw)\" 或 \"Phoenix SM600 Drone Controller (Raw)\")。
-
展开该设备,找到你在第 2 步中定义的对应摇杆垂直方向的原始字节控件(例如 Data Byte 4 或你在 displayName 里标记的 \"左摇杆上下?\" 对应的 byte4Raw)。选择这个原始字节控件。
-
对 LeftStickHorizontalRaw Action 重复此过程,将其绑定到代表左摇杆水平方向的原始字节控件(例如 Data Byte 5 或 byte5Raw)。
-
(为其他需要读取的原始字节 Action(如右摇杆)重复绑定过程)
-
完成后,点击 Input Actions 编辑器窗口顶部的 Save Asset 按钮。
-
-
编写或调整输入读取脚本: 现在我们使用一个脚本来引用并读取这些配置好的 Actions。以下是你提供的脚本的一个修正和解释版本,假设我们读取上面定义的 LeftStickVerticalRaw 和 LeftStickHorizontalRaw。
using UnityEngine;using UnityEngine.InputSystem; // 引入 Input System 命名空间public class LeftStickUpRightValueReader : MonoBehaviour // 脚本名称{ // 使用 [SerializeField] 在 Inspector 中关联 Action // 这些引用变量将关联到 Input Actions Asset 中名为 \"left\" 和 \"right\" 的 Action [SerializeField] private InputActionReference leftActionForLeftStickUp; // 用于关联 Input Actions Asset 中名为 \"left\" 的 Action [SerializeField] private InputActionReference leftActionForLeftStickRight; // 用于关联 Input Actions Asset 中名为 \"left\" 的 Action [SerializeField] private InputActionReference rightActionForLeftStickUp; // 用于关联 Input Actions Asset 中名为 \"right\" 的 Action [SerializeField] private InputActionReference rightActionForLeftStickRight; // 用于关联 Input Actions Asset 中名为 \"right\" 的 Action // Awake 在脚本对象被加载时调用 void Awake() { // 检查引用是否设置 if (leftActionForLeftStickUp == null || leftActionForLeftStickUp.action == null) Debug.LogError(\"Left Action Reference (for LeftStickUp) not set in LeftStickUpRightValueReader.\"); if (leftActionForLeftStickRight == null || leftActionForLeftStickRight.action == null) Debug.LogError(\"Left Action Reference (for LeftStickUp) not set in LeftStickUpRightValueReader.\"); if (rightActionForLeftStickUp == null || rightActionForLeftStickUp.action == null) Debug.LogError(\"Left Action Reference (for LeftStickUp) not set in LeftStickUpRightValueReader.\"); if (rightActionForLeftStickRight == null || rightActionForLeftStickRight.action == null) Debug.LogError(\"Right Action Reference (for LeftStickRight) not set in LeftStickUpRightValueReader.\"); } // OnEnable 在对象启用时调用 void OnEnable() { // 启用关联的 Action if (leftActionForLeftStickUp != null && leftActionForLeftStickUp.action != null) leftActionForLeftStickUp.action.Enable(); if (leftActionForLeftStickRight != null && leftActionForLeftStickRight.action != null) leftActionForLeftStickRight.action.Enable(); if (rightActionForLeftStickUp != null && rightActionForLeftStickUp.action != null) rightActionForLeftStickUp.action.Enable(); if (rightActionForLeftStickRight != null && rightActionForLeftStickRight.action != null) rightActionForLeftStickRight.action.Enable(); } // OnDisable 在对象禁用时调用 void OnDisable() { // 禁用关联的 Action if (leftActionForLeftStickUp != null && leftActionForLeftStickUp.action != null) leftActionForLeftStickUp.action.Disable(); if (rightActionForLeftStickRight != null && rightActionForLeftStickRight.action != null) rightActionForLeftStickRight.action.Disable(); } // Update 每帧调用一次 void Update() { // 读取 Action 的当前值 (Float 类型) // \"left\" Action 现在对应 leftStick/up 的值 (0 ~ ~1) float leftStickUpValue = 0f; if (leftActionForLeftStickUp != null && leftActionForLeftStickUp.action != null) { leftStickUpValue = leftActionForLeftStickUp.action.ReadValue(); } float leftStickRightValue = 0f; if (leftActionForLeftStickRight != null && leftActionForLeftStickRight.action != null) { leftStickRightValue = leftActionForLeftStickRight.action.ReadValue(); } float RightStickUpValue = 0f; if (rightActionForLeftStickUp != null && rightActionForLeftStickUp.action != null) { RightStickUpValue = rightActionForLeftStickUp.action.ReadValue(); } // \"right\" Action 现在对应 leftStick/right 的值 (0 ~ ~1) float RightStickRightValue = 0f; if (rightActionForLeftStickRight != null && rightActionForLeftStickRight.action != null) { RightStickRightValue = rightActionForLeftStickRight.action.ReadValue(); } Debug.Log($\"Action \\\"left\\\" (左摇杆Up): {RightStickUpValue:F2} | Action \\\"right\\\" (左摇杆Right): {leftStickRightValue:F2}\" ); // --- 每帧输出这两个值到 Console --- Debug.Log($\"Action \\\"left\\\" (左摇杆Up): {leftStickUpValue:F2} | Action \\\"right\\\" (左摇杆Right): {RightStickRightValue:F2}\"); // {值:F2} 用于格式化输出,保留两位小数 // leftStickUpValue 的范围是 0 到 ~1: // 0 代表没有向上推,~1 代表完全向上推。s // leftStickRightValue 的范围是 0 到 ~1: // 0 代表没有向右推,~1 代表完全向右推。 // 当左摇杆回中时,这两个值都应该是 0。 // 当你推向左上角时,leftStickUpValue 和 leftStickRightValue 都会大于 0。 // 在这里你可以根据 leftStickUpValue 和 leftStickRightValue 的值来控制你的无人机行为。 // 例如:你可以结合这两个值来判断左摇杆的推向方向和力度,用于无人机的水平移动等。 } // 注意: 使用 InputActionReference 时,通常不需要手动 Dispose}
将脚本添加到场景并配置:
-
在 Unity 场景中创建一个空的游戏对象(GameObject),或者选择一个你想用来处理输入的现有对象。
-
将上面编写的 CustomDeviceInputReader.cs 脚本拖拽到这个游戏对象的 Inspector 面板上。
-
你会看到脚本组件上有 Left Stick Vertical Raw Action 和 Left Stick Horizontal Raw Action 两个字段(以及你可能添加的其他字段)。
-
点击每个字段旁边的圆形图标,或者直接将你在 CustomControllerActions 资源文件中定义的相应 Action(例如 Gameplay/LeftStickVerticalRaw)拖拽到对应的字段上。
-
确保这个挂载了脚本的游戏对象在场景中是激活(Active)的。
运行与测试:
-
连接你的自定义 HID 设备。
-
运行 Unity 场景。
-
观察 Console 窗口的输出。当你移动手柄的左摇杆时,你应该能看到 Raw Left Stick 的字节值 (0-255) 和 Processed Left Stick 的标准化值 (-1 to +1) 相应地变化。
-
根据输出调整 NormalizeByteAxis 函数中的逻辑(特别是中心值 128 和除数 127/128),以确保静止时轴值接近 0,推到极限时接近 -1 或 +1。
下一步/优化:
-
直接映射标准控件: 如果你确定了哪些原始字节对应标准的游戏手柄控件(如左摇杆、右摇杆、按钮),可以回到第 2 步和第 3 步,修改设备布局 (struct 和 class)。使用 Input System 提供的更高级的 InputControl 布局(如 StickControl, ButtonControl),并在 FinishSetup() 方法中将原始字节数据处理后映射到这些标准控件上。这样做的好处是,你的 Input Actions 可以直接绑定到标准的 leftStick, rightStick, buttonSouth 等路径,使输入配置更通用,读取脚本也更简单(可以直接 ReadValue() 获取摇杆值)。但这需要对设备的数据格式有更深入的理解。
-
处理按钮: 按钮通常隐藏在某个字节的特定位(bit)中。需要使用位运算(如 & 按位与)来检查特定位是否为 1,以判断按钮是否按下。同样可以在设备布局中定义 ButtonControl 并进行映射。
现在,你应该拥有一个完整的流程:从识别未知 HID 设备、定义其数据布局、在 Unity Input System 中注册它,到最后通过 Input Actions 读取其(目前是原始的)输入值并在游戏中使用。
目前有用的链接:
unity如何添加自定义HID设备,自己开发的手柄如何支持unity。 - 哔哩哔哩
HID Support | Input System | 1.0.2 官方教程
https://zhuanlan.zhihu.com/p/503209742

