【Android】桌面小组件开发
心血来潮,由于小米记账组件都需要收费,因此使用google的gemini-cli开发了一个记账app,在此记录下桌面小组件开发流程。
一,创建组件布局
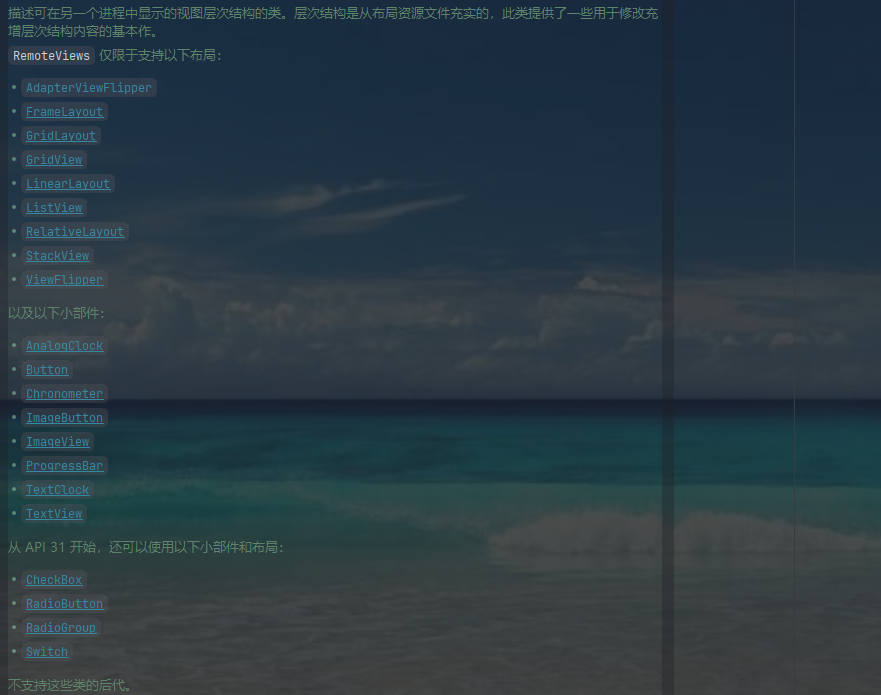
注意,RemoteView目前只支持如下布局
二,声明组件xml
在res目录下新建一个xml文件夹,AI自动创建了account_widget_info.xml文件,内容如下
这里面声明了组件的最小宽高、更新频率、初始化布局、组件分类等信息
三,实现AccountWidget类
此类中,在onUpdate方法中,可以通过appWidgetId对指定的组件进行更新
@Override public void onUpdate(Context context, AppWidgetManager appWidgetManager, int[] appWidgetIds) { // There may be multiple widgets active, so update all of them for (int appWidgetId : appWidgetIds) { updateAppWidget(context, appWidgetManager, appWidgetId); } }package com.zjw.weight;import android.app.PendingIntent;import android.appwidget.AppWidgetManager;import android.appwidget.AppWidgetProvider;import android.content.ComponentName;import android.content.Context;import android.content.Intent;import android.graphics.Color;import android.widget.RemoteViews;import java.util.Calendar;import java.util.List;import java.util.Locale;import java.util.Map;/** * Implementation of App Widget functionality. */public class AccountWidget extends AppWidgetProvider { static void updateAppWidget(Context context, AppWidgetManager appWidgetManager, int appWidgetId) { // Construct the RemoteViews object RemoteViews views = new RemoteViews(context.getPackageName(), R.layout.account_widget); // Get current date Calendar calendar = Calendar.getInstance(); String currentDate = String.format(Locale.US, \"%04d-%02d-%02d\", calendar.get(Calendar.YEAR), calendar.get(Calendar.MONTH) + 1, calendar.get(Calendar.DAY_OF_MONTH)); // Load data for the current date Map<String, List> dailyExpenses = AccountDataUtil.loadDailyExpenses(context, currentDate); // Calculate totals float totalFood = AccountDataUtil.getCategoryTotal(context, currentDate, AccountDataUtil.getFoodKey()); float totalTransport = AccountDataUtil.getCategoryTotal(context, currentDate, AccountDataUtil.getTransportKey()); float totalShopping = AccountDataUtil.getCategoryTotal(context, currentDate, AccountDataUtil.getShoppingKey()); float totalOther = AccountDataUtil.getCategoryTotal(context, currentDate, AccountDataUtil.getOtherKey()); float totalExpense = totalFood + totalTransport + totalShopping + totalOther; // 获取每月预算并计算每日计划金额 float monthlyBudget = SettingsActivity.getMonthlyBudget(context); // 获取当月天数 Calendar cal = Calendar.getInstance(); int daysInMonth = cal.getActualMaximum(Calendar.DAY_OF_MONTH); // 计算每日计划金额 float dailyPlan = daysInMonth > 0 ? monthlyBudget / daysInMonth : 0; // 计算结余 = 每日计划 - 当日总支出 float balance = dailyPlan - totalExpense; // 计算当月结余 // 获取当月已过天数 int dayOfMonth = cal.get(Calendar.DAY_OF_MONTH); // 计算当月总预算 float monthlyTotalBudget = dailyPlan * dayOfMonth; // 计算当月总支出 float monthlyTotalExpense = 0; for (int i = 1; i = 0) { views.setTextColor(R.id.tv_monthly_balance_value,greenColor); } else { views.setTextColor(R.id.tv_monthly_balance_value, redColor); } views.setTextViewText(R.id.tv_income_label, context.getString(R.string.daily_plan_label)); views.setTextViewText(R.id.tv_balance_label, context.getString(R.string.balance_label)); views.setTextViewText(R.id.tv_monthly_balance_label, context.getString(R.string.monthly_balance_label)); // 根据结余状态设置图标 if (balance >= 0) { views.setImageViewResource(R.id.iv_balance_status, R.drawable.ic_balance_positive); views.setTextColor(R.id.tv_balance_value, greenColor); } else { views.setImageViewResource(R.id.iv_balance_status, R.drawable.ic_balance_negative); views.setTextColor(R.id.tv_balance_value, redColor); } views.setContentDescription(R.id.fab_add_record, context.getString(R.string.add_record)); // Update individual expense category totals views.setTextViewText(R.id.tv_food_expense_widget, String.format(context.getString(R.string.expense_category_food) + \" %.1f\", totalFood)); views.setTextViewText(R.id.tv_transport_expense_widget, String.format(context.getString(R.string.expense_category_transport) + \" %.1f\", totalTransport)); views.setTextViewText(R.id.tv_shopping_expense_widget, String.format(context.getString(R.string.expense_category_shopping) + \" %.1f\", totalShopping)); views.setTextViewText(R.id.tv_other_expense_widget, String.format(context.getString(R.string.expense_category_other) + \" %.1f\", totalOther)); // Set up click listeners for buttons Intent addRecordIntent = new Intent(context, AccountEditActivity.class); PendingIntent addRecordPendingIntent = PendingIntent.getActivity(context, 0, addRecordIntent, PendingIntent.FLAG_UPDATE_CURRENT | PendingIntent.FLAG_IMMUTABLE); views.setOnClickPendingIntent(R.id.fab_add_record, addRecordPendingIntent); // Set up click listener for the entire widget to launch AccountEditActivity Intent launchEditIntent = new Intent(context, AccountEditActivity.class); PendingIntent launchEditPendingIntent = PendingIntent.getActivity(context, 0, launchEditIntent, PendingIntent.FLAG_UPDATE_CURRENT | PendingIntent.FLAG_IMMUTABLE); views.setOnClickPendingIntent(R.id.ll_widget_container, launchEditPendingIntent); // 只保留上一天、下一天和添加记录按钮的点击事件 Intent prevDayIntent = new Intent(context, AccountWidget.class); prevDayIntent.setAction(\"ACTION_PREV_DAY_CLICK\"); PendingIntent prevDayPendingIntent = PendingIntent.getBroadcast(context, 4, prevDayIntent, PendingIntent.FLAG_UPDATE_CURRENT | PendingIntent.FLAG_IMMUTABLE); Intent nextDayIntent = new Intent(context, AccountWidget.class); nextDayIntent.setAction(\"ACTION_NEXT_DAY_CLICK\"); PendingIntent nextDayPendingIntent = PendingIntent.getBroadcast(context, 5, nextDayIntent, PendingIntent.FLAG_UPDATE_CURRENT | PendingIntent.FLAG_IMMUTABLE); // Instruct the widget manager to update the widget appWidgetManager.updateAppWidget(appWidgetId, views); } @Override public void onUpdate(Context context, AppWidgetManager appWidgetManager, int[] appWidgetIds) { // There may be multiple widgets active, so update all of them for (int appWidgetId : appWidgetIds) { updateAppWidget(context, appWidgetManager, appWidgetId); } } @Override public void onReceive(Context context, Intent intent) { super.onReceive(context, intent); if (intent != null) { String action = intent.getAction(); if (action != null) { // Handle button clicks (for now, just update the widget) AppWidgetManager appWidgetManager = AppWidgetManager.getInstance(context); ComponentName thisWidget = new ComponentName(context, AccountWidget.class); int[] appWidgetIds = appWidgetManager.getAppWidgetIds(thisWidget); onUpdate(context, appWidgetManager, appWidgetIds); // 只处理上一天和下一天按钮的点击事件 switch (action) { case \"ACTION_PREV_DAY_CLICK\": // Handle previous day break; case \"ACTION_NEXT_DAY_CLICK\": // Handle next day break; } } } } @Override public void onEnabled(Context context) { // Enter relevant functionality for when the first widget is created } @Override public void onDisabled(Context context) { // Enter relevant functionality for when the last widget is disabled }}总结下,AppWidgetProvider主要逻辑如下
1,使用RemoteViews传入布局
2,根据数据对view进行自定义更新
3,调用appWidgetManager.updateAppWidget方法传入id和remoteView,即可刷新组件
4,设计点击事件,这通过PendingIntent触发
四,Androidmanifest中声明组件
AI自动在Androidmanifest中创建了一个静态receiver,其AccountWidget继承AppWidgetProvider,
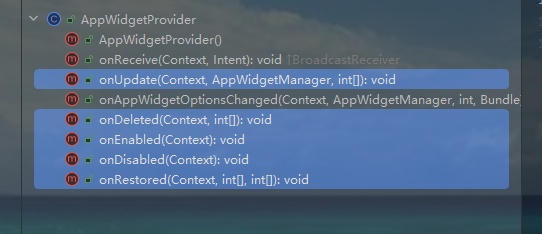
可以选择性实现如下模版方法
以上,即创建完毕了一个桌面组件。
五,原理
1,launcher通过PKMS查询声明了action是\"android.appwidget.action.APPWIDGET_UPDATE\"的receiver,
2,解析Metadata,这样launcher就可以解析到目标应用的xml声明
3,解析appwidget xml,保存此组件的基本信息
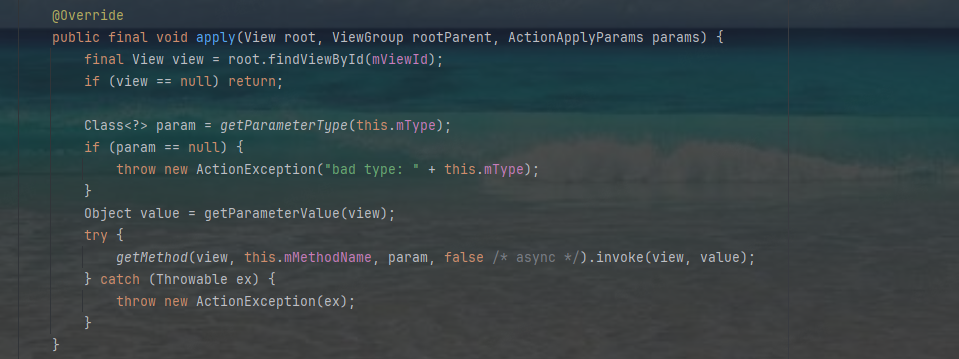
4,通过RemoteView保存一个update的全部action行为,action保存了view id和行为name,主要用于反射
以setTextColor为例,


这样就将viewId,methodName通过binder传递给了launcher,launcher再通过遍历action列表调用ReflectionAction#apply方法,即可实现行为传递,本质是反射调用。
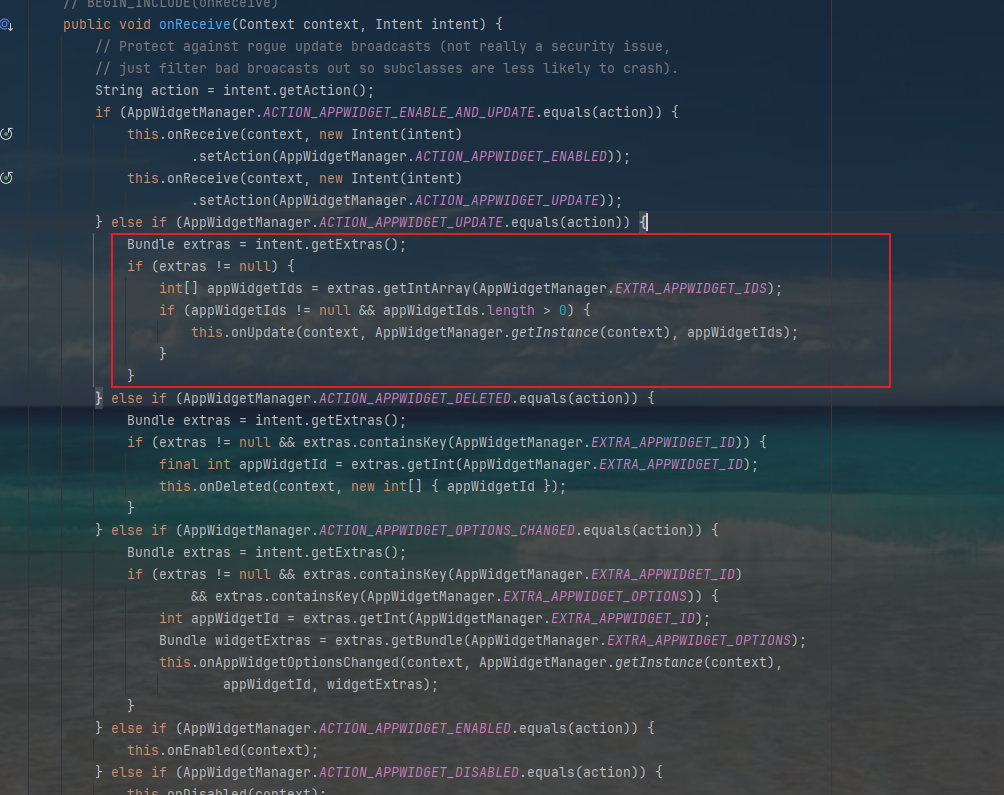
5,组件应用可通过发送广播,强行更新指定id的组件,id可通过AppWidgetManager获取,如下
// Trigger widget update Intent intent = new Intent(this, AccountWidget.class); intent.setAction(AppWidgetManager.ACTION_APPWIDGET_UPDATE); int[] ids = AppWidgetManager.getInstance(getApplication()) .getAppWidgetIds(new ComponentName(getApplication(), AccountWidget.class)); intent.putExtra(AppWidgetManager.EXTRA_APPWIDGET_IDS, ids); sendBroadcast(intent);随后,发送一个AppWidgetManager.ACTION_APPWIDGET_UPDATE广播,即可触发AppWidgetProvider#onReceiver,如下,进而调用到AccountWidget,
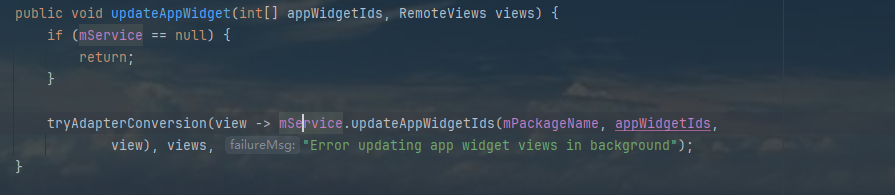
6,组件应用更新组件参数后,通过appWidgetManager.updateAppWidget(appWidgetId, views);即触发组件的实际更新
内部通过一个Service,将packageName,view和appWeightId传递给组件Service,即实现更新